Welcome.
Let's start by being honest about what this guide is and what it isn't.
Who this guide is for
This guide is for the person a new customer just delegated their accounting setup to. You probably don't have a finance background. You might be a junior software developer, an operations coordinator, a founder's first hire, or simply the only person in the room who isn't afraid of forms with twenty fields. That's enough.
We assume you can use a web browser, you can fill in a form, and you can ask for help when something looks wrong. Everything else — chart of accounts, general ledger, fiscal year, trial balance — we'll teach you as it comes up. There's a glossary at the end with every term defined in plain language.
What you'll have at the end
By the time you finish this guide, you will have:
- A working Chart of Accounts (the master list of every category your business will record money against)
- An active fiscal year with twelve monthly periods
- Tax configurations set up for GST
- At least one customer and one vendor on file
- Your first customer invoice, posted to the General Ledger
- Your first vendor bill, posted to the General Ledger
- One recorded customer payment applied to that invoice
- A clean Trial Balance where every debit equals every credit — the universal sign of a healthy ledger
And, just as importantly, you'll understand what each of those things is and why it matters. No magic. No "ask the accountant." Just plain mechanics.
Five-minute vocabulary primer
Here are six words you'll see constantly. Skim them now — the rest of the guide will revisit each one with examples. Don't try to memorise.
Account
A bucket. Every bit of money your business touches lands in some bucket: "Cash on Hand", "Bank — HDFC Current", "Sales Revenue", "Office Rent". The complete list of buckets is the Chart of Accounts.
Debit & Credit
The two sides of every transaction. They are not "good" and "bad" — they are just left and right. Every entry in the system has a debit side and a credit side, and they always equal each other. That's the entire trick of double-entry accounting.
General Ledger (GL)
The master diary. Every transaction gets a dated entry in the General Ledger with its debit and credit lines. The balance of any account at any moment is just the sum of all its GL entries.
Fiscal Year
A twelve-month accounting calendar. In India this usually runs 1 April → 31 March. In the US it usually matches the calendar year. Reports are organised by fiscal year, and at the end of each year you "close the books" and start fresh.
Customer Invoice / Vendor Bill
An invoice is a bill you send to your customer — "you owe us ₹10,000". A vendor bill is a bill you receive from your supplier — "you owe us ₹5,000". Both eventually become General Ledger entries that move money in and out of accounts.
Trial Balance
A one-page summary that lists every account with its current balance, debits on one side and credits on the other. If both sides total to the same number, your books are in balance. If they don't, something is broken. You'll generate one of these in Section 13.
The 30,000-ft view.
Before we touch a single screen, here's the whole shape of what we're about to do.
What is double-entry accounting?
Double-entry is a 600-year-old idea that every transaction has two sides. If money moves in, it had to come from somewhere. If money moves out, it had to go somewhere. You record both sides, every time, and the totals always match.
Imagine you sell a customer a ₹10,000 service. The customer hasn't paid yet, so two things just happened:
- Sales Revenue went up by ₹10,000 (you earned it)
- Accounts Receivable went up by ₹10,000 (the customer owes you)
Both are true at once. The system records both. Later, when the customer actually pays you, two more things happen:
- Bank Account goes up by ₹10,000
- Accounts Receivable goes down by ₹10,000 (they don't owe you anymore)
Net effect across both events: Sales Revenue is up ₹10,000, the bank balance is up ₹10,000, AR is back to zero. Every account moved by the right amount, automatically. That's the magic of double-entry — you can't lose track of money because the math doesn't let you.
You don't have to do this math yourself
Ragenaizer Accounts is built to generate the General Ledger entries automatically whenever you create an invoice, post a payment, or close a period. You will rarely write a manual journal entry. Your job is to set up the rules — this guide is about those setup steps.
The setup roadmap
Here's the full sequence we'll follow. Each step depends on the ones before it — you can't skip ahead.
Logging in & the dashboard.
Before you do anything, get familiar with where things live. This is your home base.
Logging in
Open the Ragenaizer login page in a fresh browser tab and sign in with the credentials your administrator gave you. If you don't have credentials yet, ask. We won't cover password setup here — that's a separate guide.
Where you land: the Accounts dashboard
After you log in, you'll see the home screen with one tile per Ragenaizer module. Click Accounts. You'll land on the Accounts Dashboard — a single screen that summarises everything in your books and gives you one-click shortcuts to the twelve main areas of the application.
On a clean install (like the one we're using for this guide) the dashboard is mostly empty. That's expected. Every screenshot in this section is taken on day one with zero data. The "after" you'll see will be the same screen once you've followed along.
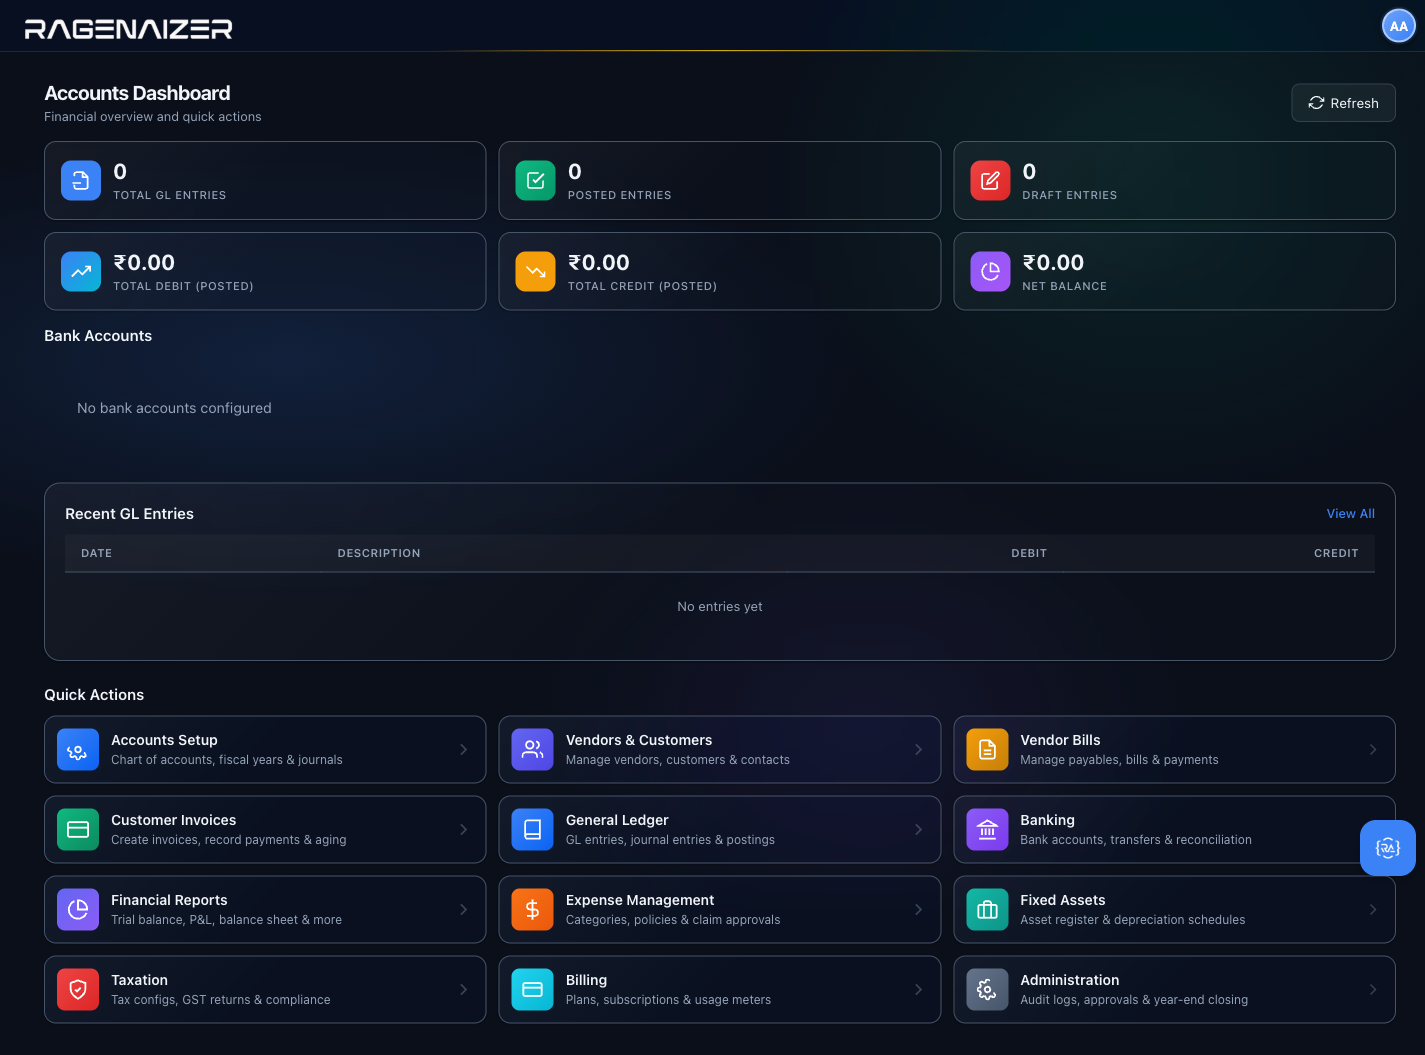
The KPI tiles — what each number means
Across the top of the dashboard you'll see seven business KPI tiles. These are not GL-counts or
technical metrics — they are the numbers a founder, CFO, or controller actually asks about in a morning standup.
Every tile is rolled up live from the underlying GL, AR, AP, and bank data by a single backend call to
GET /api/accounts/dashboard/kpis. On a fresh install they all read zero; once real invoices, bills, and
payments flow through the system they give you the whole business-health picture at a glance.
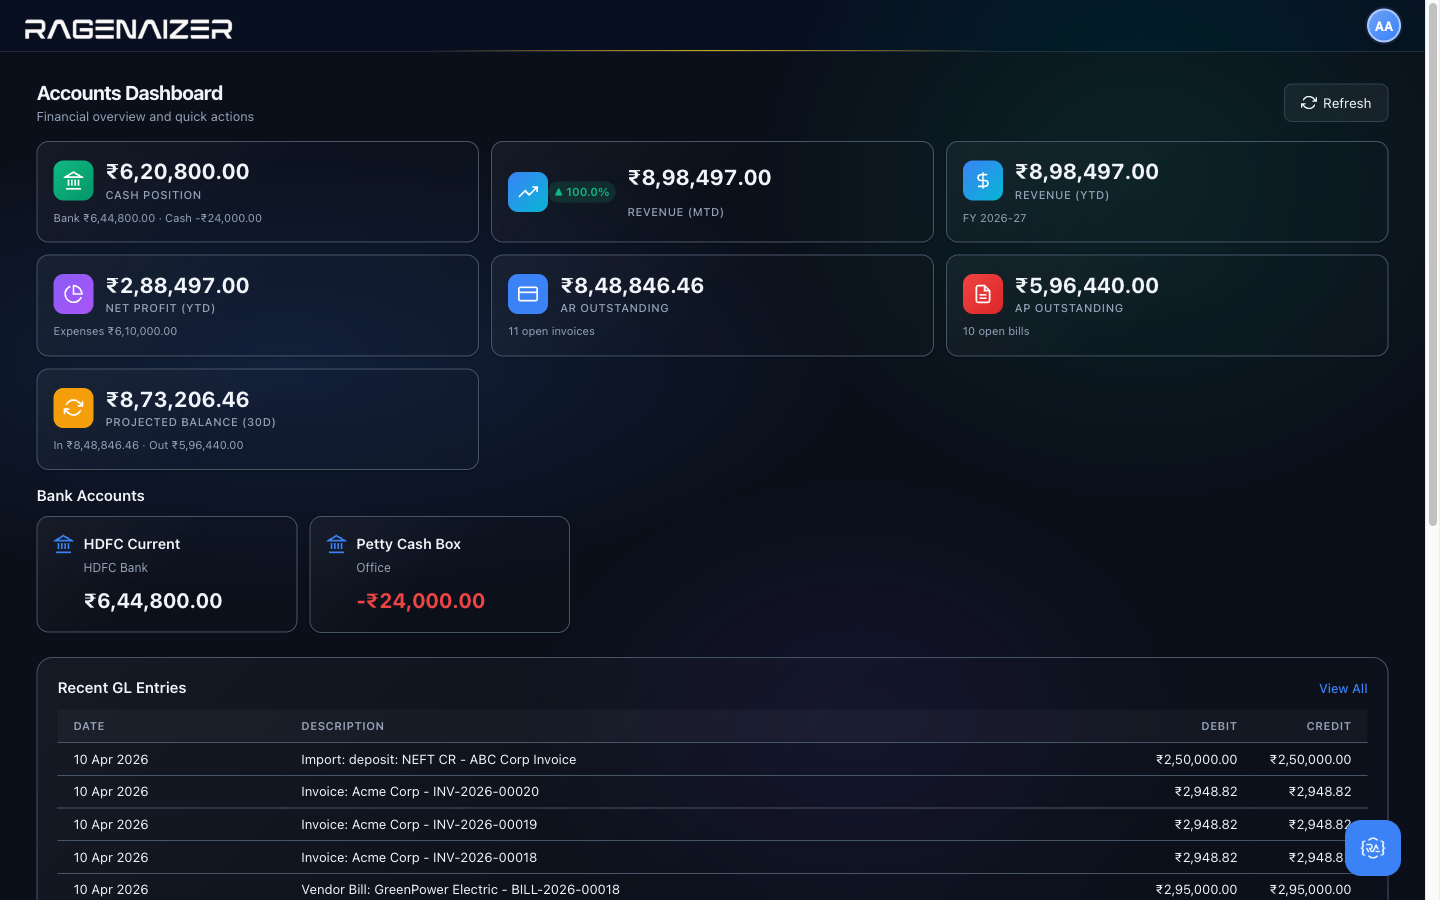
What each tile means, in reading order:
- Cash Position — sum of every active bank account's current balance, with a sublabel that splits Bank vs. Cash/Petty Cash so you can see how much is in a tellable account vs. in physical cash. Pulled from
bank_accounts.current_balance, grouped byaccount_type. - Revenue (MTD) — total revenue posted in the current calendar month, with a trend arrow in the top-right of the tile comparing against the previous month. Green up-arrow if you're ahead of last month, red down-arrow if you're behind. Computed as
credit − debiton every GL line against an Income-type account in the current month window. - Revenue (YTD) — same math but for the active fiscal year. The sublabel shows the FY name (e.g. "FY 2026-27") so you always know which window you're looking at. On a tenant with no active FY, this tile shows a dash.
- Net Profit (YTD) —
Revenue YTD − Expenses YTD. Goes red if you're running at a loss. This is the single most important number senior management looks at — it's the bottom line. - AR Outstanding — total
balance_dueacross every customer invoice in approved, sent, partially_paid, or overdue status. Sublabel counts how many open invoices make up that total. A red OVERDUE badge appears in the corner if any of those invoices are past their due date, so you can tell at a glance whether collections is on top of things or needs a nudge. - AP Outstanding — mirror of AR on the vendor side: what you owe vendors today across all open bills, with the same overdue badge and count sublabel.
- Projected Balance (30d) — a simple 30-day cash flow forecast. Starts from your current cash position, adds every AR balance due in the next 30 days, subtracts every AP bill due in the next 30 days, and shows what the bank is likely to look like a month from now if collections and payments run to schedule. Sublabel breaks down the inflow and outflow components so you can see whether the change is driven by money coming in, money going out, or both.
Technical counts moved to Administration
Earlier versions of the dashboard showed six tiles counting GL entries, debits, credits, and balance sums. Those are still accessible via Administration → System → GL Summary (§15.5) because they're useful for debugging, but they're not what day-to-day management wants on the main dashboard. The new tiles answer business questions (how much cash? what's the revenue this month? who owes us?) instead of system-health questions (how many journal entries are in the database?).
If Revenue YTD goes up but Net Profit goes down, expenses are outpacing sales
The dashboard doesn't just give you the numbers — it gives you the relationship between them. Read the tiles as a row, not as isolated stats: Cash Position + Net Profit YTD + AR Outstanding + Projected Balance 30d together tell you whether the business is solvent, profitable, getting paid on time, and likely to stay liquid next month. If any one of those is red or alarming, click into the corresponding module (Banking, Receivables, Reports) and drill down to find out why.
Quick Actions — every button explained
Below the KPIs is a grid of twelve cards, one for each major area of the Accounts application. They're not just navigation links — they're a mental map of the whole product. Here's what each one does, in the order you'll encounter them in this guide.
Accounts Setup
setup.htmlThe configuration hub for everything foundational: account types, account groups, the Chart of Accounts, opening balances, fiscal years, periods, journal types, and country templates. You'll spend most of Sections 4–7 of this guide here.
Walkthrough →Vendors & Customers
parties.htmlThe unified directory of every party your business deals with — both the people who pay you (customers) and the people you pay (vendors). One screen, two tabs.
Walkthrough →Vendor Bills
payables.htmlEverything on the money-going-out side: bills you've received from suppliers, the payments you've made against them, and the AP aging report.
Walkthrough →Customer Invoices
receivables.htmlThe money-coming-in side: invoices you've issued to customers, the payments you've received, credit notes, and the AR aging report.
Walkthrough →General Ledger
ledger.htmlThe master diary — every journal entry the system has ever recorded, browsable, filterable, and reversible. After you post your first invoice you'll come here to see what the system did behind the scenes.
Walkthrough →Banking
banking.htmlBank account master data, inter-account transfers, and bank reconciliation — the process of matching what your bank statement says against what your General Ledger says.
Overview →Financial Reports
reports.htmlEvery report finance teams care about: Trial Balance, Profit & Loss, Balance Sheet, Cash Flow, account ledgers, AR aging, AP aging. Everything is generated live from the General Ledger.
Walkthrough →Expense Management
expenses.htmlEmployee expense claims — categories, policies, submission, approval, and reimbursement. Each approved claim becomes a vendor bill in the GL.
Overview →Fixed Assets
assets.htmlLong-lived things you bought — vehicles, computers, machinery. Tracks the original cost, the depreciation schedule, and disposal. The system posts depreciation entries to the GL automatically.
Overview →Taxation
taxation.htmlTax codes, rates, HSN/SAC product classification, and the GSTR-1 / GSTR-3B reports for filing. We'll seed the standard India GST rates in Section 6.
Walkthrough →Billing
billing.htmlSubscription billing — recurring plans, customer subscriptions, usage meters, automated billing cycles. If you charge customers monthly, this is where you set it up.
Overview →Administration
admin.htmlThe audit trail, setup checklists, year-end closing, and entity-level history. You'll mostly come here when something looks wrong and you need to find out who changed what.
Walkthrough →Recent activity feed
In the middle of the dashboard there's a "Recent GL Entries" table. On a clean install it's empty — come back to it after Section 10 and you'll see your first invoice posting appear in real time.

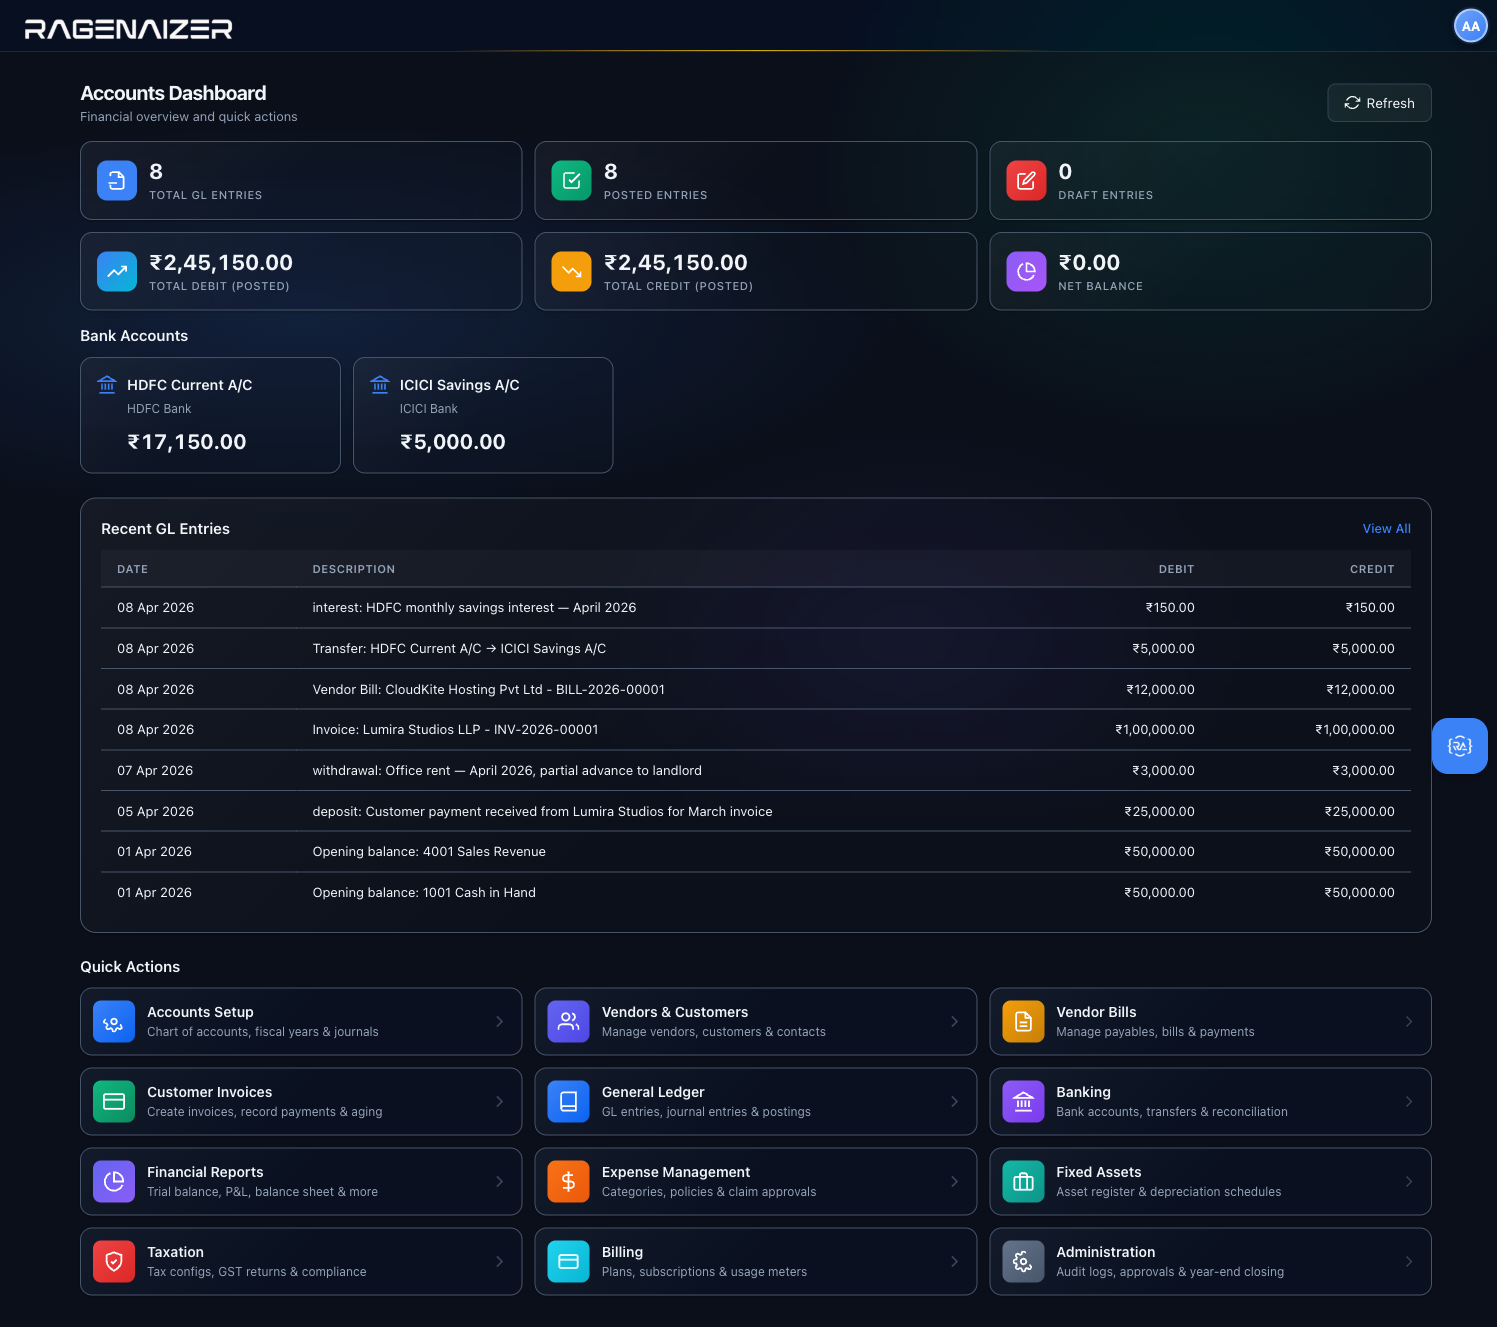
Chart of Accounts.
The complete list of every category your business will record money against. Build it once, then everything else — invoices, bills, reports — reads from it.
Chart of Accounts (CoA)
The complete list of every "bucket" your business records transactions against. Cash, Sales Revenue, Office Rent, Salaries, Bank Loans, etc. Each bucket has a code (a number) and a name. Together they form a hierarchy: Account Type → Account Group → Account.
Where to find Accounts Setup
From the Accounts dashboard, click the Accounts Setup Quick Action card (or open setup.html directly).
You'll land on a page with a left sidebar of nine numbered tabs grouped under three headings:
Chart of Accounts (1–5), Fiscal (6–7), Journals (8) and Templates (9).
We'll work through them in numerical order — the order is meaningful, each step builds on the one before.
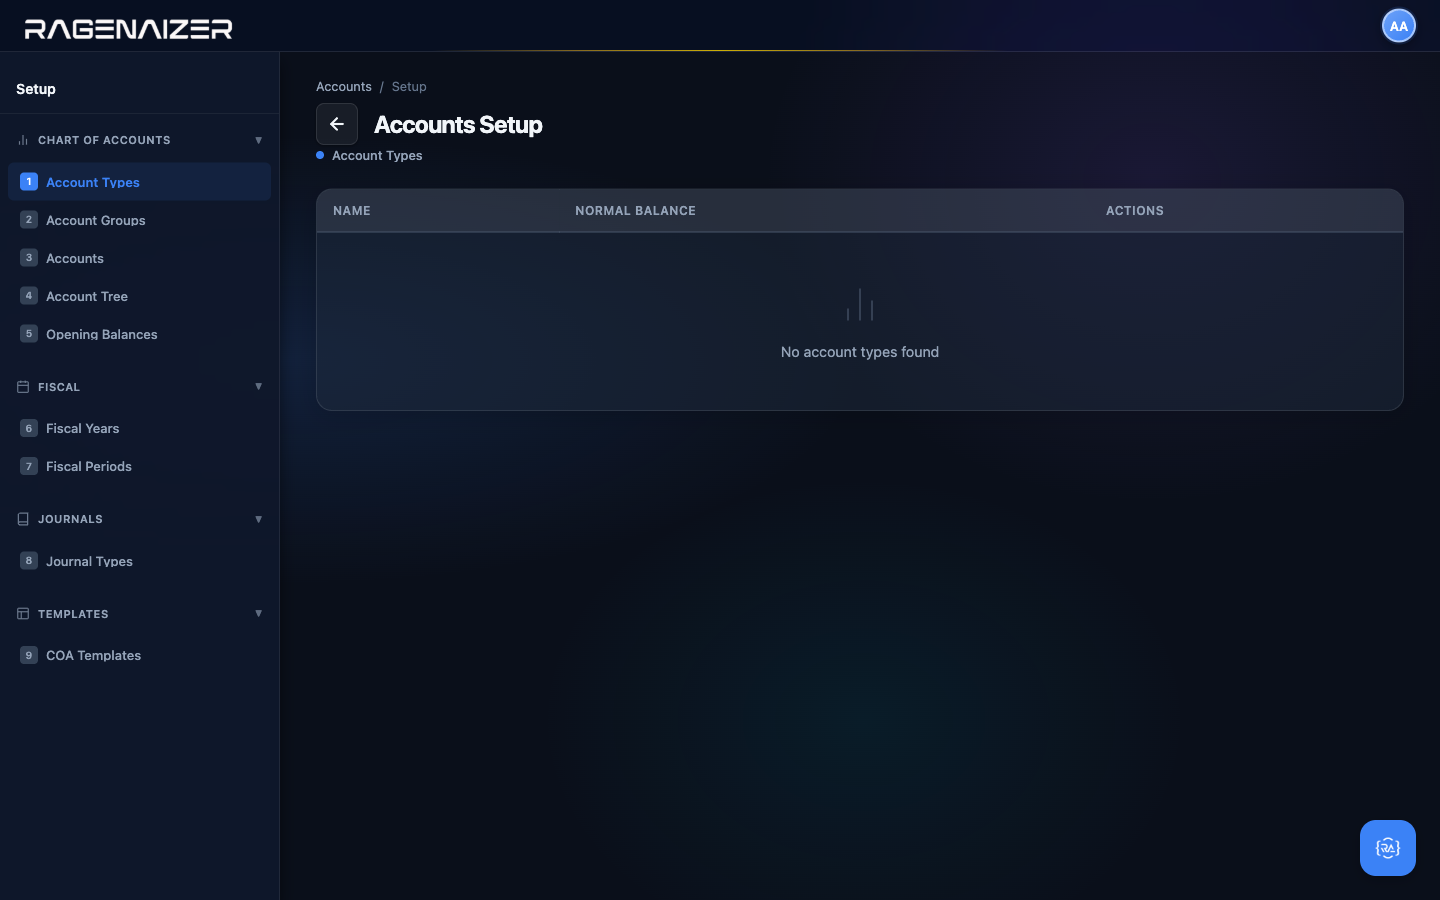
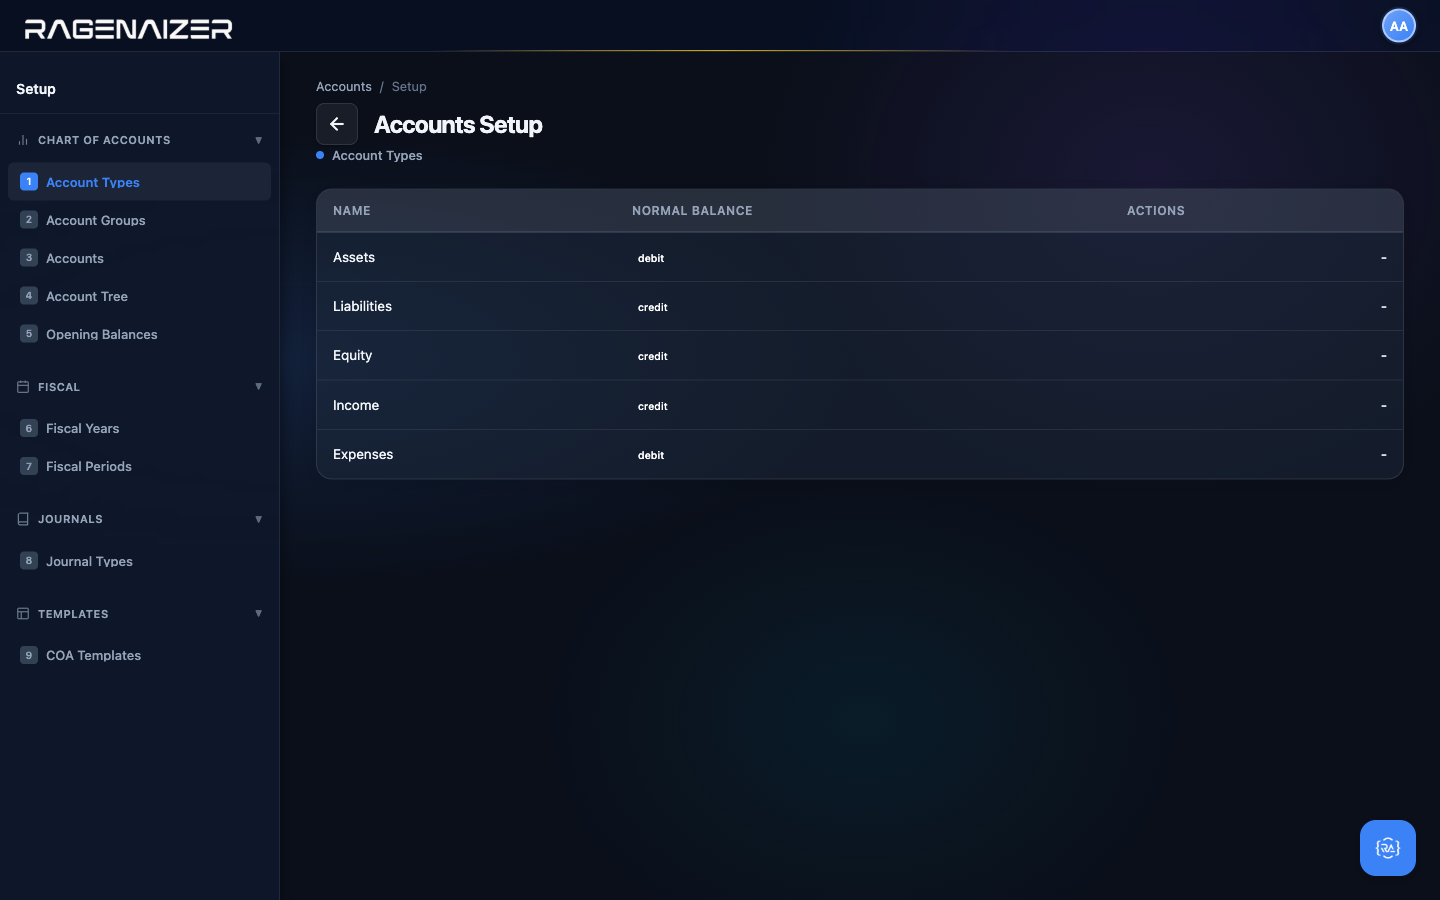
Tab 1 — Account Types
The first tab lists the five fundamental categories every accounting system uses. They are Assets, Liabilities, Equity, Revenue, and Expenses. They're seeded automatically the first time you open the page — you don't need to create them. Each row also tells you the account type's normal balance side (debit or credit) and its display order in the Chart of Accounts.
Normal Balance
The side — debit or credit — on which an account naturally increases. Assets and Expenses increase on the debit side. Liabilities, Equity, and Revenue increase on the credit side. This is why bookkeeping students drill the rule "DEAD CLER" — Debits go to Expenses, Assets, Draws; Credits go to Liabilities, Equity, Revenue.
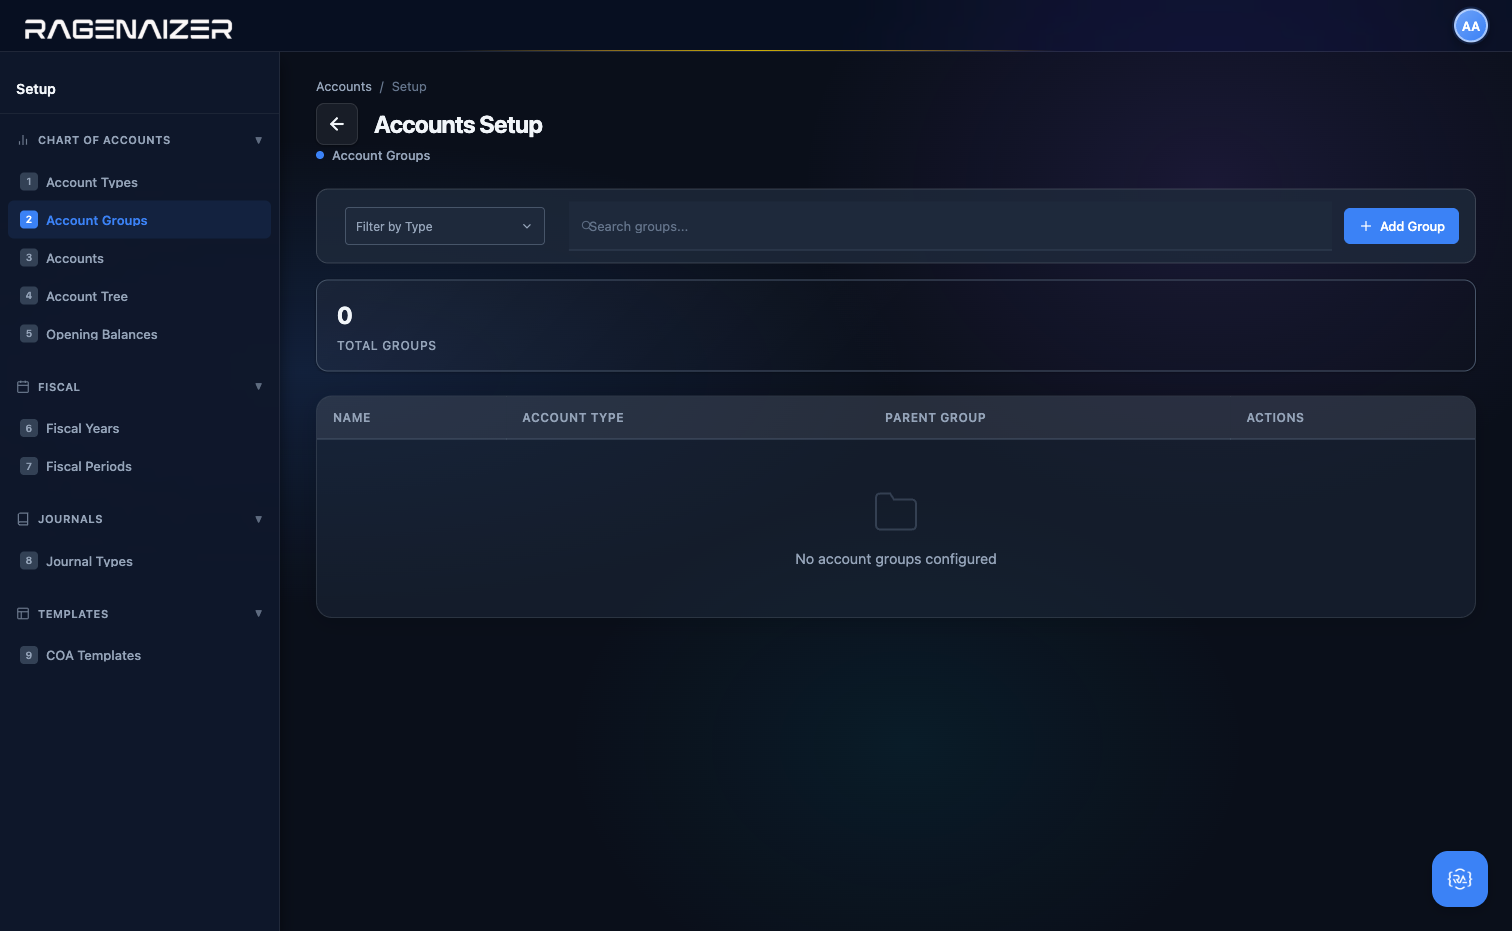
Tab 2 — Account Groups
Account Groups are sub-categories within an account type. For example, the Assets type has groups like "Current Assets", "Fixed Assets", "Investments", and "Other Assets". You don't have to use groups, but they make the Chart of Accounts much easier to read and they roll up nicely on reports.
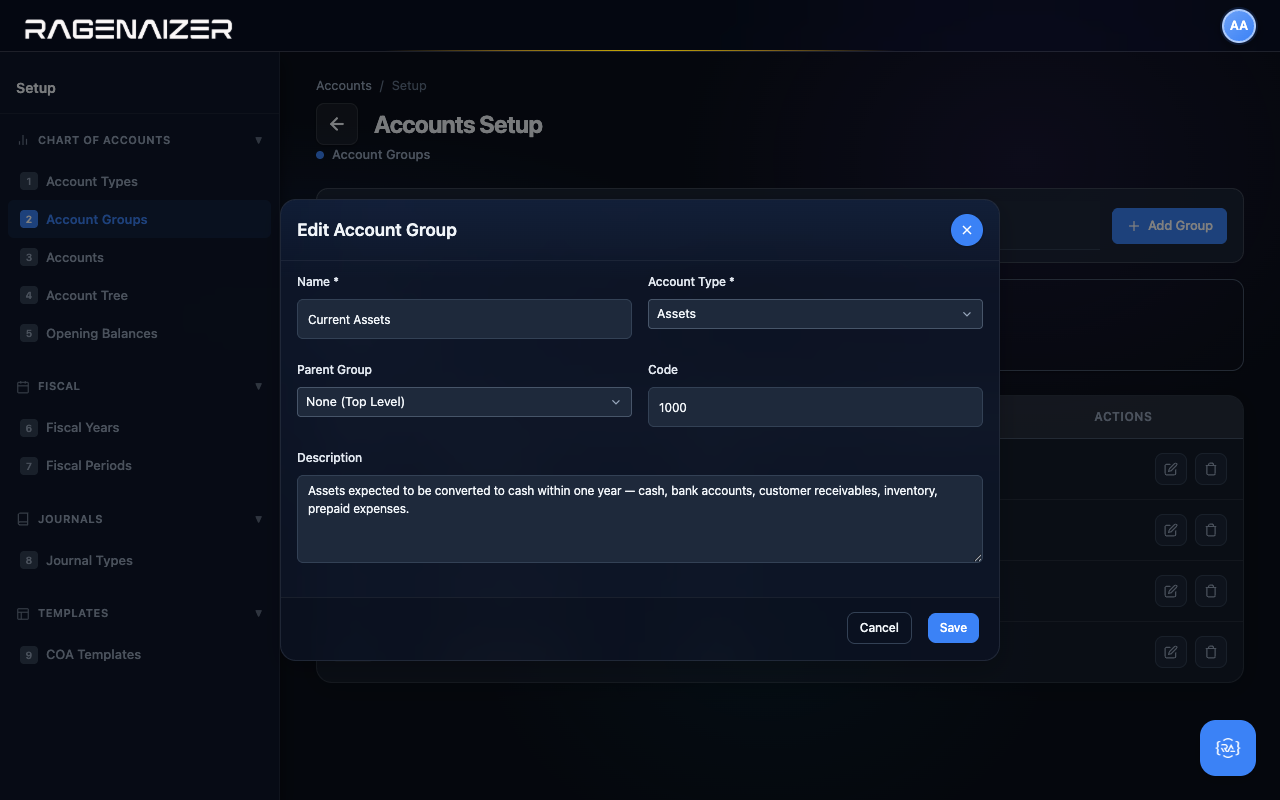
Open the Account Groups tab. On a fresh install it's empty — click + Add Group to create your first one.
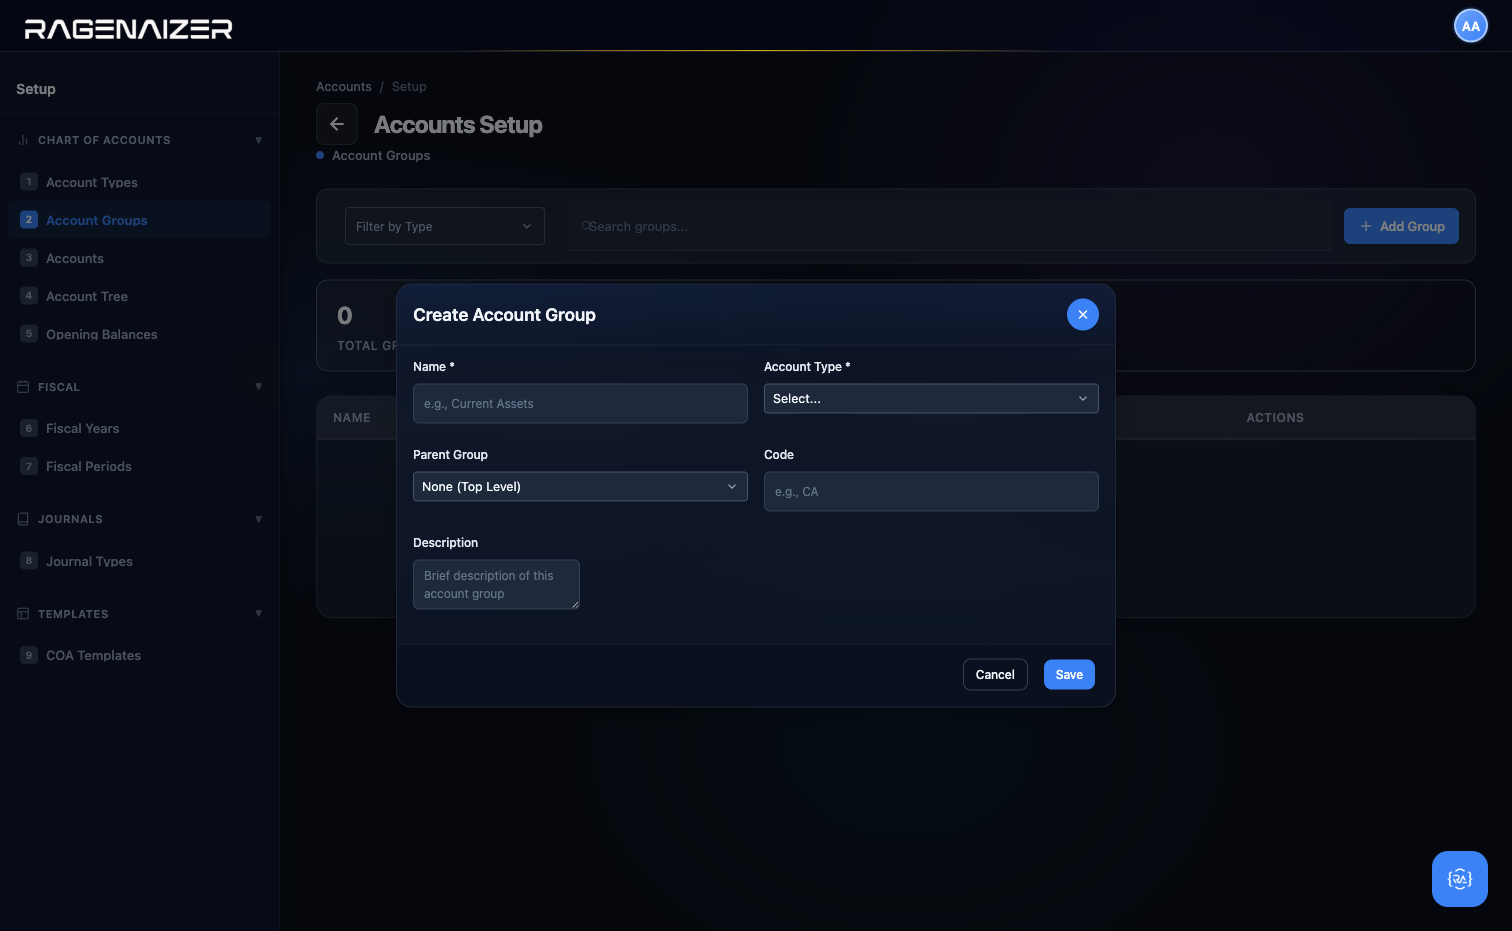
Fill it out for our first group: name Current Assets, type Assets, code 1000, description as below. The parent group stays empty — this is a top-level group.
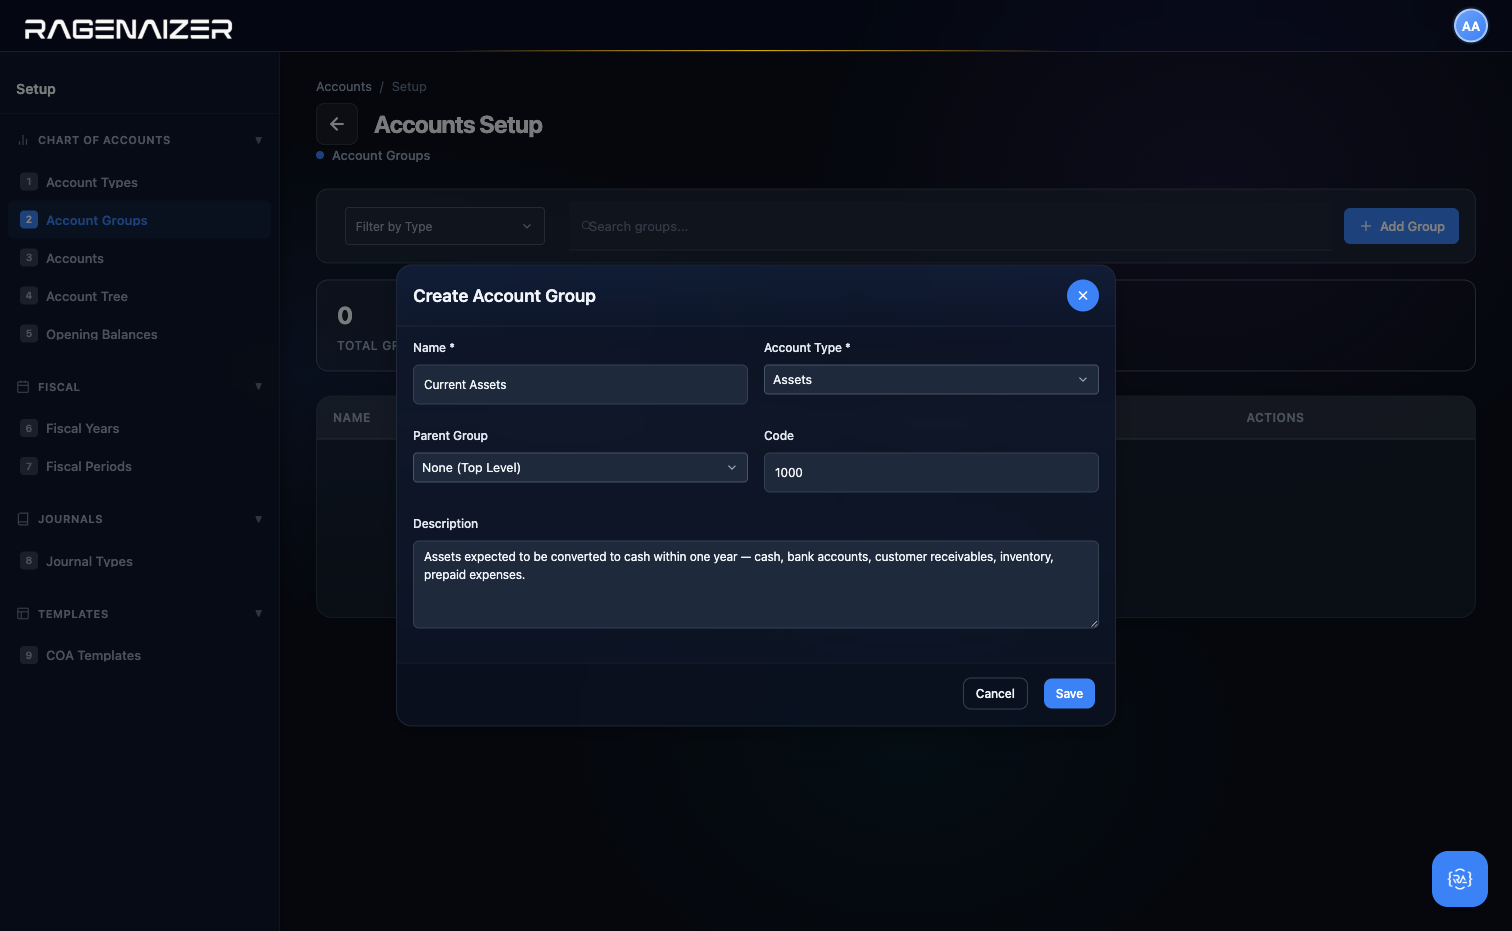
Repeat for the other three groups we need for this guide: Current Liabilities (type Liabilities, code 2000), Operating Revenue (type Income, code 4000), and Operating Expenses (type Expenses, code 5000). After all four are saved, the table looks like this:
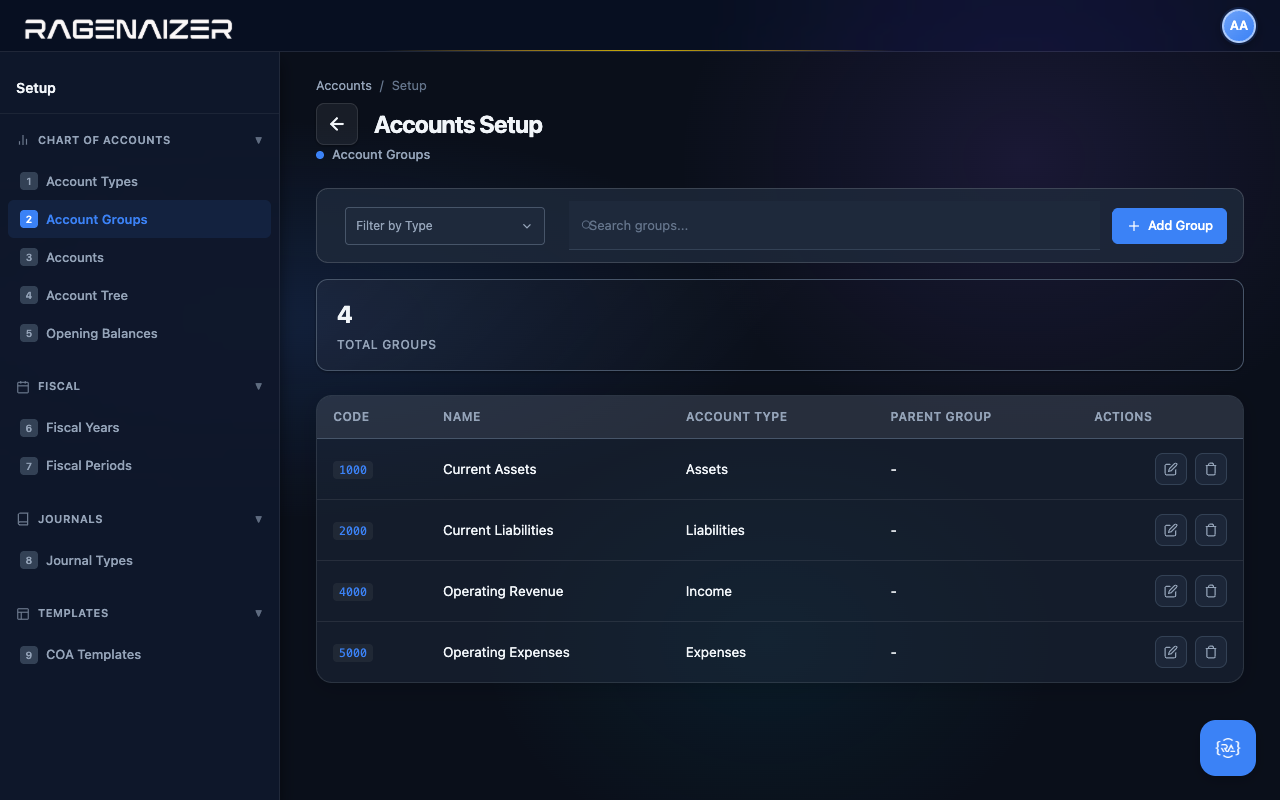
Filter, search, and row actions
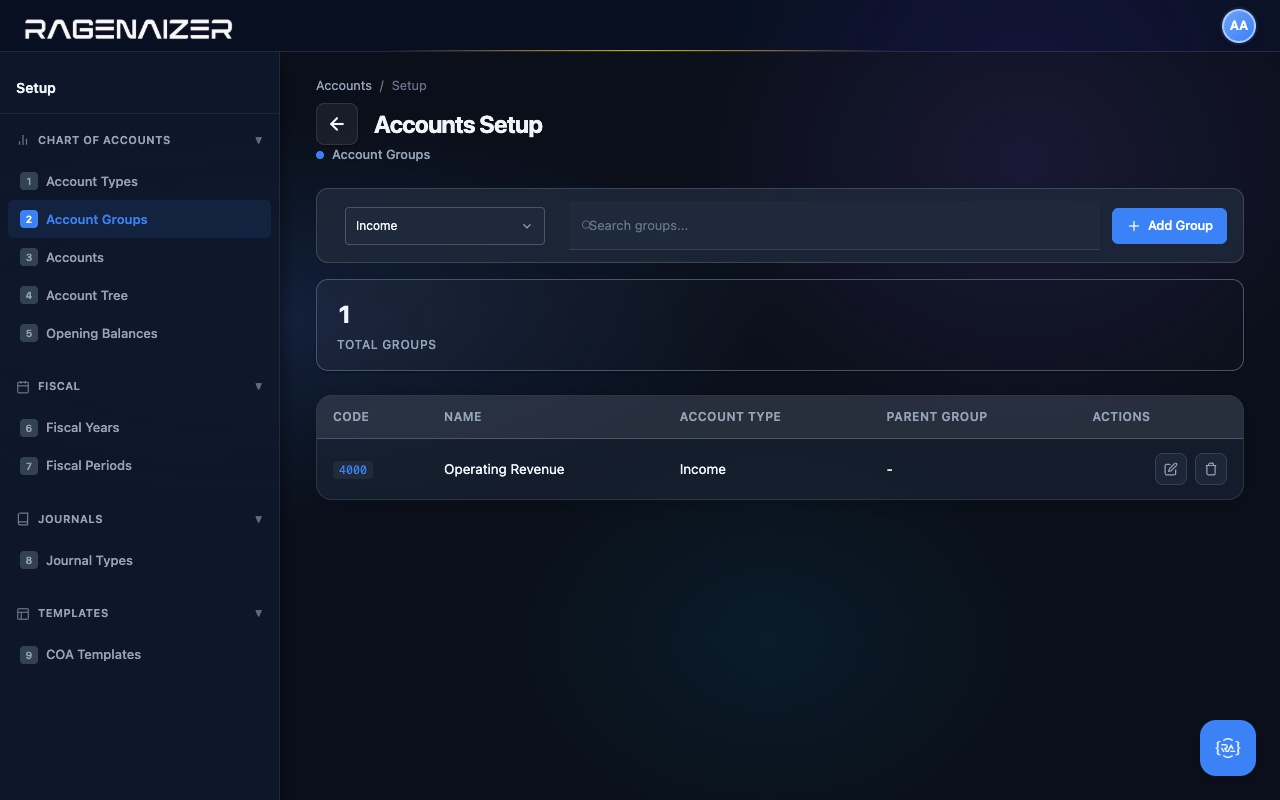
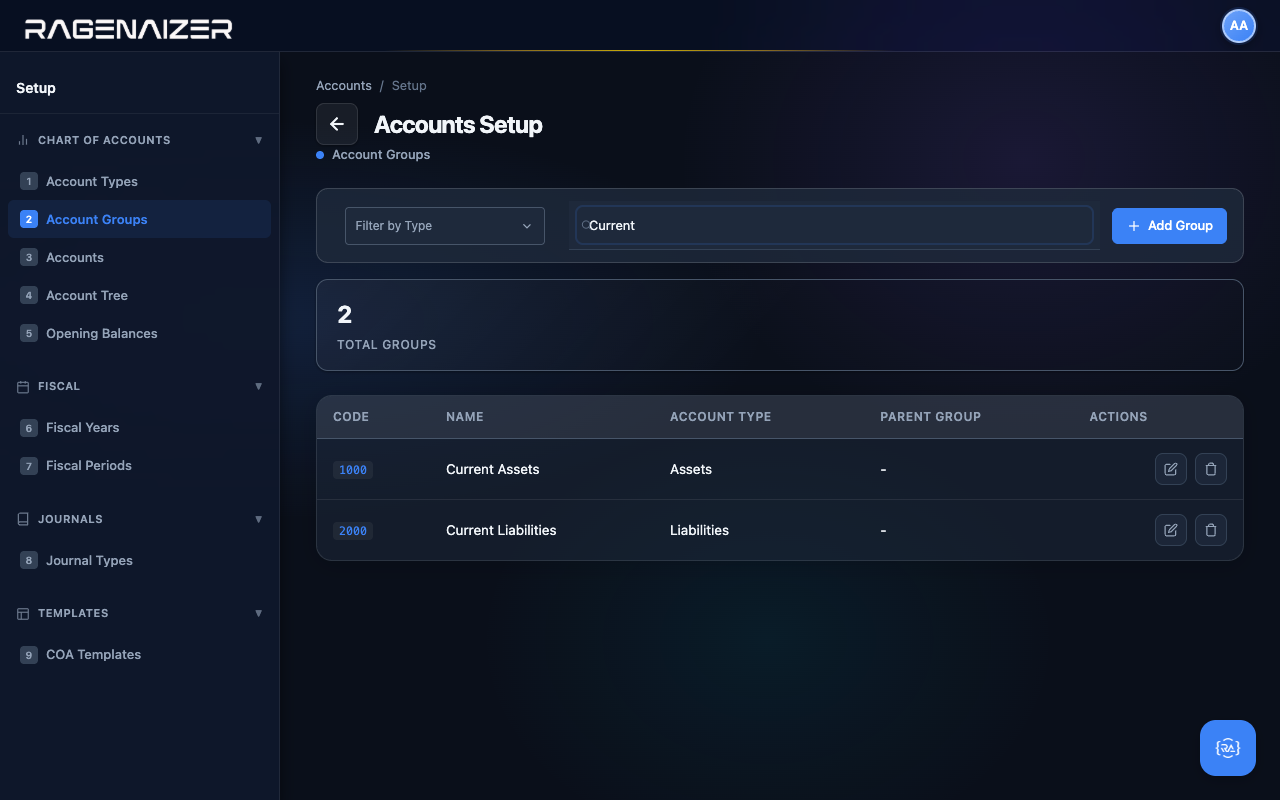
The toolbar at the top of the table is fully wired up. The Filter by Type dropdown narrows the table to just one account type (e.g. just Income groups). The Search box filters by name or code in real time. Both update the Total Groups counter on the stat tile so you can see how many rows the filter is hiding.
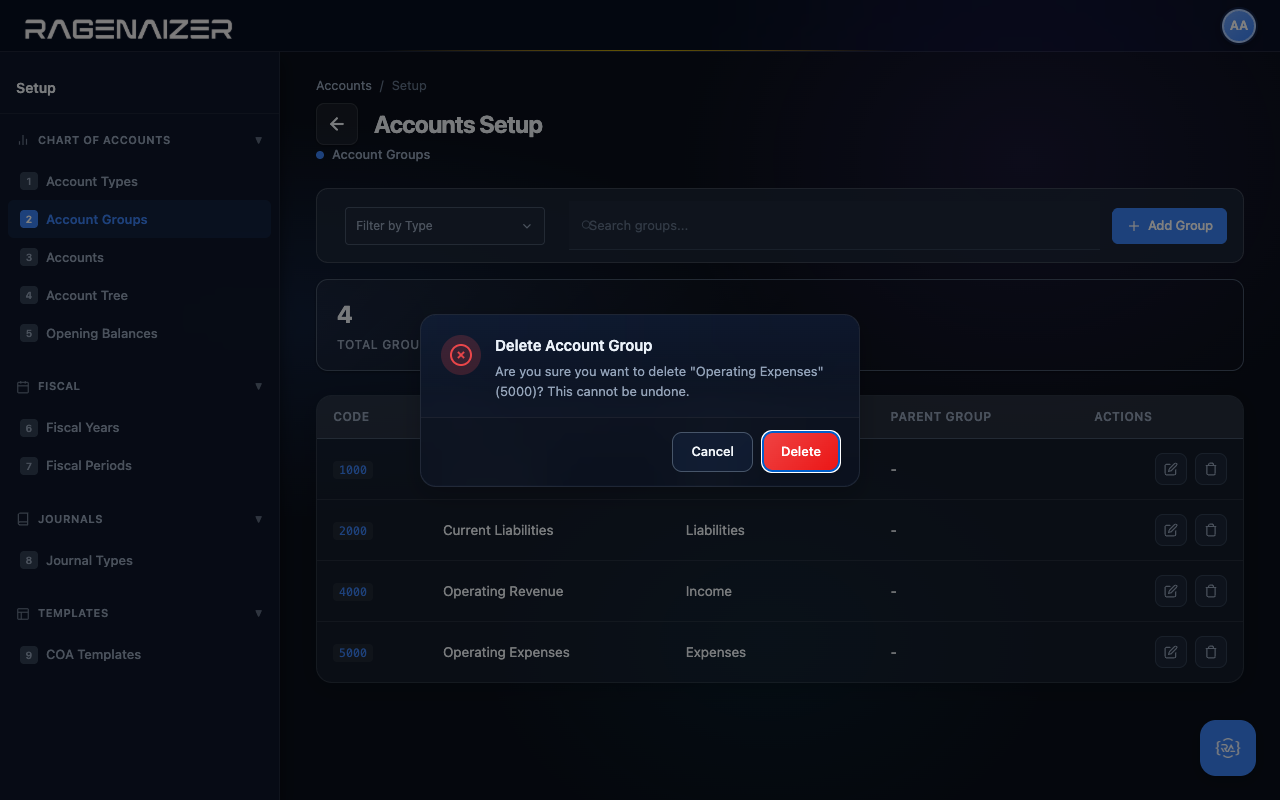
The far-right Actions column has two buttons per row: Edit (pencil) and Delete (trash). Clicking Edit opens the same modal you used to create the group, but pre-filled and with the title Edit Account Group. You can change any field except the type assignment.
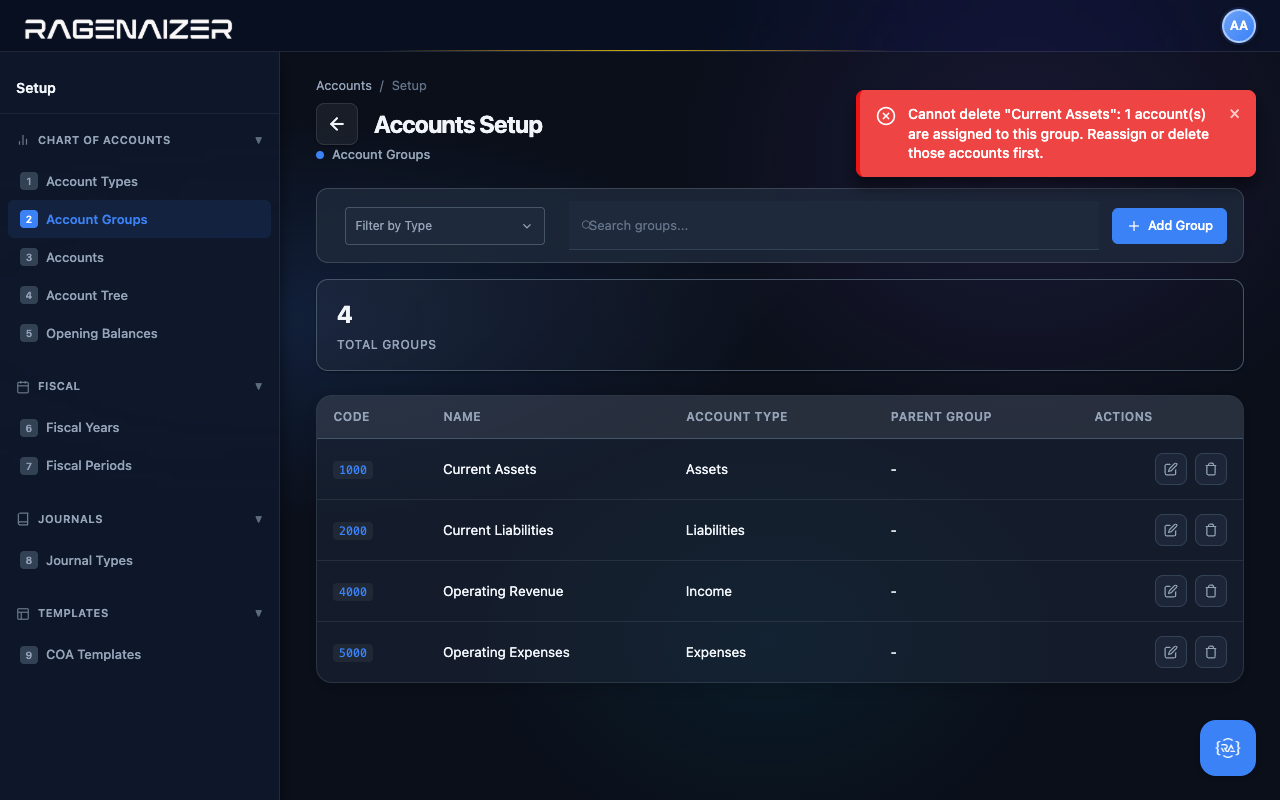
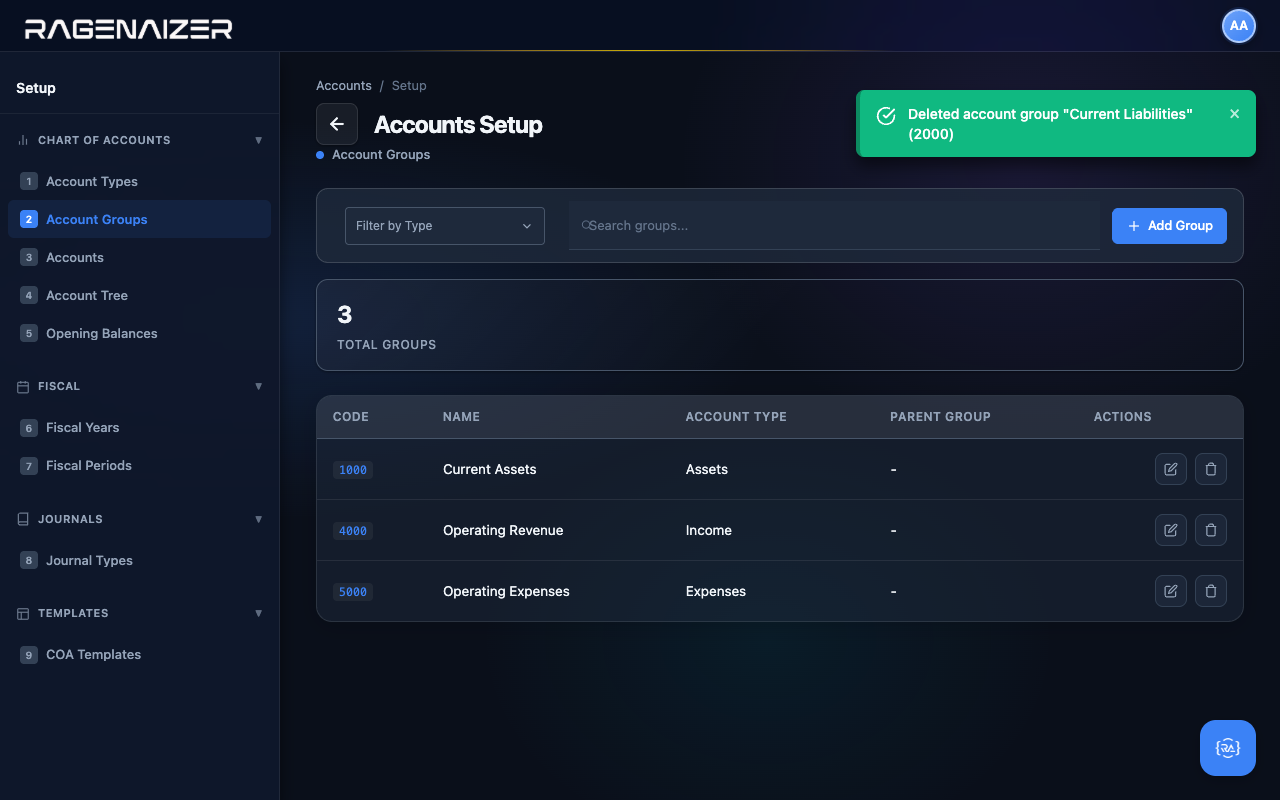
Clicking Delete shows a labelled confirm that names the group you're about to remove. The system will refuse to delete a group that has accounts assigned to it (or sub-groups underneath it) — you'll get a clear error message telling you exactly what's blocking the delete.
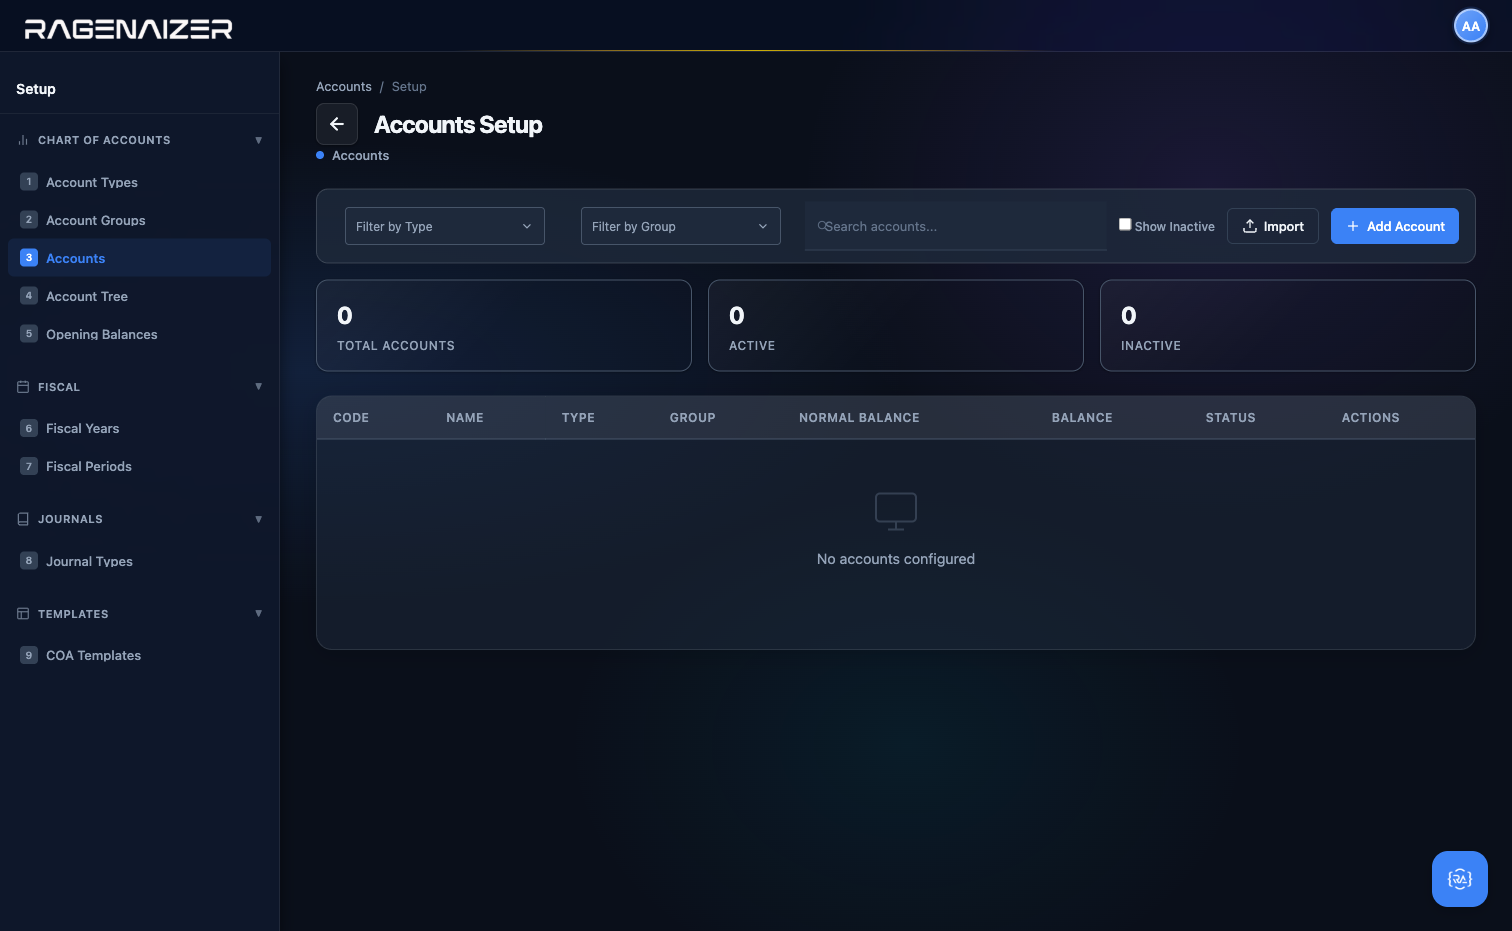
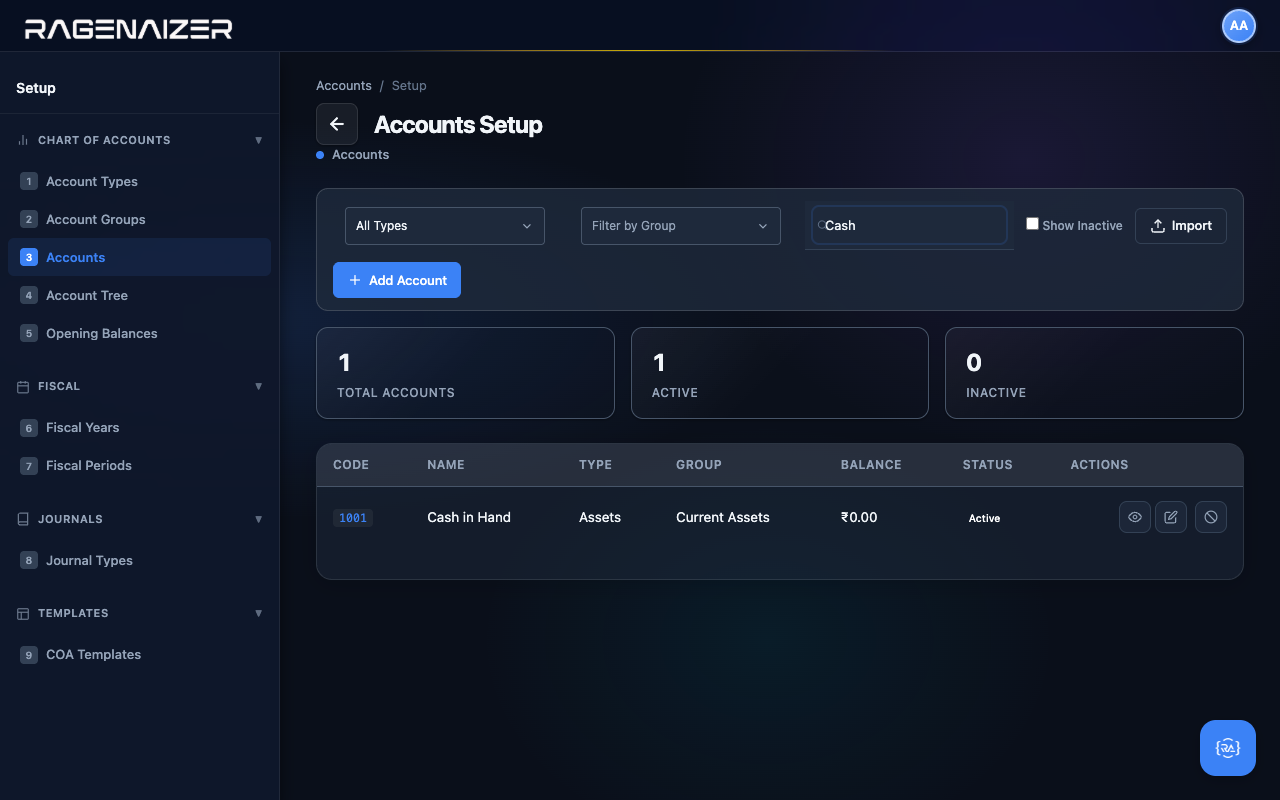
Tab 3 — Accounts
Now the heart of the matter. Each Account is the actual ledger line that transactions get recorded against. "Cash in Hand", "Sales Revenue", "Office Rent Expense" — these are accounts. Every account belongs to a Type (one of the five) and optionally to a Group (the sub-categories you just made).
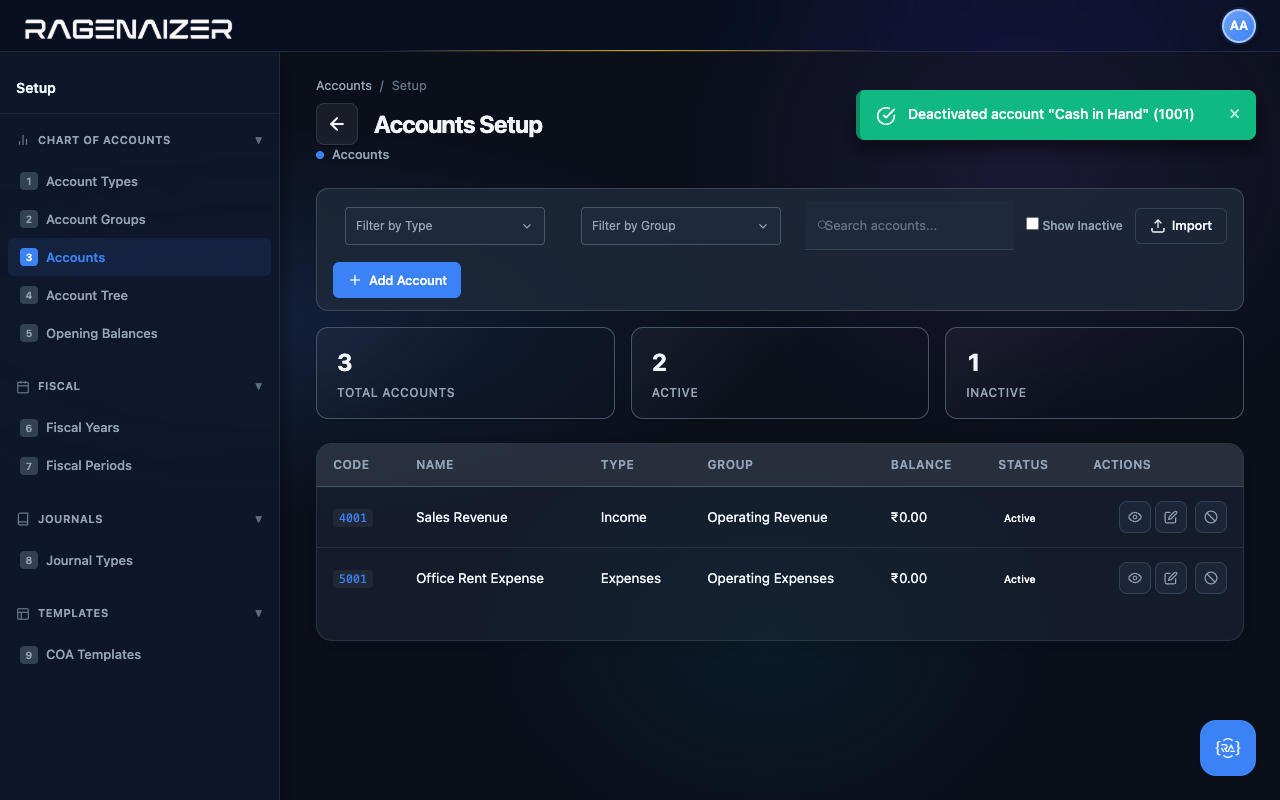
Open the Accounts tab. On a clean install the table is empty and the three stat tiles read zero. Click + Add Account.
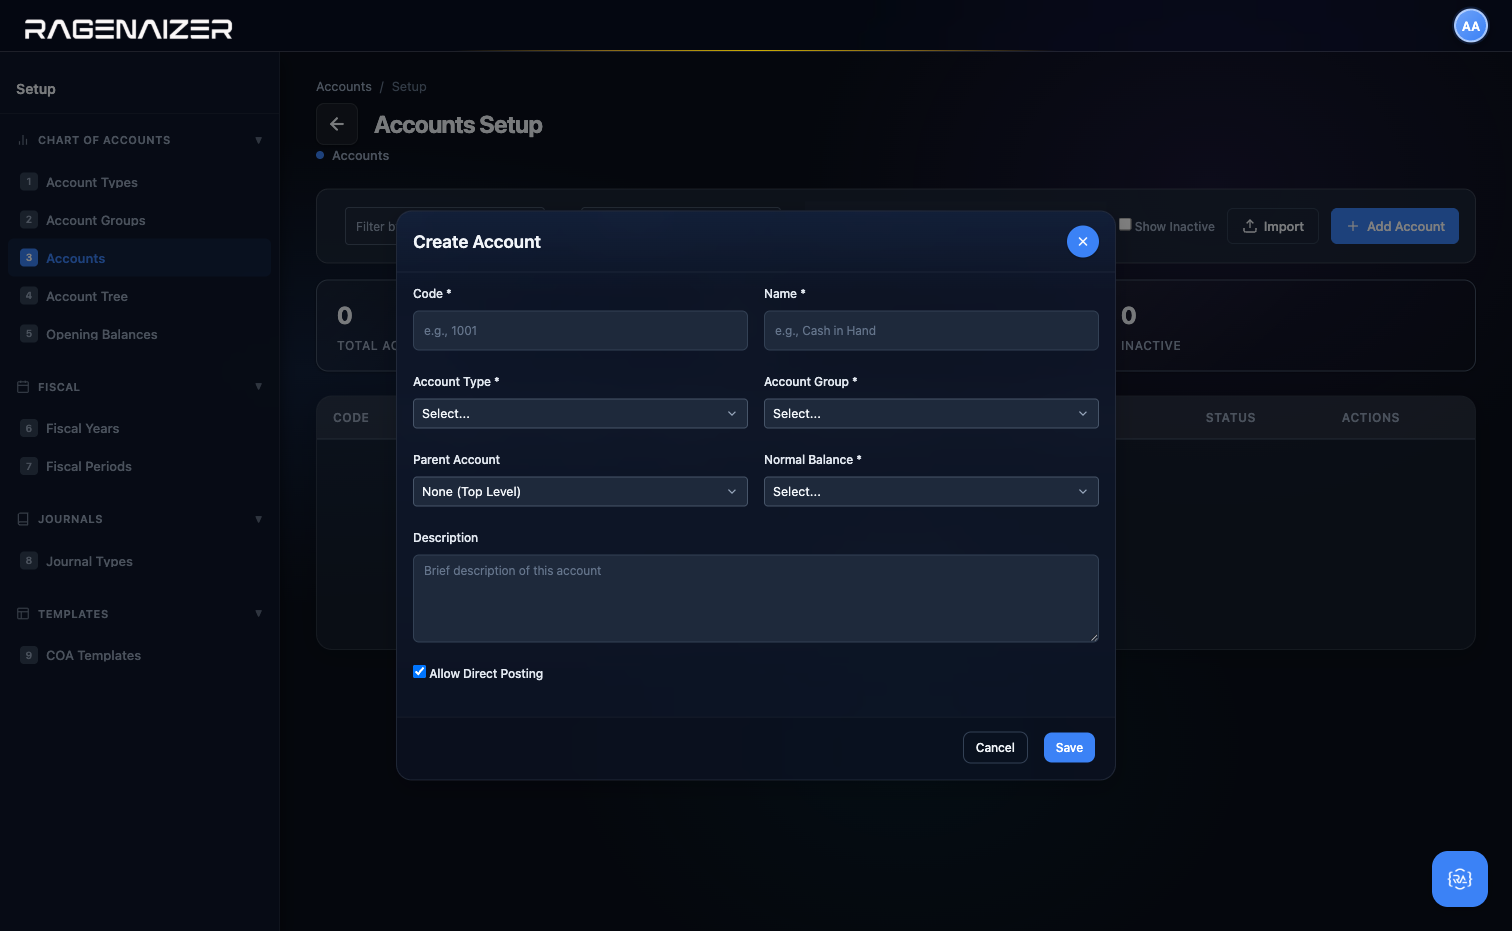
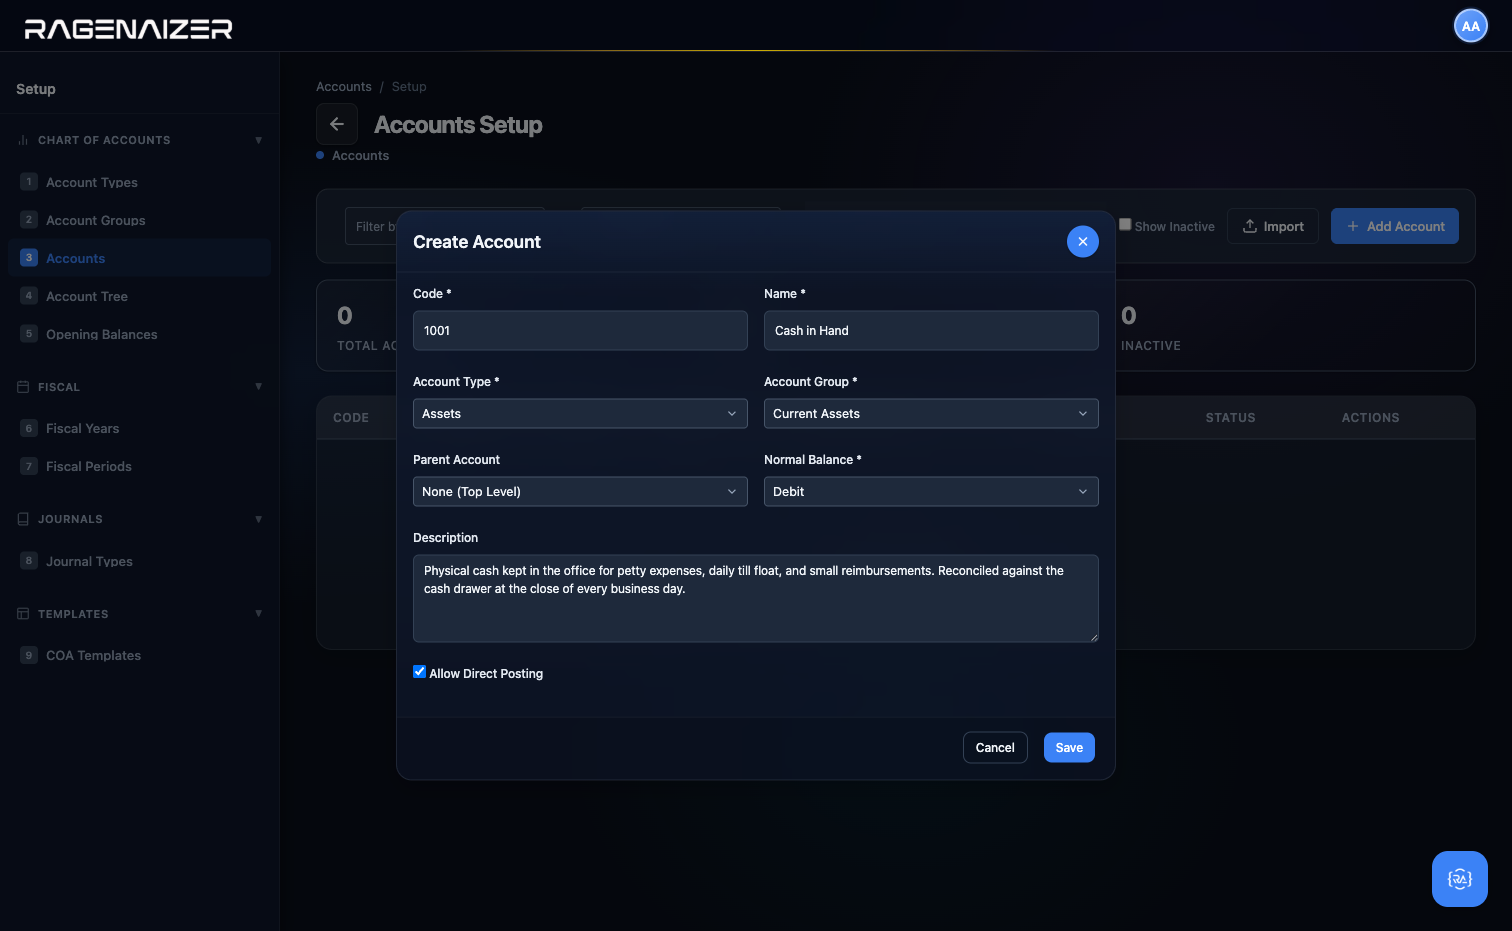
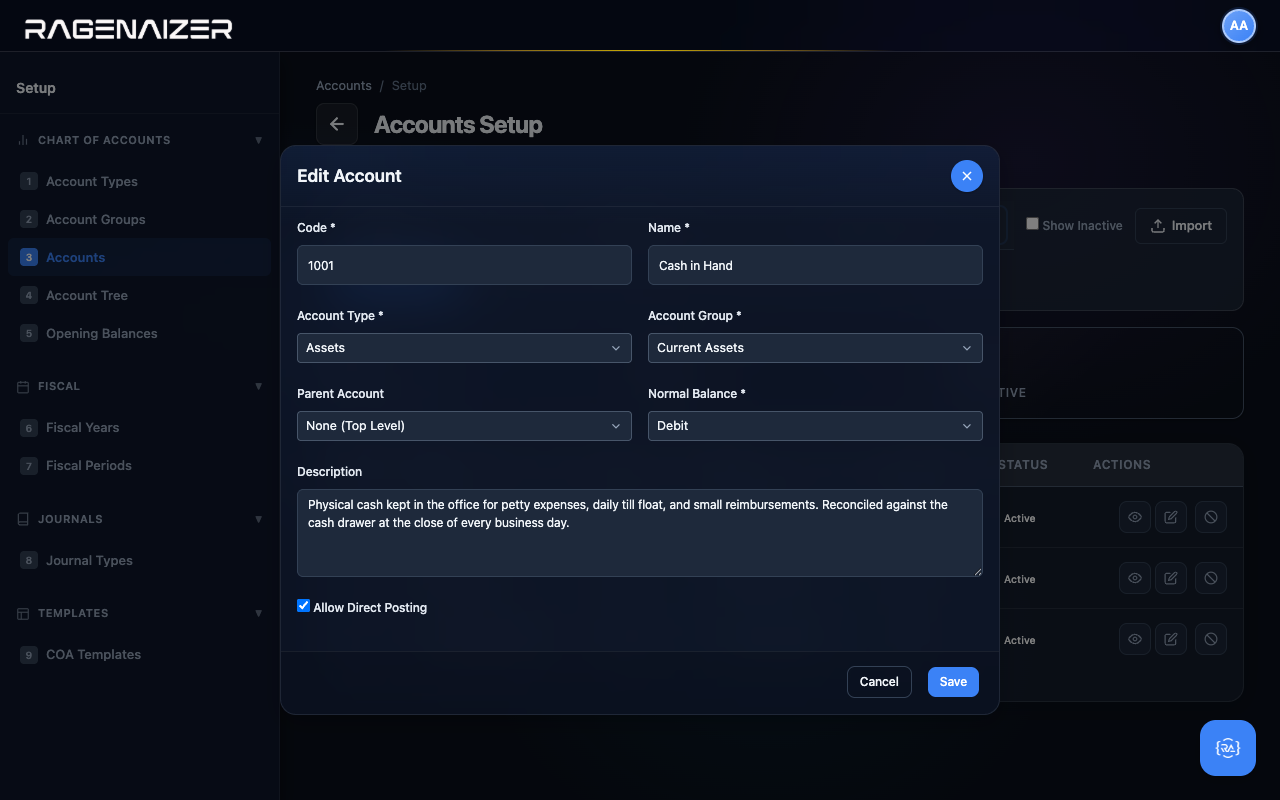
Fill it out for our first account — Cash in Hand. Code 1001, Name Cash in Hand, Type Assets, Group Current Assets, Normal Balance auto-fills to Debit when you pick the type. Allow Direct Posting stays checked — we want to be able to post journal entries directly to Cash.
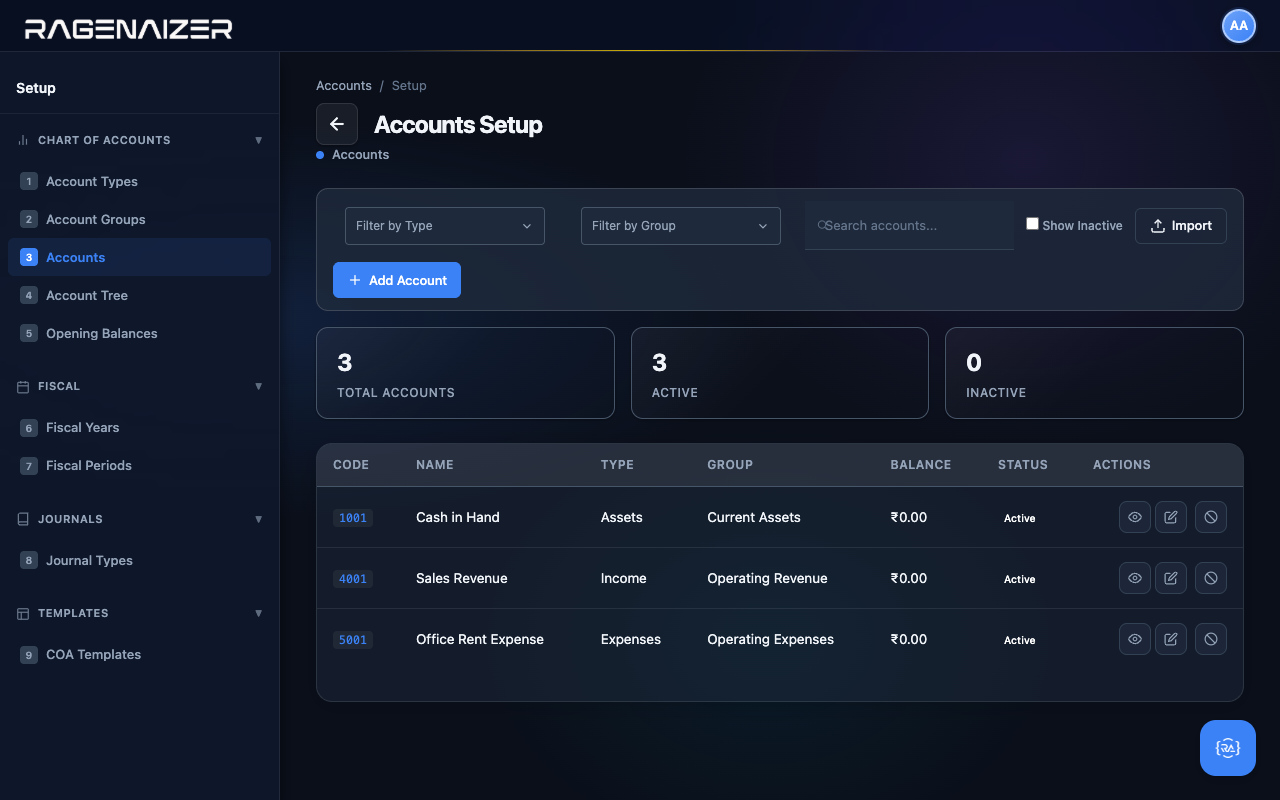
Repeat for two more accounts that we'll need throughout the guide: 4001 Sales Revenue (type Income, group Operating Revenue) and 5001 Office Rent Expense (type Expenses, group Operating Expenses). After all three are saved, the table fills in with the new CODE column visible and clean row actions on the right.
View, Edit, Deactivate — the three row actions
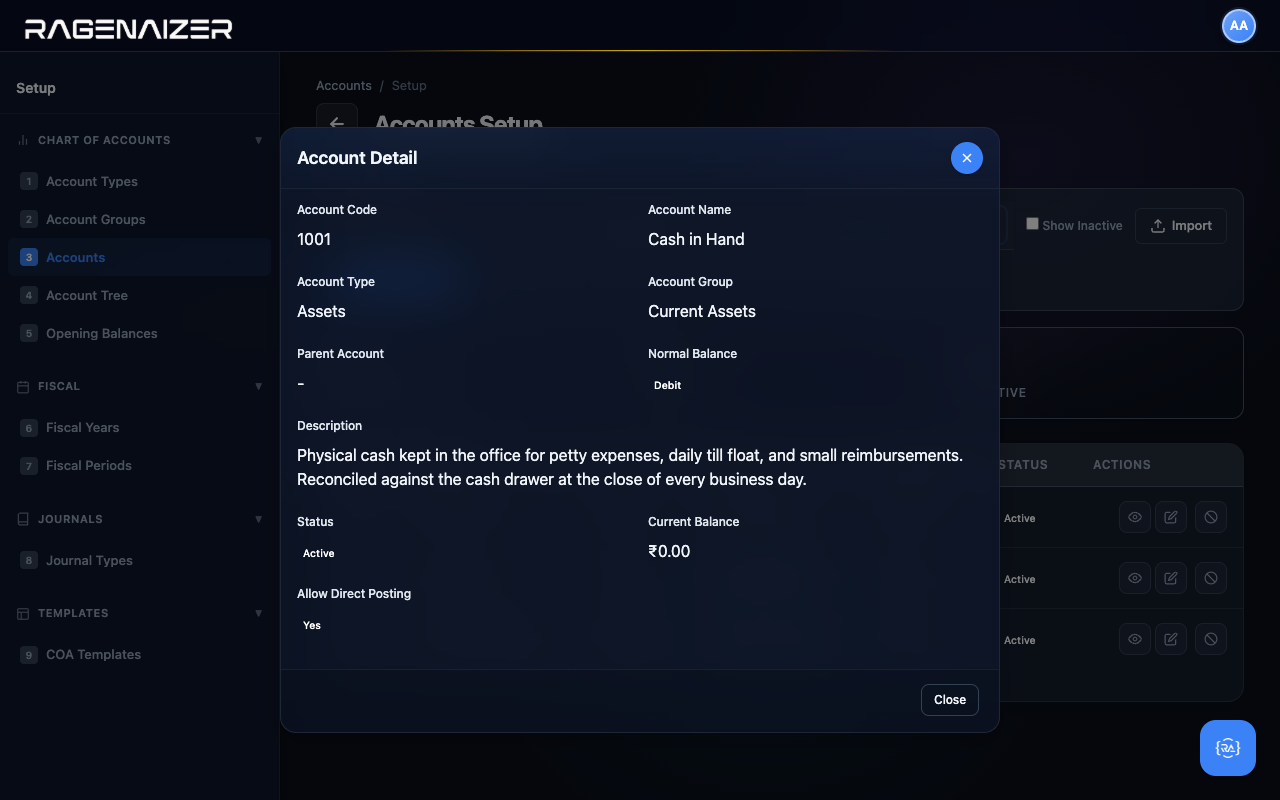
Click the eye icon on any row to open the read-only Account Detail modal. It shows every field including the Normal Balance, the Description, and the Current Balance — nine fields in total laid out in a clean two-column grid.
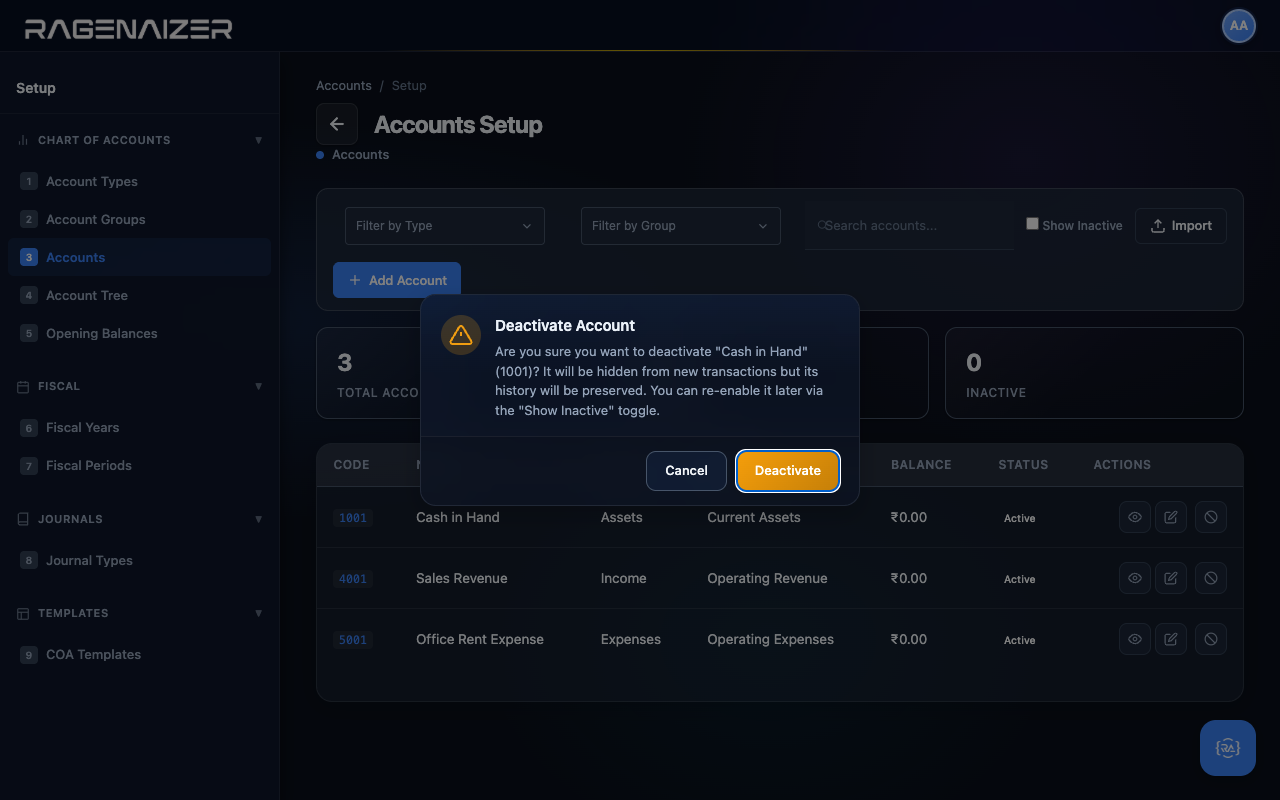
The third row button is Deactivate — the red prohibit icon. This is a soft delete: the account is hidden from new transactions but its history is preserved forever, and you can re-enable it later. The confirm dialog explains all of this in plain English so you don't have to guess.

Search and filter
The toolbar above the Accounts table has two filter dropdowns (by Type and by Group) and a free-text search box. Both filters work together — pick a type and the table narrows; type something into search and it narrows further.

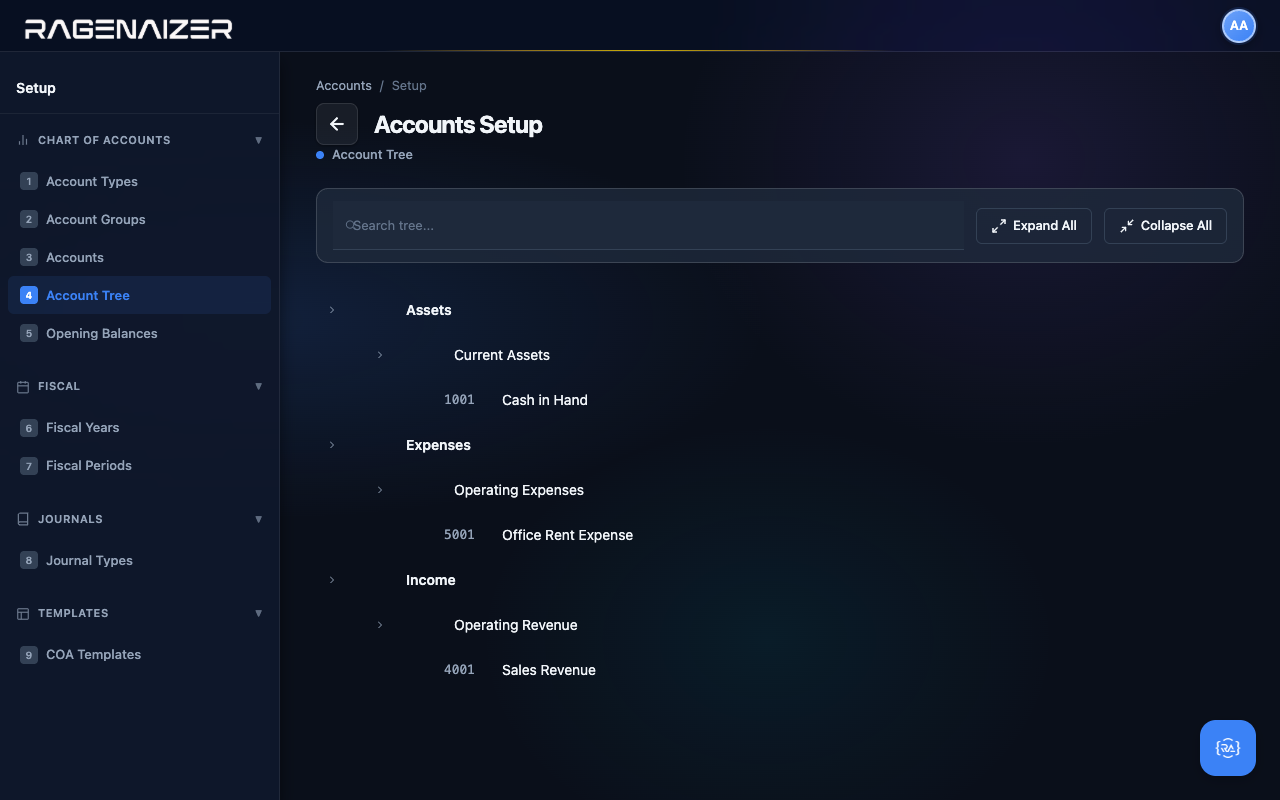
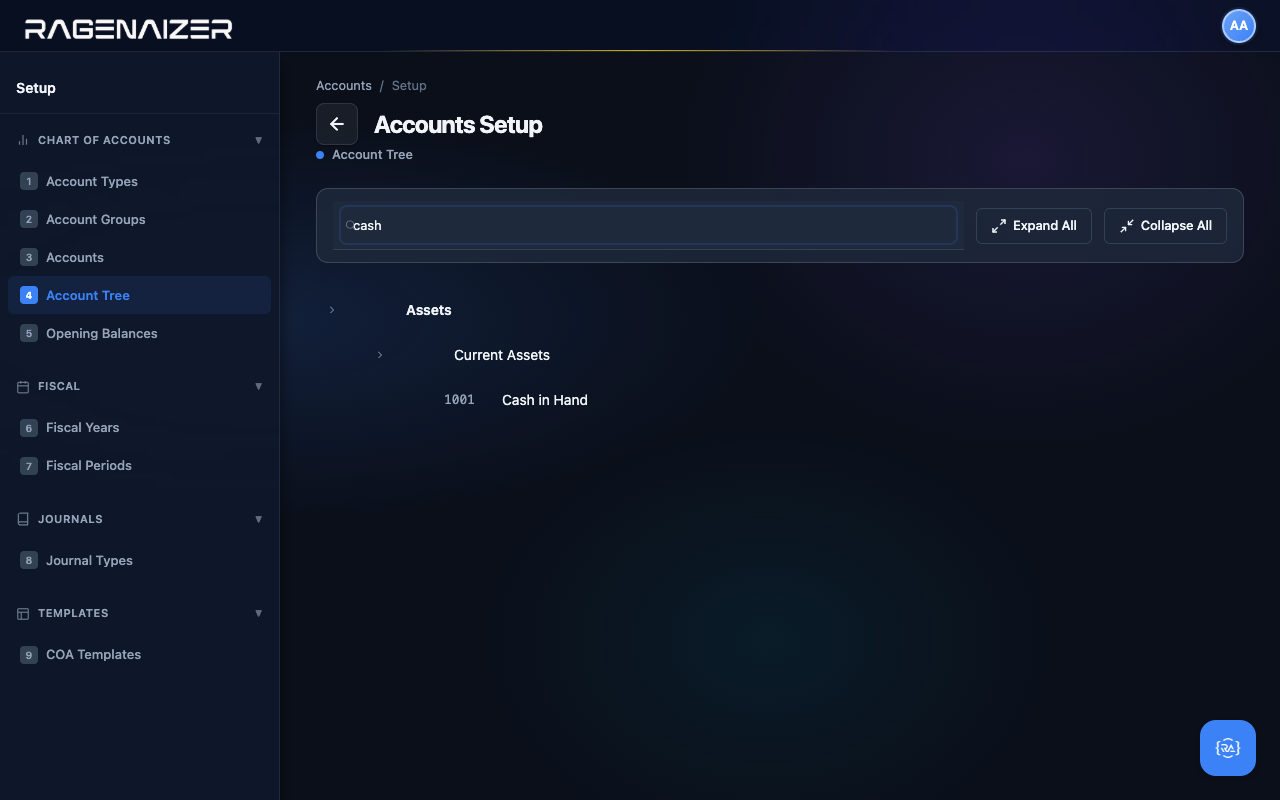
Tab 4 — Account Tree
The Account Tree is the same data as the Accounts tab, but rendered as a collapsible hierarchy: Type → Group → Account. For finance teams it's the most natural way to look at the Chart of Accounts — you can collapse the parts you don't care about and expand the parts you do.

Fiscal Year.
Defining your accounting year — when it starts, when it ends, and how it splits into twelve monthly periods. Then doing the same for next year, and the year after that, forever.
Fiscal Year vs. Calendar Year
A calendar year always runs January 1 → December 31. A fiscal year is whatever 12-month accounting period your business chooses. In India that's typically 1 April → 31 March (because the income tax year follows the same calendar). In the US most companies use January → December. Pick whichever your accountant tells you to — once chosen, you stick with it.
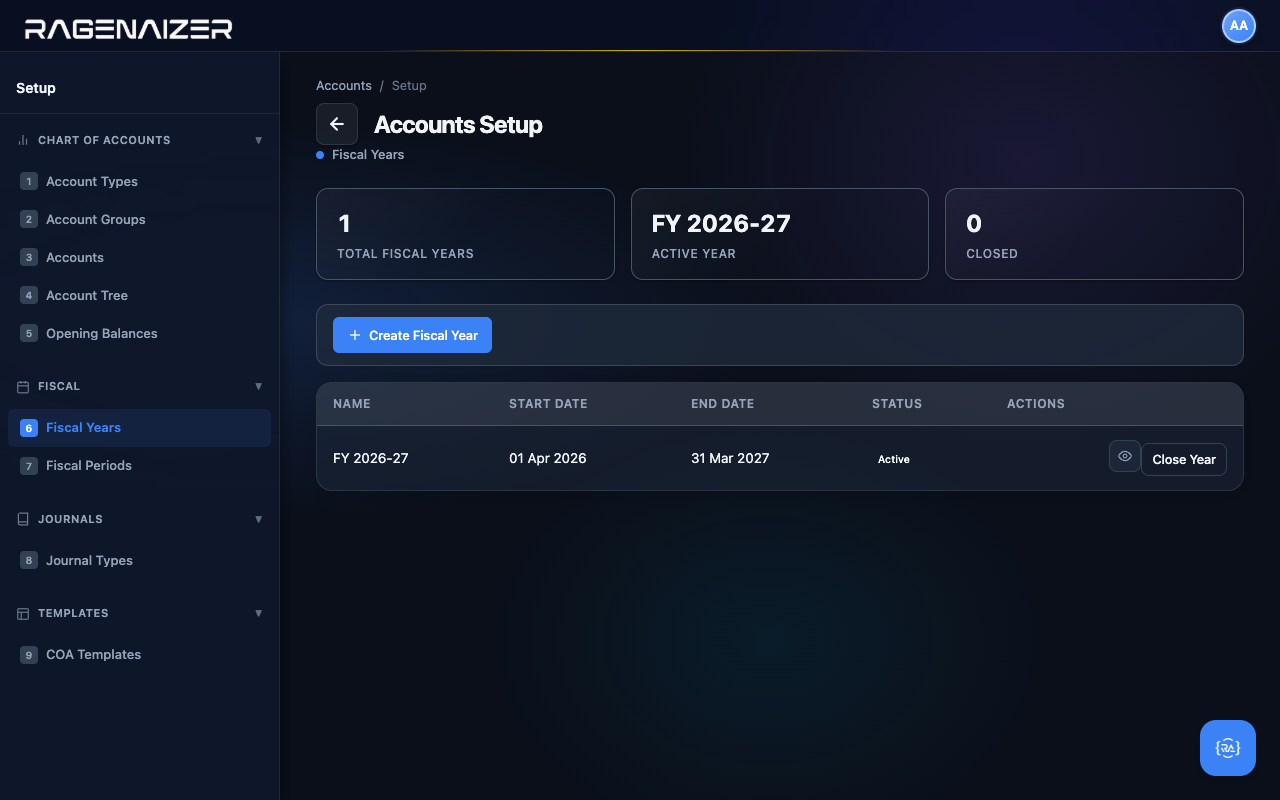
Tab 6 — Fiscal Years
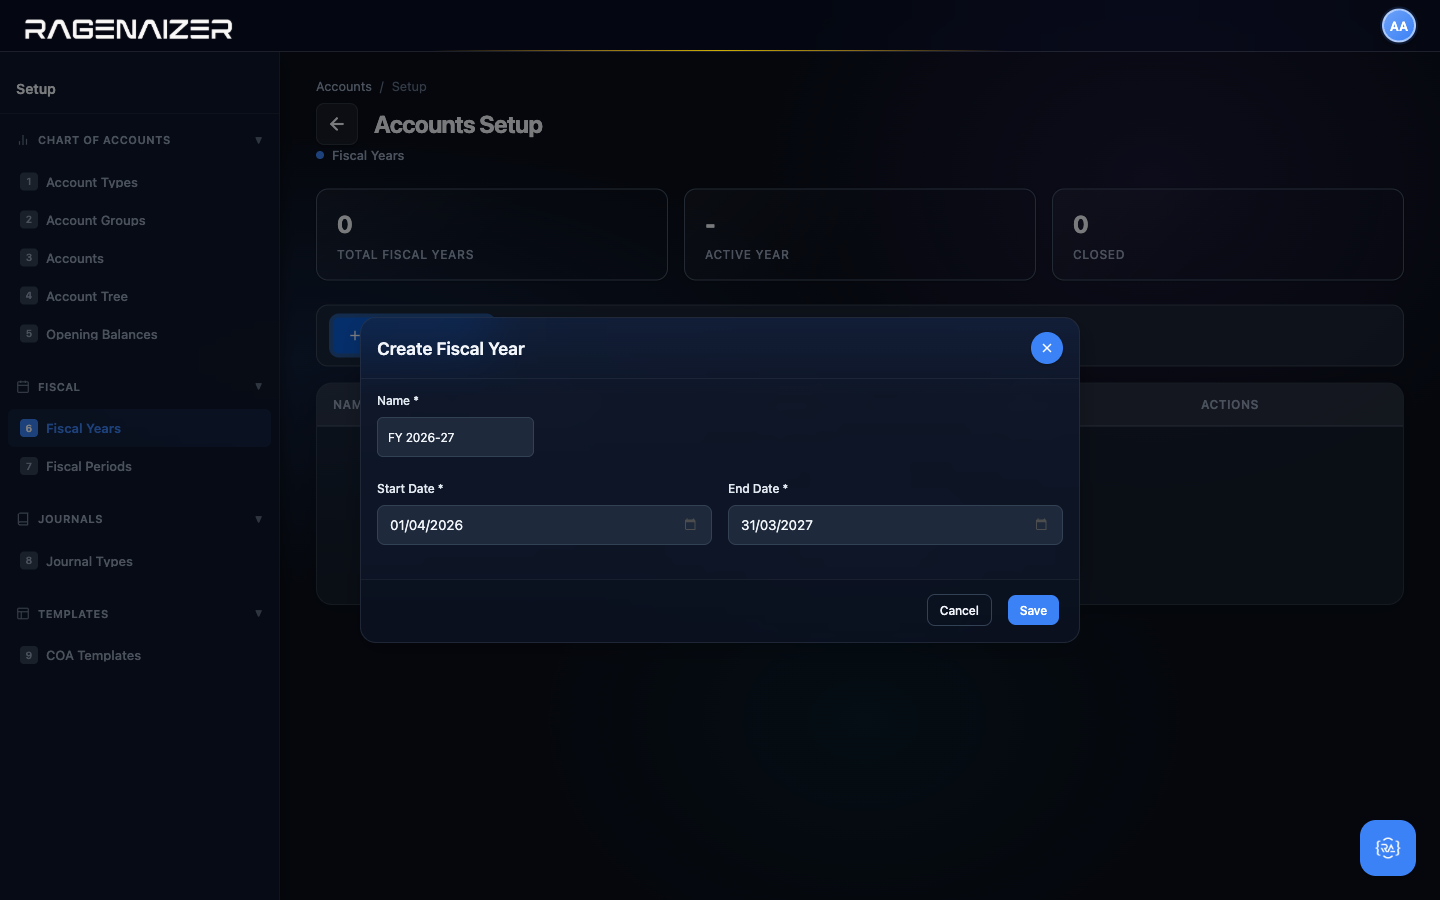
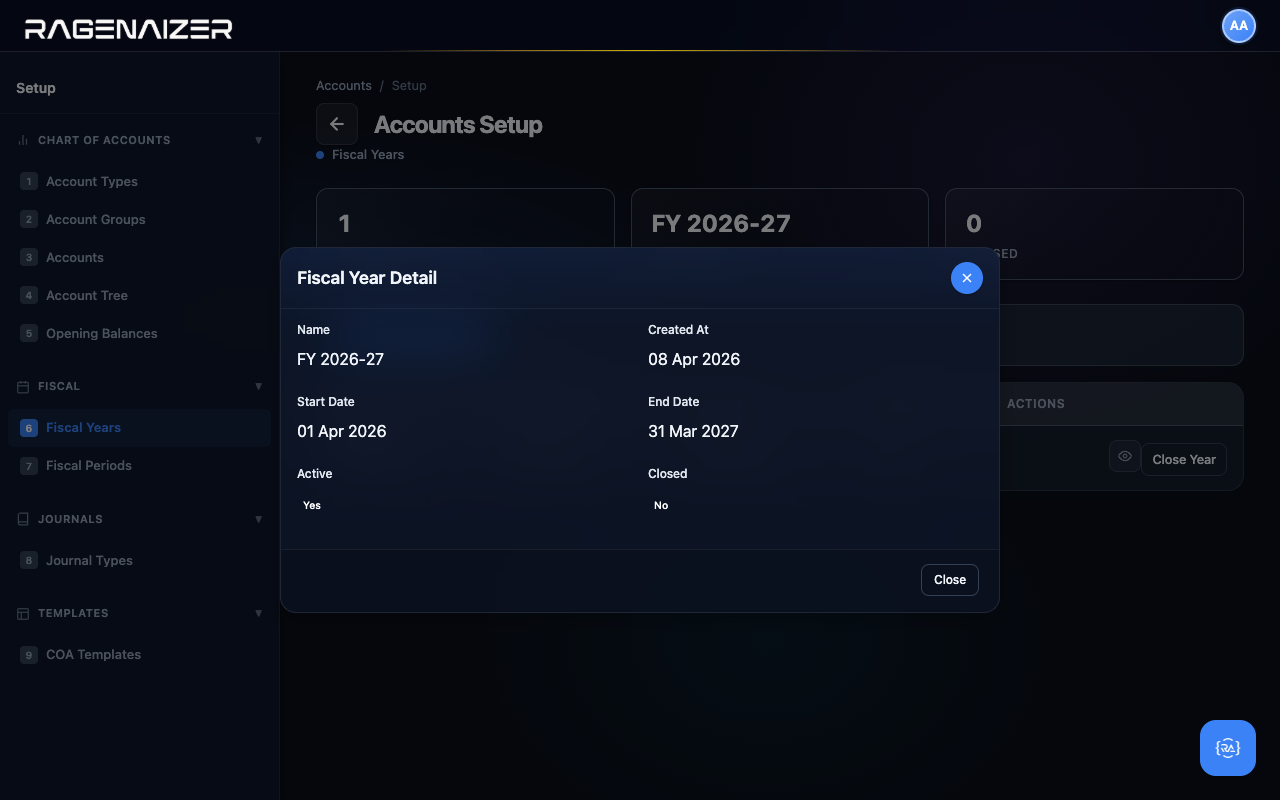
Open the Fiscal Years tab. The page shows three stat tiles (Total / Active Year / Closed) and a table. On a clean install both the table and the tiles are empty — click + Create Fiscal Year.
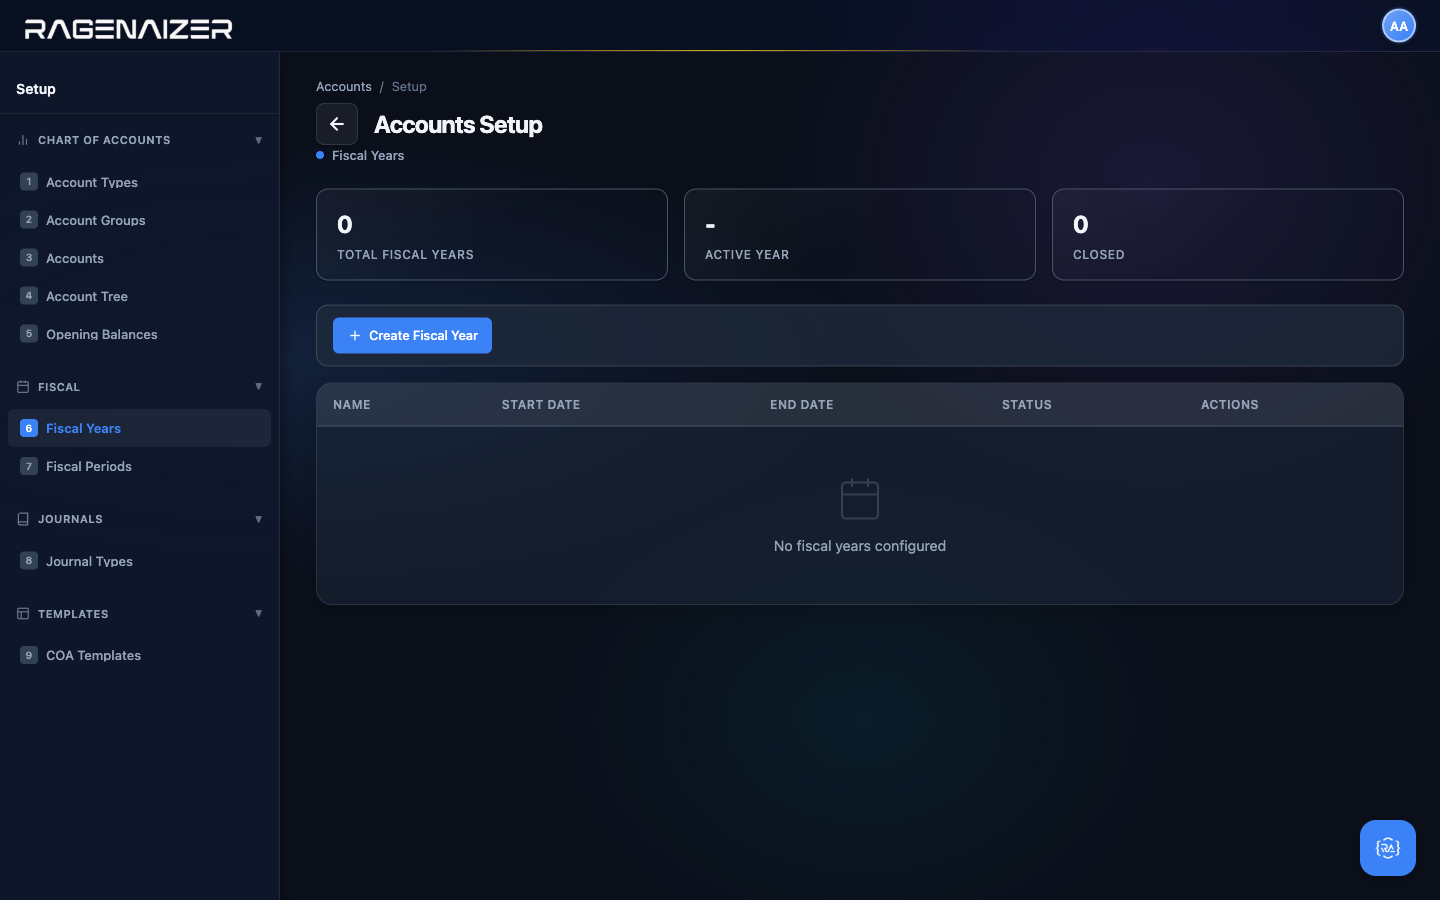
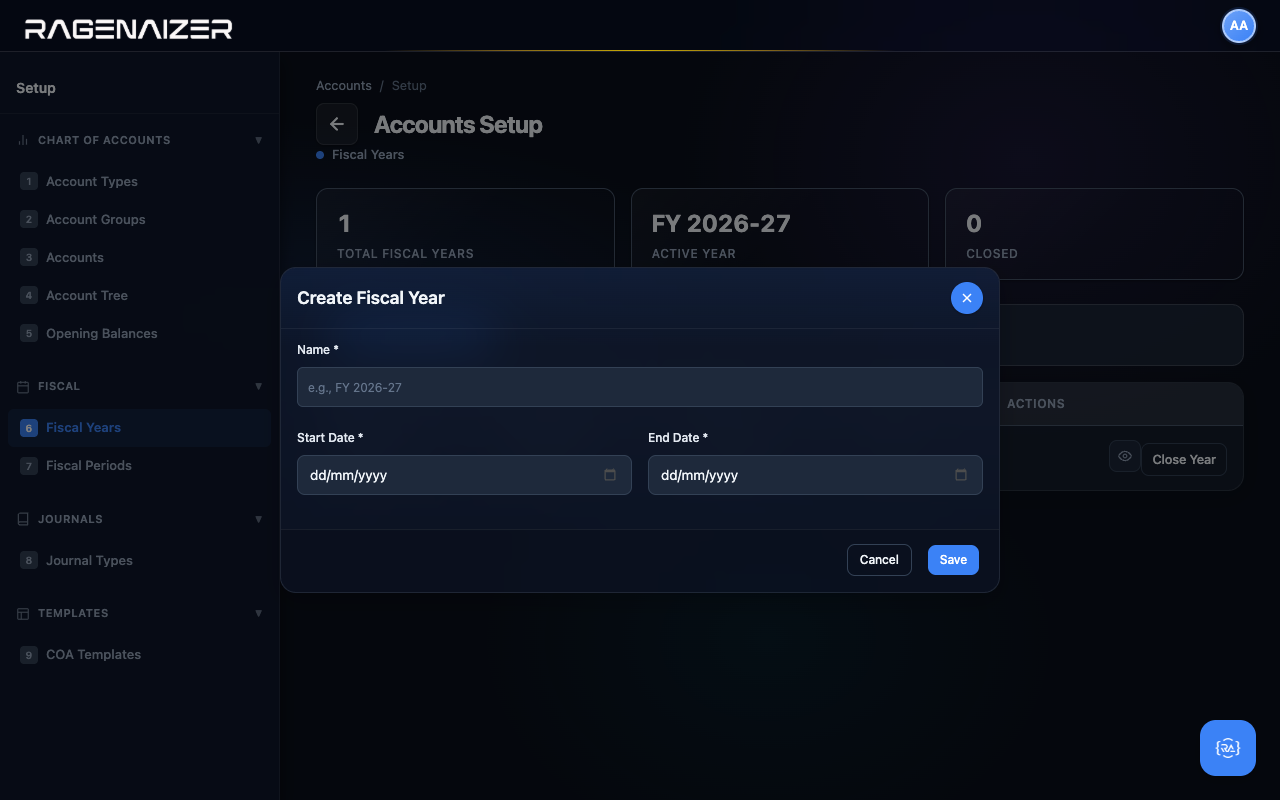
Fill it in for our demo year: Name FY 2026-27, Start Date 01 Apr 2026, End Date 31 Mar 2027. Click Save — the system creates the fiscal year, marks it as the active year, and automatically generates twelve monthly periods (Apr-2026 through Mar-2027). You'll see them in the next tab.
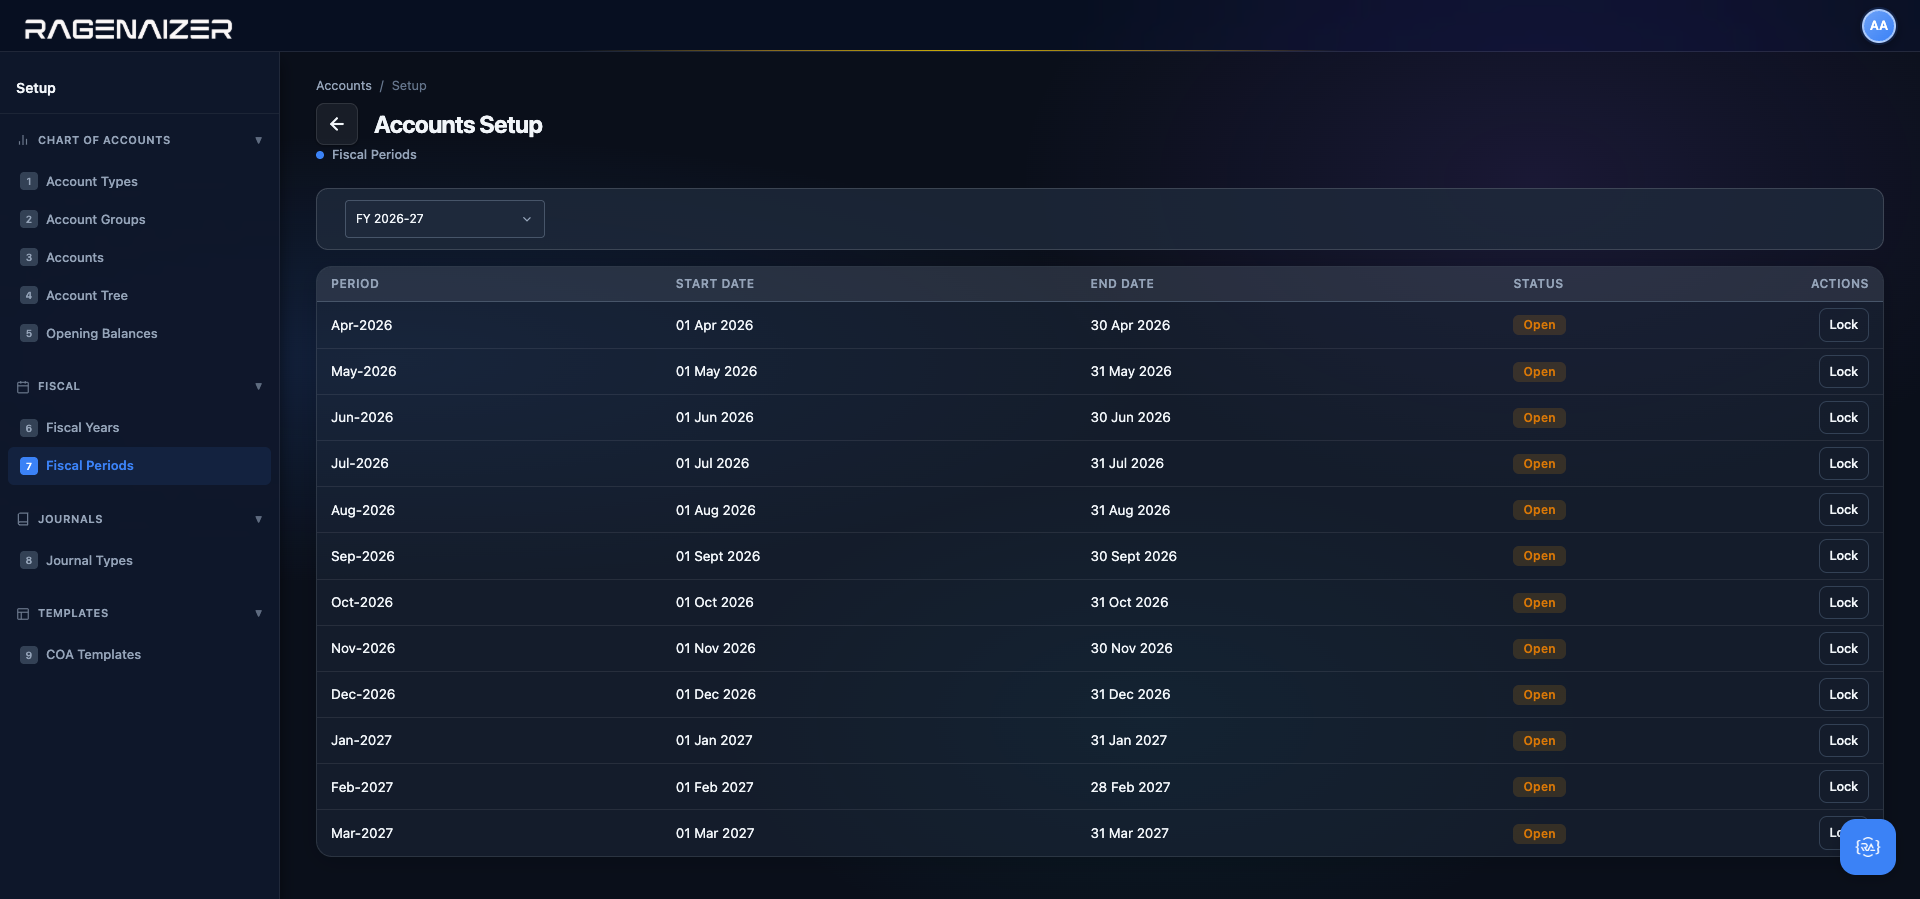
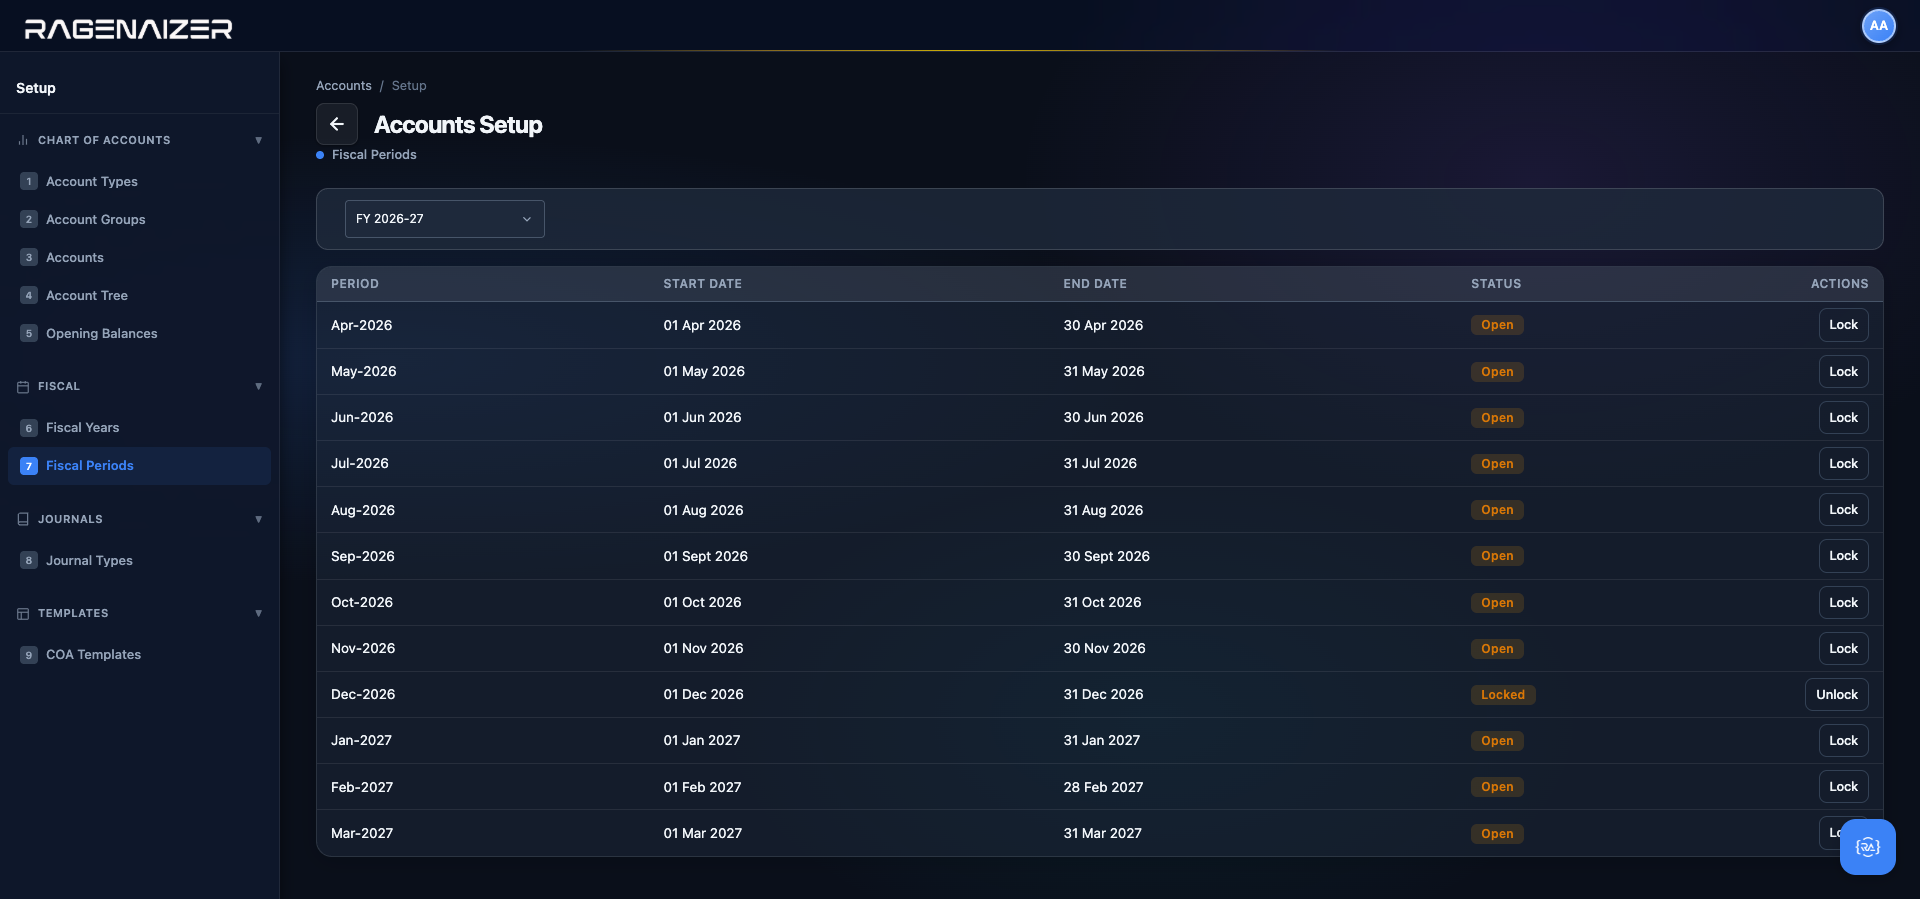
Tab 7 — Fiscal Periods
Click on Fiscal Periods (tab 7). You'll see twelve rows — one per month — auto-generated from the fiscal year you just created. You don't create periods by hand; the system always splits a year into twelve calendar months.
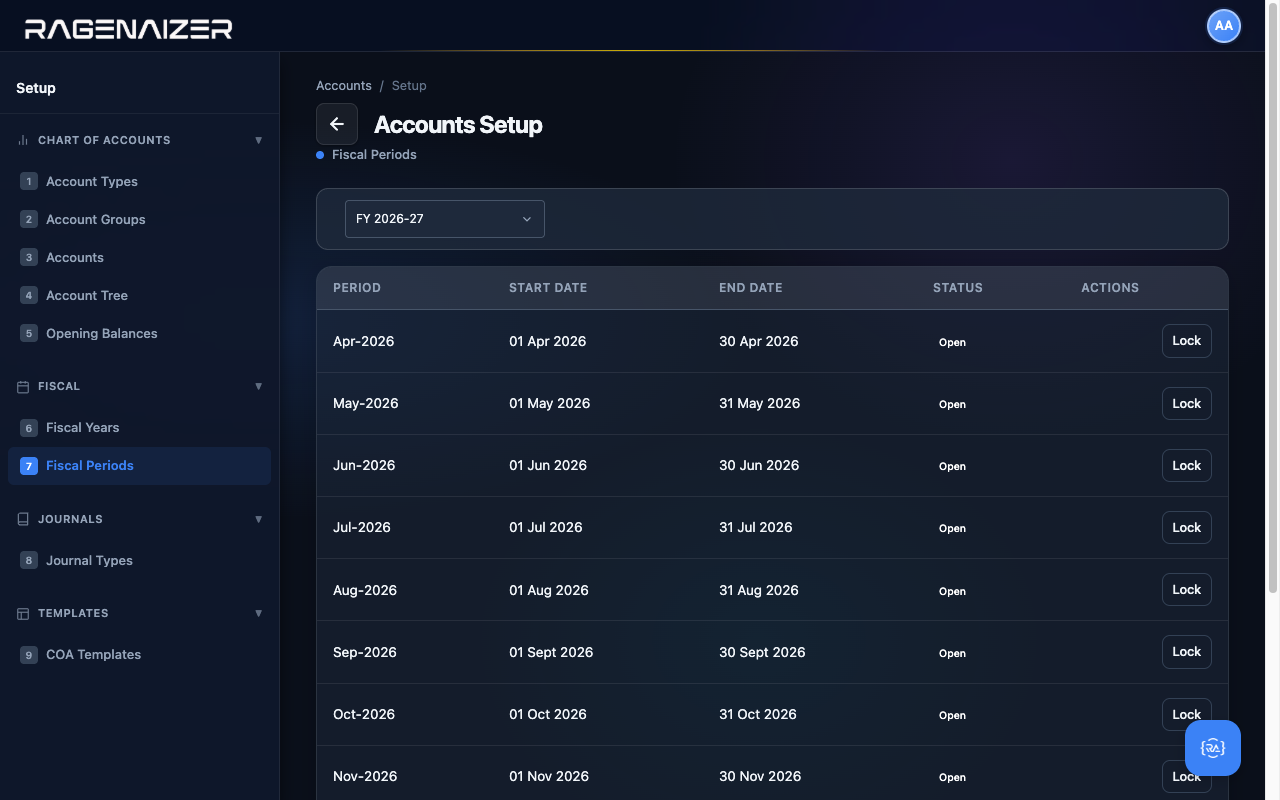
Locking a period
Locking a period prevents new journal entries from being posted to that period. You typically lock a month at month-end, after the books for that month have been reviewed and signed off. Locked periods can be unlocked later if you find an error — but only by an admin, and the audit log records who did it and when.
What happens when you post into a locked period
Let's prove the lock actually does something. Flip to the General Ledger page, click Create Entry, and try to
save a balanced journal entry dated inside a locked period. The front-end form will happily let you fill it in —
the check happens at the API layer, not the client — so the real moment of truth comes when you click Save as Draft.
The backend looks up the fiscal period that contains entry_date, sees is_locked = true,
and returns an HTTP 409 Conflict with a targeted message:
HTTP/1.1 409 Conflict
{
  "error": "Cannot create entry in locked period 'Dec-2026'"
}
The same rule applies everywhere a GL entry would be posted: approving a customer invoice dated inside a locked period,
approving a vendor bill, recording a bank transaction — every single write path goes through the same
CheckPeriodLocked guard in BusinessLayer_Fiscal, so it's impossible to sneak a past-dated
entry into a closed month through the UI or the API. The front-end surfaces the backend error as a toast.
Locking is about new writes, not old reads
Every invoice, bill, payment, and manual JE that was already in the period before you locked it stays exactly as it was — the month's Trial Balance, P&L, and Balance Sheet are untouched. The lock is a write-guard on future writes only. Reports read through it freely, the audit log keeps every action, and the closing report you generated before the lock is still a valid frozen snapshot.
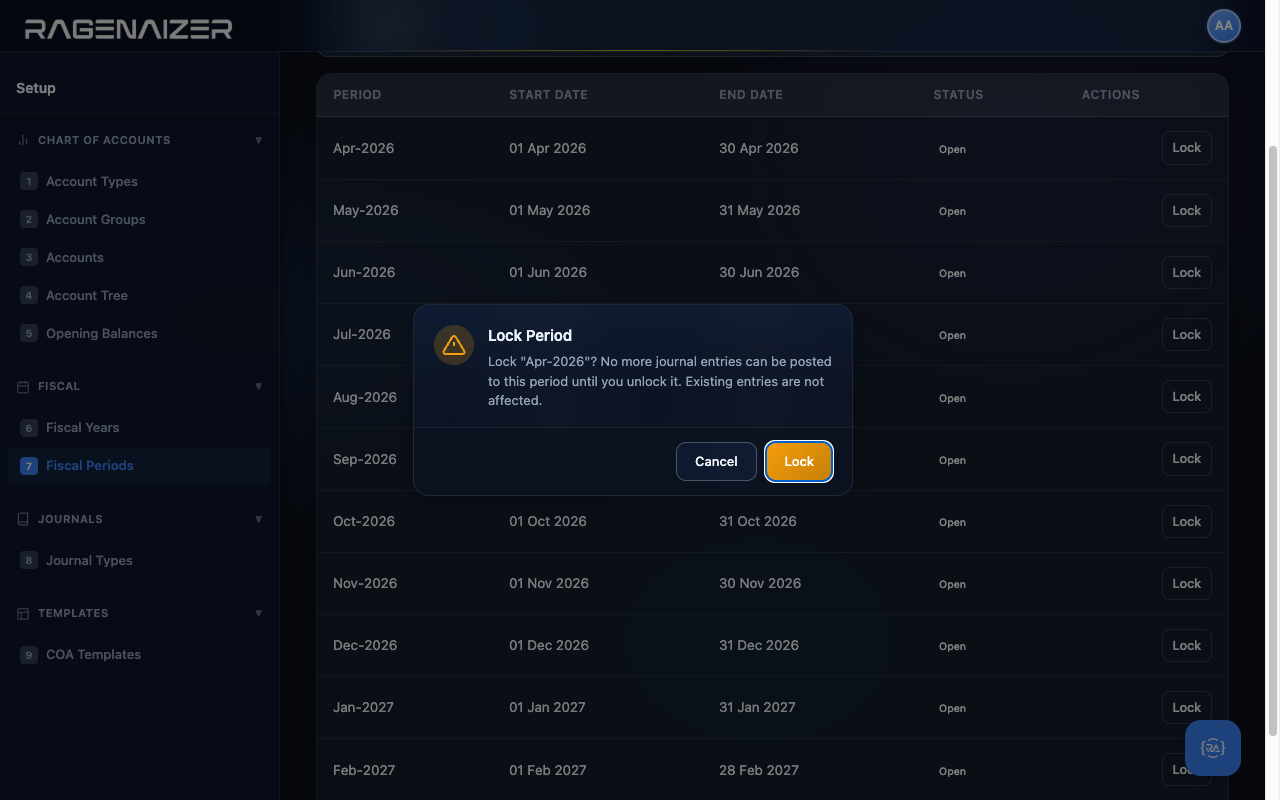
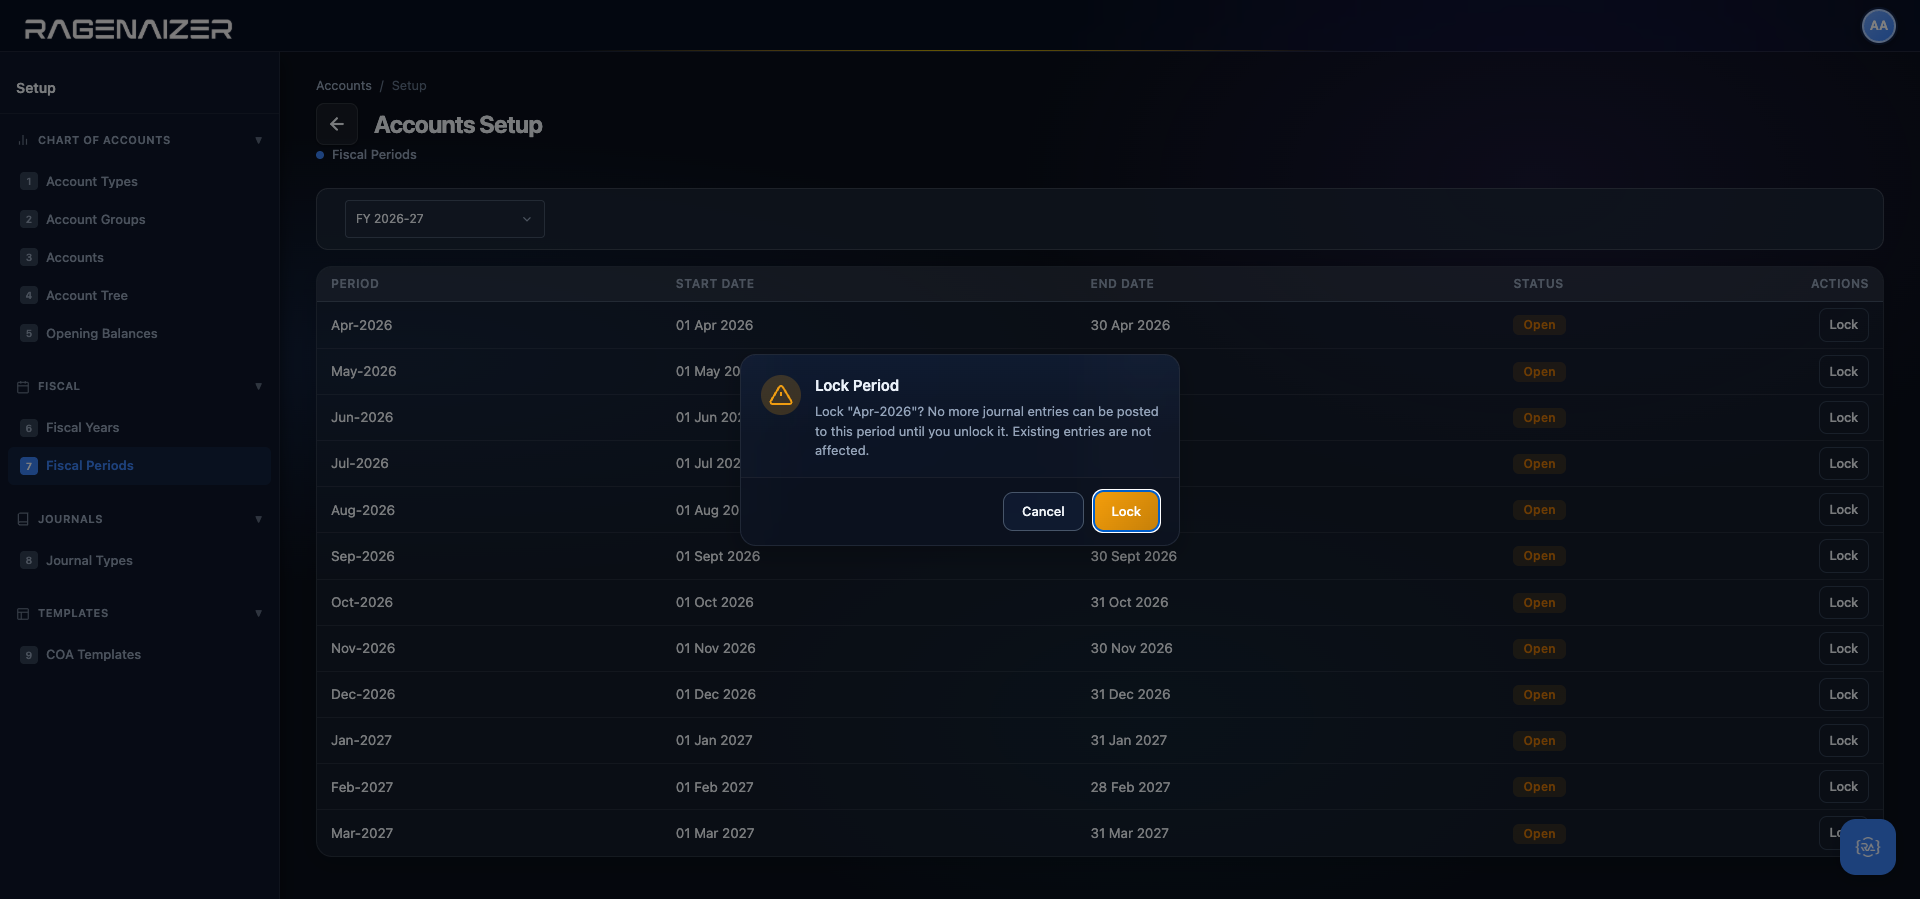
Demo: lock a future period and watch the badge flip
You should not lock the current month mid-month — live transactions are still landing in it — so for demo purposes we'll lock a period that's safely in the future (say Dec 2026) and then unlock it so the books remain exactly as we started.
fiscal_period, action = locked or unlocked), so you can always see who locked what and when in the Audit Logs tab.Lock only after sign-off, unlock only for genuine corrections
In practice: on the 5th of the following month (after all invoices for last month have been approved, all bills recorded, all bank reconciliations completed, and the Trial Balance cross-checked), you go to Fiscal Periods and lock the previous month. If a week later a genuine correction needs to hit that period (e.g. a vendor's invoice arrived late with the prior month's date), an admin can unlock, post the entry, and re-lock. Every state change lands in the audit log so the trail is auditable for your CA at year-end. Two rules: (1) only admins can unlock, and (2) the audit log is searchable by action so you can always produce a list of every lock/unlock event for a given fiscal year if a reviewer asks.
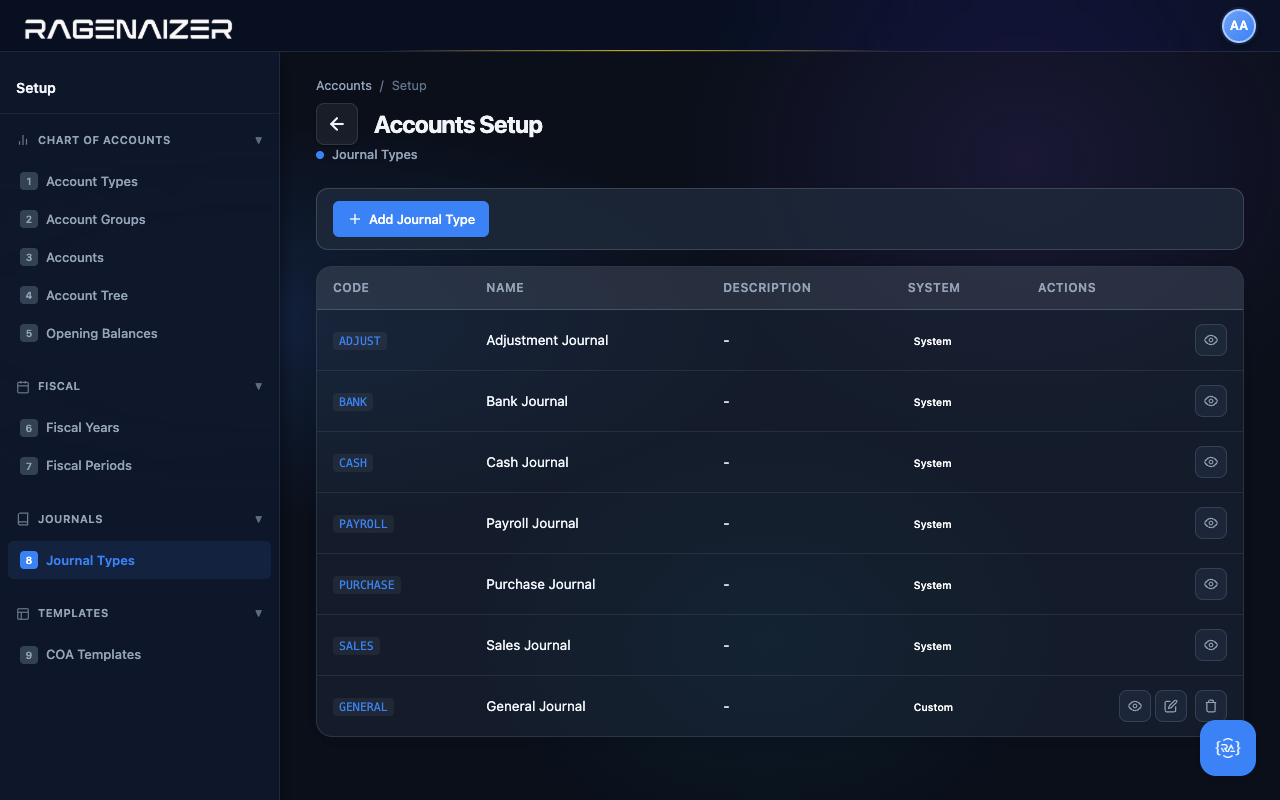
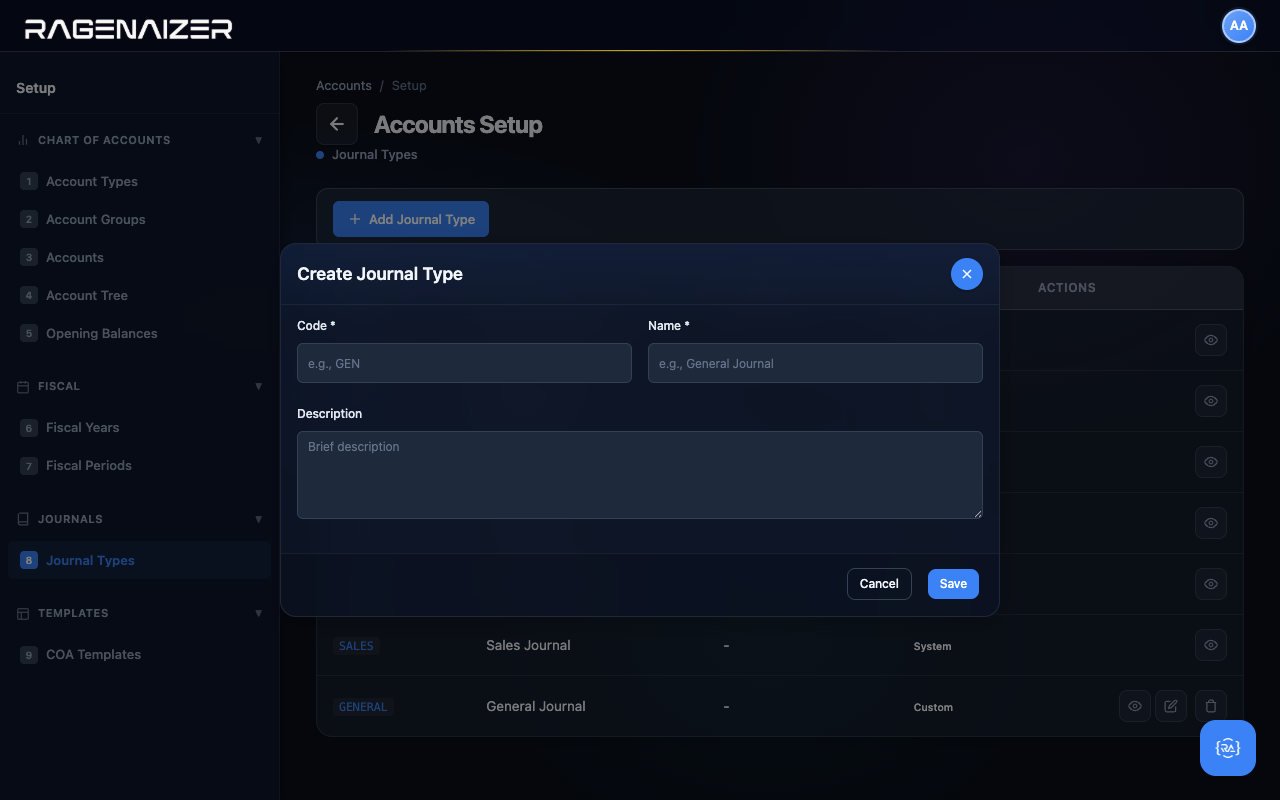
Tab 8 — Journal Types
Every journal entry the system creates — whether you make it manually or it's auto-generated by an invoice — is tagged with a Journal Type. The system seeds six standard system types automatically: Sales, Purchase, Cash, Bank, Adjustment, Payroll. You can add your own custom types if you need to (e.g. one named "Year-End Closing" or "Inter-Company Transfer"). System types can't be edited or deleted; custom types can.
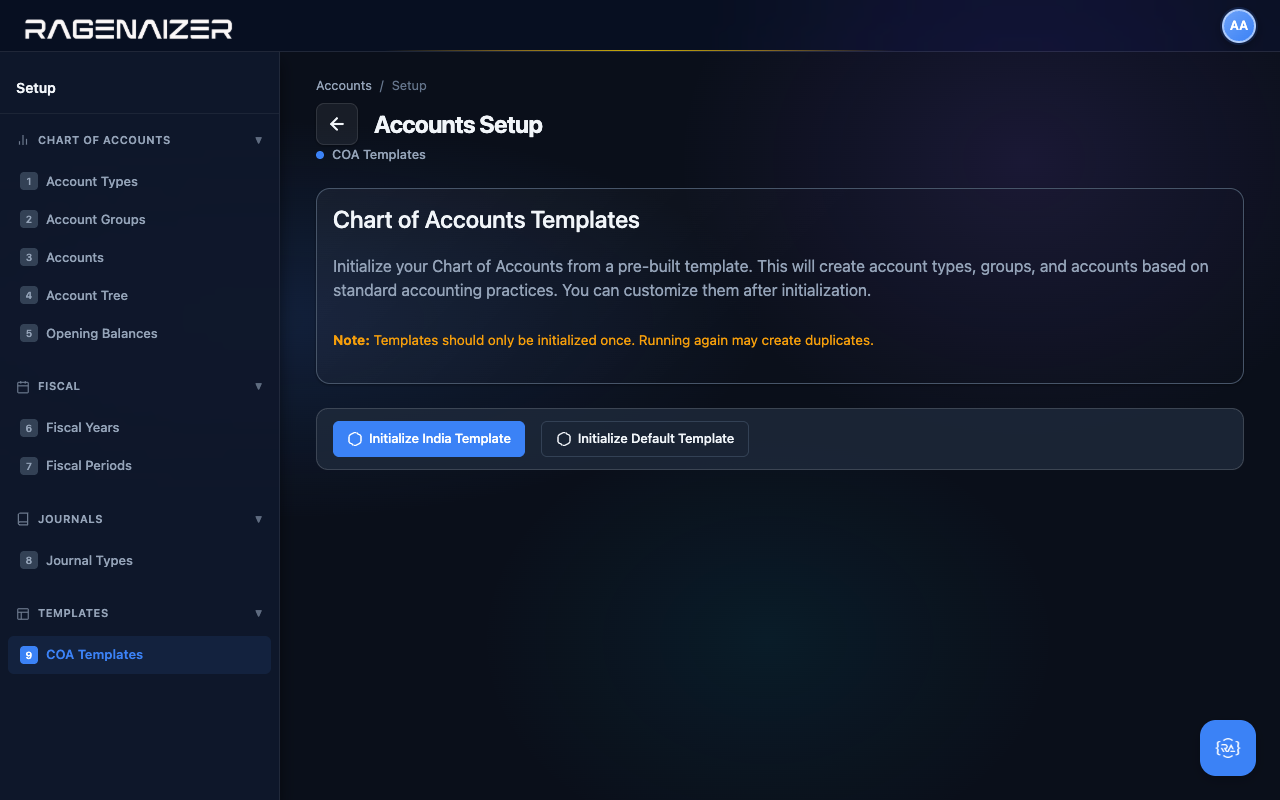
Tab 9 — COA Templates (the shortcut)
The last tab gives you a shortcut: instead of building your Chart of Accounts by hand (like we just did manually in Section 4), you can click Initialize India Template to seed 79 ready-made accounts in two clicks. We didn't use it in this guide because we wanted you to see exactly how the building blocks fit together, but for a real production setup the templates are usually the right choice.
Tax setup — GST.
Configuring the tax codes you'll apply to invoices and bills. We'll set up India's GST 18% — the rate that applies to most B2B services.
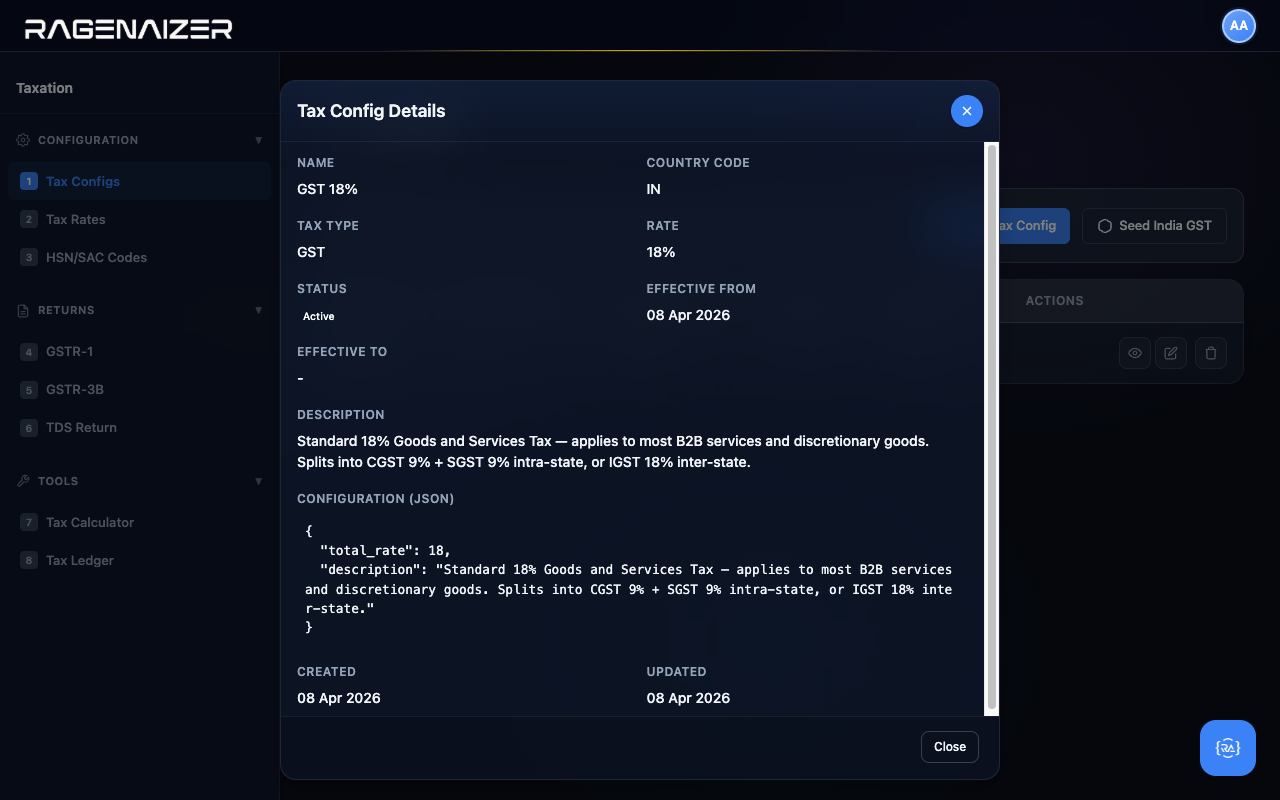
Tax Config vs Tax Rate
A Tax Config is the abstract definition of a tax (e.g. "GST 18%") — the country, the type, the headline rate, the legal description. A Tax Rate is one of the component rates inside that config (e.g. "CGST 9%" and "SGST 9%" both belong to the GST 18% config). Most countries only need one rate per config; India splits it into CGST + SGST for intra-state and IGST for inter-state.
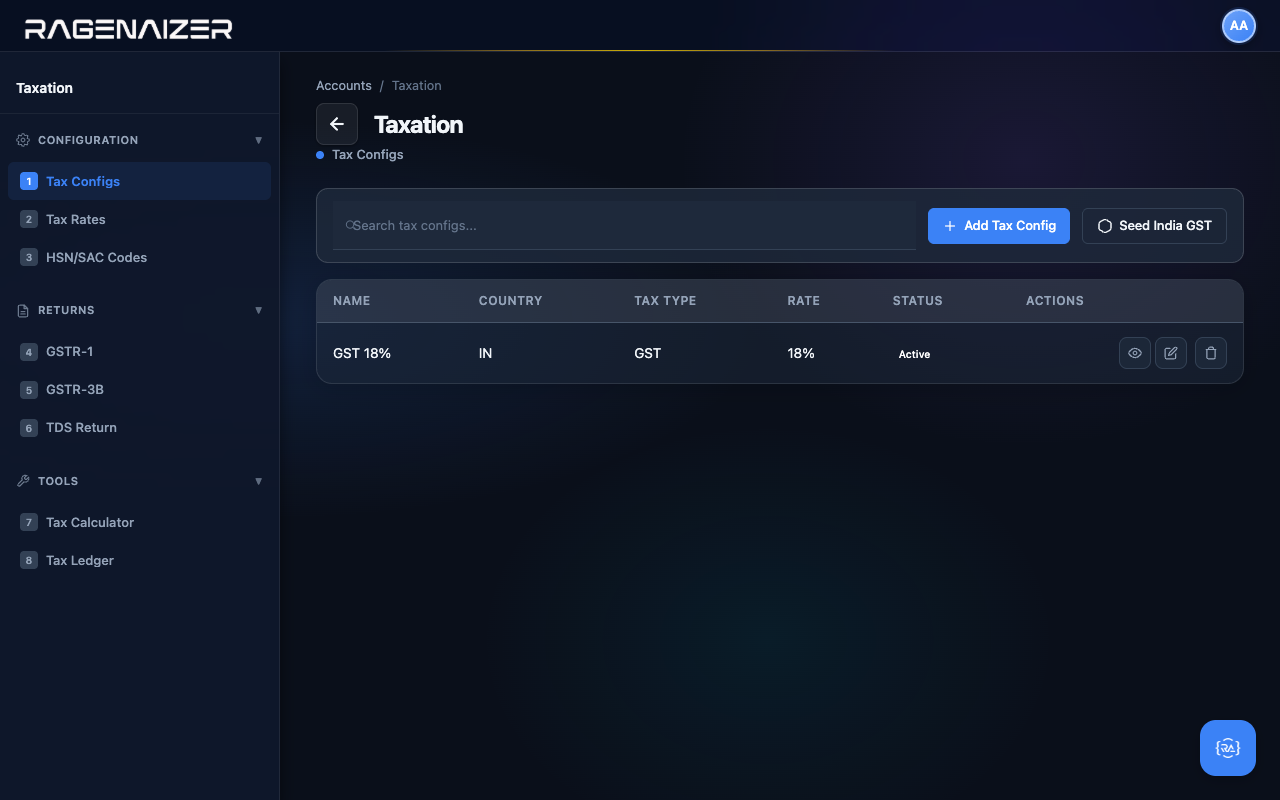
Open the Taxation page
From the Accounts dashboard click the Taxation Quick Action card. The Taxation page has eight tabs grouped into three sections: Configuration (Tax Configs, Tax Rates, HSN/SAC), Returns (GSTR-1, GSTR-3B, TDS Return), and Tools (Tax Calculator, Tax Ledger). For initial setup we only need the first three.
Tax Config Detail (View modal)
Click the View (eye) icon on the GST 18% row. The Tax Config Details modal opens with every field laid out in a clean two-column grid: name, country code, type, rate, status, dates, full description, and the underlying configuration JSON. The JSON block holds anything country-specific (the CGST/SGST split, exemptions, etc.) that doesn't fit in a simple field.
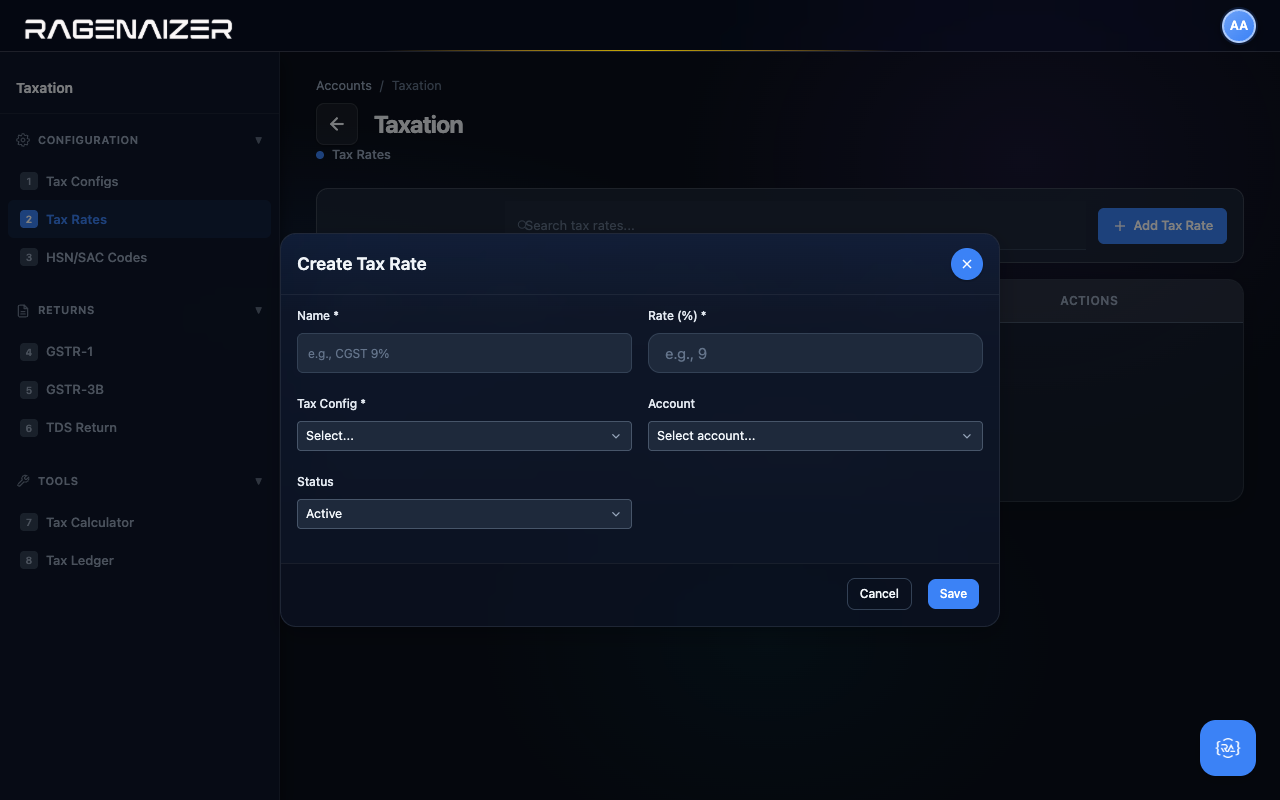
Tab 2 — Tax Rates
The Tax Rates tab is where you create the actual rate lines that get applied to invoices. Each rate links back to a Tax Config and optionally to a tax-output GL account (so the system knows where to post the tax liability when an invoice is approved).
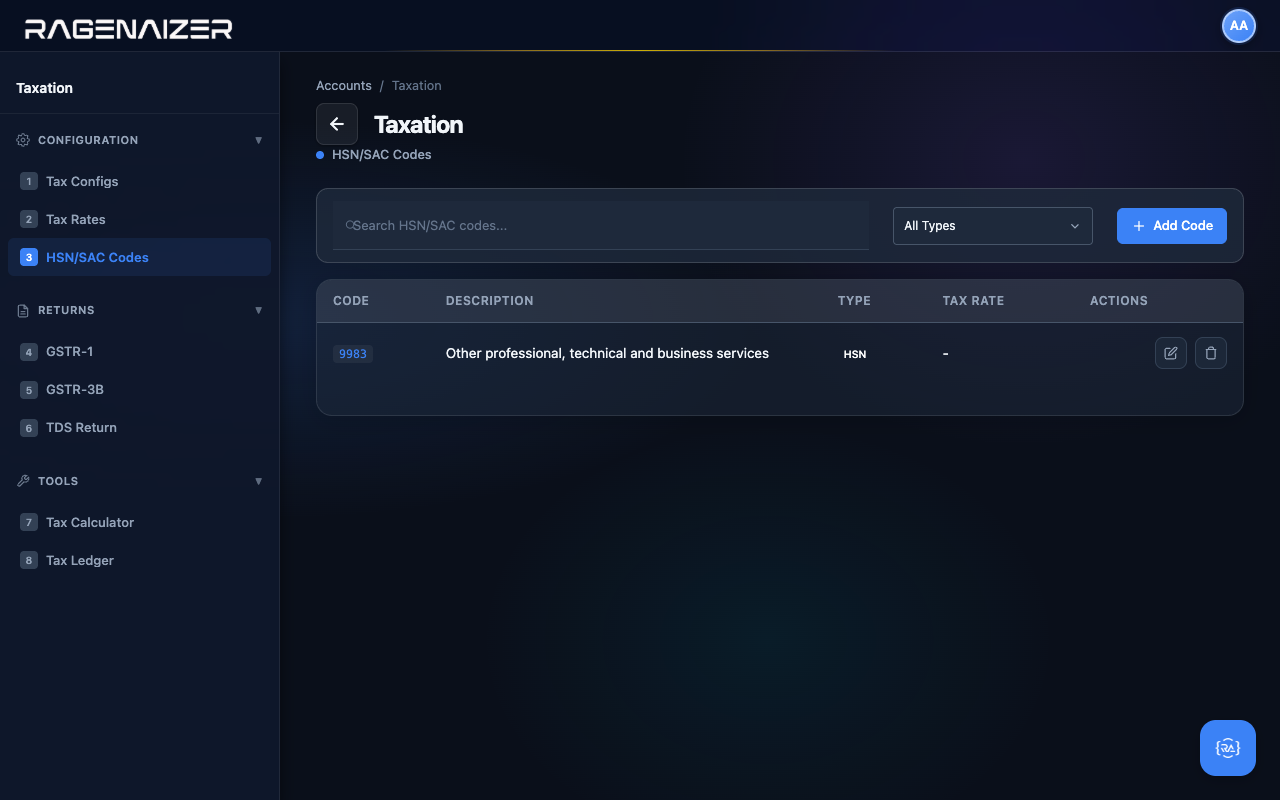
Tab 3 — HSN/SAC Codes
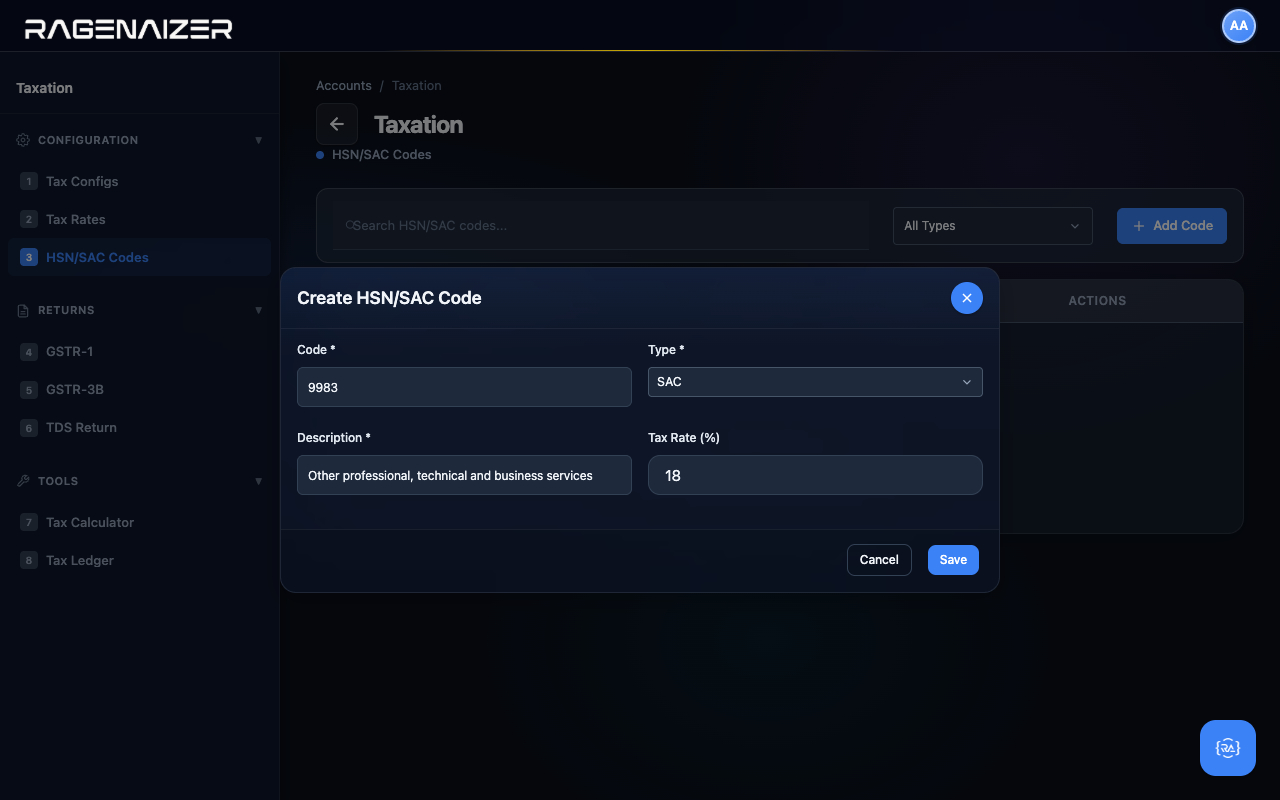
In India, every invoice line has to include an HSN code (for goods) or SAC code (for services). These are six-to-eight digit codes the GST council assigns to every type of product/service so the right tax rate gets applied automatically. You don't need to create one for every product you sell — usually a handful covers your whole catalogue.
Click + Add Code to create one. For our brand consulting demo we use 9983 — "Other professional, technical and business services" — with the standard 18% rate.
Opening balances.
If you're moving from another system — or just starting day one with cash already in the bank — the closing balances of every account go here.
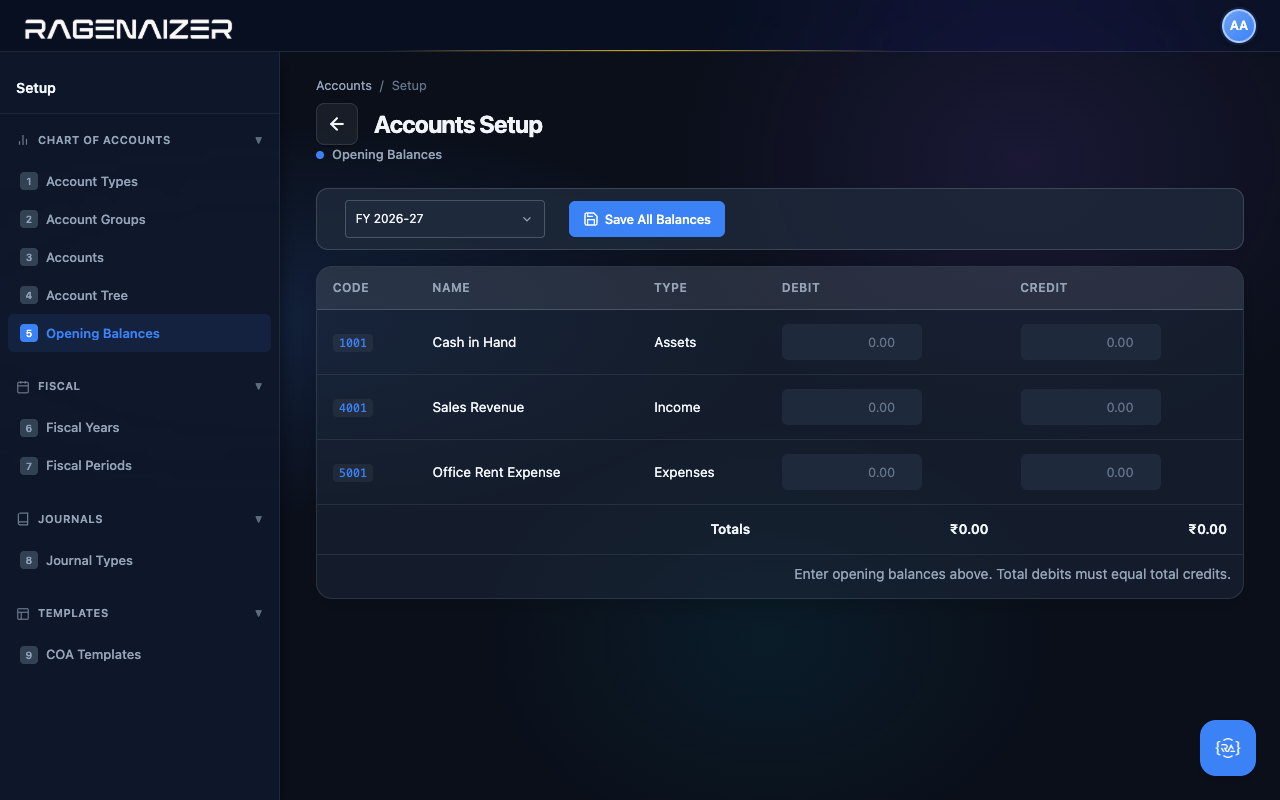
Opening Balance
The amount sitting in an account on the very first day of your fiscal year, before any transactions in this system have been entered. If you have ₹50,000 cash in hand on April 1, 2026, that's a debit opening balance of ₹50,000 on the Cash account. Opening balances must always be balanced — total debits across all accounts must equal total credits — otherwise your books start out broken.
The Opening Balances tab
Open Setup → Opening Balances (sidebar tab 5). The page is a simple grid: every active account becomes one row, with two editable cells per row (Debit and Credit). You only fill in one side per account — an asset gets a debit, a liability or revenue gets a credit. The Totals row at the bottom updates live as you type.
Filling in a balanced set
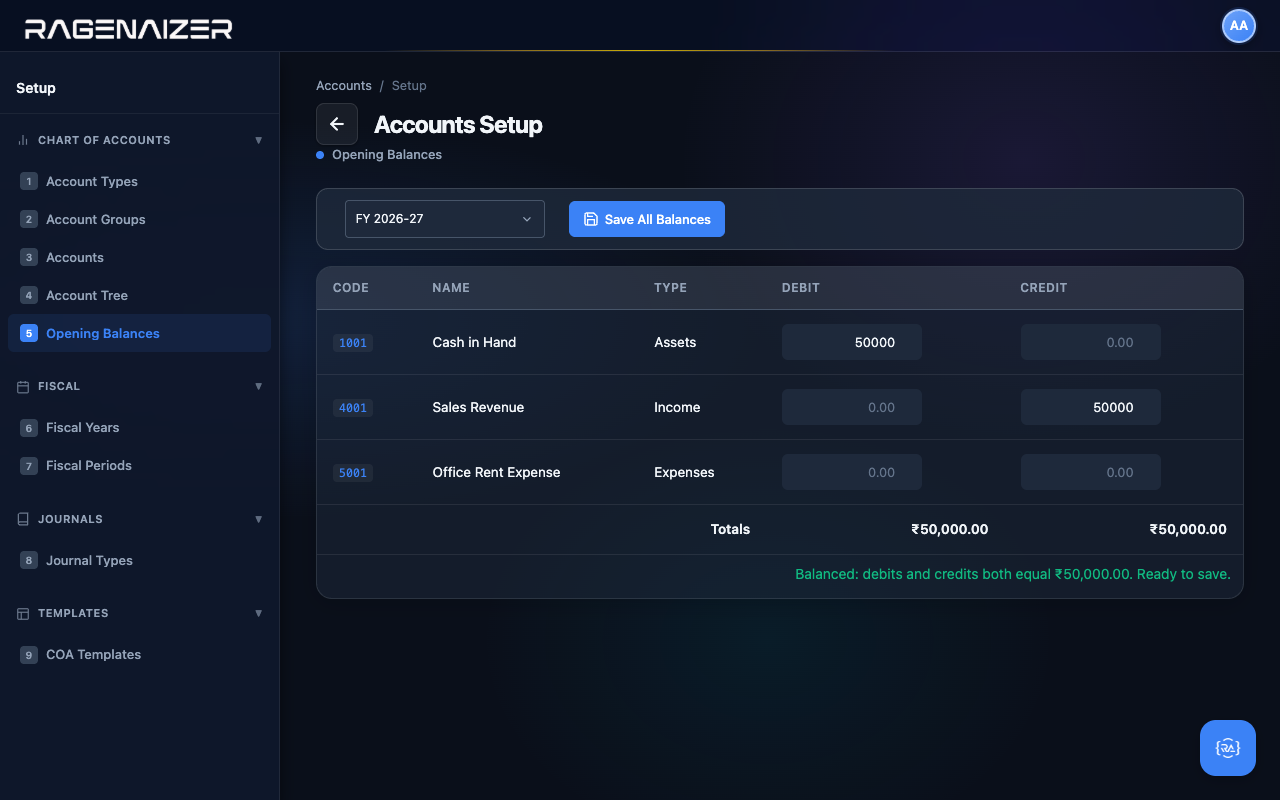
For our demo we're starting with ₹50,000 in petty cash, contributed by the owner. The double entry is:
- Debit Cash in Hand ₹50,000 — we have the cash
- Credit Sales Revenue ₹50,000 — the offsetting income line (in a real scenario you'd credit Owner's Equity, but this demo skips that account for simplicity)
Type 50000 in the Debit cell of Cash in Hand and 50000 in the Credit cell of Sales Revenue. The Totals row ticks up in real time, and the status text below the grid turns from grey neutral to green: "Balanced: debits and credits both equal ₹50,000.00. Ready to save."
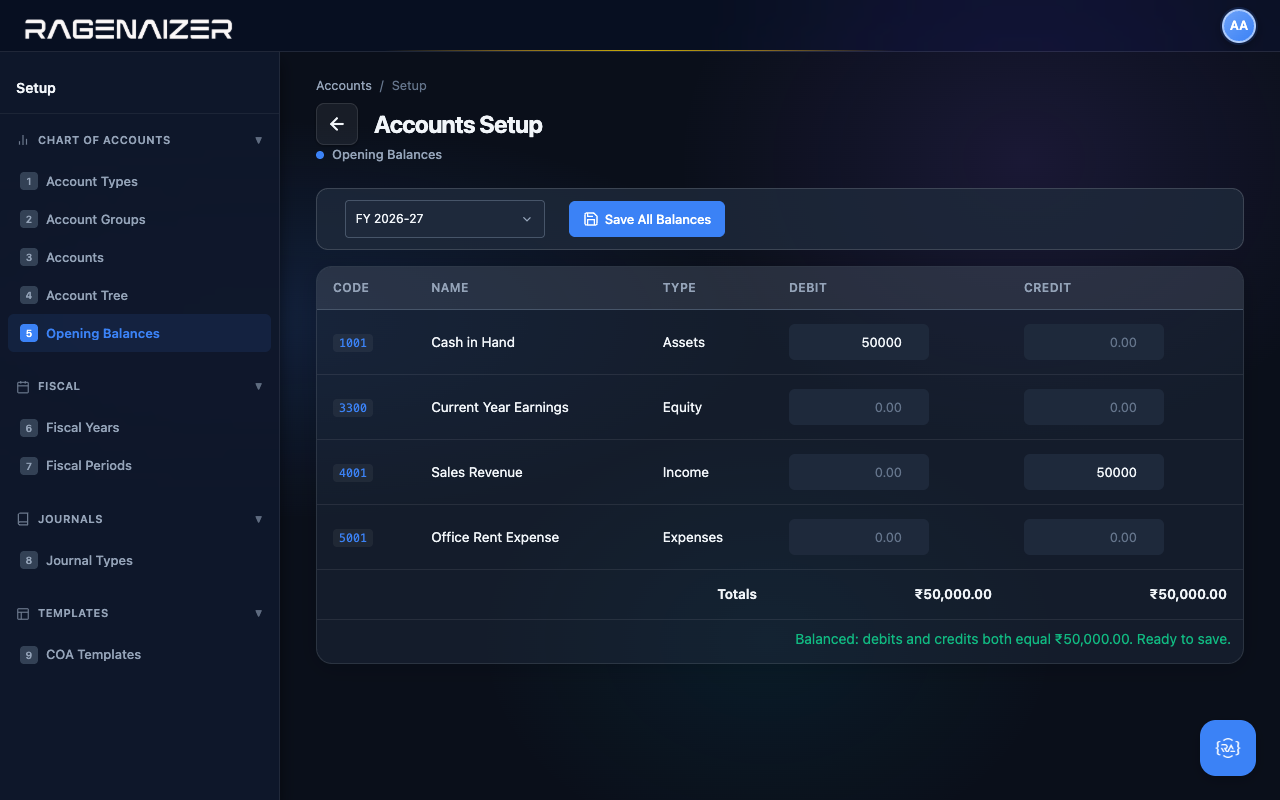
Saving and what happens behind the scenes
Click Save All Balances. The system POSTs each non-zero row as a separate API call. Behind the scenes, for each opening balance it creates a real journal entry in the General Ledger: the account you specified gets the debit/credit you entered, and the offset goes to a system account called Current Year Earnings (code 3300). If 3300 doesn't exist yet, the system auto-creates it for you the first time you save — you don't need to know about it.
After save, the page reloads and the form is now pre-filled with the values you entered. You can come back and change them later (until you start posting real transactions) by typing new values and clicking Save again.
Customers.
The first party in your books — the people who pay you. Created once, then auto-suggested on every invoice.
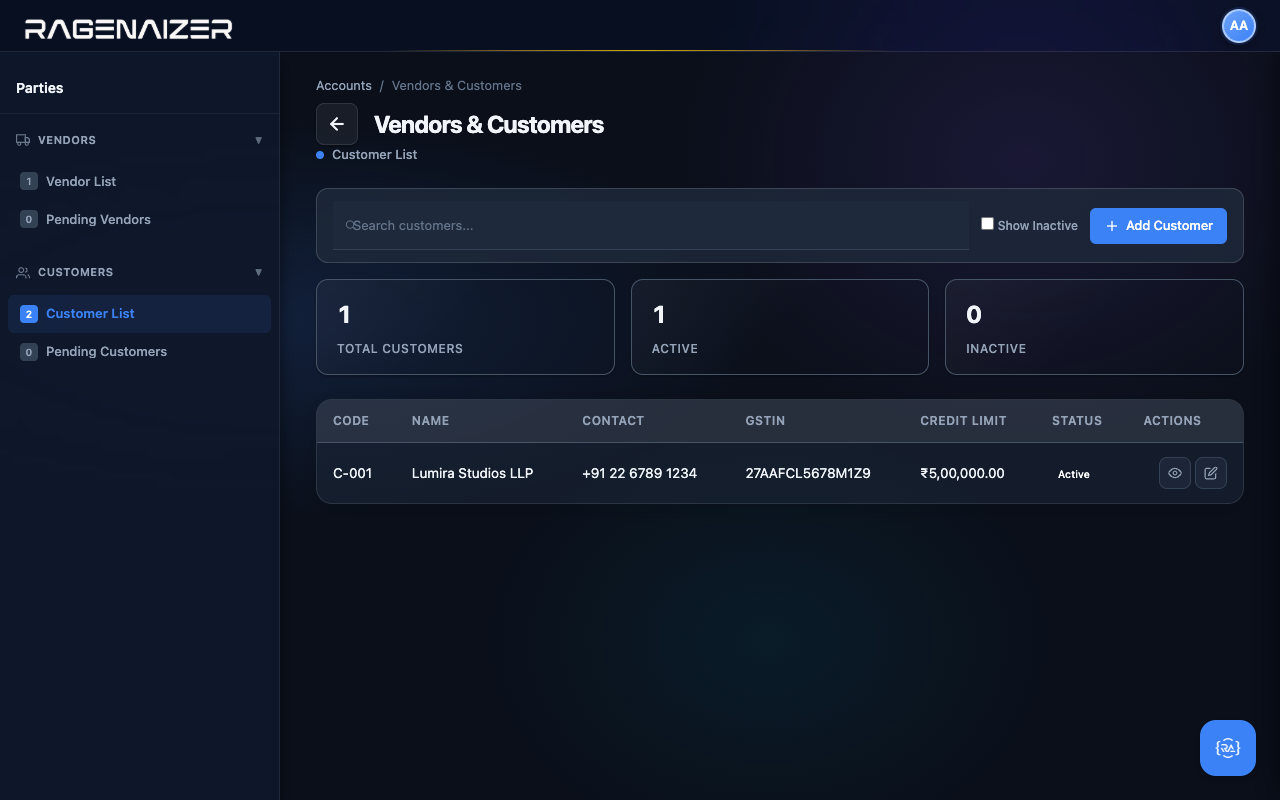
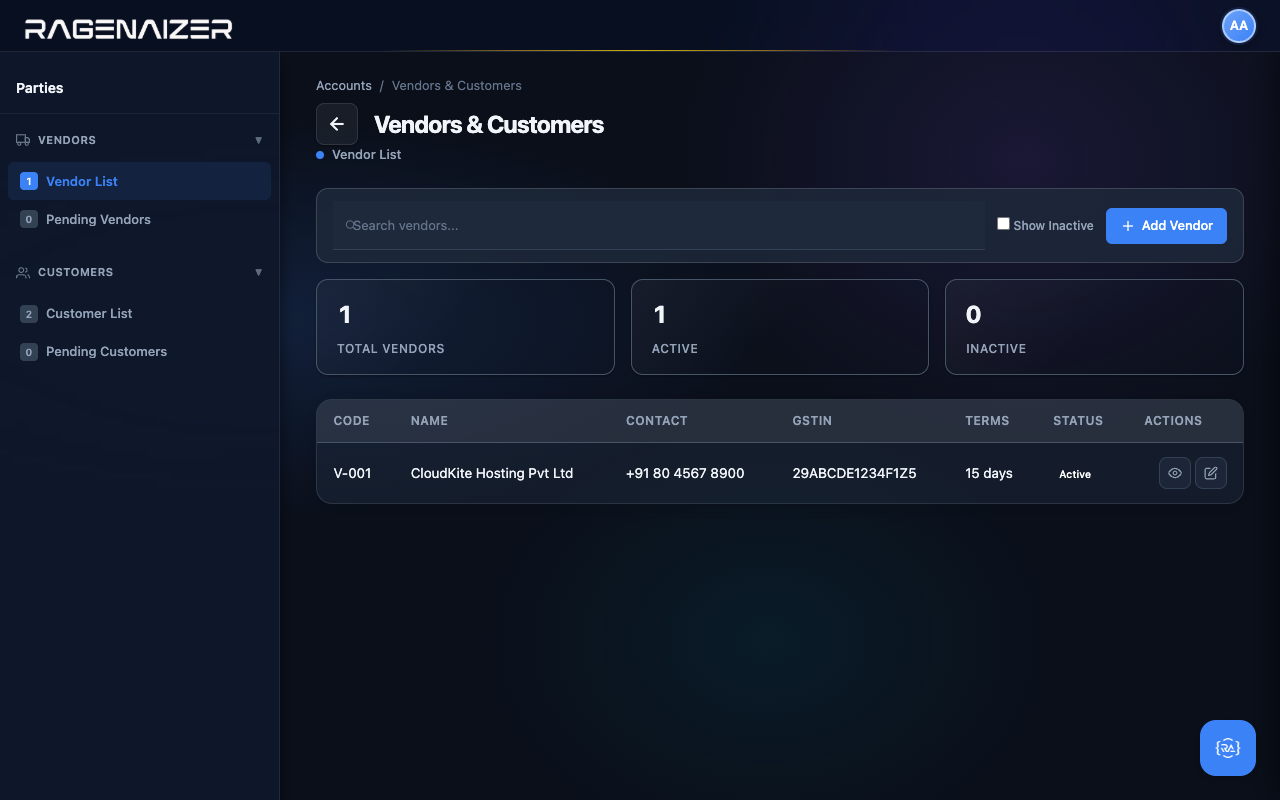
Open Vendors & Customers
From the dashboard click the Vendors & Customers Quick Action card. The page is shared between the two types of party because most controls are identical — the sidebar has two sections, Vendors at the top and Customers below. Click Customer List.
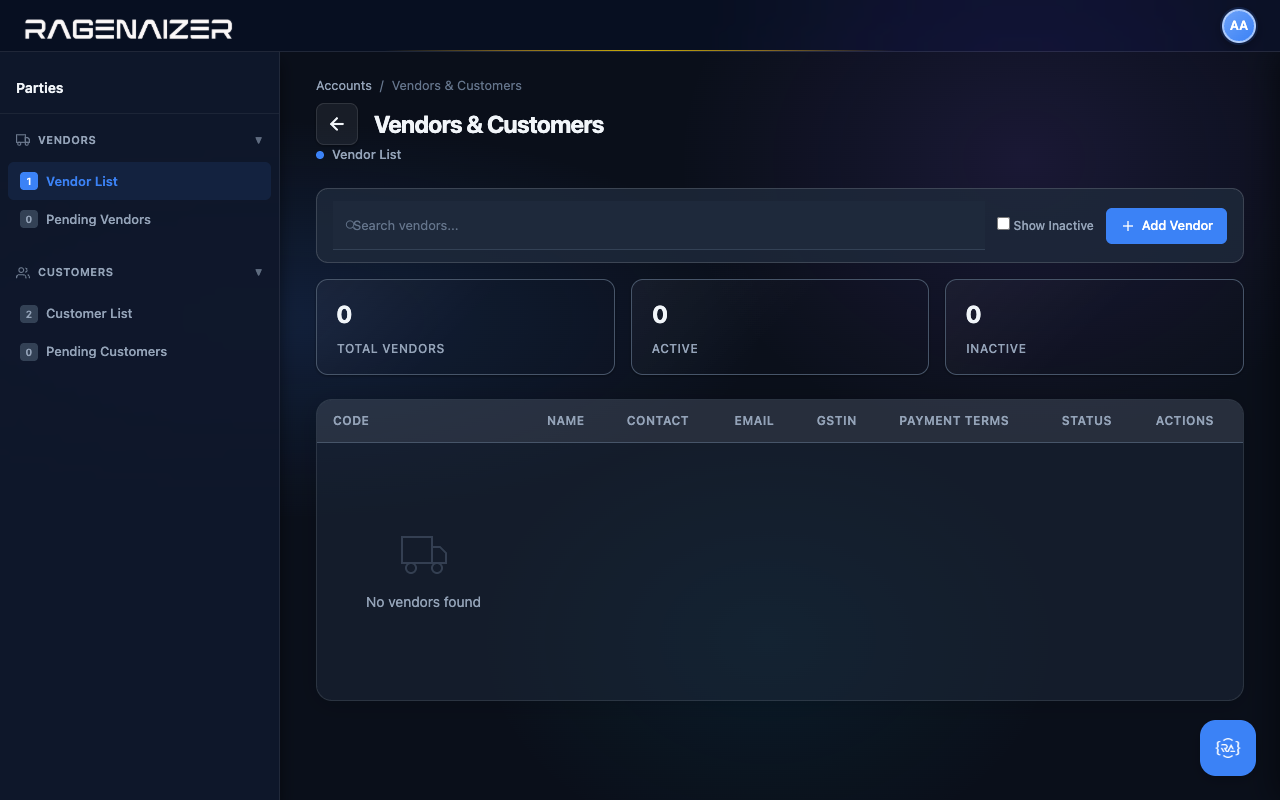
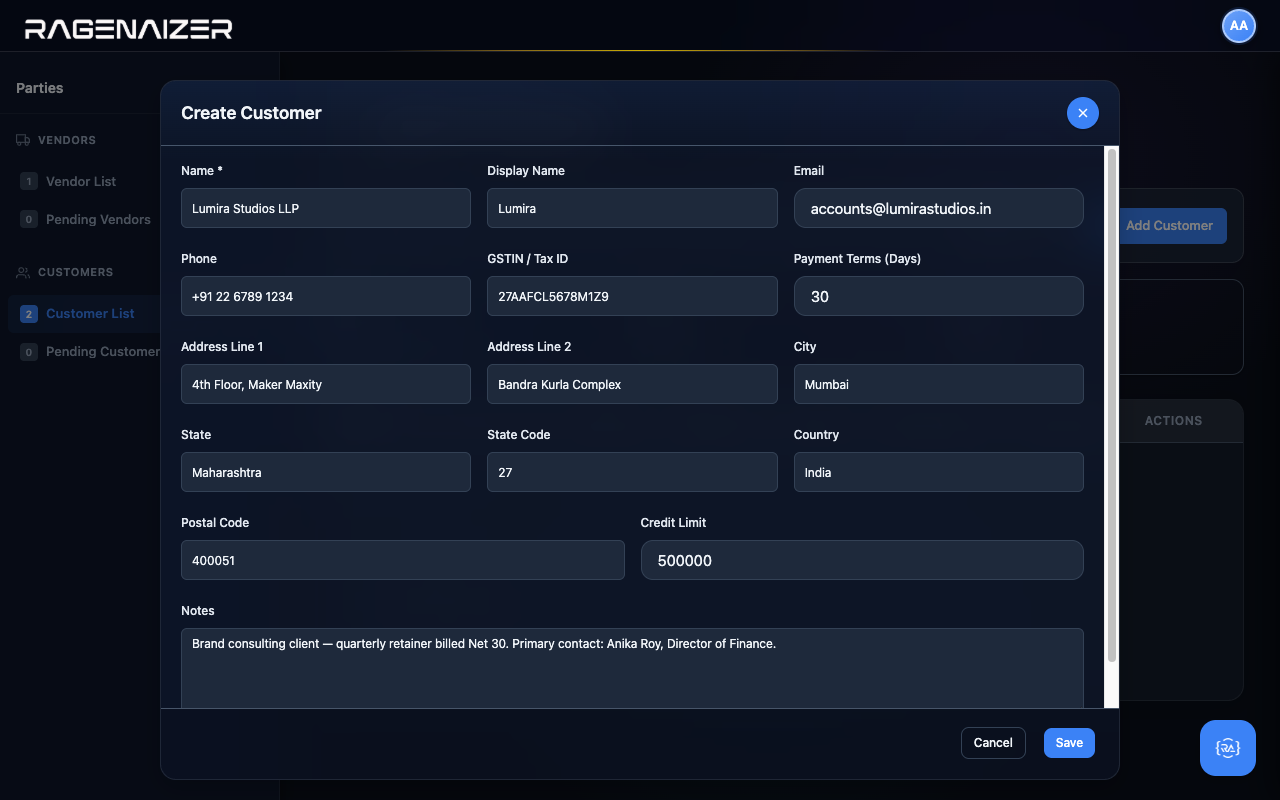
Adding a customer end-to-end
Click + Add Customer. The Create Customer modal opens with seventeen fields covering everything an invoice and a payment will need: name, contact info, GSTIN/tax ID, billing address, payment terms, credit limit, notes. Most fields are optional — only Name is required — but the more you fill in now, the less work later.
For our demo we'll add Lumira Studios LLP, a brand consulting client billed Net 30 with a ₹5,00,000 credit limit.
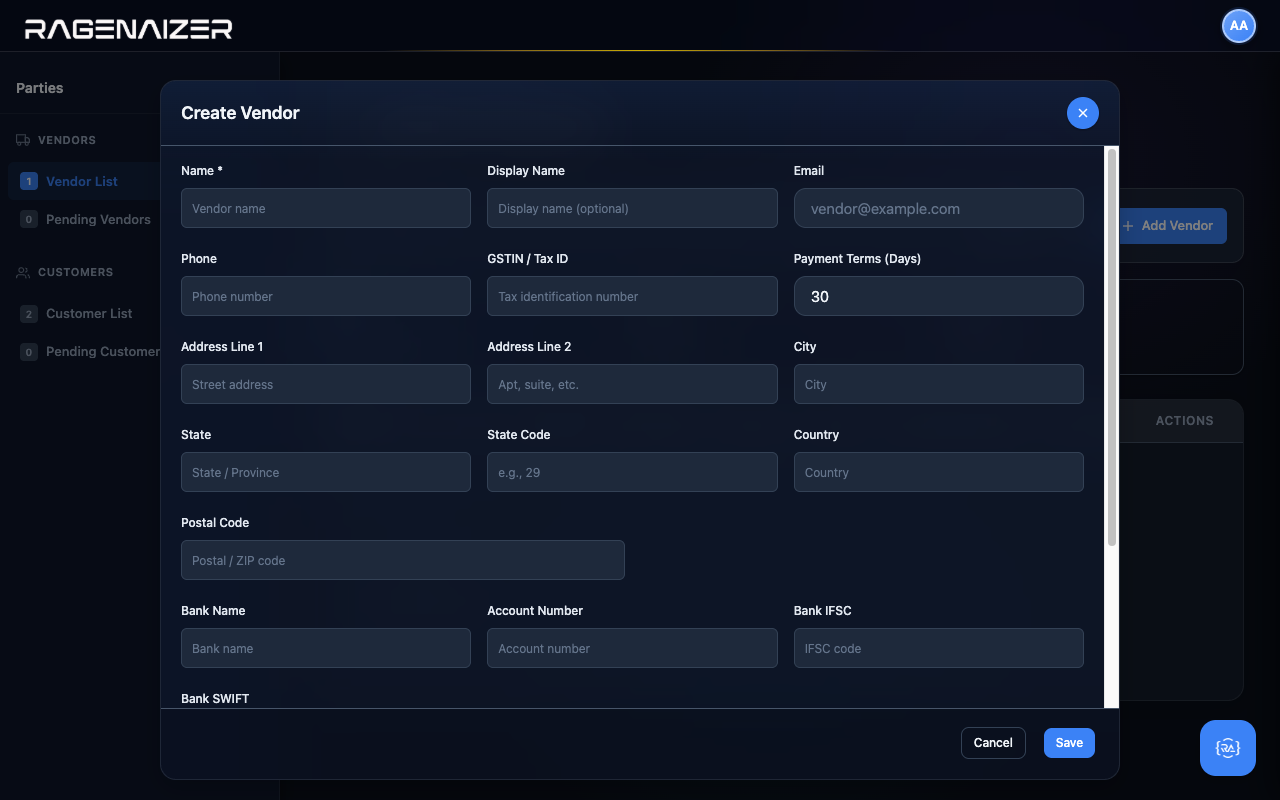
Vendors.
The other side of the directory — the people you pay. Same form, mirror semantics.
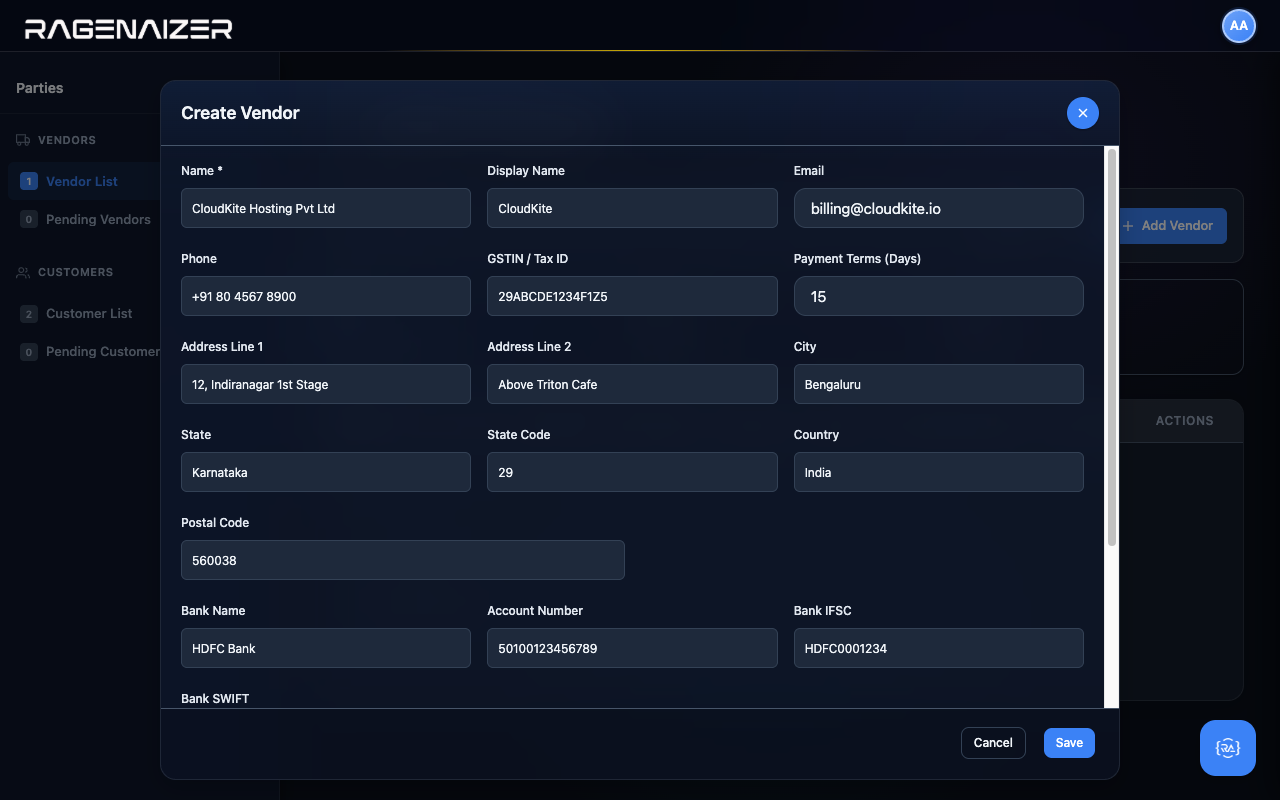
Adding a vendor
Click Vendor List in the sidebar (still on the same page). The form is almost identical to the Customer one but adds four bank-detail fields at the bottom: Bank Name, Account Number, IFSC, SWIFT. Vendors get bank fields because that's where you'll be sending payments.
For our demo, the vendor is CloudKite Hosting Pvt Ltd, our cloud infrastructure provider, billed Net 15.
Customer Invoices.
Your first real money-in transaction. We'll create a draft, approve it, post it, and watch the General Ledger update itself.
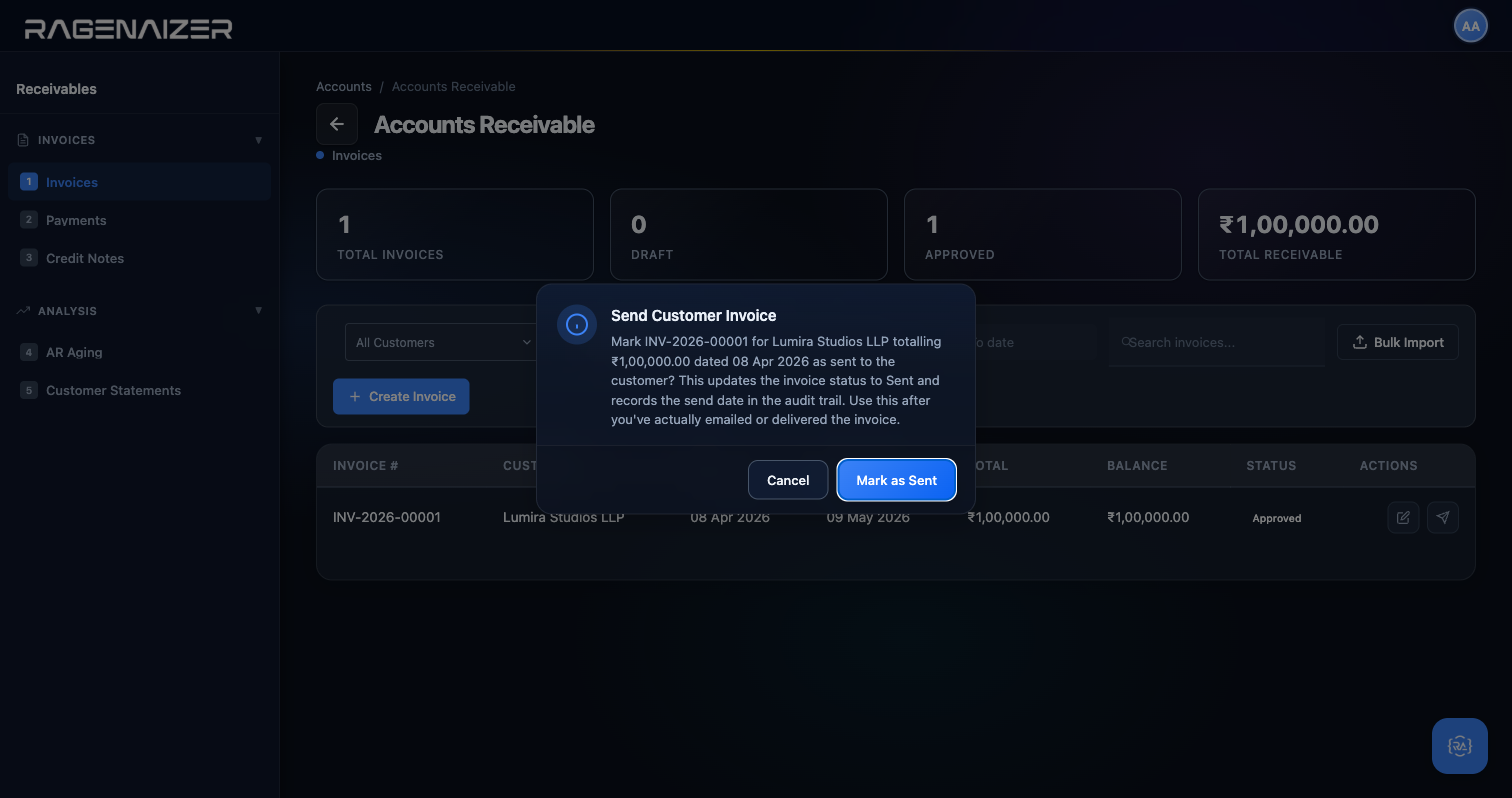
Draft vs Approved vs Sent vs Paid
An invoice goes through four distinct states. Draft: it exists but doesn't affect any account balance. You can edit it freely. Approved: it's been finalised — the system has posted a journal entry to the GL (Dr AR / Cr Revenue). You can't edit it any more, but you can still send it. Sent: the customer has been notified (typically by email). Paid: the customer has paid — a payment record exists and the AR balance has been cleared.
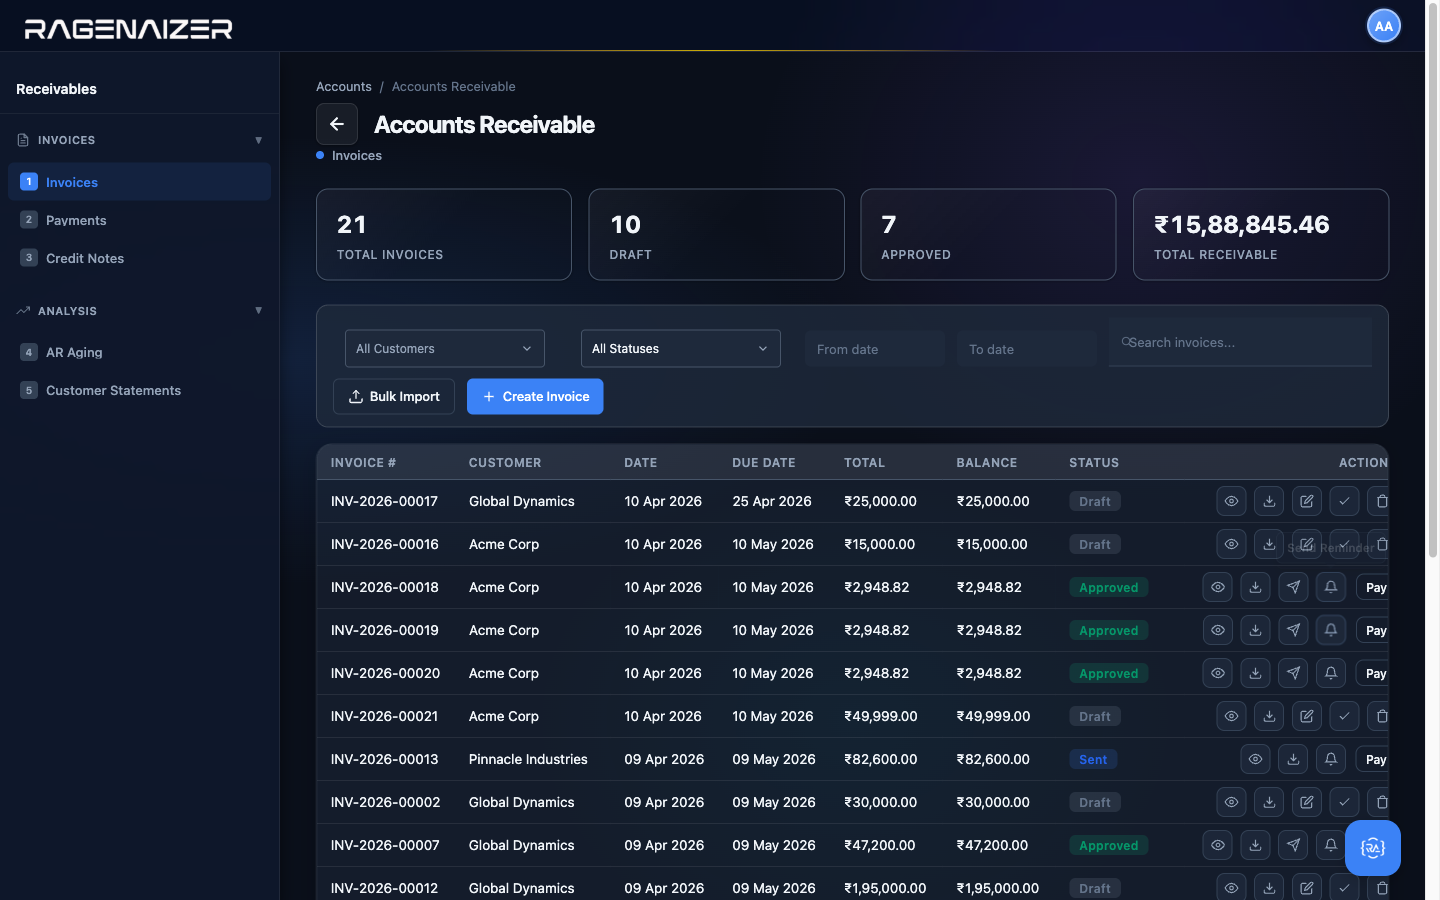
Open Accounts Receivable
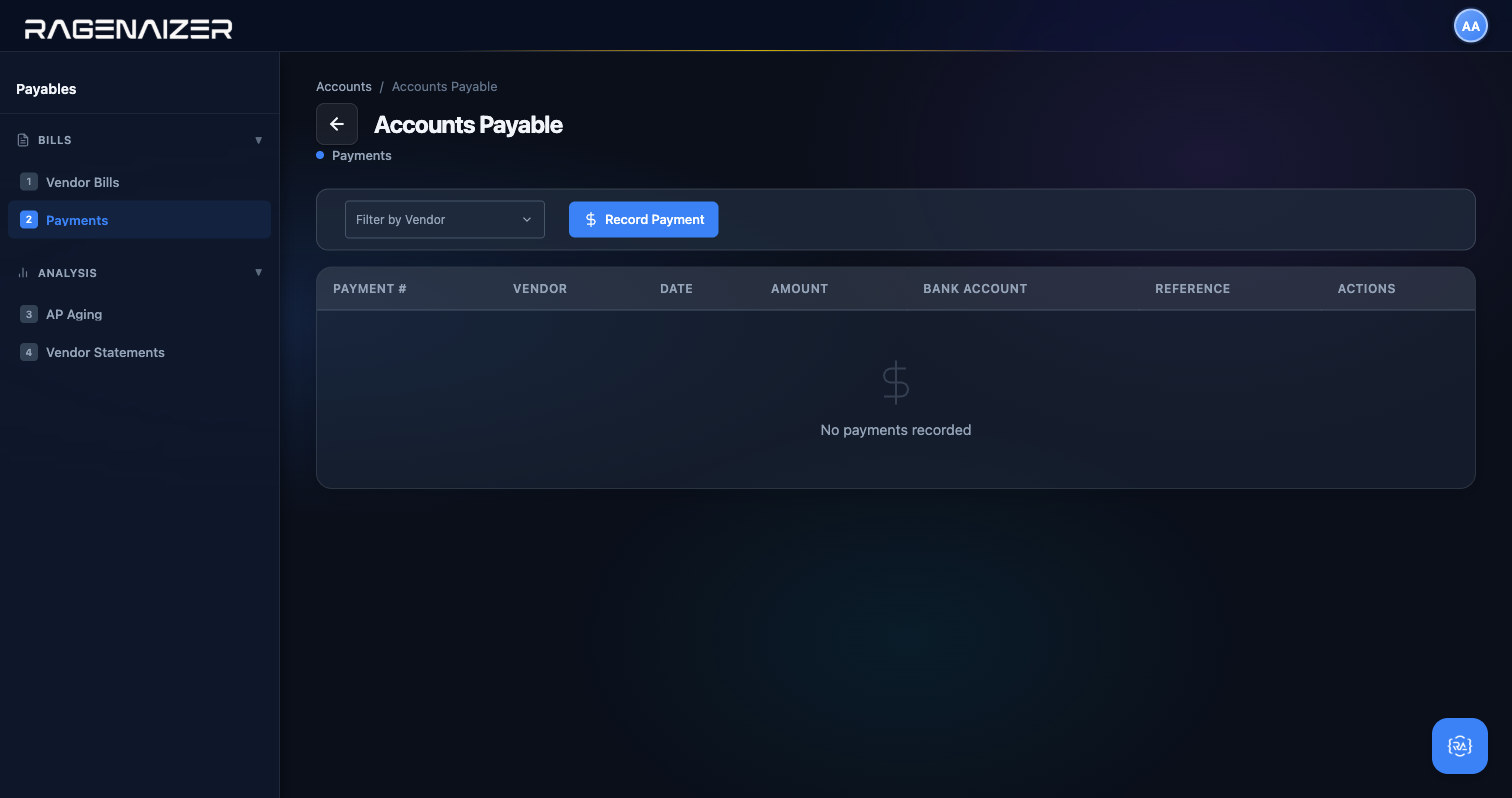
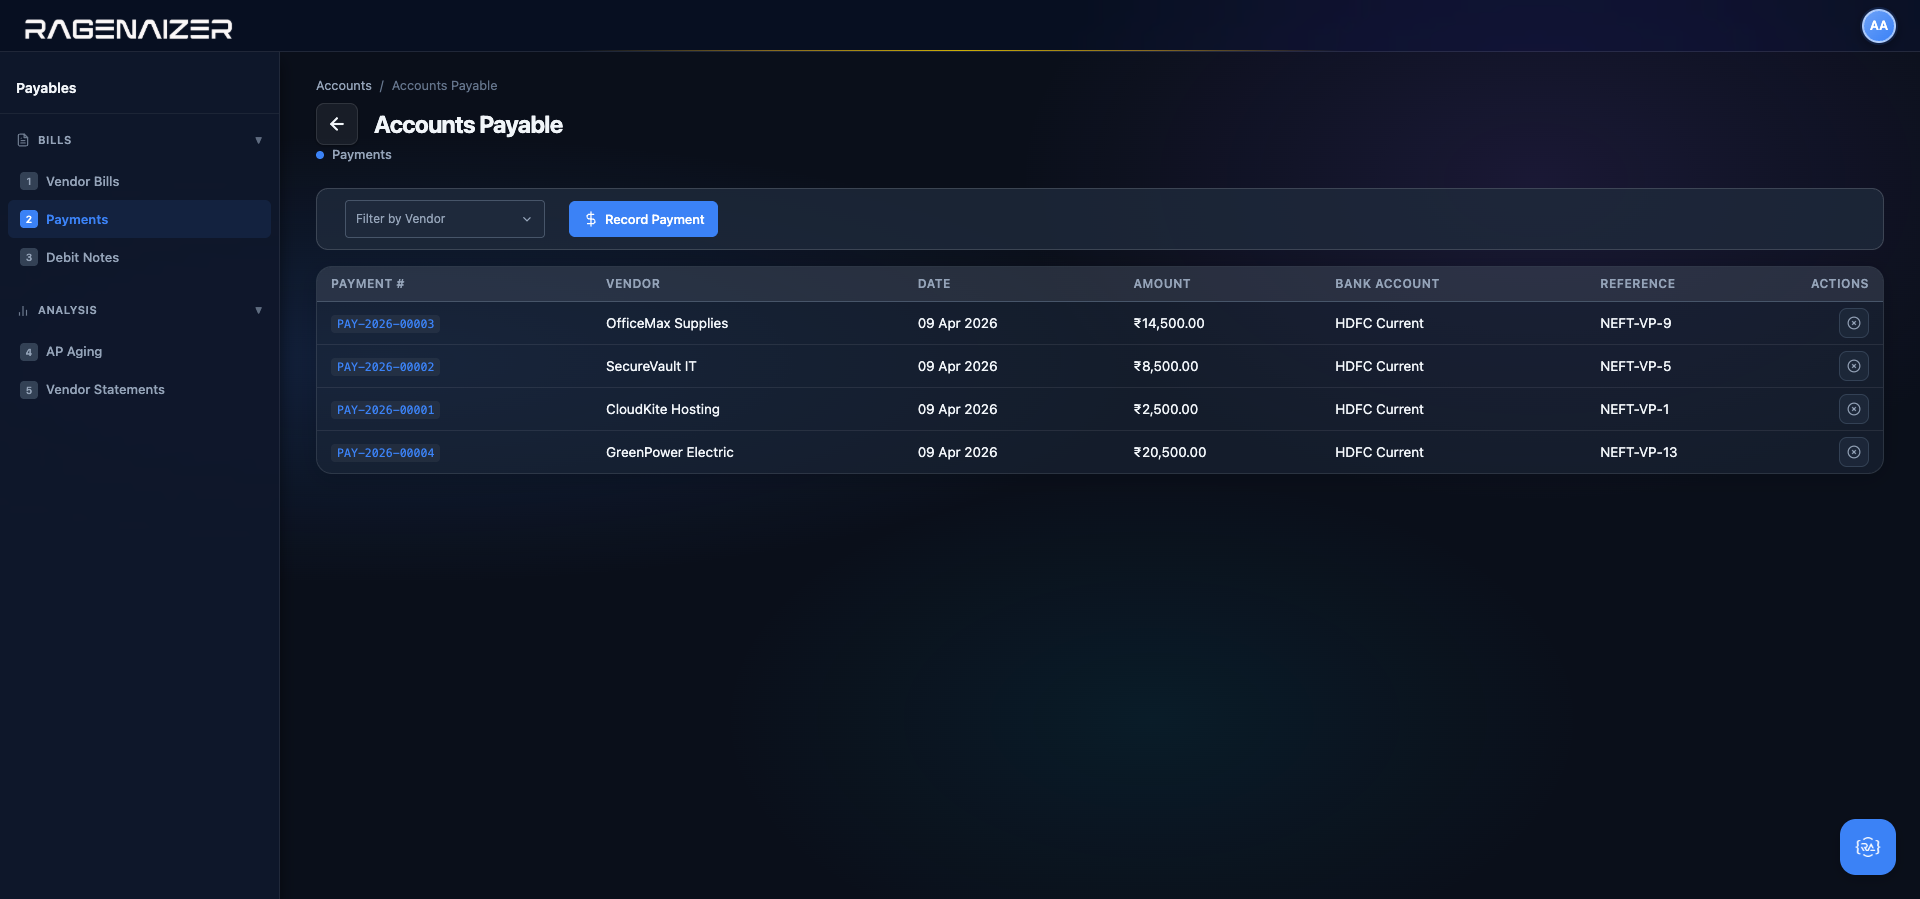
From the dashboard click Customer Invoices (or the URL receivables.html). The page has five sidebar tabs:
Invoices, Payments, Credit Notes, AR Aging, Customer Statements. Start on the default Invoices tab.

Creating an invoice
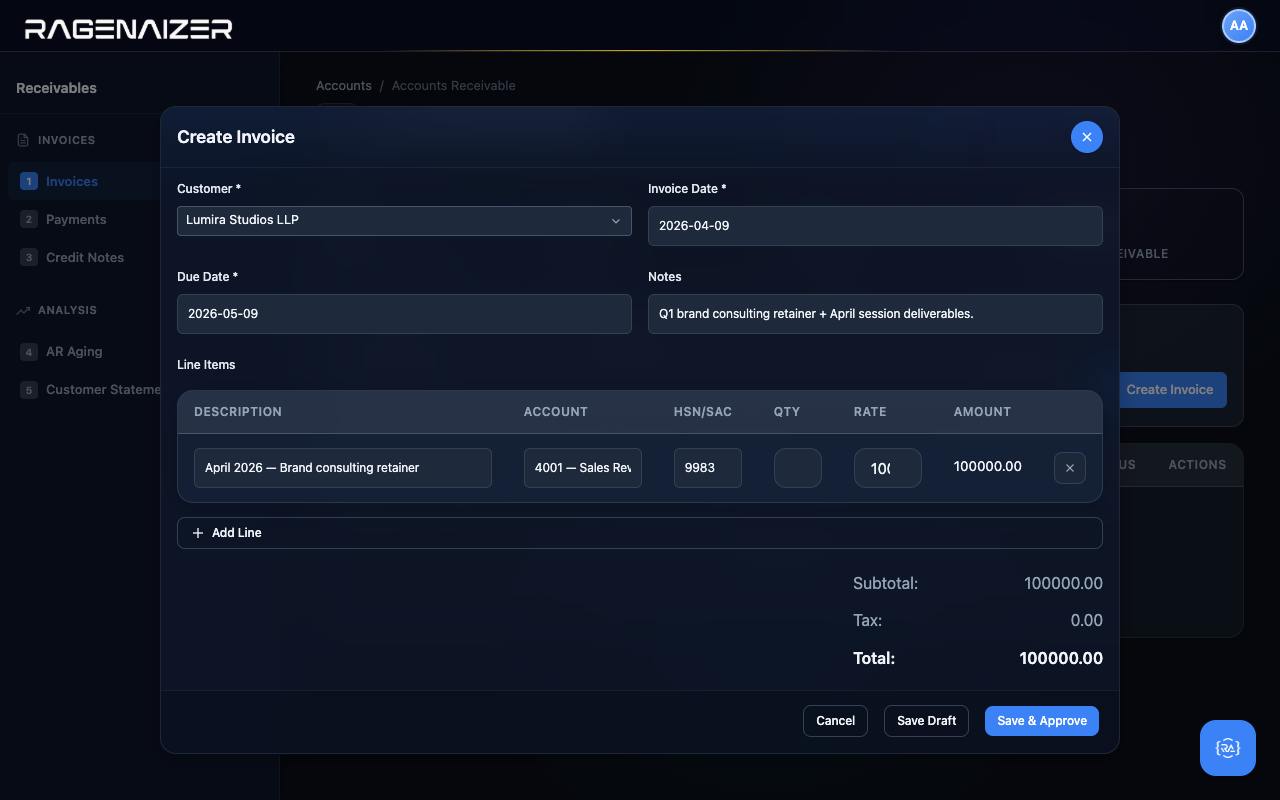
Click + Create Invoice. The Create Invoice modal opens with the standard layout: customer at the top, dates next, then a Line Items table where each row is one billable item. Pick the customer Lumira Studios LLP from the dropdown, set Invoice Date to yesterday and Due Date to 30 days out, and add a description in the Notes field.
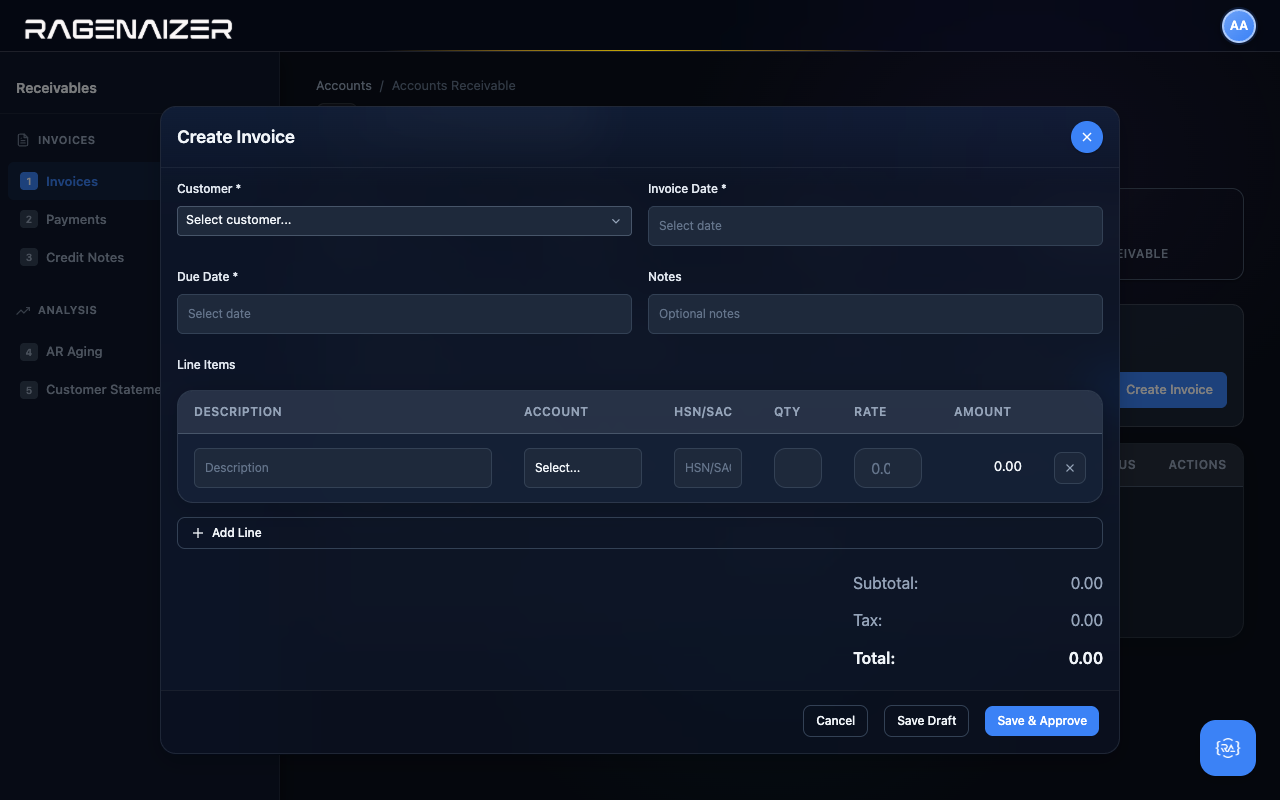
Fill in the line item: Description April 2026 — Brand consulting retainer, Account 4001 — Sales Revenue, HSN 9983, Qty 1, Rate 100000. The amount column auto-calculates and the Subtotal / Total summary at the bottom updates live.
Save Draft → Approve
Click Save Draft. The modal closes, the table fills with one row, and the stat tiles tick: Total → 1, Draft → 1. The status badge says Draft — nothing has hit the General Ledger yet.

Now click the green Approve check icon. The system runs the approval flow: validates the lines, picks (or auto-creates) the Accounts Receivable account 1130, and posts a balanced GL entry — Dr 1130 ₹1,00,000 / Cr 4001 ₹1,00,000. The status badge flips to Approved, the Approved counter ticks to 1, the Total Receivable stat ticks up to ₹1,00,000.
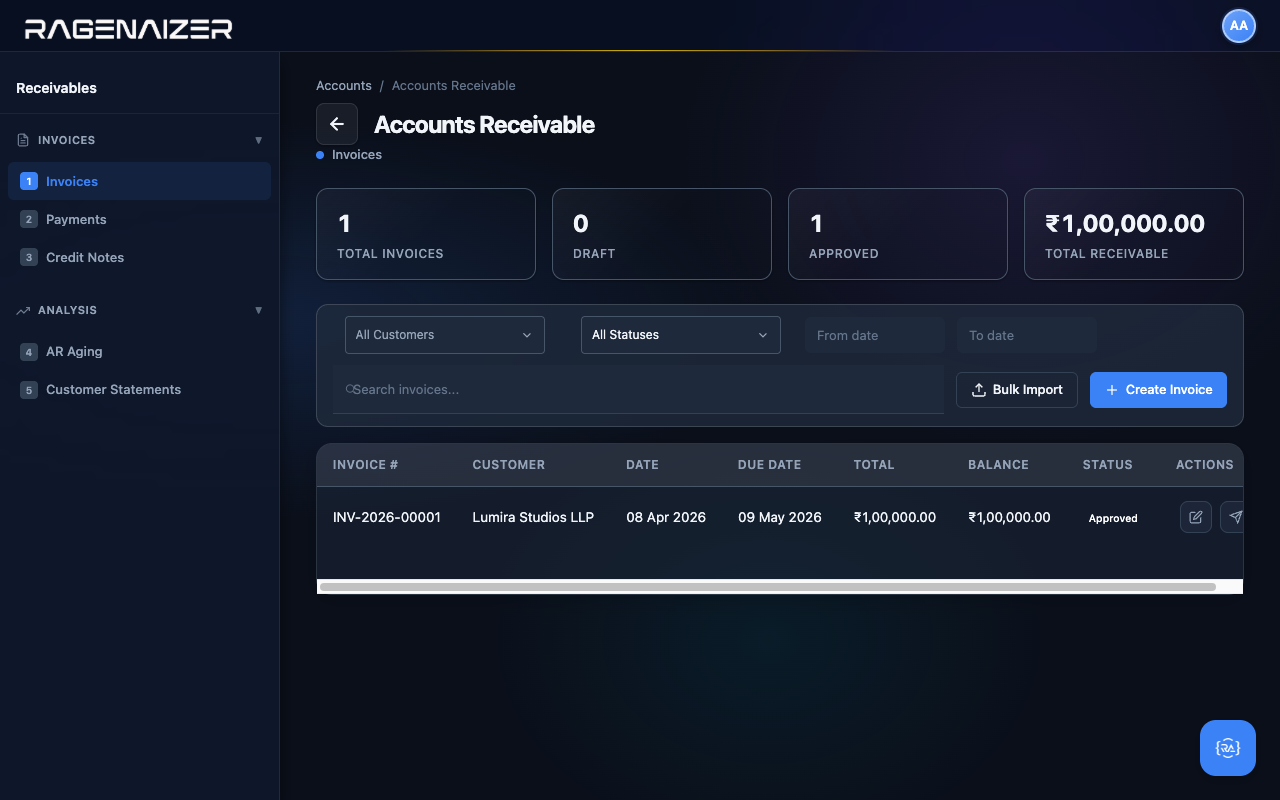
Click Send on the row to demonstrate the next state transition.
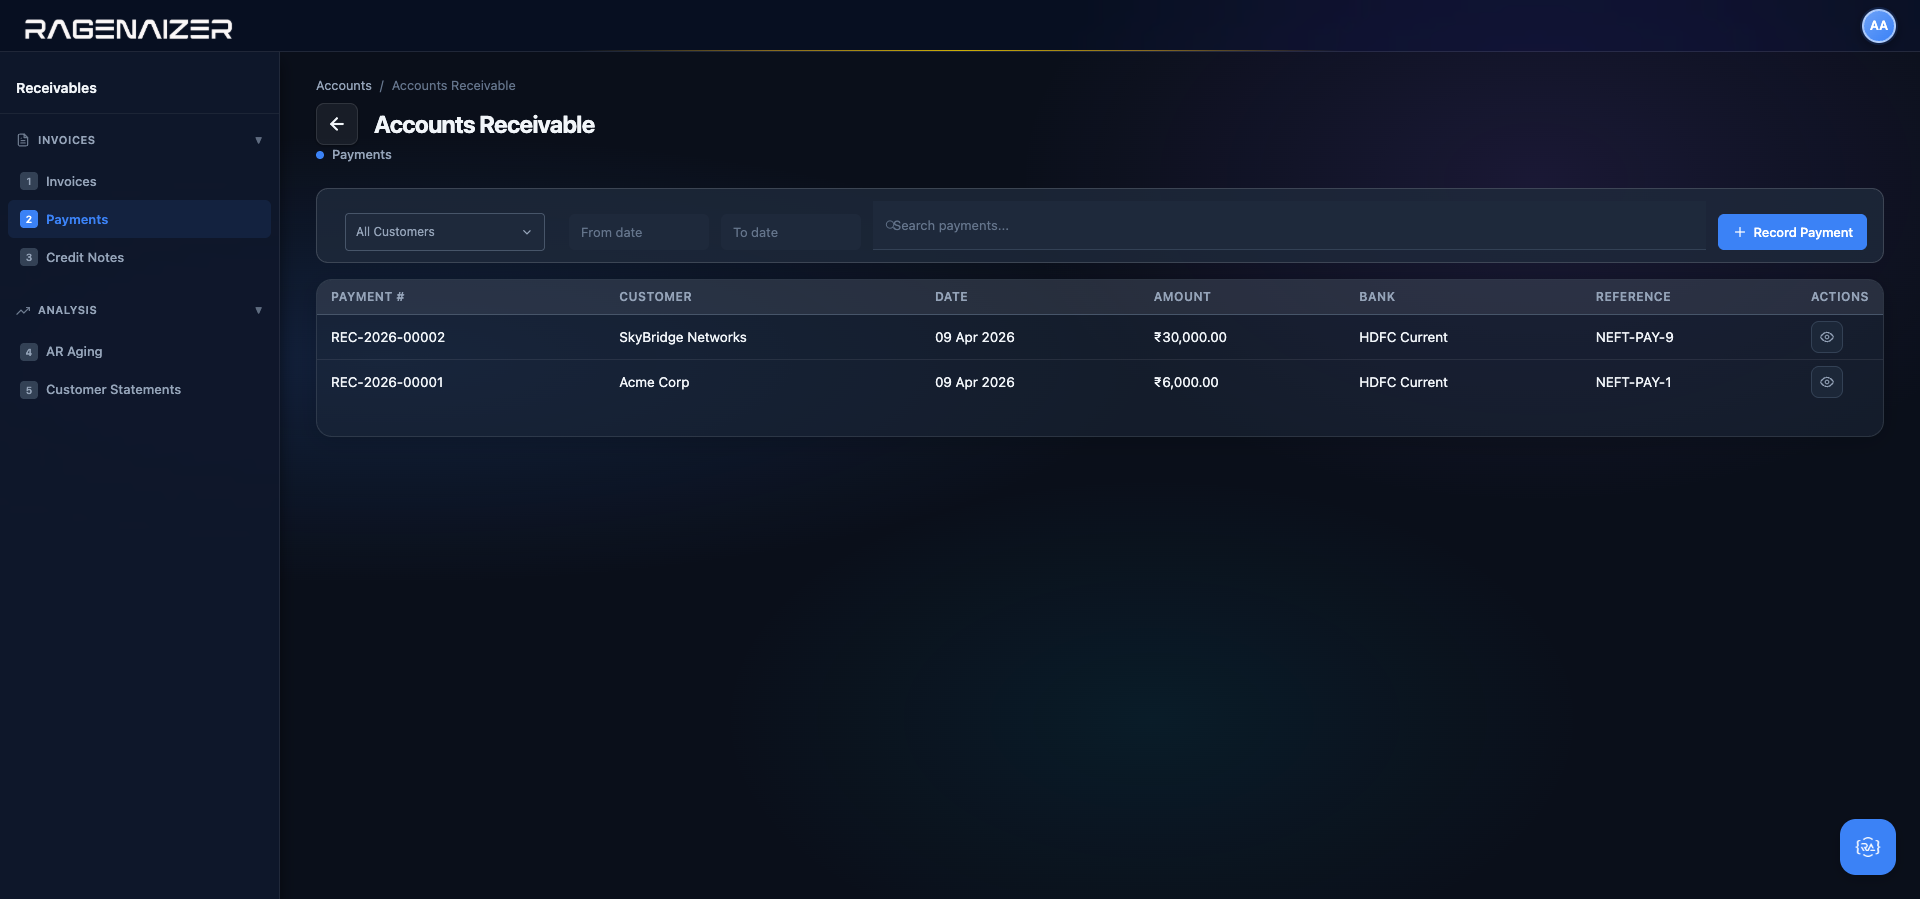
Tour the other Receivables tabs
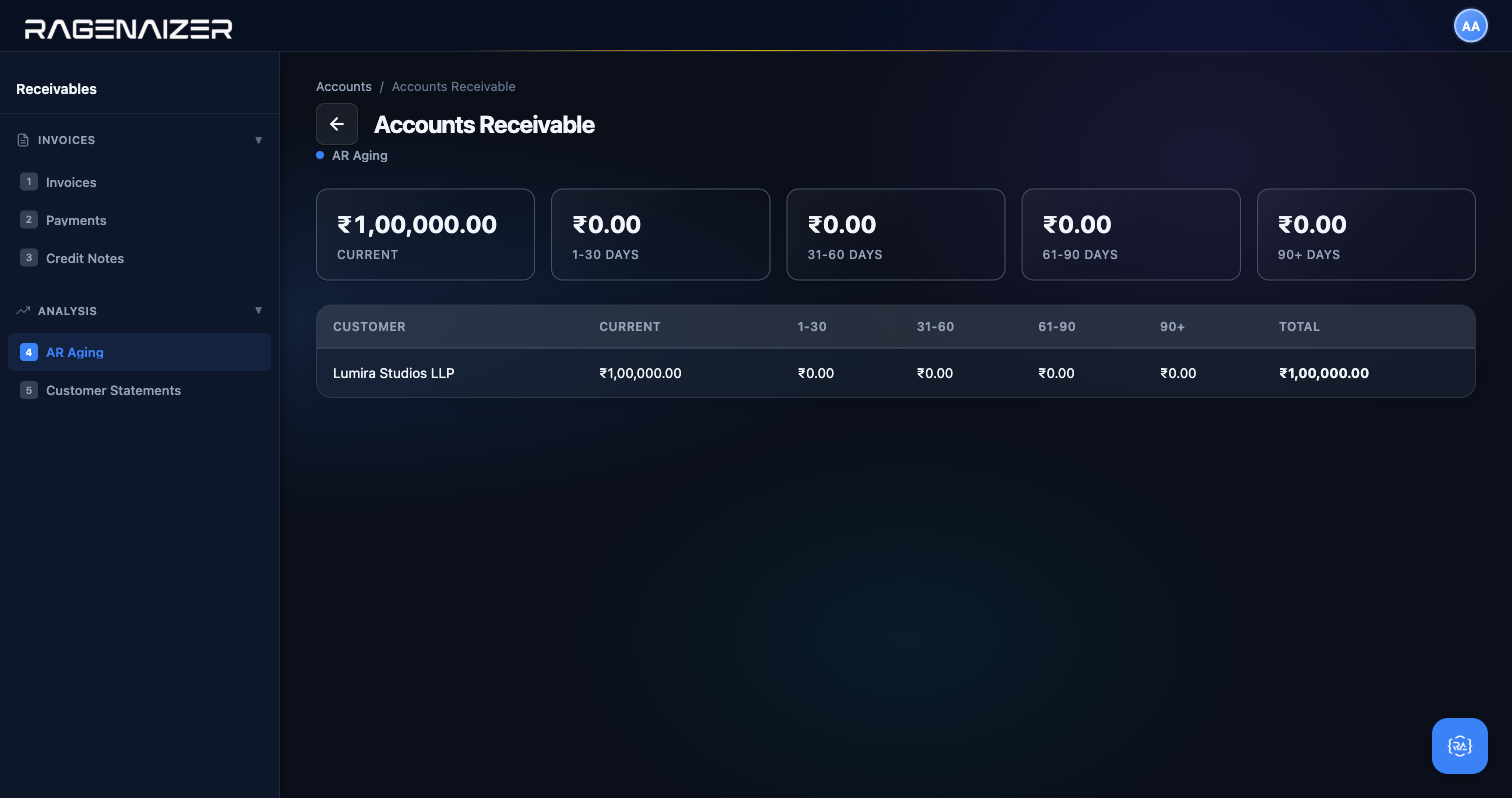
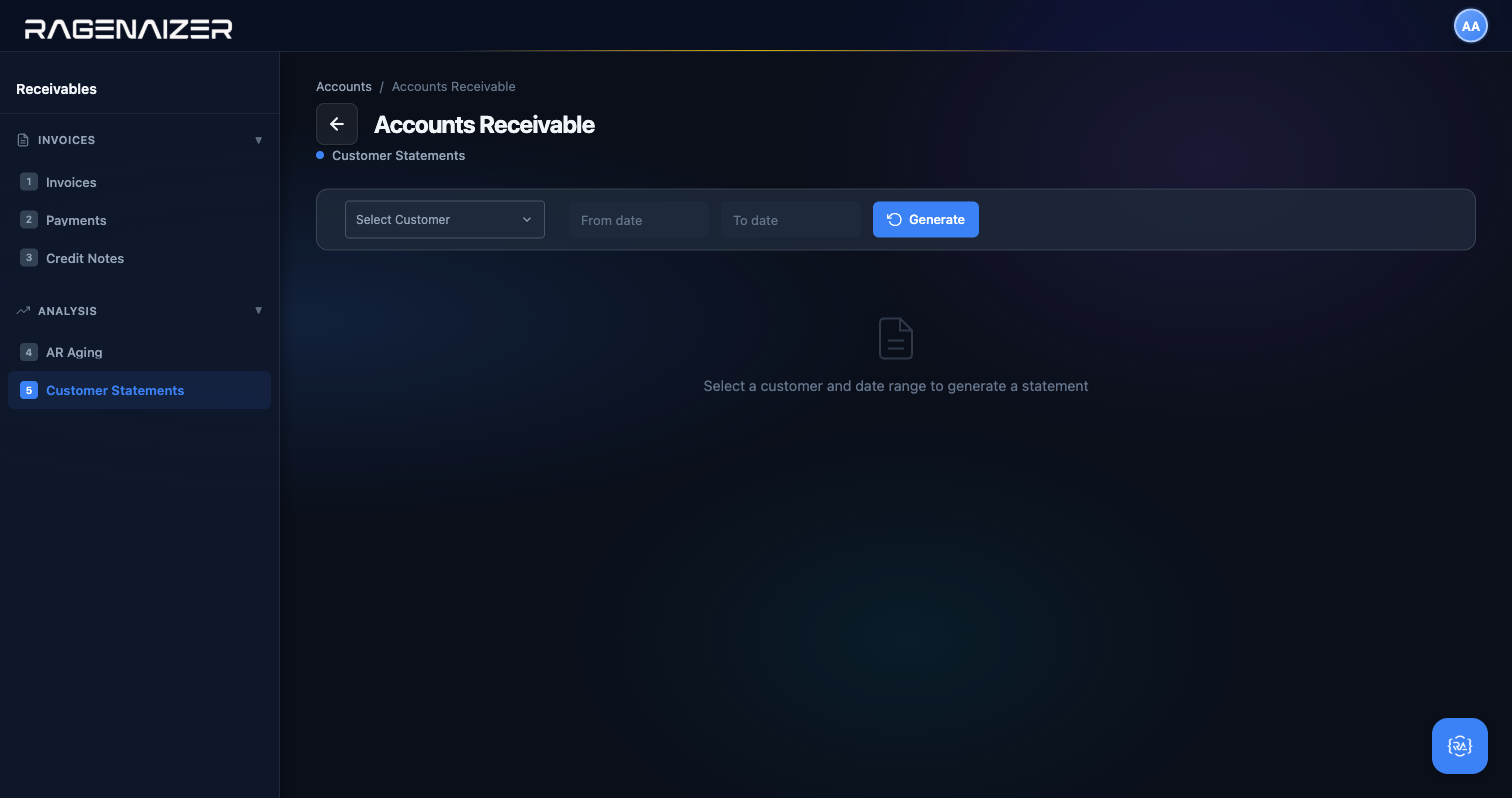
The Receivables page has four more sidebar tabs beyond Invoices, all empty on day one but worth a look so you know where to find things later: Customer Payments (record payments received against approved invoices), Credit Notes (issue refunds or write-offs against an existing invoice), AR Aging (a buckets-by-days report of who owes you what and how late they are), and Customer Statements (per-customer running statements you can email).


Customer Payments — view only, correct via credit note
Once you have a few customer payments recorded, the Customer Payments tab shows one row per payment with date, customer, invoice, amount, bank account, reference, and a single View action.
- Leaves the original payment intact (so the bank reconciliation against the actual bank statement is still sound).
- Creates a visible offsetting entry with a clear reason and line items describing the adjustment.
- Can be partially applied (only a portion of the invoice was wrong) or fully applied (the whole invoice is being cancelled).
- Reduces the customer's outstanding balance by the credit amount.
Concretely: suppose you recorded a ₹50,000 payment from Acme Corp against INV-2026-00020, but the customer actually sent only ₹5,000 — the extra ₹45,000 was a typo. Don't void the payment. Instead:
- Go to Credit Notes tab (§10.4b).
- Create a new credit note, customer = Acme Corp, linked invoice = INV-2026-00020, amount = ₹45,000, description = "Overpayment correction — typo in original payment entry".
- Approve the credit note — the system posts Dr Sales Returns / Cr Accounts Receivable, clearing the ₹45,000 from the customer's AR balance.
- The customer statement now shows INV-2026-00020 (₹50,000), PAY-2026-00015 (₹50,000 against it), and CRN-2026-00003 (₹45,000 credit against it) — net balance ₹45,000 in customer's favour, to be applied against their next invoice or refunded to their bank account with a manual journal.
Bank reconciliation truth vs. book correction
The customer actually did send money into your bank — even if it was the wrong amount, the bank statement will show the full credit. If you void the payment record, your book's bank balance no longer matches the actual bank balance, and your next reconciliation breaks. The credit note approach keeps the bank side untouched (money received is still recorded correctly) and records the customer-side correction as an explicit, auditable adjustment. This is the same distinction we covered for vendor payments in §11.4 — the difference is that on the vendor side you're refunding a bill you shouldn't have paid, so the bank side does need to be reversed (money going back out of your account), which makes a full void the right call. On the customer side the bank credit is real, so only the book entry needs adjusting — credit note it is.
Late payment reminders — automatic and manual
An invoice that's been approved, sent, and is past its due date is not a paid invoice — it's an overdue receivable. Every day that passes without a reminder is a day that gently teaches your customer that payment deadlines are optional. Ragenaizer automates the nudge with two complementary reminder channels: a scheduled Hangfire job that fires every morning without human input, and a manual Send Reminder button on every open invoice row so the collections person can fire a one-off escalation whenever they need to.
Reminder vs. invoice email
The email the customer got when the invoice was first approved was a new-invoice notification (§10.3's Send button). A reminder is a follow-up sent after the invoice has been outstanding past a threshold. Both use the same email transport; the difference is the subject line, tone, and the fact that reminders are recorded in the invoice_reminders table for audit.
The two automatic jobs
Two recurring Hangfire jobs are registered at startup and run every day regardless of whether you have the UI open:
before-due-reminders— 09:00 server time. Finds every approved / sent invoice wheredue_date = CURRENT_DATE + 3 daysand sends a friendly "your invoice is due in 3 days" reminder to the customer's billing contact. This is the "nudge" email — tone is polite, assumes the customer intends to pay.overdue-invoices— same job that flips invoices to overdue status at 06:00 each morning. After the status flip it iterates every newly-overdue row and fires a follow-up reminder. The tone escalates with days overdue:- on_due (0 days) — friendly reminder, "just a heads-up, today is due date".
- overdue_7 (1–7 days late) — firm but still friendly, "we haven't received payment, can you confirm the payment date?".
- overdue_15 (8–15 days late) — serious, "this invoice is now 15 days past due; please remit immediately or contact us to discuss a payment plan".
- overdue_30 (16+ days late) — final-notice language, "failure to respond within 7 days may result in escalation".
A cron running every hour would still only send one email per day
Before every send, the job asks the invoice_reminders table whether a successful reminder has already been inserted for this (tenant_id, invoice_id) with DATE(sent_at) = CURRENT_DATE. If yes, it silently skips. This means you can run the job manually in the middle of the day (e.g. after fixing a downtime blip) without spamming the customer with a second email. Failed sends are NOT deduped — a transient SMTP failure leaves a success=false row, so the next run will retry until the send actually goes out.
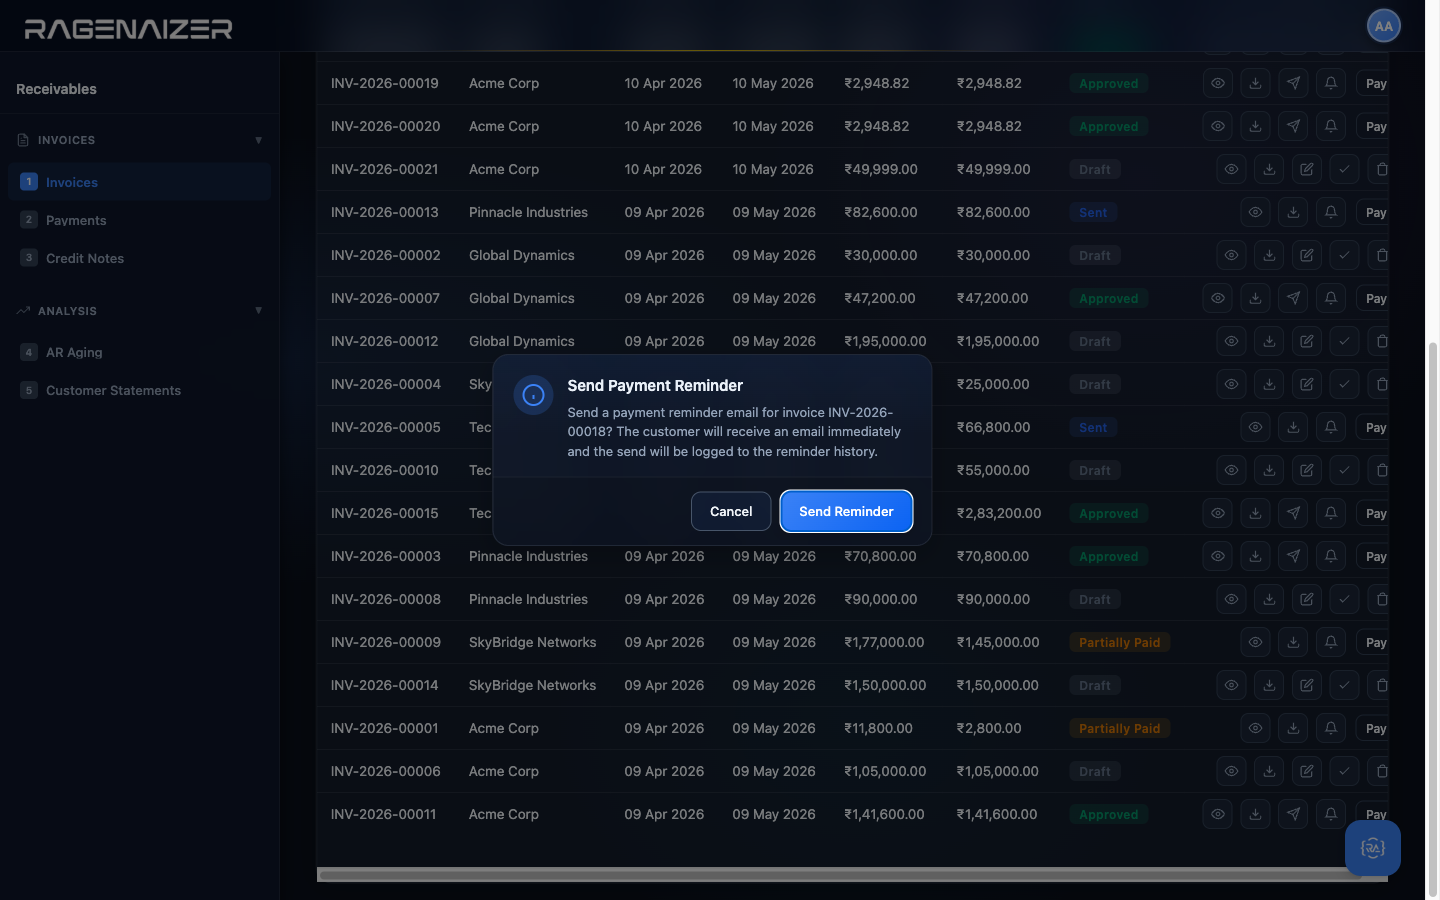
The manual Send Reminder button
For when "tomorrow morning's auto-run is too far away". Every invoice row in the Receivables → Invoices table now has a bell-icon Send Reminder action alongside the existing View, Download PDF, and Pay buttons. It appears only on invoices in statuses where a reminder is meaningful: approved, sent, partially_paid, and overdue. Draft invoices don't get the button (nothing to remind about) and paid invoices don't either (nothing owed).
Click the bell icon on any open invoice.
SendInvoiceReminder business-layer method which: (1) fetches the invoice + customer, (2) refuses if the invoice is paid / cancelled / written-off or has zero balance, (3) calls the notification service to dispatch the email, (4) inserts a row into invoice_reminders with reminder_type = 'manual' and sent_by = <your user id>, (5) emits an audit log entry.The send short-circuits and still records the attempt
If the customer row has an empty email field, the business layer does NOT call the notification service (there's nothing to send to). Instead it inserts a invoice_reminders row with success = false and error_message = 'Customer has no email address'. This turns up in the reminder-history endpoint so the collections person knows the reminder never actually went out and can follow up via phone or set the customer's email and retry. Silent-failure is not an option — every reminder attempt leaves a trail.
Reminder history API
Every send (automatic or manual, success or failure) writes one row to invoice_reminders tagged with the
invoice, the reminder_type, the user (NULL for automatic runs), the recipient email, the subject line, and a
success boolean + optional error message. You can query the full history for a specific invoice via
GET /api/accounts/invoices/{id}/reminders. For audit purposes the audit log (§15.5) also captures
every send under entity type customer_invoice with action reminder_sent.
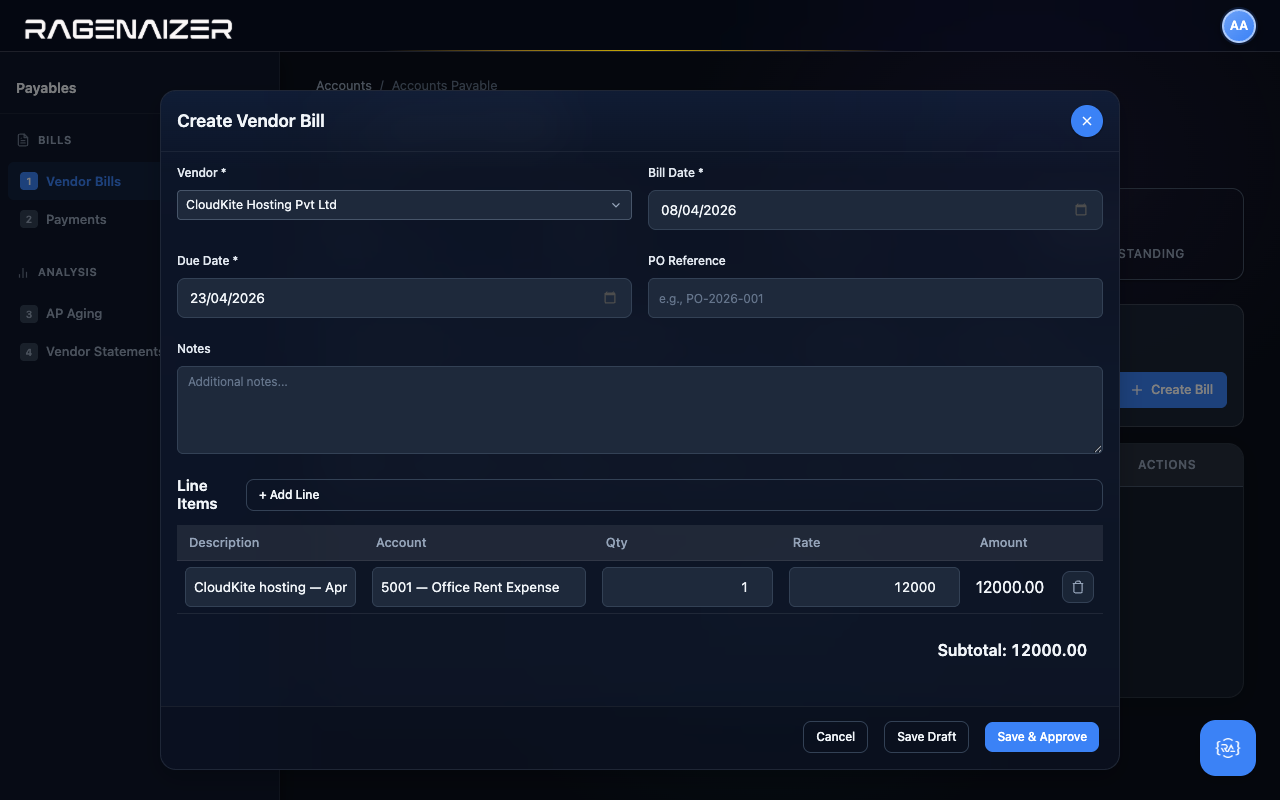
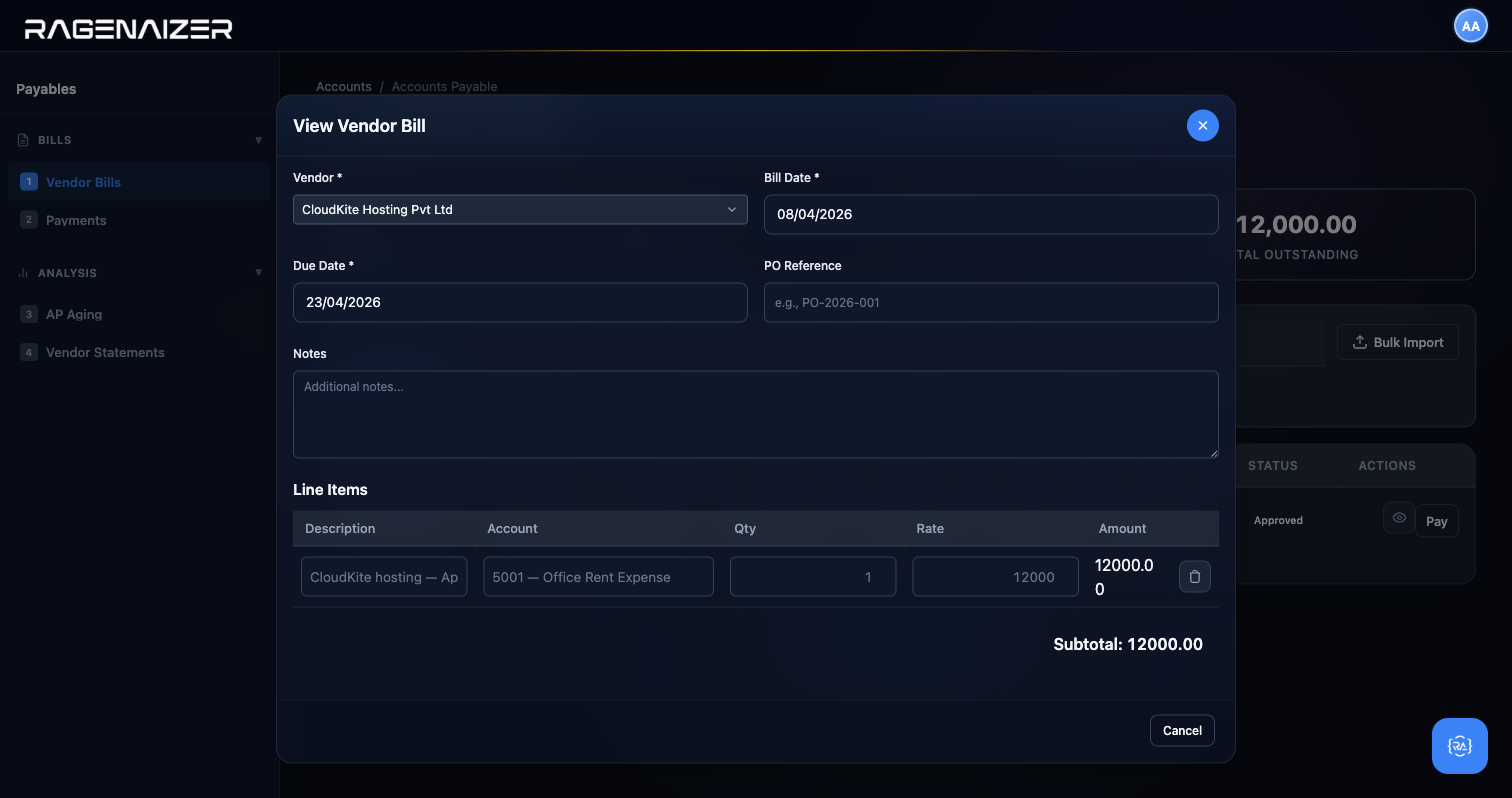
Vendor Bills.
The mirror of Section 10 — bills you've received from suppliers. Same flow: create draft, approve, GL posts, balance shows.
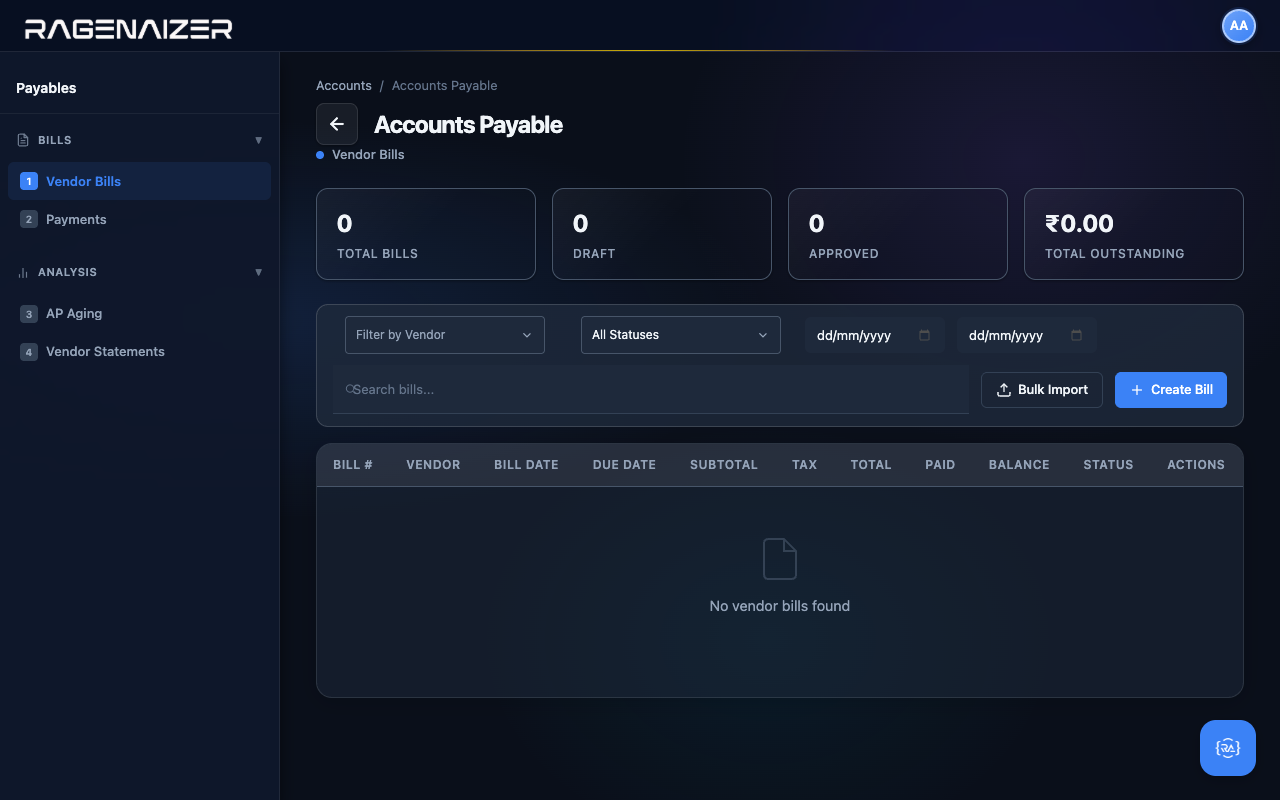
Open Vendor Bills
Open payables.html from the dashboard or sidebar. The layout mirrors Receivables exactly: four stat tiles, the
same filter toolbar, the same table layout. The terminology shifts from customer/invoice to vendor/bill, but
everything else is identical.
Creating a bill
Click + Create Bill. Pick the vendor CloudKite, set the bill date and due date, fill in the line item: CloudKite hosting — April 2026, Account 5001 — Office Rent Expense, qty 1, rate ₹12,000.
(We're using Office Rent Expense as a placeholder for our hosting costs because we didn't create a dedicated Cloud Infrastructure account in this guide. In a real Chart of Accounts you'd create one and put it under Operating Expenses.)
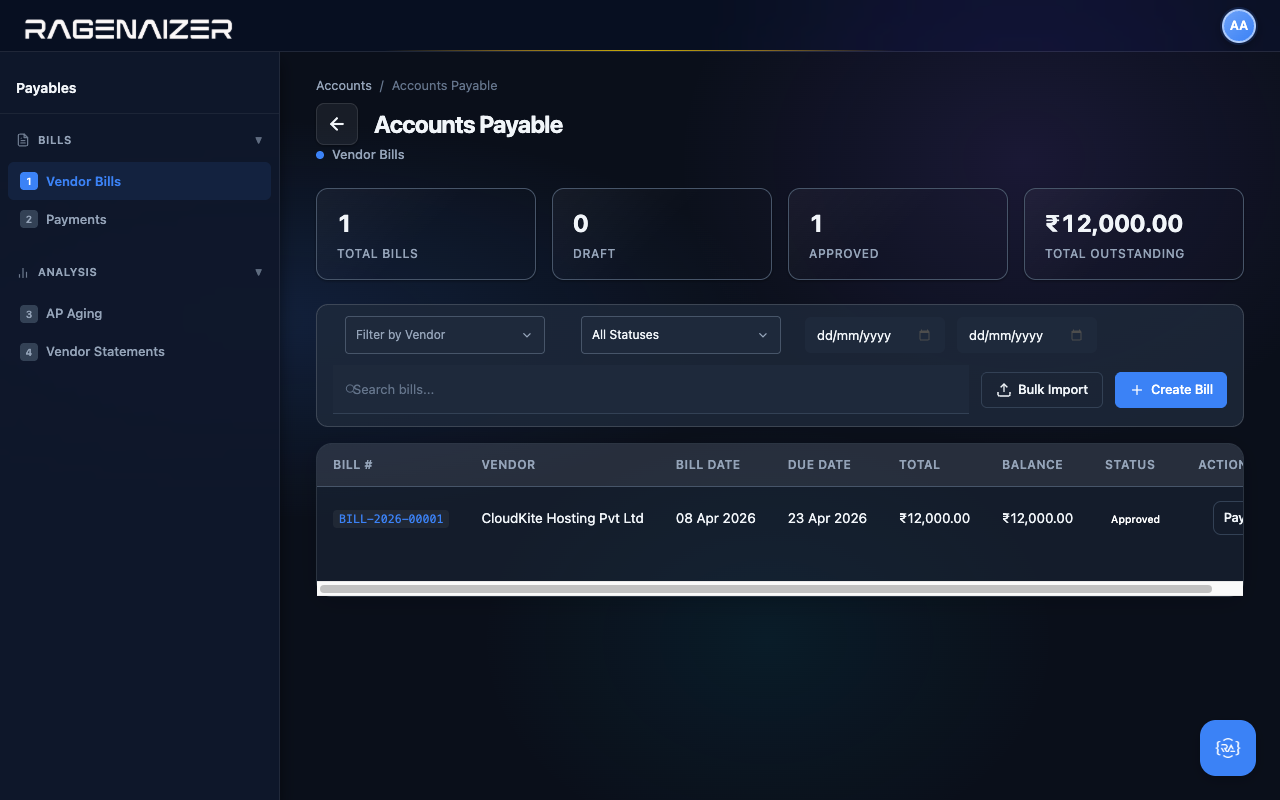
Approve and watch the GL
Save Draft, then click the Approve check icon on the row. The system posts the mirror of the invoice entry: Dr 5001 Office Rent Expense ₹12,000 / Cr 2110 Accounts Payable ₹12,000. The Approved tile ticks to 1 and the Total Outstanding stat now shows ₹12,000 — this is what you owe vendors.
Tour the other Payables tabs
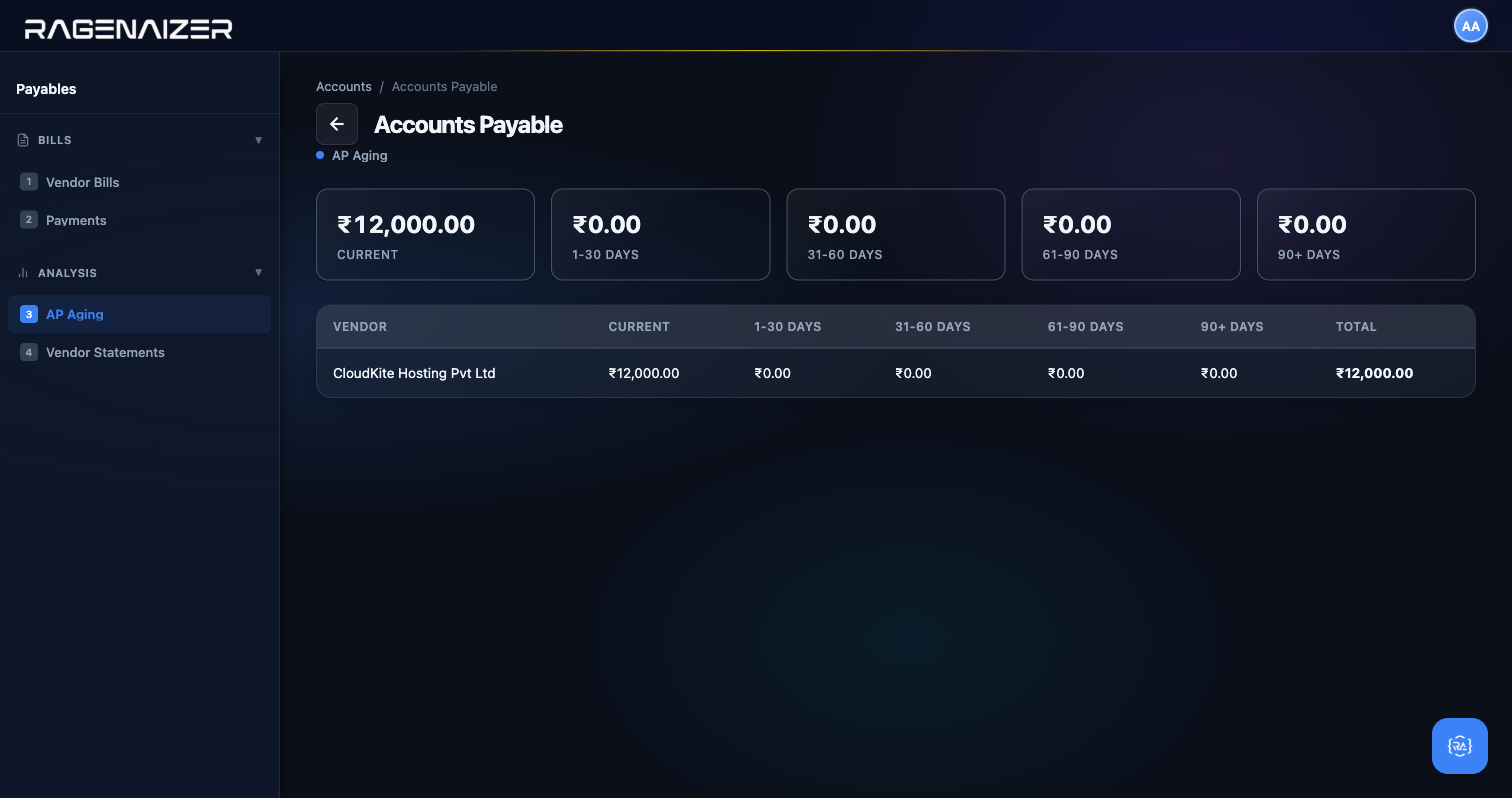
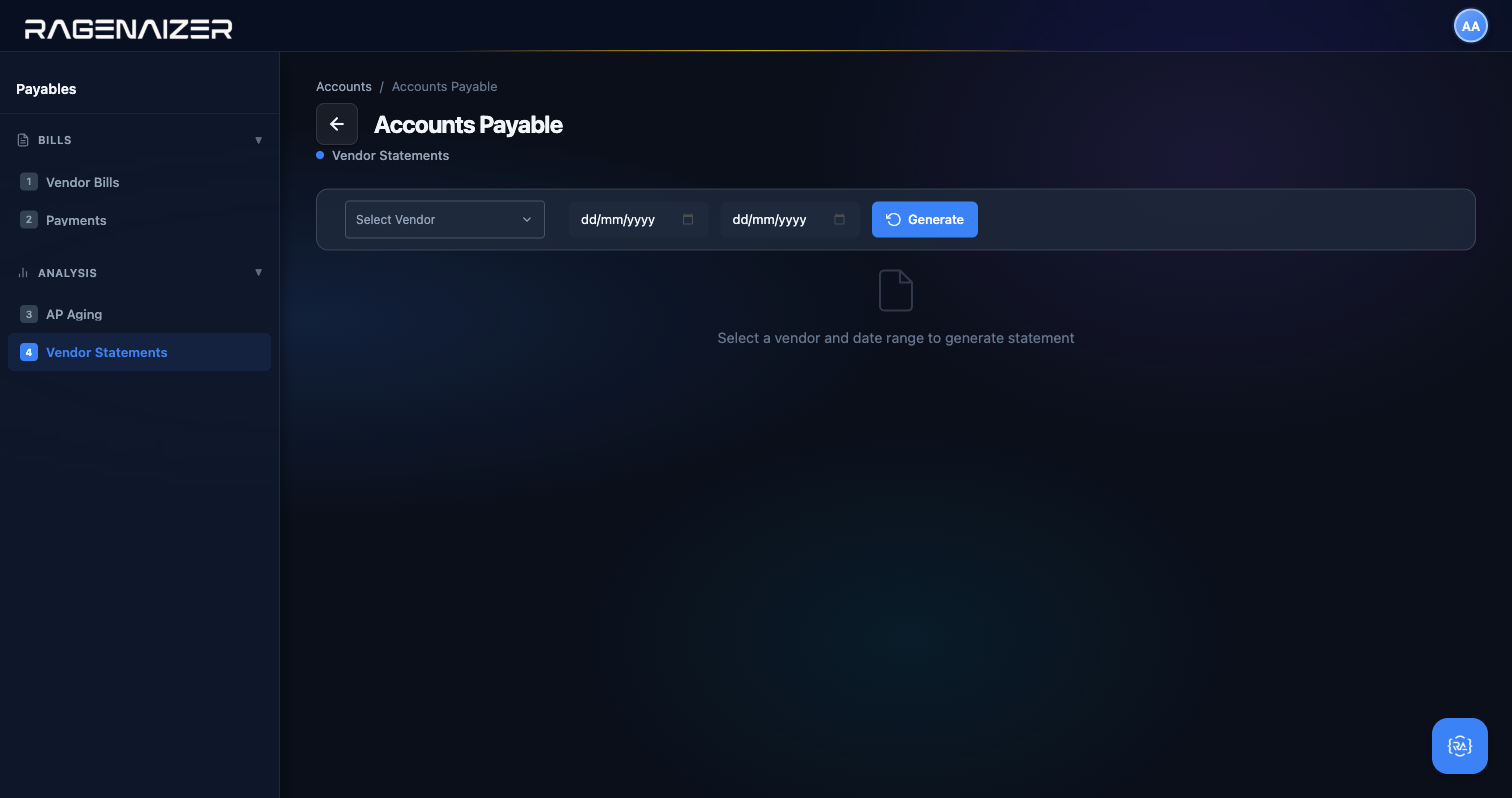
As with Receivables, the rest of the Payables sidebar holds three more tabs you should know about: Vendor Payments (record outgoing payments against approved bills), AP Aging (the mirror of AR Aging — shows what you owe vendors and how late you are), and Vendor Statements (per-vendor running statements you can hand back to a vendor for reconciliation).
Voiding a vendor payment — the full reversal
Three things are guaranteed to happen in real life: vendors send duplicate invoices, you pay the wrong one, and by the time you notice it the payment is already posted. The Void Payment action on each row in the Vendor Payments list undoes the entire posting in one click, cleanly and reversibly, without deleting anything that would disrupt audit trails.
_BUGS_FIXED_DURING_CAPTURE.md for the motivation: the pre-fix version of this feature soft-deleted the payment row but left the ledger, bill balance, and bank account completely untouched — classic silent-books-corruption bug.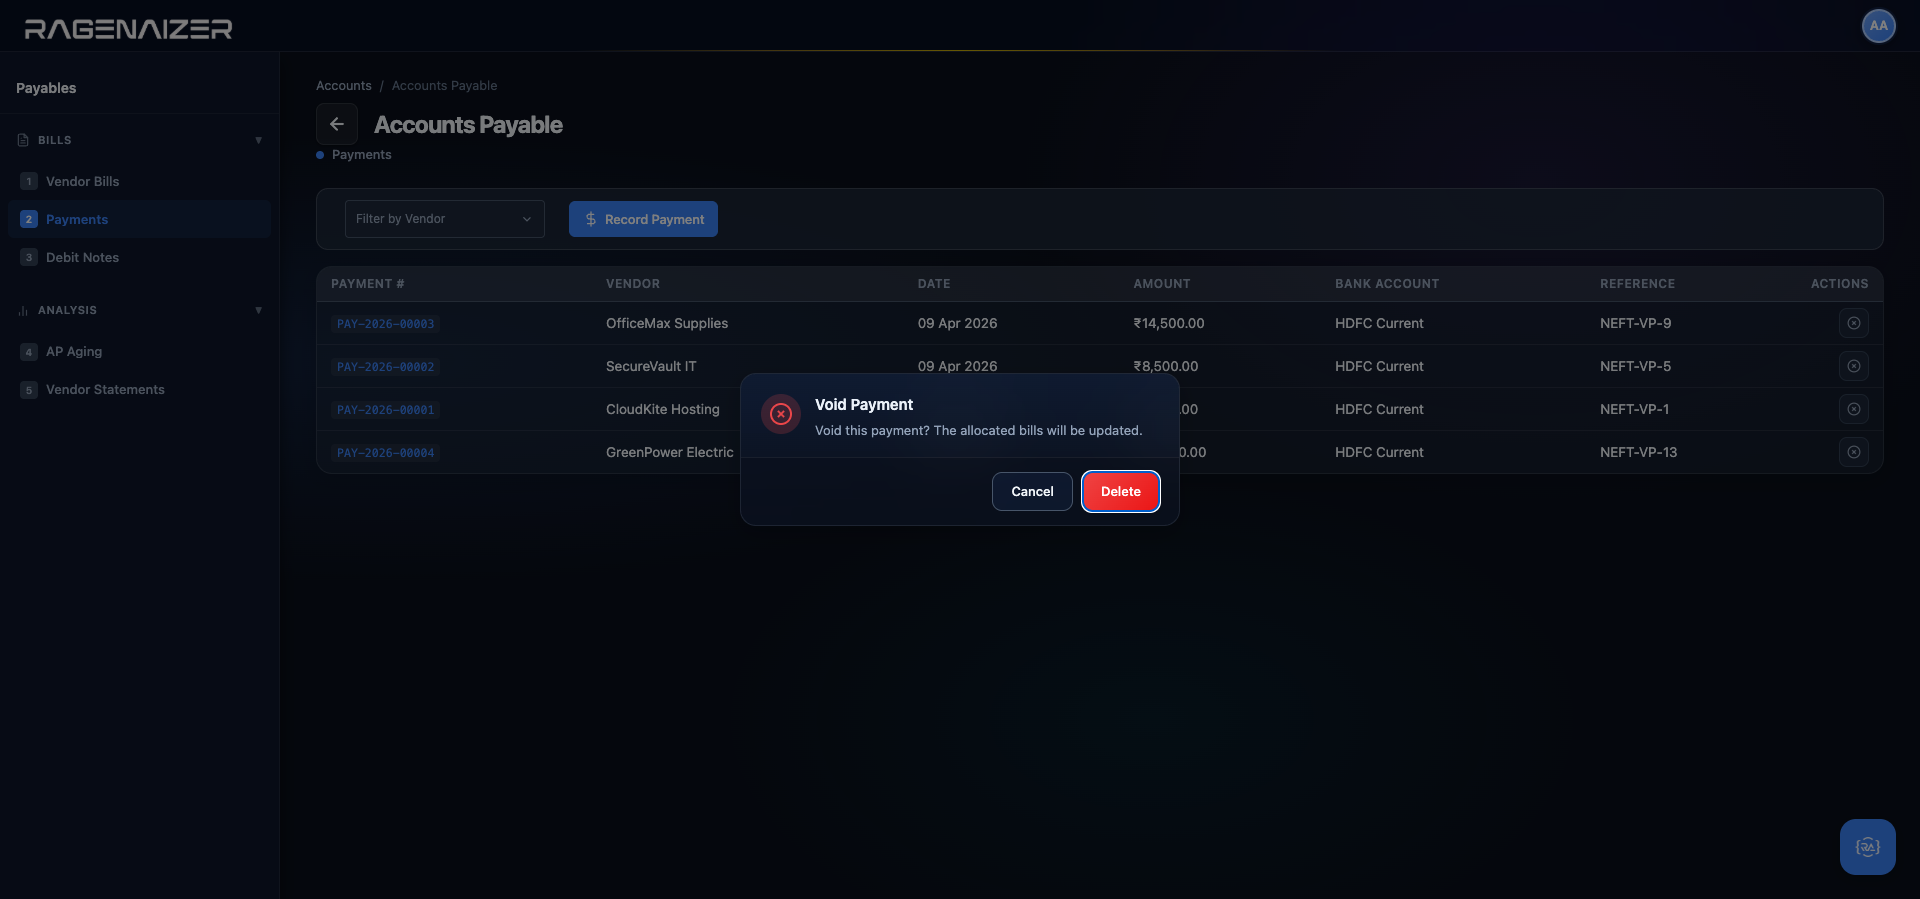
What the reversal actually does (in one atomic transaction)
When you confirm the Void, the backend runs all of the following inside a single database transaction. Either every step succeeds or none of them do — there is no half-voided state:
- Reads every
vendor_payment_allocationsrow for this payment to find which bills and how much of each bill it paid. - For each allocated bill: subtracts the allocated amount from the bill's
paid_amount, adds it back tobalance_due, and recomputesstatus— if the bill is now back to fully unpaid it flips from paid or partially_paid back to approved. - Looks up the original GL entry that the payment created (journal type BANK, ref_type vendor_payment), and posts a mirror reversing entry — same lines, same amounts, debits and credits swapped, ref_type reversal, description "Reversal: Void payment PAY-…". The original entry's
is_reversedflag flips totrue, so it still appears in the GL but is visibly marked as reversed and ignored by the Trial Balance calculations. - Updates the bank account balance by
+amountto undo the original-amount. Your HDFC balance goes back to exactly what it was before the payment. - Deletes the allocation rows (they no longer point to real money). The parent
vendor_paymentsrow stays in the database but is soft-deleted viais_active = false— so the audit history survives, but queries like GET /payments filter it out. - Writes one audit-log entry for the void with
allocations_reversedcount and the operator's user ID.
The end state: the books are exactly where they were before the payment was ever recorded. The bill is back to Approved, the bank balance is back to pre-payment, the GL shows both the original entry and its mirror reversal so a reviewer can see the full history. Trial Balance still balances to the paisa because the two GL entries net to zero. Audit log keeps every hop.
Audit history must survive even the worst user mistake
The naive implementation would be "just delete the payment row and recompute everything". This is wrong for two reasons: (1) auditors need to see that a payment was made, voided, and who voided it — hard-deleting loses that evidence forever; (2) the original GL entry has already been referenced by bank reconciliation, cash flow reports, and possibly other systems — deleting it would rip holes through downstream data. The right move is a mirror reversal: the original stays, the mirror nullifies its effect, and both are visible in the audit log. This is the same pattern accountants have used on paper ledgers for centuries — you never erase, you post a corrective entry.
Use a credit note for customer overpayment errors
The Vendor Payments tab has a Void action. The Customer Payments tab (under Receivables) currently has only a View action — there is no symmetrical Void Customer Payment endpoint yet. This is a deliberate workflow choice for now: if a customer payment was recorded in error (e.g. you entered ₹50,000 when the customer actually sent ₹5,000), the accounting-correct response is to issue a credit note for the excess, which offsets the ledger and the customer statement in one step. The Credit Note workflow is covered in §10.6 above. A Void Customer Payment feature is on the roadmap for parity with the vendor side, but until it ships, reach for the credit note as the idiomatic correction mechanism.
Purchase Orders — the pre-bill lifecycle
A Purchase Order (PO) is a document you raise before a vendor sends you a bill. It says "I plan to buy X from you; please deliver, then send me an invoice". It isn't a financial transaction — no GL entry is posted when a PO is created, approved, or sent — but it anchors the entire procurement flow from "we want to buy this" to "we've been billed and we've paid". It's the Accounts module's way of answering three questions a vendor bill alone can't: was this order authorised?, did the goods actually arrive?, and did the bill match the order?
Purchase Order
A vendor-facing document that moves through six statuses — draft, approved, sent, partially received, received, billed — with an additional cancelled terminal state. Status transitions are controlled by row-action buttons in the list view and by the PO's own detail modal. No GL impact until the PO is converted into a vendor bill (step 11.3 above), at which point the bill takes over the financial lifecycle.
Open Accounts → Purchase Orders from the dashboard. The demo tenant ships with eight POs across every status so you can see the full spectrum without creating new data.
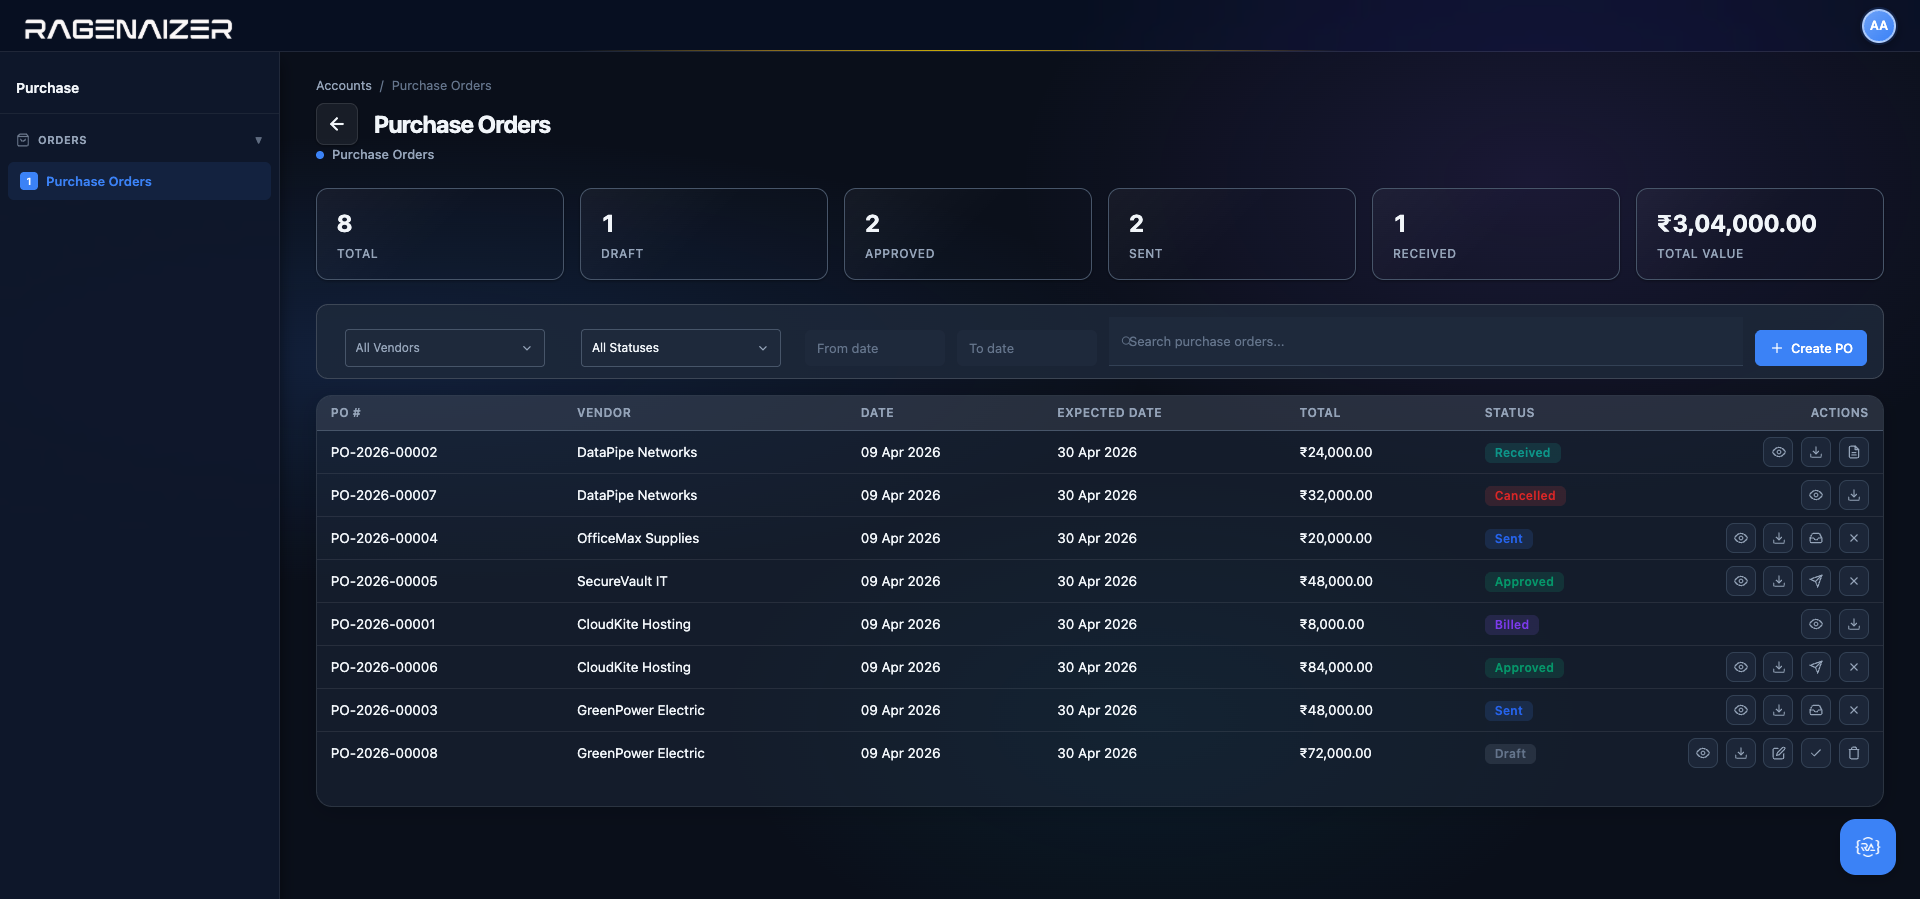
The six-state lifecycle
- Draft — the PO exists but can still be edited freely. No commitment to the vendor yet. Delete is allowed.
- Approved — an authoriser (typically a manager) has ticked the approve button. The PO is locked down; fields can no longer change. Ready to be sent.
- Sent — you've clicked Send, which in a real deployment emails the vendor a formatted PDF of the PO. In the demo, it just flips the status flag. The vendor is now on the hook to deliver.
- Partially Received — you got some of the ordered items but not all. The received-quantity column updates line-by-line and the status moves to this intermediate state until all lines are fulfilled.
- Received — every line is received in full. You can now generate a vendor bill from it.
- Billed — you clicked Convert to Bill on a received PO. A new vendor bill row is created with the same vendor, lines, amounts — and, crucially, a back-reference to the originating PO. From here the bill follows the normal vendor-bill lifecycle (section 11.2).
A seventh state, Cancelled, is a terminal off-ramp — you can cancel a PO in any state before it becomes Billed. The demo data shows PO-2026-00007 in this state.
Creating a new PO
Click + Create PO. The form is wider than most because it includes the line-items grid inline.
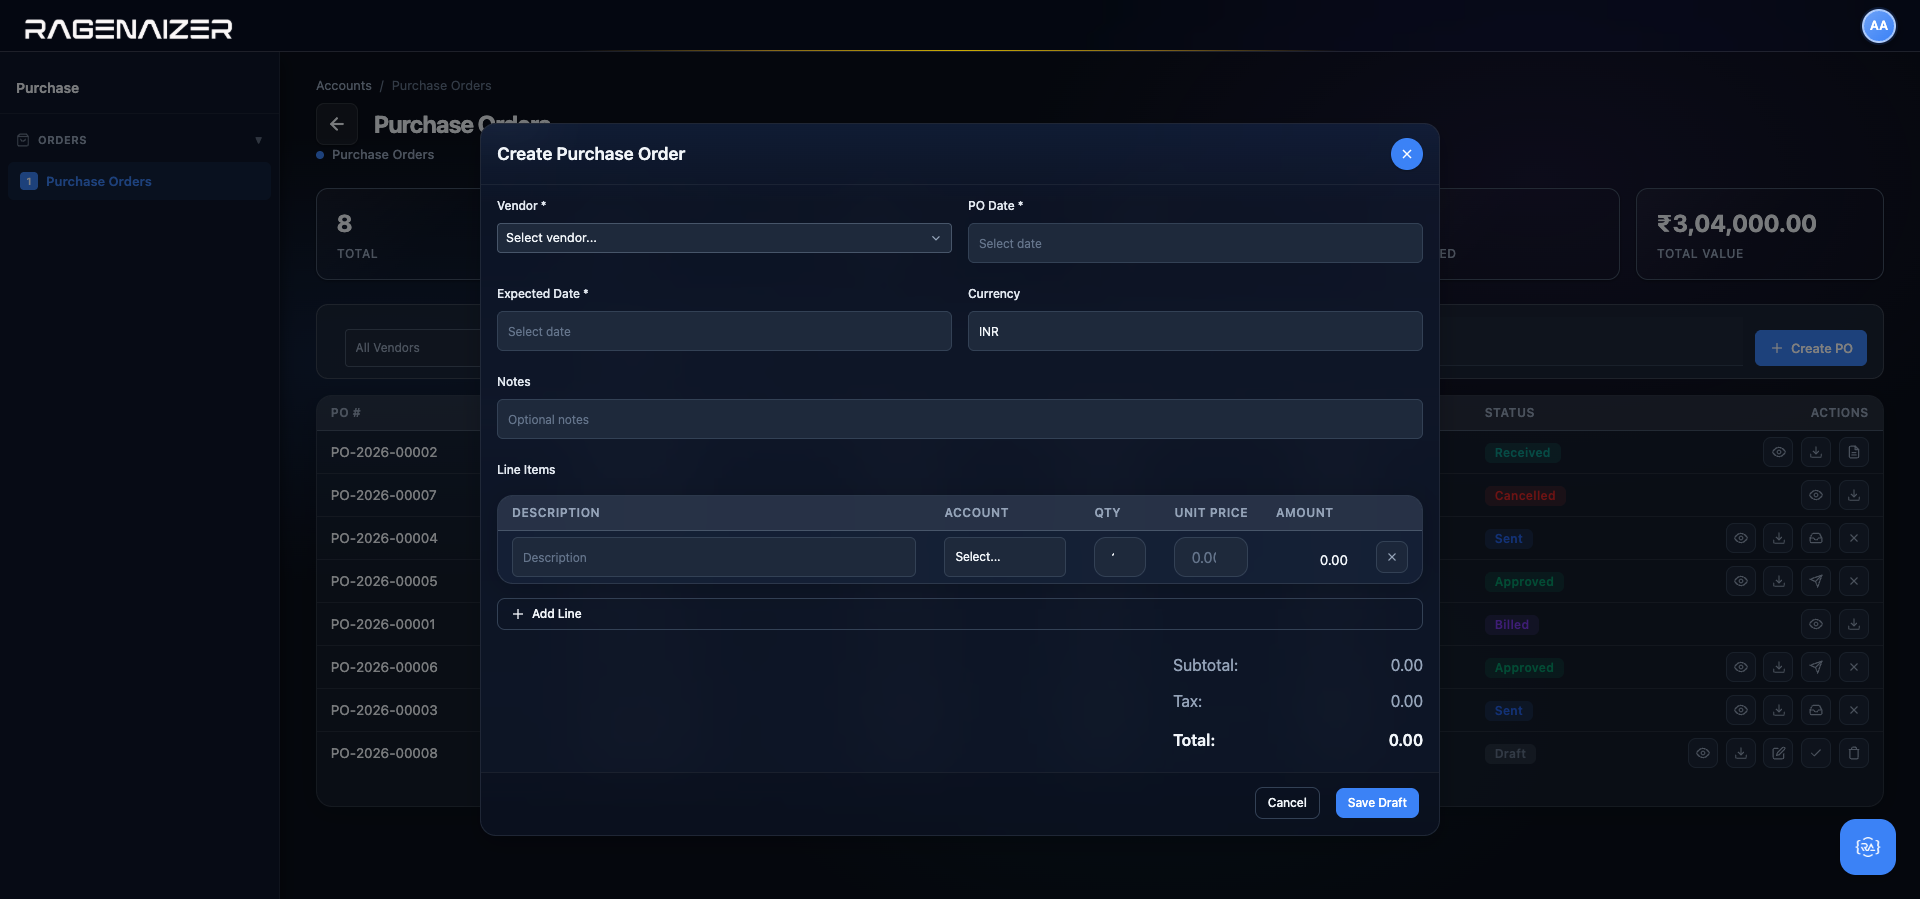
A single PO can span multiple expense categories
A PO to Office Depot might have two line items: printer cartridges (→ Office Supplies) and folding tables (→ Furniture & Fixtures). Those hit different GL accounts when the bill is eventually posted. So the account is captured on the line, not the PO header. When the PO converts to a bill, each line's account carries forward intact — no re-classification needed.
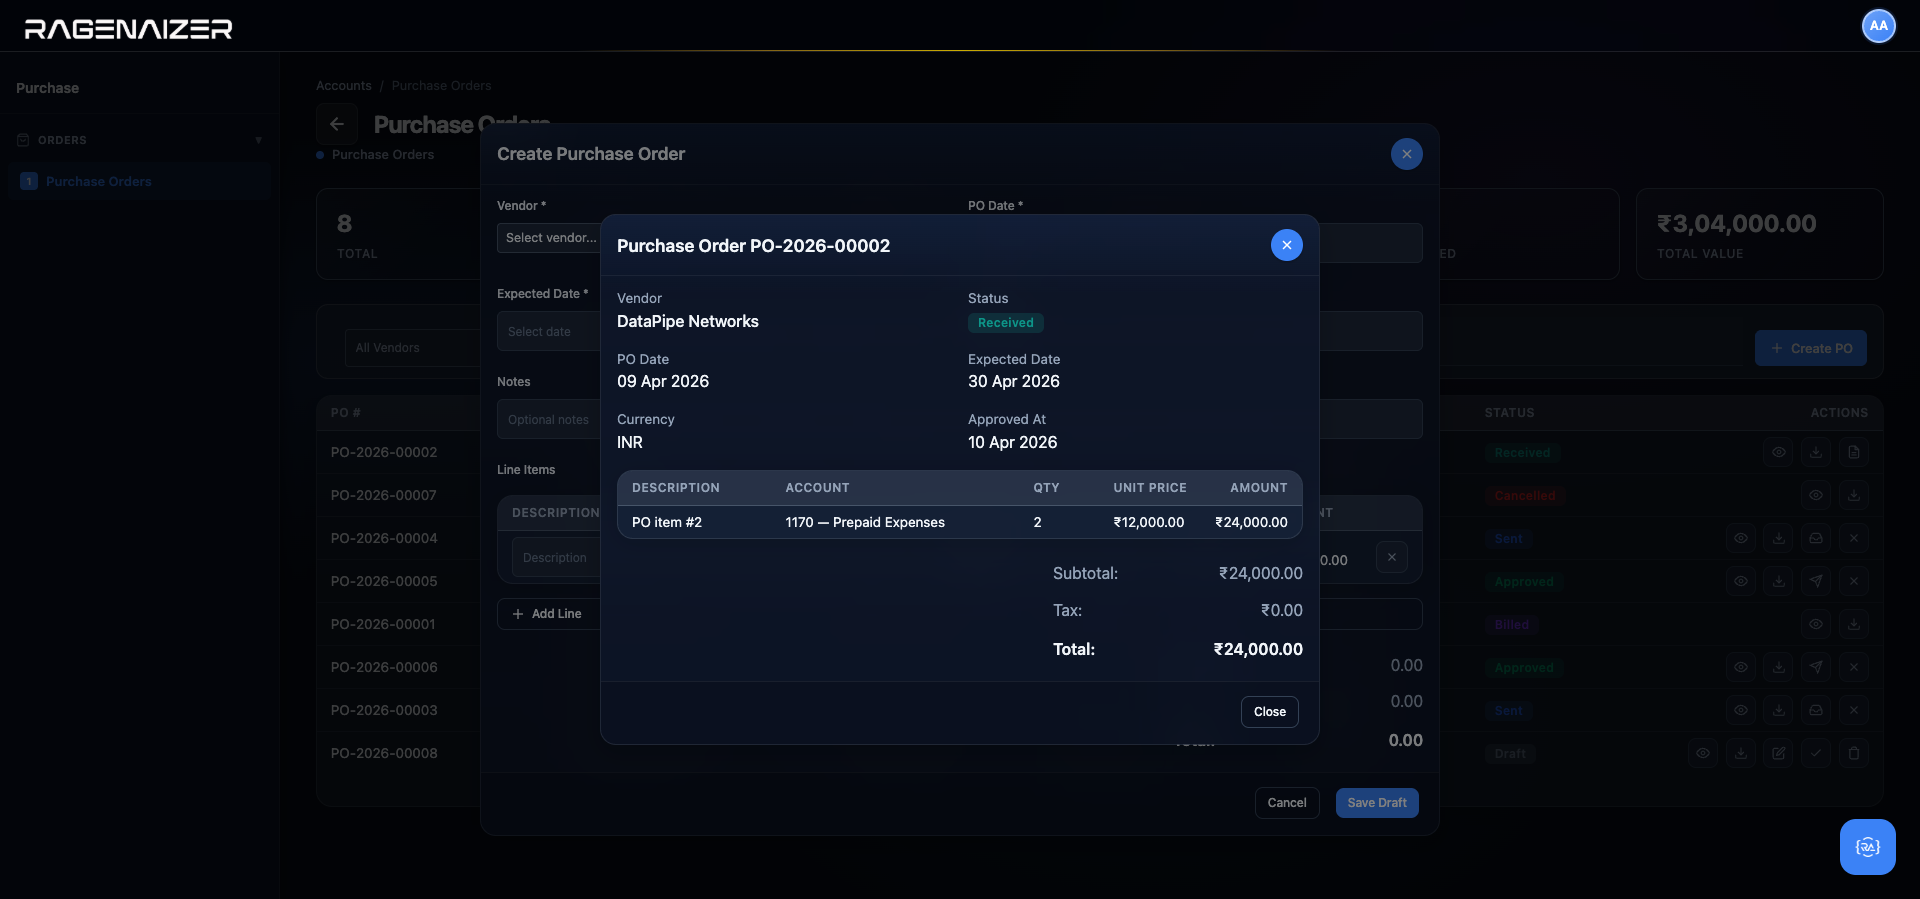
The View modal — the source of truth
Click the View (eye) icon on any row to open a read-only detail modal. It's the same layout as the create modal but with every field disabled, plus it shows the PO number, its current status badge, and the final computed total. Use it when you need to reference a PO's details without risk of accidentally editing. It's also what the Send PO action renders internally before formatting the outgoing email.
Converting to a bill — where the GL finally wakes up
A PO posts zero GL entries — it's a pure document. The moment financial reality catches up is when you click Convert to Bill on a received PO. This action:
- Creates a new row in
vendor_billswithpo_idset to the source PO (so you can always trace back). - Copies the vendor, every line item (description, account, quantity, rate, amount, tax), and the totals over to the new bill.
- Leaves the bill in Draft status so the AP clerk can still edit it if the vendor's invoice doesn't exactly match the PO (a common case — rate adjustment, partial shipment, tax calculation difference).
- Flips the source PO's status from received to billed (the terminal non-cancelled state).
From here the bill follows the normal AP lifecycle (sections 11.2–11.3): approve, post the GL entry (Dr Expense / Cr Accounts Payable), record payment when money leaves the bank. The PO becomes the audit anchor that links "we ordered this" to "we received this" to "we were billed this" to "we paid this" — all four events connected through stable foreign keys, not manual filing.
PO qty vs. received qty vs. billed qty
In procurement-heavy businesses, the classical control is the "3-way match" — the PO, the Goods Receipt Note, and the vendor's invoice must all agree on quantities before AP is allowed to release payment. Ragenaizer does a lightweight version: the PO's per-line received_qty must be populated (via the Receive action on the row) before Convert to Bill is enabled, and the resulting bill carries those same quantities — so a PO for 10 units that was only half-received produces a bill for 5 units, not 10. If the vendor then bills for 10, you edit the bill line down to 5 in Draft and the GL matches the physical reality.
The General Ledger.
Where every entry the system creates lives. We'll inspect the entries that the opening balances, invoice, and bill from earlier sections produced.
General Ledger (GL)
The master diary of your books. Every dated debit/credit transaction lives here as a "GL Entry" with its own unique number (GL-2026-00001 etc.). Each entry has at least two lines — one debit and one credit — and the totals always balance. Every other report in the system — Trial Balance, P&L, Balance Sheet — is just a different way of slicing the GL.
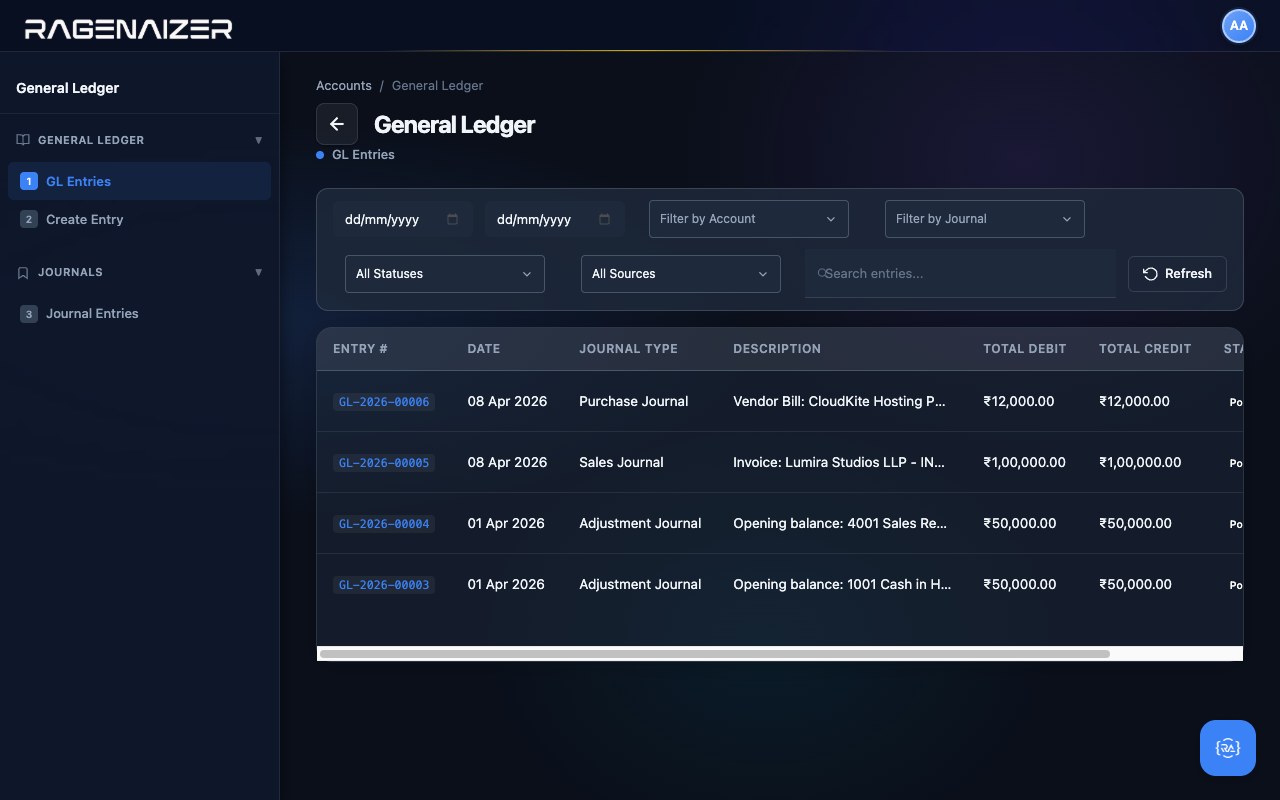
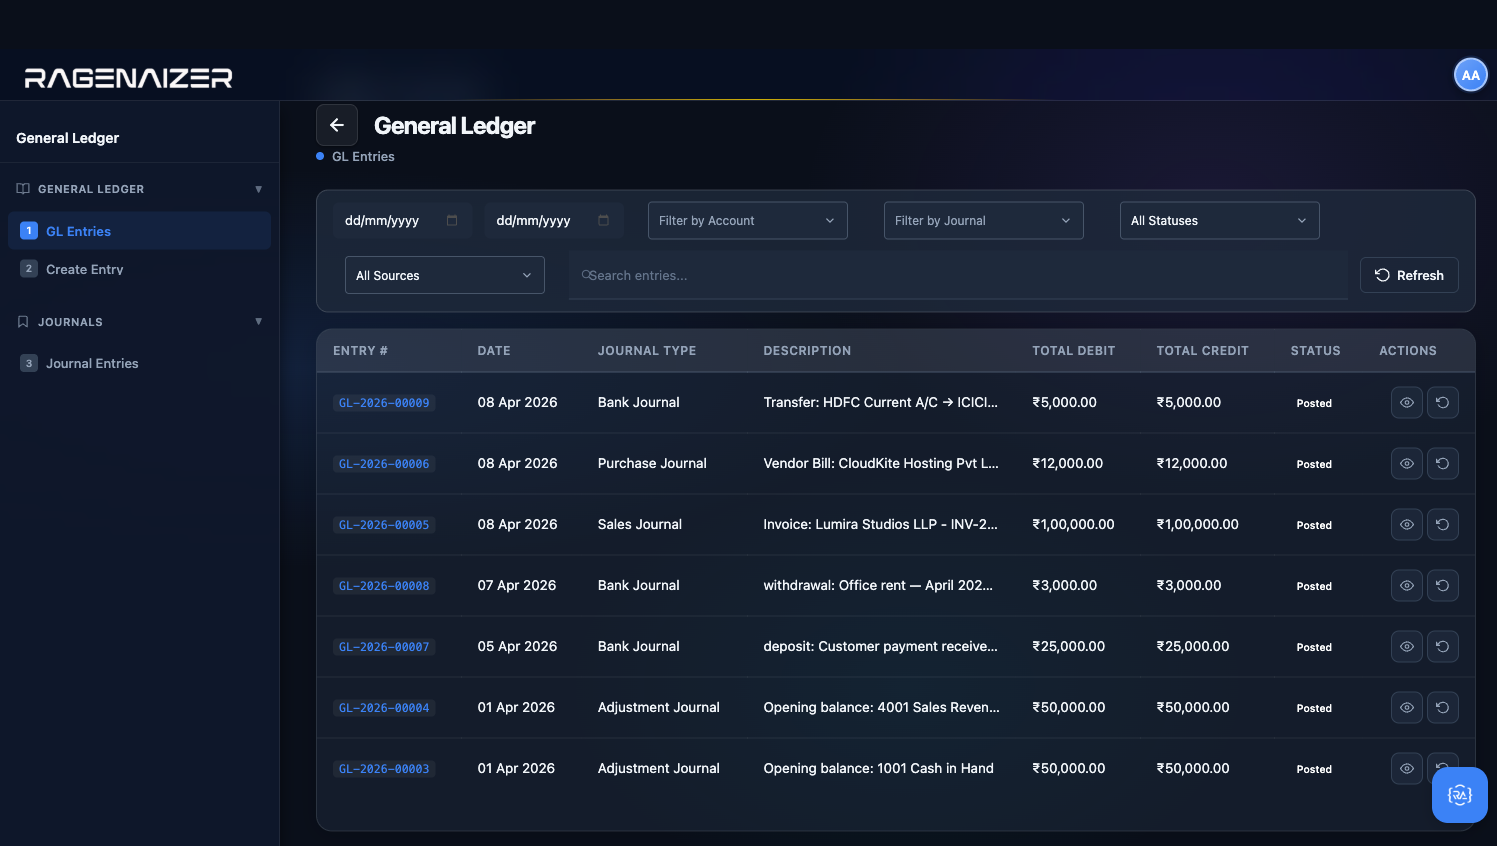
The GL Entries page
From the dashboard click General Ledger (ledger.html). The page shows every GL entry the system has
ever recorded, sorted newest-first by default. After everything we did in sections 7–11, you should see four entries:
- GL-2026-00003 — Opening balance for Cash in Hand (Dr 1001 ₹50,000 / Cr 3300 ₹50,000)
- GL-2026-00004 — Opening balance for Sales Revenue (Dr 3300 ₹50,000 / Cr 4001 ₹50,000)
- GL-2026-00005 — The Lumira invoice (Dr 1130 ₹1,00,000 / Cr 4001 ₹1,00,000)
- GL-2026-00006 — The CloudKite bill (Dr 5001 ₹12,000 / Cr 2110 ₹12,000)
The GL Entry Detail modal
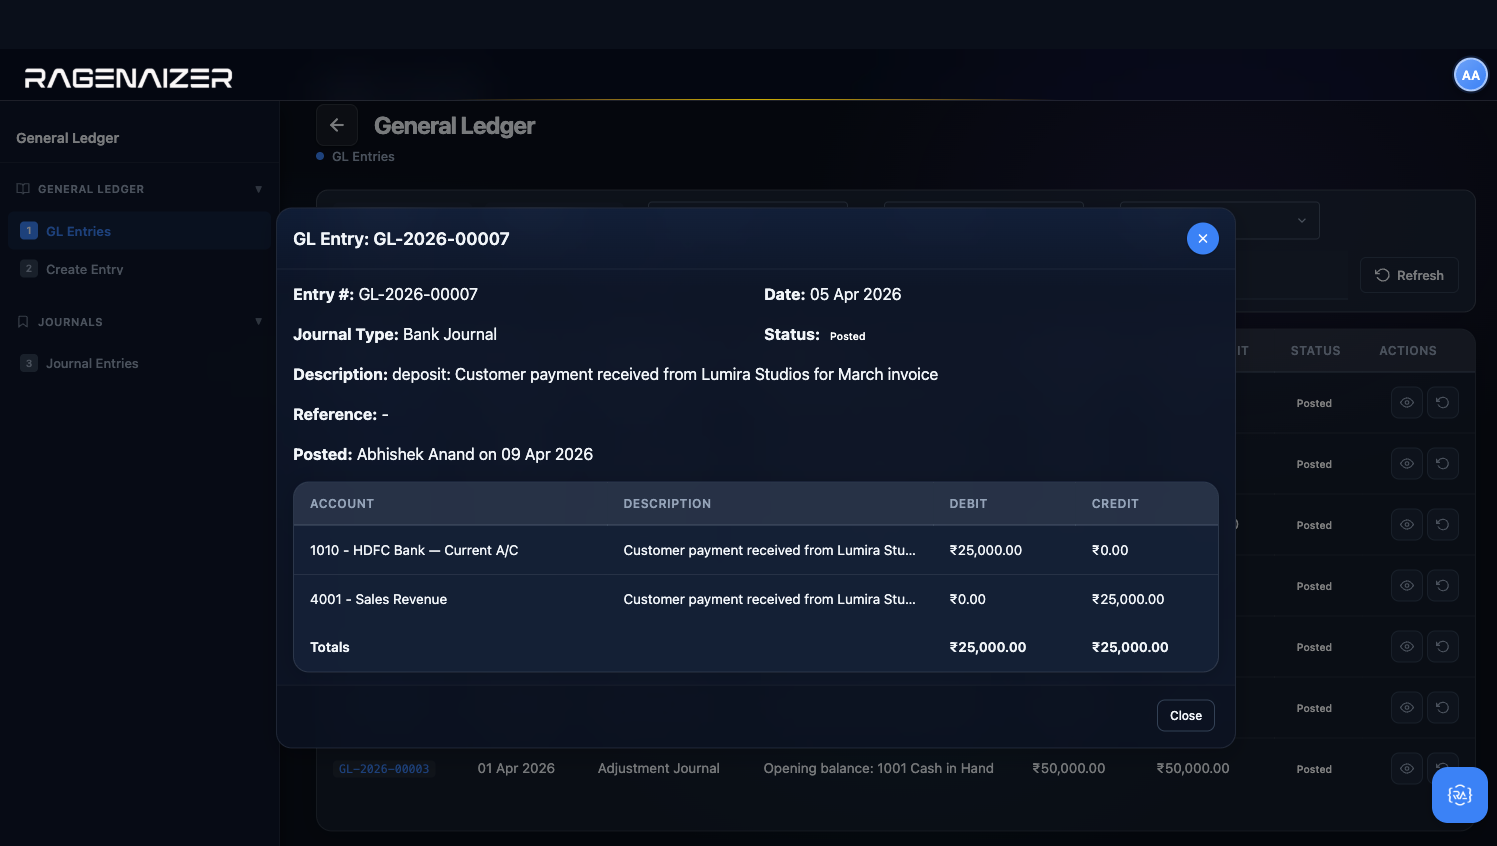
Click the View (eye) icon on the most recent row — the CloudKite bill GL entry. The detail modal opens with the entry header (number, date, journal type, status, description, who posted it, when) and the line table below. Each line shows Account, Description, Debit, and Credit. The Totals row at the bottom always balances — this is the fundamental invariant of double-entry bookkeeping.
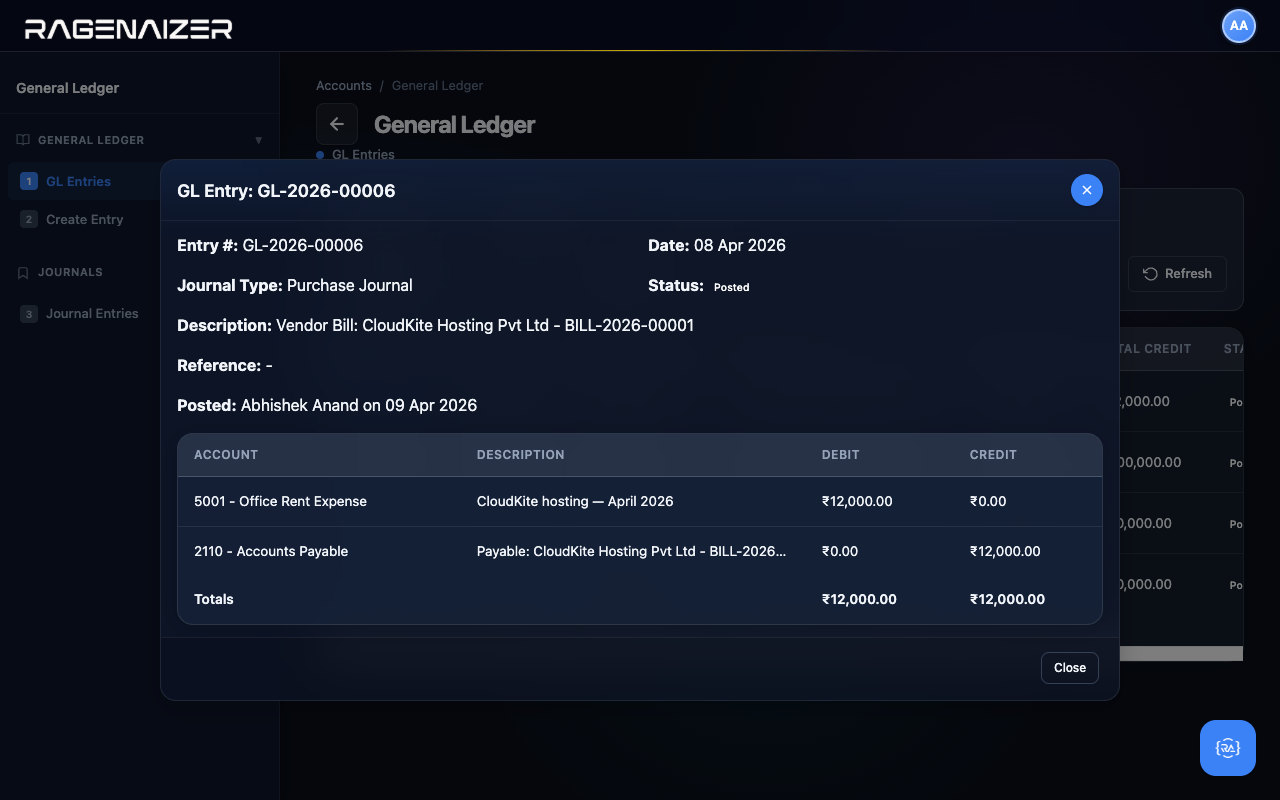
Every transaction you make tells the same story twice
Notice how the bill's GL entry has exactly two lines: debit Office Rent Expense, credit Accounts Payable. Same amount, opposite sides. That's the rule. When you eventually pay CloudKite, a second GL entry will be created — debit Accounts Payable, credit Bank — and the Accounts Payable balance returns to zero. Every transaction in your business decomposes into pairs of debits and credits like this.
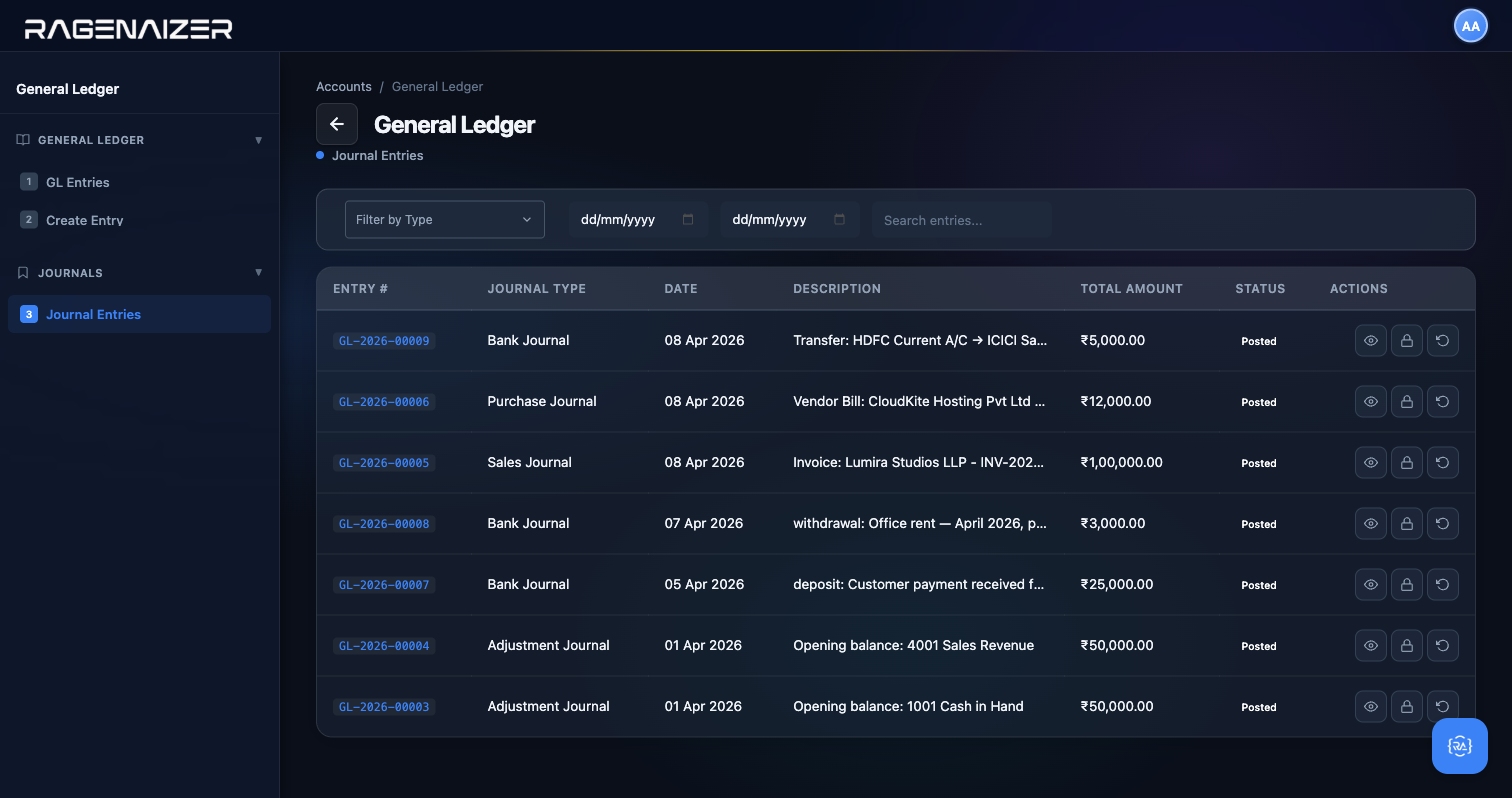
The Journal Entries tab and reversing an entry
The Ledger page has a second tab in the sidebar — Journal Entries — which gives you a more audit-friendly view of the same data, sorted by journal type and with row actions for the operations a controller actually performs at month end: View, Post (for any entries left in Draft), Lock (freeze a fiscal period's entries), and Reverse (post a perfectly mirrored entry that nullifies a previous one without deleting it).

Reports.
Trial Balance, Balance Sheet, P&L, Cash Flow, AR & AP Aging — all generated live from the GL we just inspected.
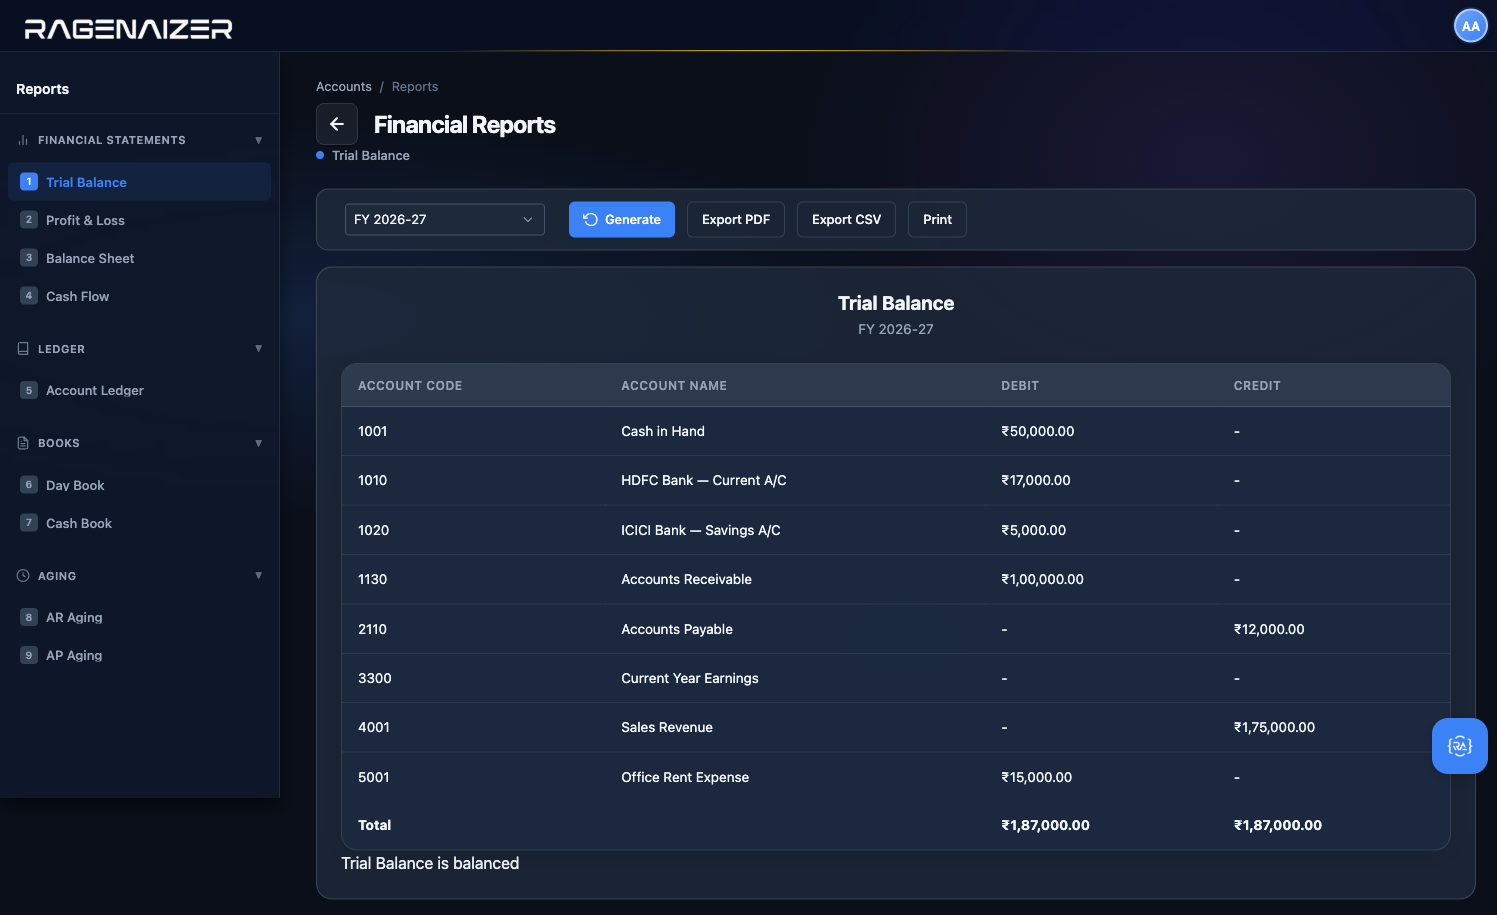
Trial Balance — the sanity check
Open reports.html. The page has nine sidebar tabs grouped into three sections: Financial Statements (Trial Balance,
P&L, Balance Sheet, Cash Flow), Ledger (Account Ledger), Books (Day Book, Cash Book), and Aging
(AR Aging, AP Aging). Start with Trial Balance.
The Trial Balance lists every account with a non-zero balance and shows whether the books are balanced. It's the fastest way to check that your bookkeeping is healthy. Pick the fiscal year from the dropdown and click Generate.

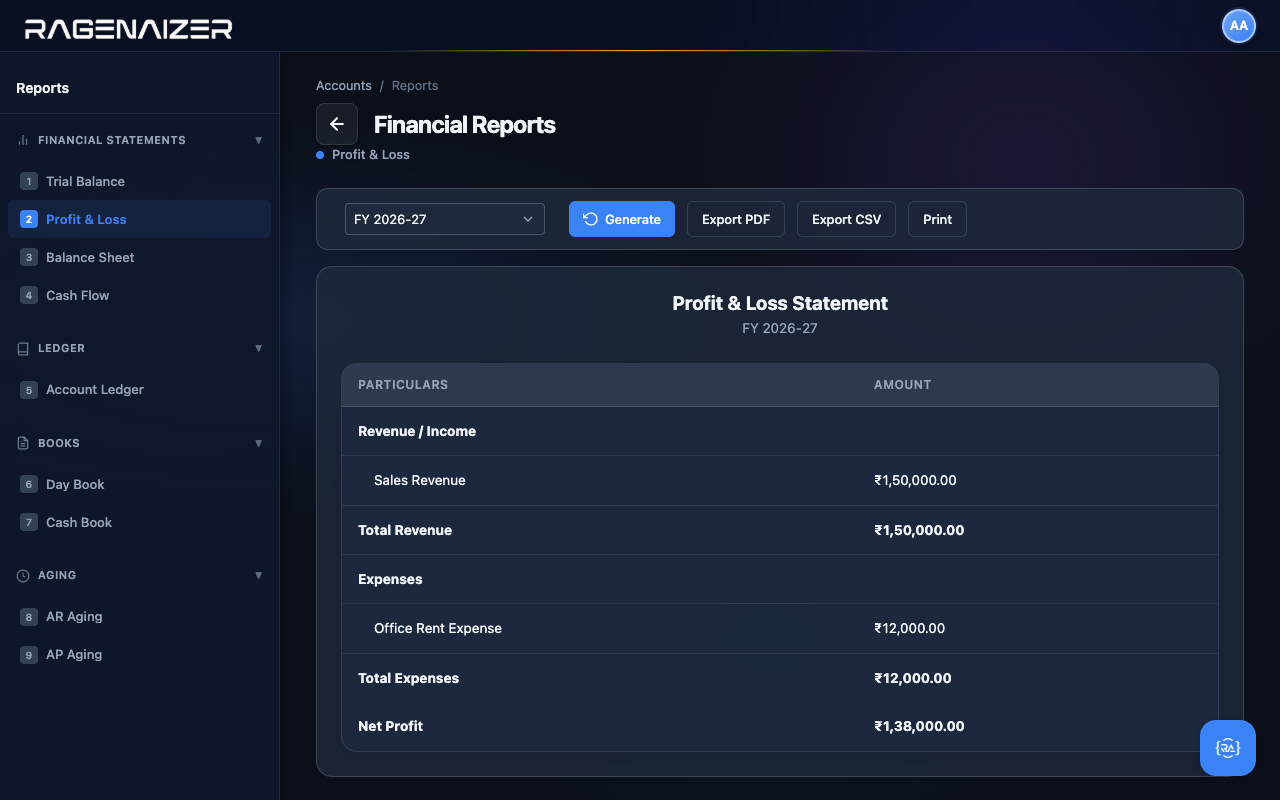
Profit & Loss (with year-over-year comparison)
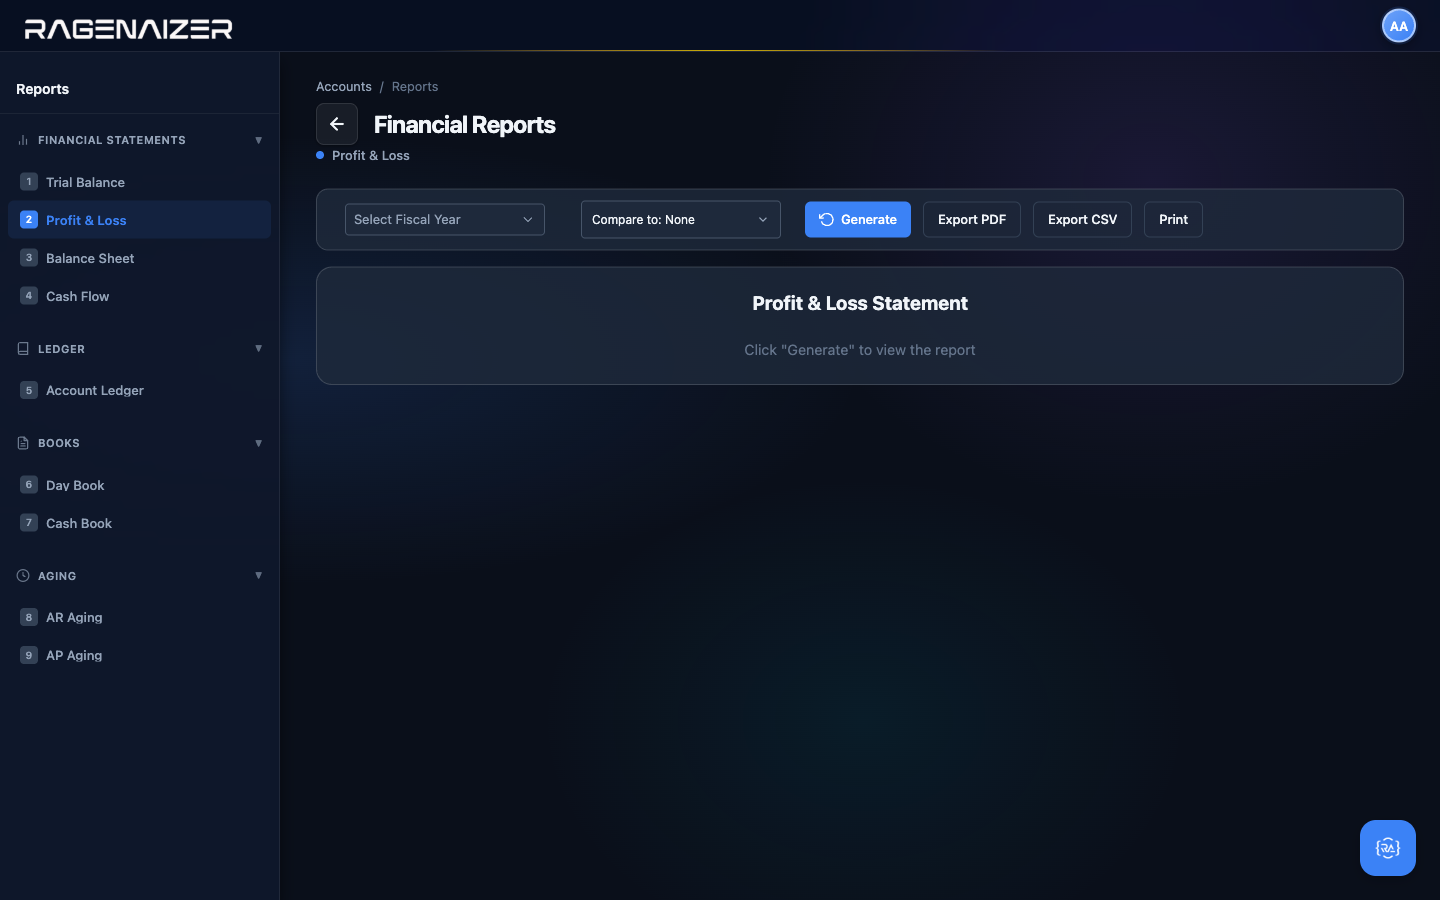
Click P&L in the sidebar. The Profit & Loss statement summarises your income statement — revenues earned during the period minus expenses incurred during the period, equals net profit or loss. Pick the fiscal year and click Generate.
Comparative mode — "Compare to"
A raw P&L tells you what this year looks like. A comparative P&L tells you whether that's good or bad relative to the period you care about. In the toolbar above the report there's a Compare to dropdown with three options: None (the default, backward compatible with every prior use of the report), Previous Year (same date range shifted back one year — this is the most common view for annual reviews), and Previous Period (the immediately preceding window of the same length — useful for month-over-month trend analysis).
Select Previous Year and click Generate. The report refreshes with six columns instead of the usual two: Code, Account Name, Current, Comparison, Variance, Variance %. Every variance cell is colored direction-aware — green when it's favorable (income up, expense down), red when unfavorable.
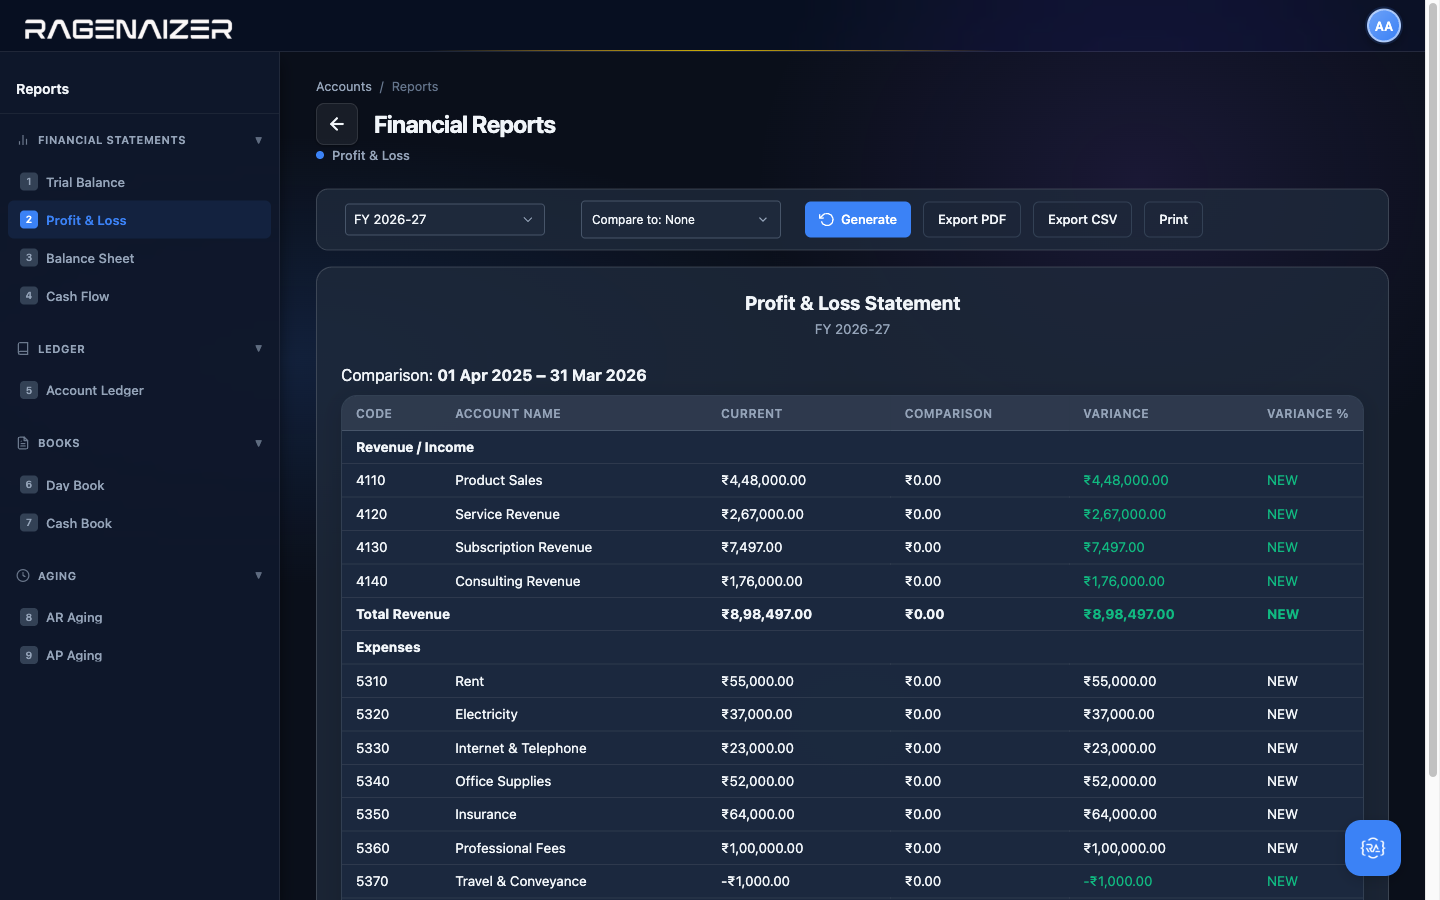
Income/assets/equity favorable when up, expenses/liabilities favorable when down
Variance is computed as current − comparison. The sign alone isn't enough to know if it's good news — an income account with a positive variance is good (you earned more) but an expense account with a positive variance is bad (you spent more). The UI codes this at render time: income rows color-positive-green, expense rows color-negative-green. The PDF export follows the same rule, so printouts match screen.
Same length, not same start date
Previous Year shifts both endpoints by exactly 1 year (so comparing Apr–Jun 2026 produces Apr–Jun 2025). Previous Period shifts by the length of the current window (so the same Apr–Jun 2026 selection compares against Jan–Mar 2026). The first is "how am I doing versus last year?"; the second is "how am I doing versus last quarter?". For a full-year P&L both choices mean a prior full year; the difference only matters when you're looking at partial windows.
Balance Sheet (with point-in-time comparison)
The Balance Sheet is a snapshot of what you own (assets), what you owe (liabilities), and what's left over (equity) at a single point in time. It must always balance — Assets = Liabilities + Equity. The Equity number is your accumulated profit (the same number that came out of the P&L) plus any owner contributions.

The Balance Sheet has the same Compare to dropdown as the P&L (see §13.2). The difference is in what the comparison window means for a point-in-time report: Previous Year shifts the as-at date back exactly 12 months (for the most common year-over-year view), and Previous Period shifts it back exactly 1 month (useful for catching month-over-month drift).
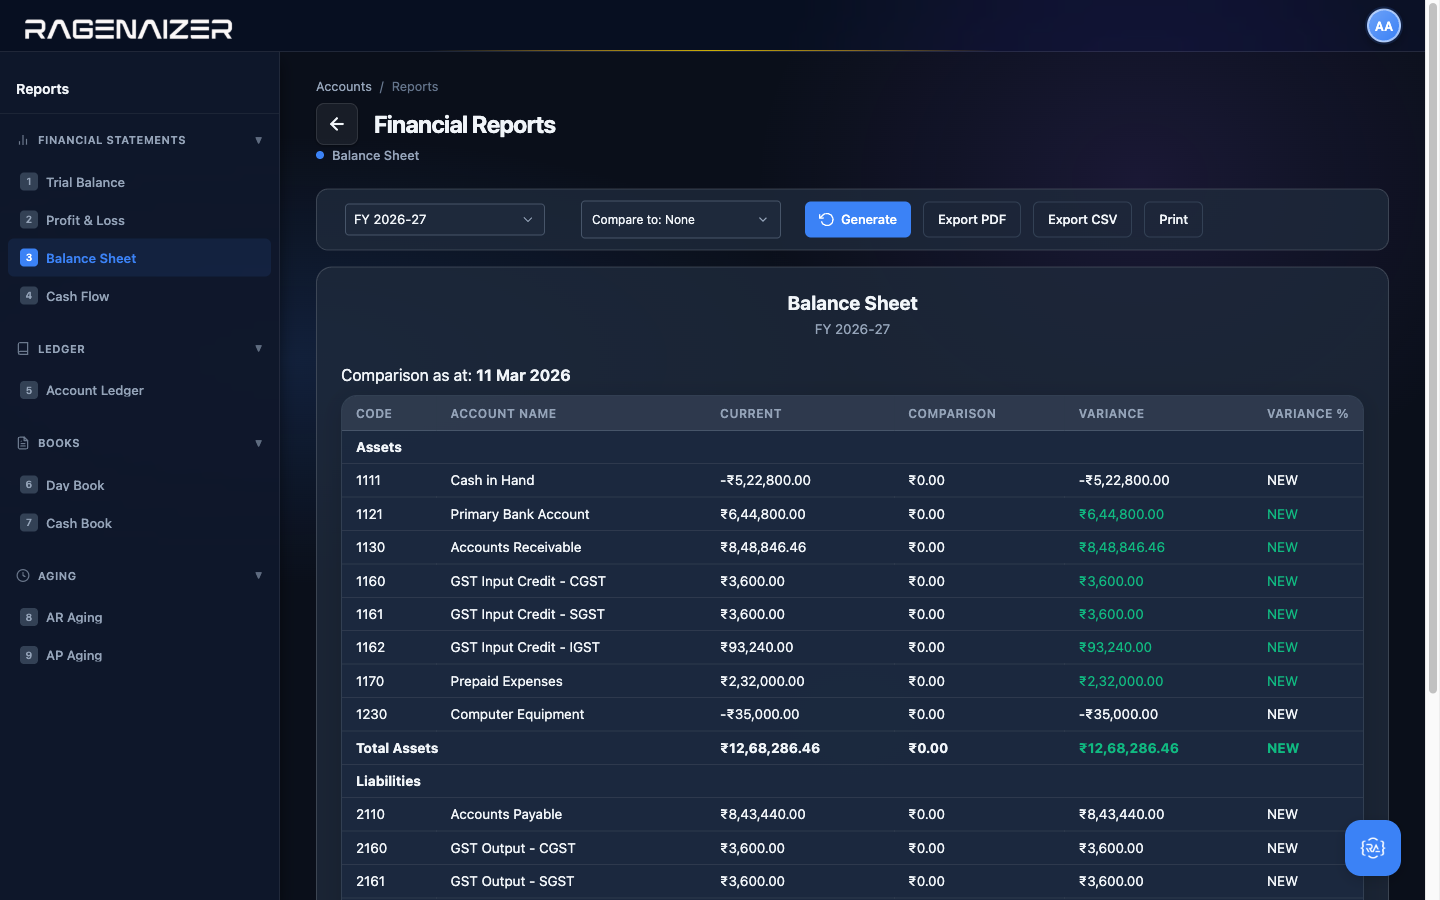
If nothing changed, every row is zero variance
A P&L comparison is about activity (what was earned/spent in each period). A Balance Sheet comparison is about position (what balances stood at each date). For example, if your Cash in Hand was ₹50,000 on Mar 11 and it's still ₹50,000 on Apr 11, the Variance is ₹0 and the row simply tells you "unchanged". This is what you want for catching silent drift: accounts that should be moving but aren't, or accounts that suddenly jumped when nothing was supposed to happen in them.
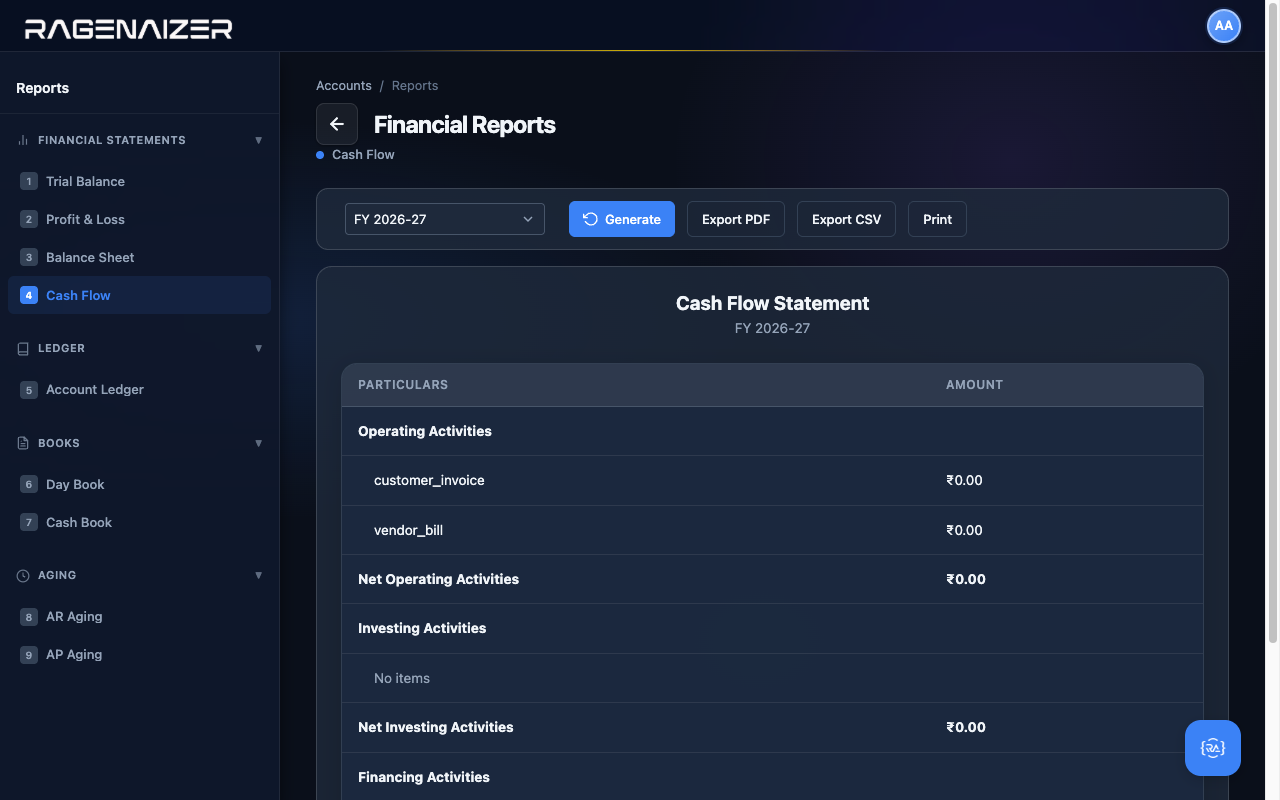
Cash Flow
The Cash Flow statement tracks the actual movement of cash — how much came in and went out, broken down into Operating, Investing, and Financing activities. Because we haven't recorded any payments yet (the invoice is approved but unpaid, the bill is approved but unpaid), our cash flow shows zero on every line. After the customer pays and we settle the vendor bill, you'll see real activity here.
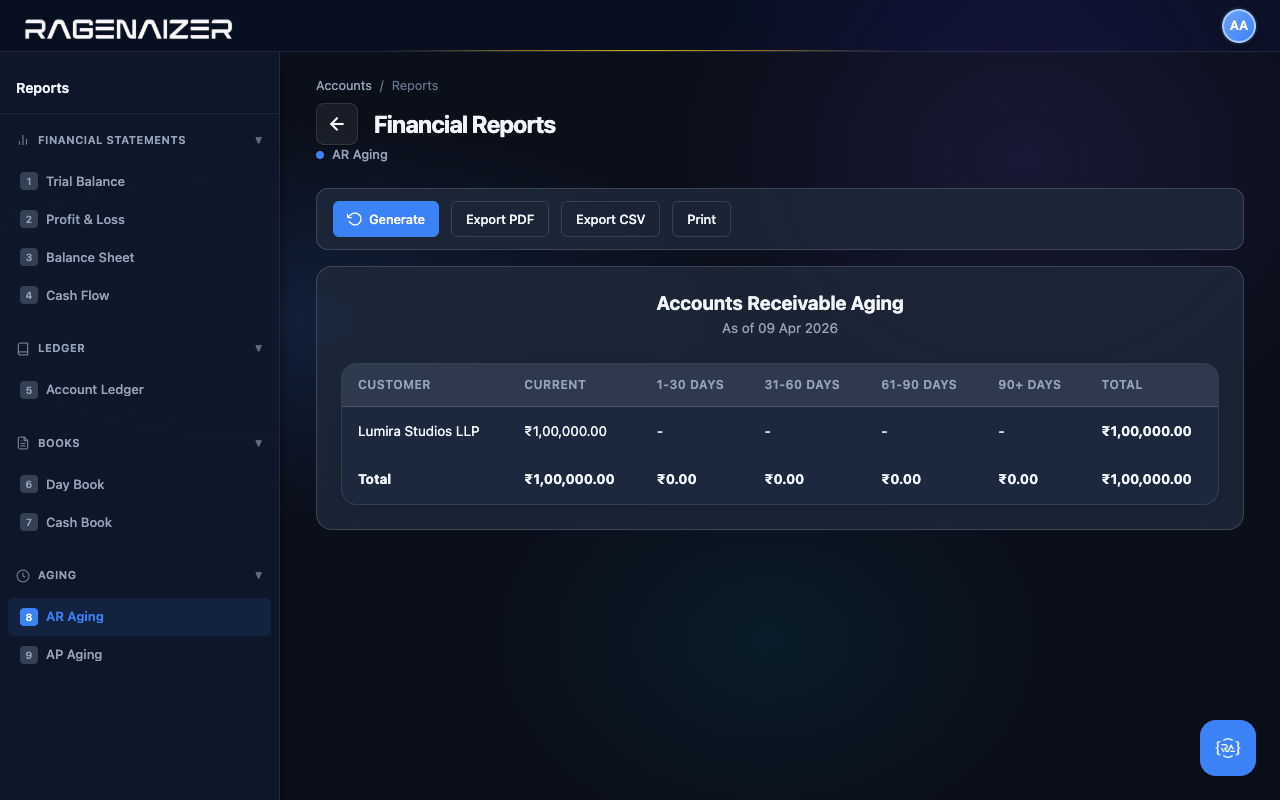
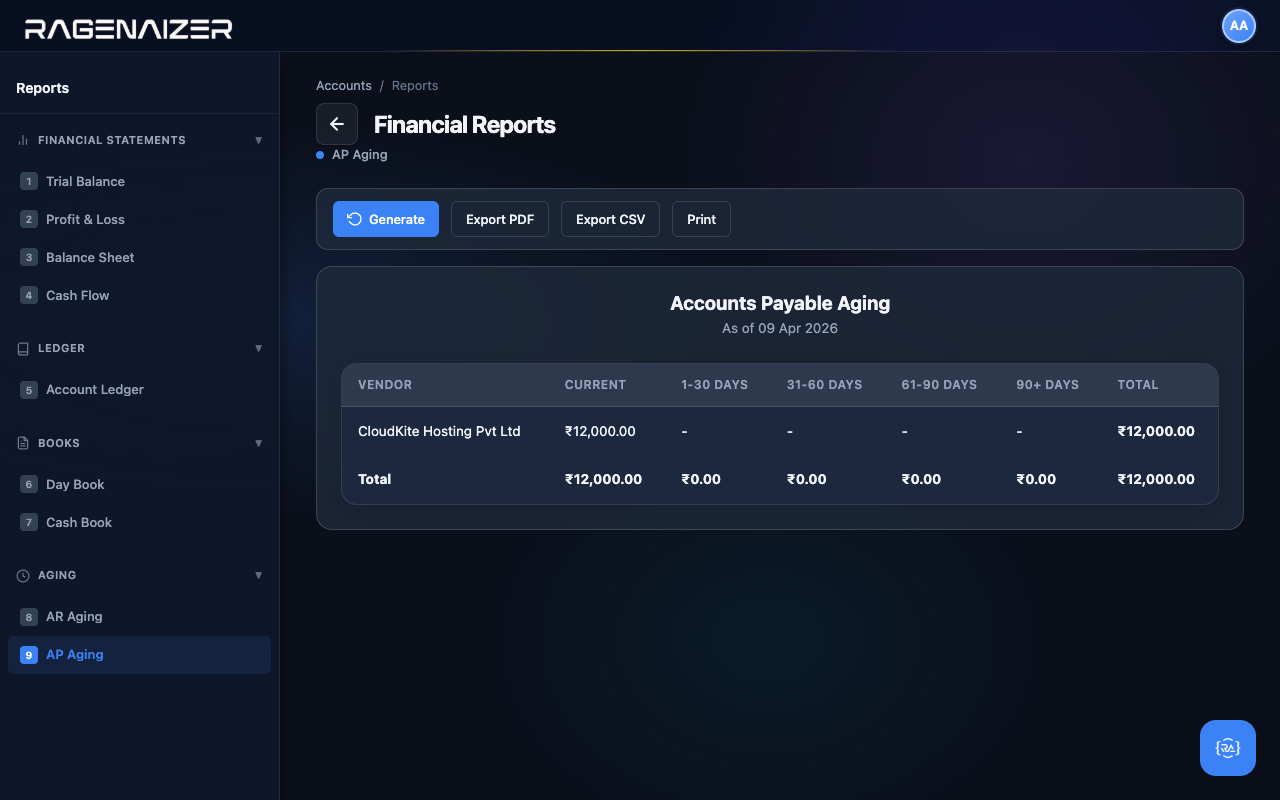
AR & AP Aging — "who owes us, who do we owe"
The Aging reports tell you how old your unpaid invoices and bills are. Anything in the Current column is not yet overdue; the 1-30, 31-60, 61-90, and 90+ columns are progressively more concerning. A healthy business has most of its receivables in the Current bucket and almost nothing past 90 days.
Audit logs & closing.
The Administration page is where you go when something looks wrong. It also contains the year-end closing checklists you'll need every March.
Audit Logs — "who did what, when"
From the dashboard click Administration (admin.html). The default tab is Audit Logs: a chronological
feed of every create / update / approve / delete action that's been performed in the Accounts module, by which user, with the
full payload of what changed. After running through this guide your audit log should have rows for every action you took —
creating customers and vendors, creating and approving invoices and bills, posting opening balances, etc.
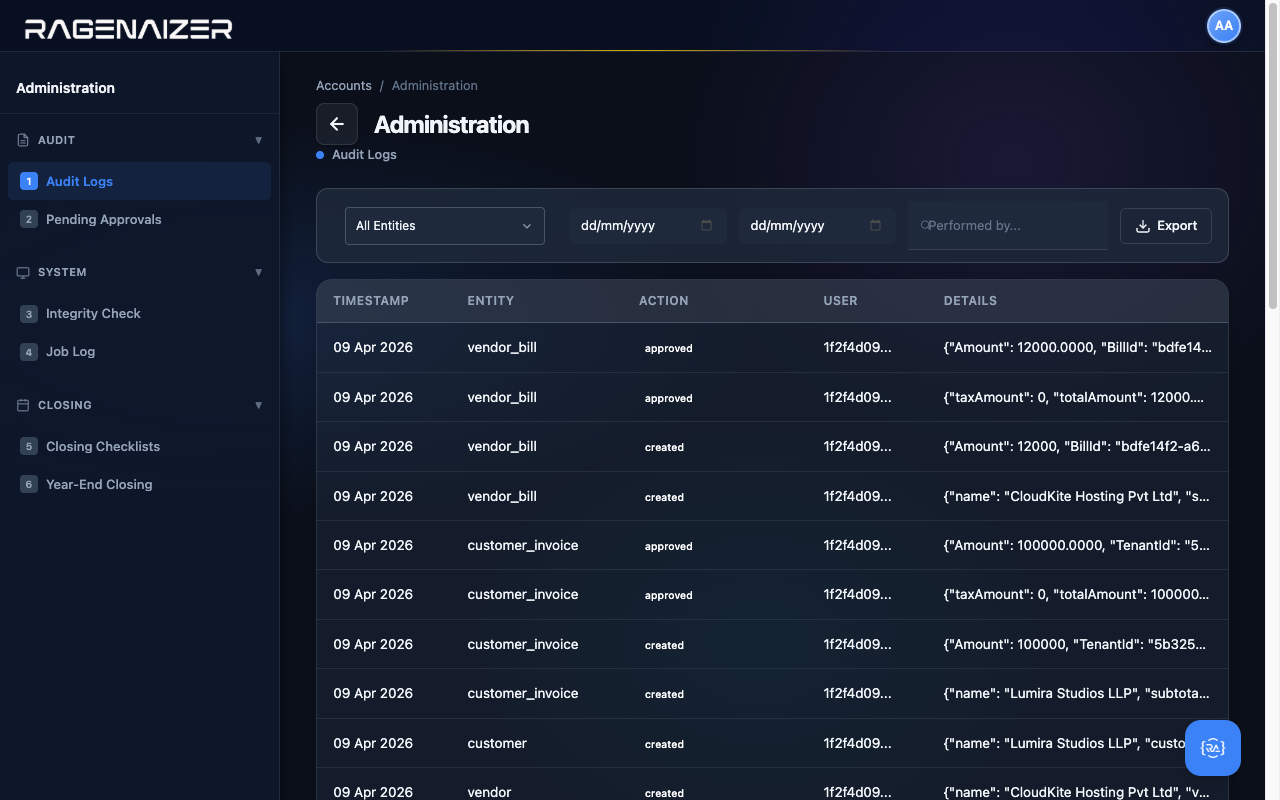
When an external auditor asks "who approved this?"
The Audit Logs page is the answer. Filter by entity type (e.g. customer_invoice), pick the date range of the period under audit, and you have a complete trail of every approval, including the user ID of who clicked the button. Export to CSV for handover.
Other Administration tabs — one-line tour
- Pending Approvals — vendor and customer creation requests from non-admin users that need a manager to sign off.
- Integrity Check — runs a battery of consistency checks against the GL: trial-balance balance, period-balance reconciliation, orphaned references. Run this monthly as a sanity gate.
- Job Log — the queue of background jobs the system runs (period rollover, scheduled invoice generation, depreciation runs). Useful when one of them silently fails and you need to find out why.
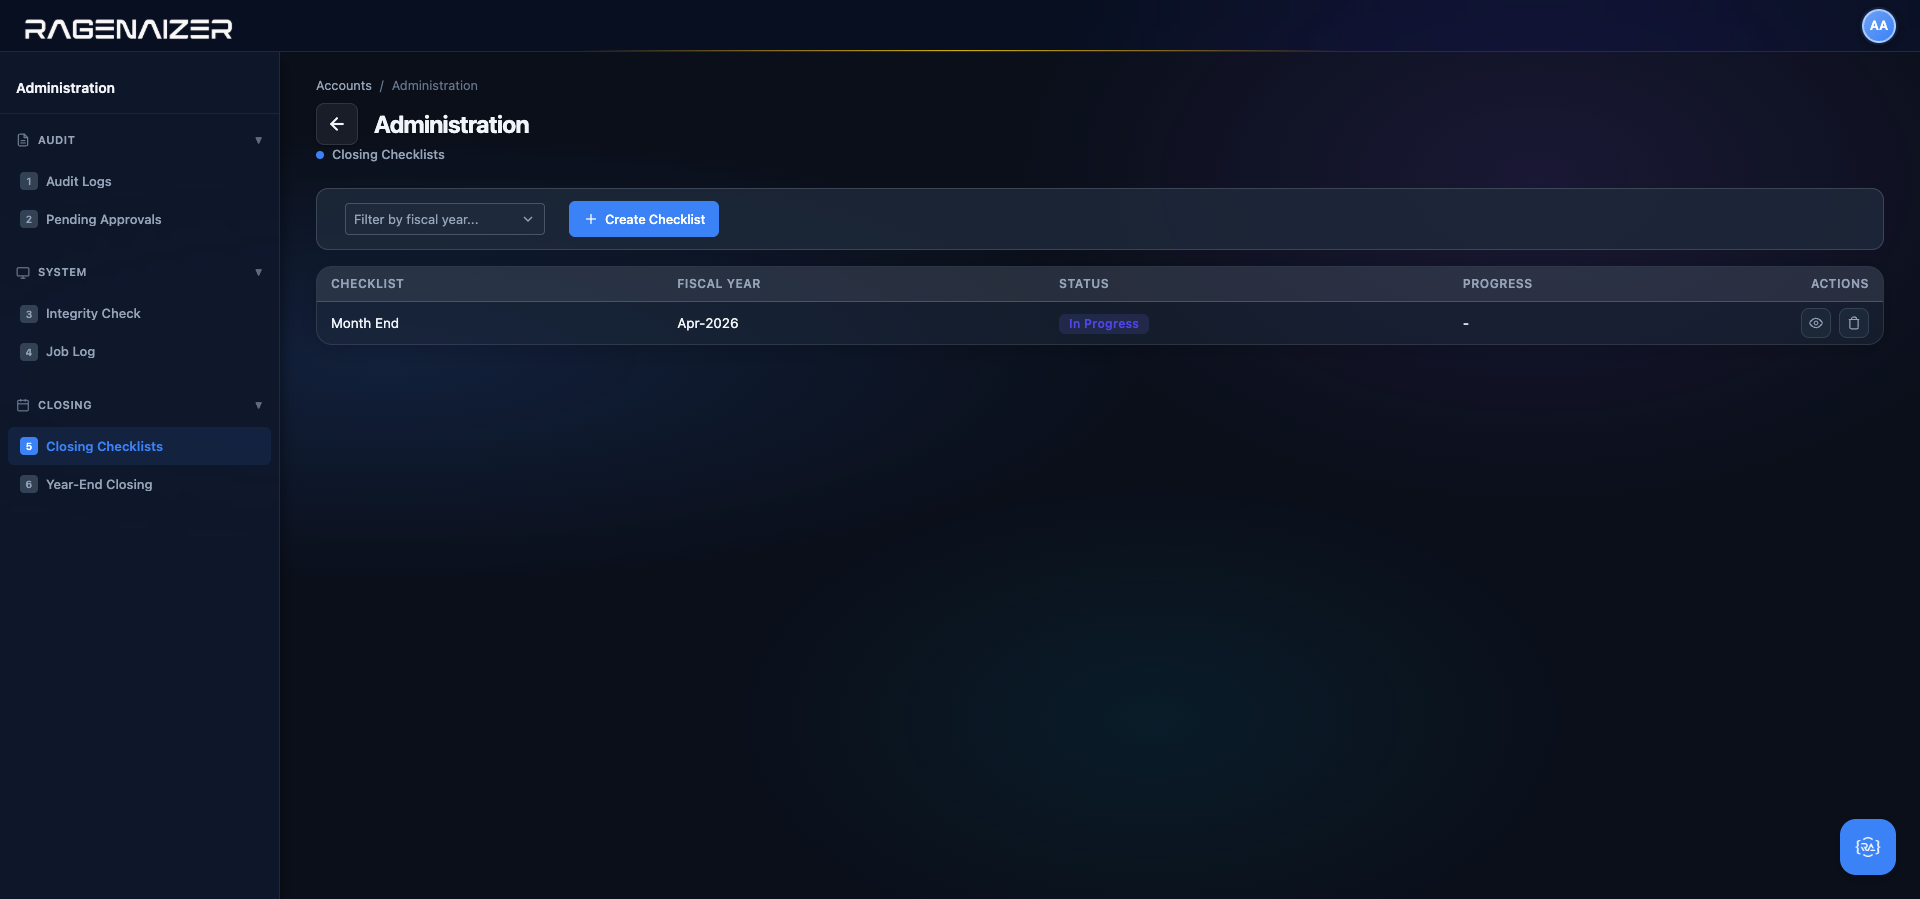
- Closing Checklists — templated month-end and year-end closing checklists. Tick items off as you complete them; they're saved against the period.
- Year-End Closing — the formal close-out: zero out all P&L accounts, post the closing entry to Retained Earnings, mark the fiscal year as Closed, and create the next year's opening balances automatically.
Closing Checklists — the standardised month-end protocol
Locking a period (which we met briefly in §5.2) is only the last step of month-end — before that you have a dozen other things to finish: all customer invoices approved, all vendor bills received and recorded, bank statements reconciled, depreciation run, TDS verified, suspense accounts at zero, and so on. Every controller has their own mental list for this; the problem is that mental lists drift — you forget an item, the junior person forgets a different item, and by the time anyone notices, the TB has already been signed off with a hole in it.
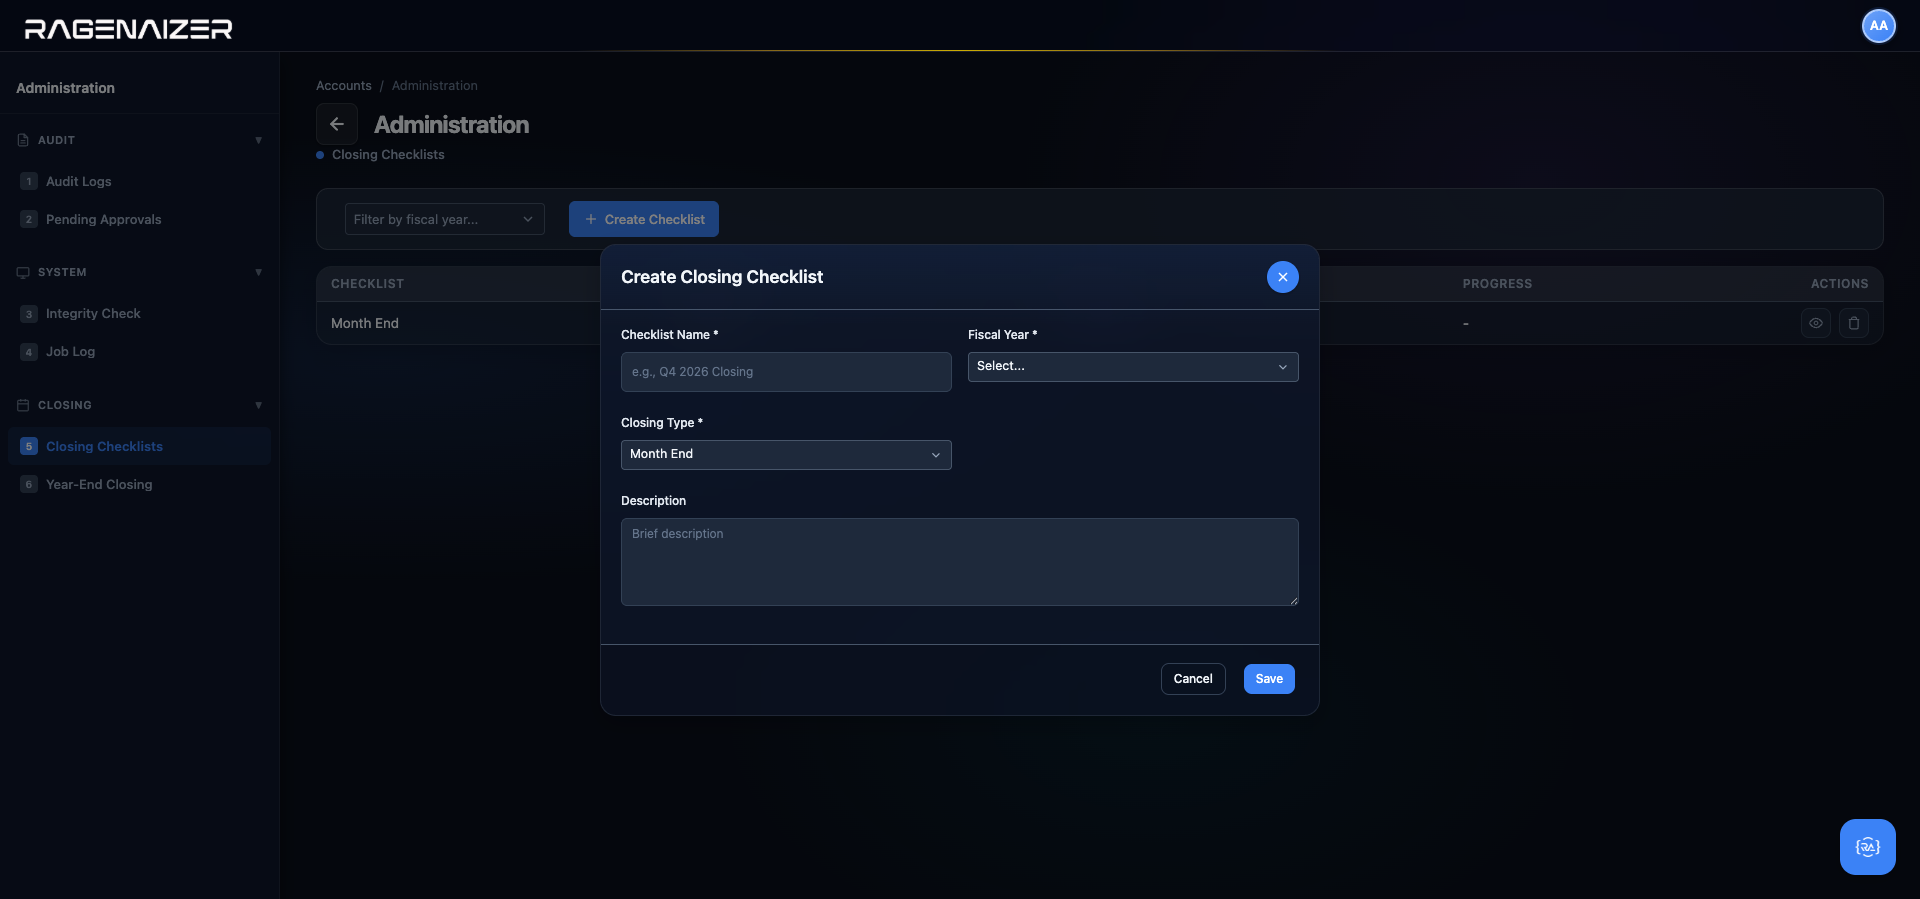
Closing Checklists makes the list explicit. Open Administration → Closing Checklists. Each row is a checklist for one period (month, quarter, or year-end), with the set of items that must be ticked off before the period can be considered closed. The system ships with a default 14-item template for month-end (covering everything from bank reconciliation to expense claim approval), and you can copy or author new templates as your firm's protocol evolves.
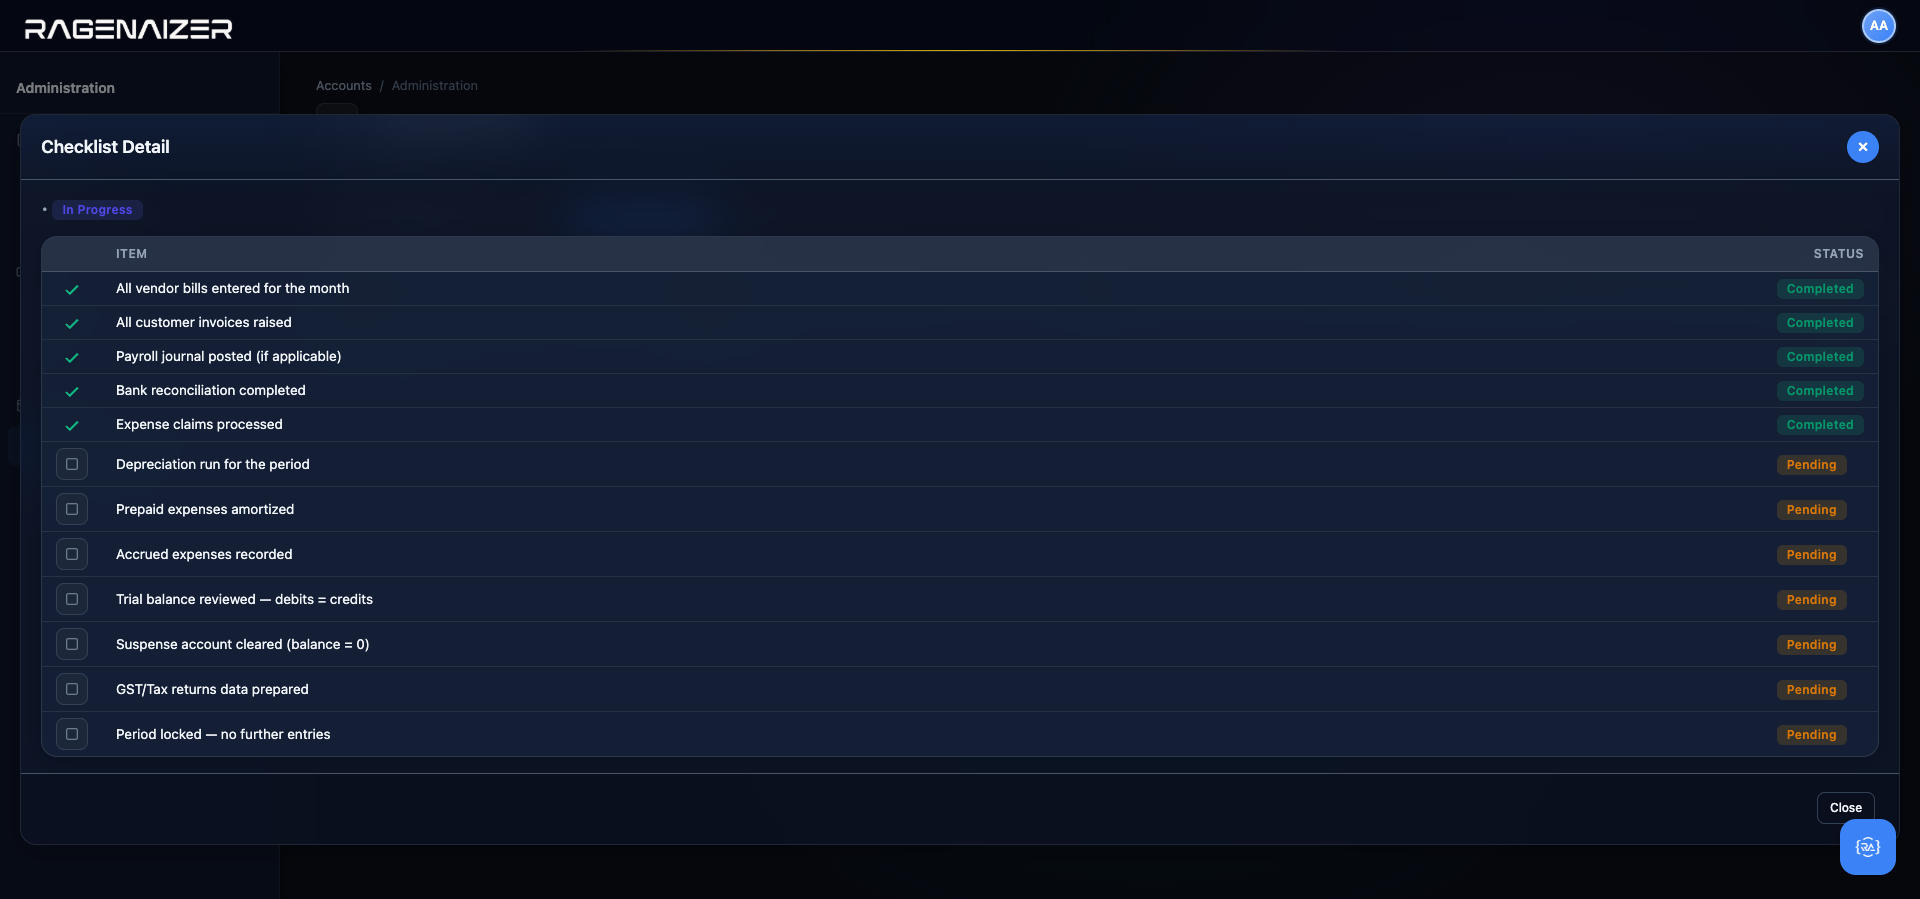
Ticking the boxes doesn't automatically lock the period
This is deliberate. The checklist is a protocol, not an enforcement mechanism — you can lock a period even if the checklist isn't 100% complete, and you can complete the checklist without locking. The separation exists because some teams want hard blocks (lock is disabled until the checklist is done) and others want soft reminders (checklist is a TODO list, lock happens whenever the controller is satisfied). The current shipping mode is "soft". A later enhancement may allow an admin toggle to make checklist completion a prerequisite for locking.
Year-End Closing — the once-a-year procedure
Once the final month of a fiscal year is locked and every closing checklist is signed off, you run Year-End Closing. Open Administration → Year-End Closing. The page takes a fiscal year, runs a series of pre-flight checks to prove the books are safe to close, and — only if every check passes — enables the irreversible Close Fiscal Year button.
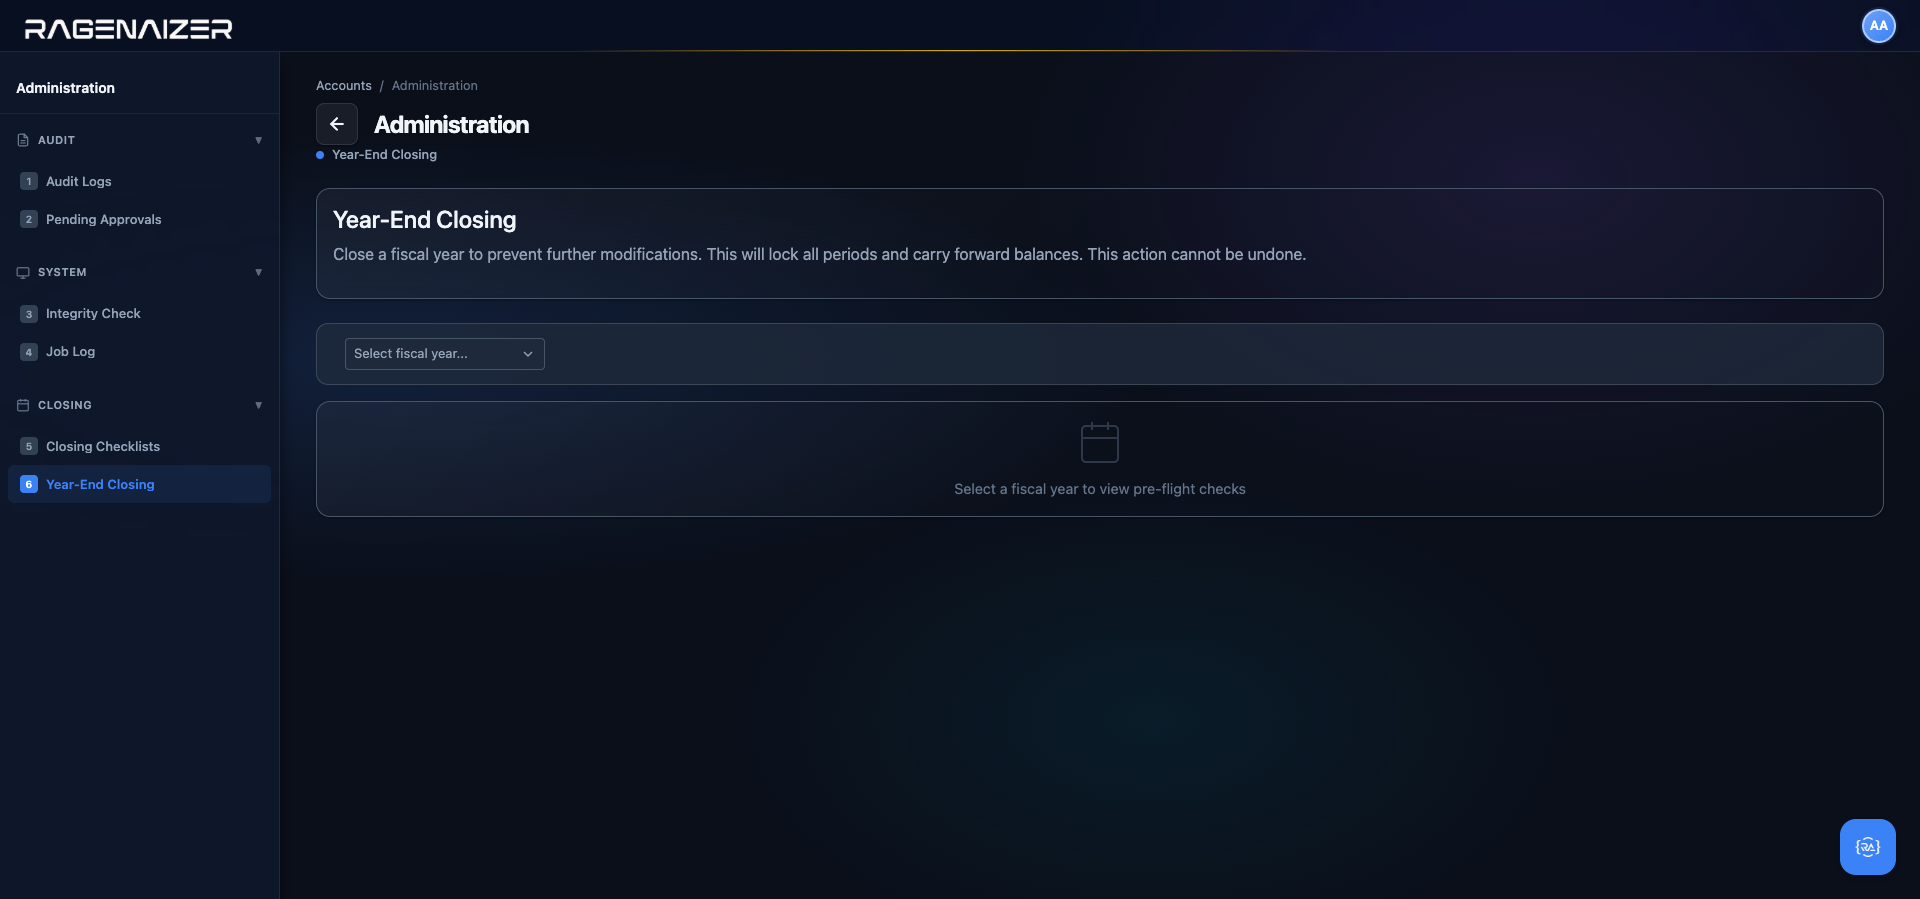
Pick the fiscal year you want to close. The page runs its pre-flight checks immediately.
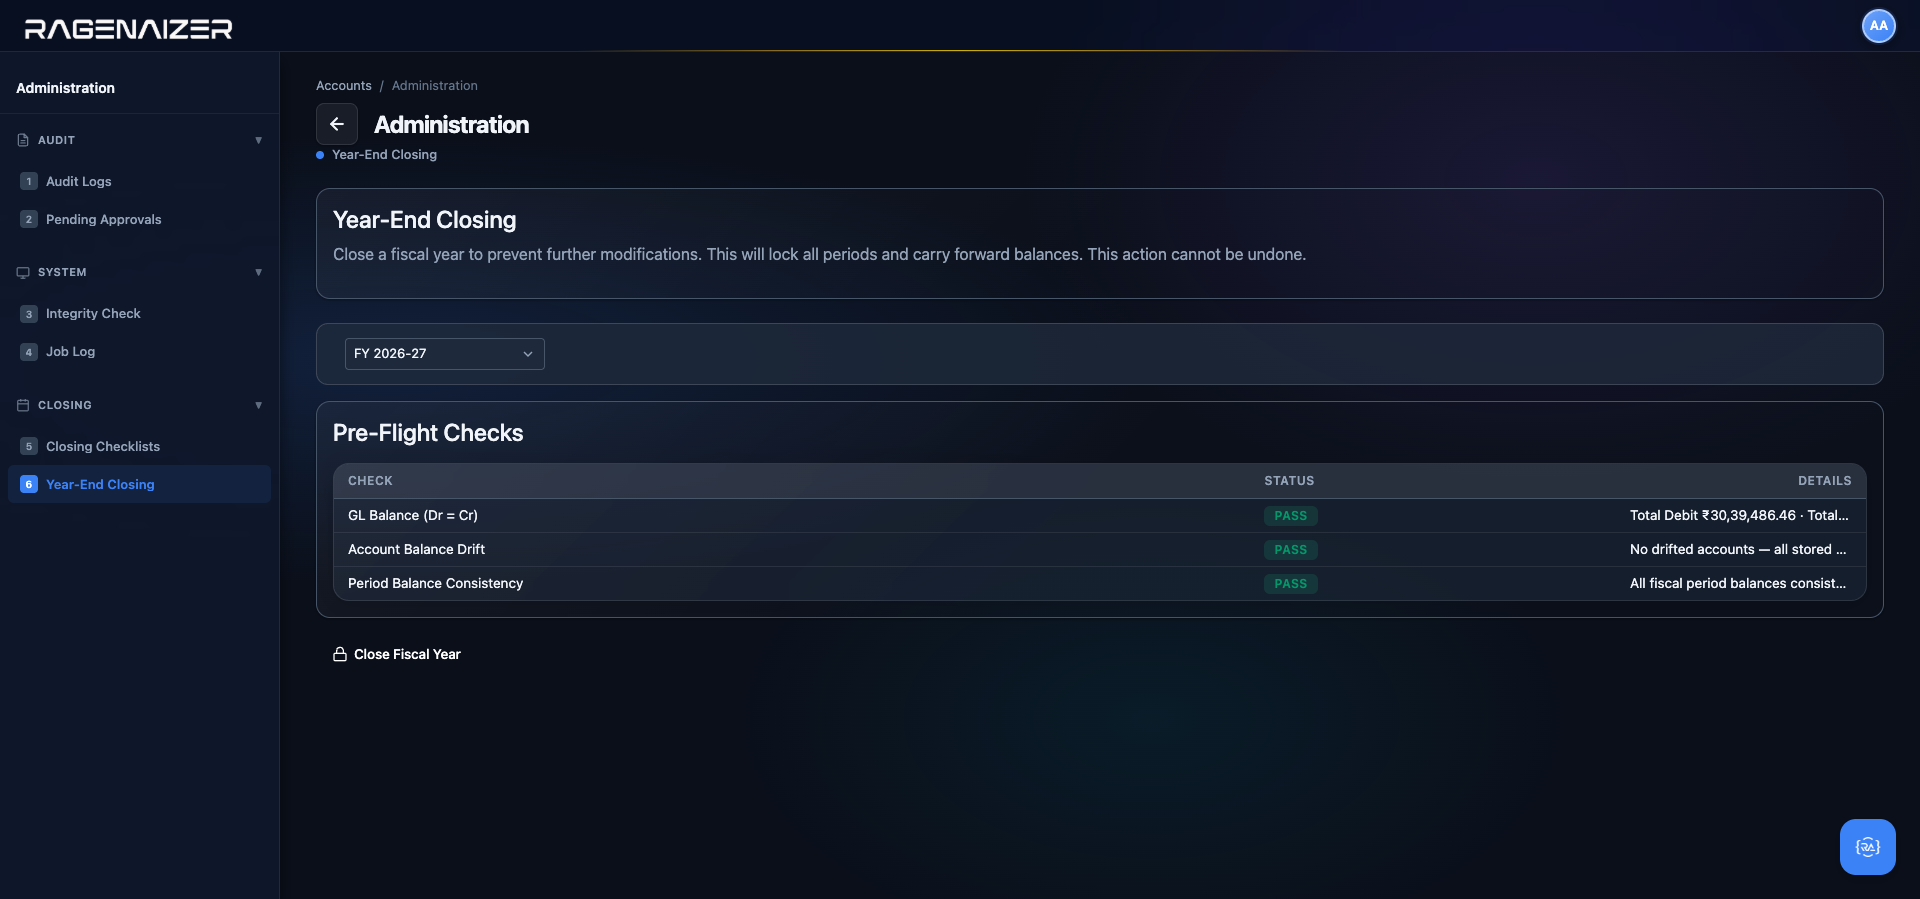
account_period_balances must agree with the live sum from gl_entry_lines for every account (otherwise the cached reports are lying about the true position); Period Balance Consistency — every fiscal period's cached aggregate must match its GL sum. All three passed here, so the Close Fiscal Year button below is enabled. If any check had failed, the button would be disabled and the offending row would be red with a drill-down explanation.A failing check is a real inconsistency — fix the source, re-run
If the TB Balance check fails, your debits and credits in gl_entry_lines don't add up — this is almost always a half-posted JE from a service restart mid-write, or a manually-edited row in the database. Fix the underlying row (usually by voiding the broken JE and re-posting it), re-run the integrity check under Administration, and come back. If Account Balance Drift fails, the cache is stale — run Recompute Balances under Administration → System and come back. Never edit the database to force a pre-flight check to pass — you'll just be burying the inconsistency in the closing entries.
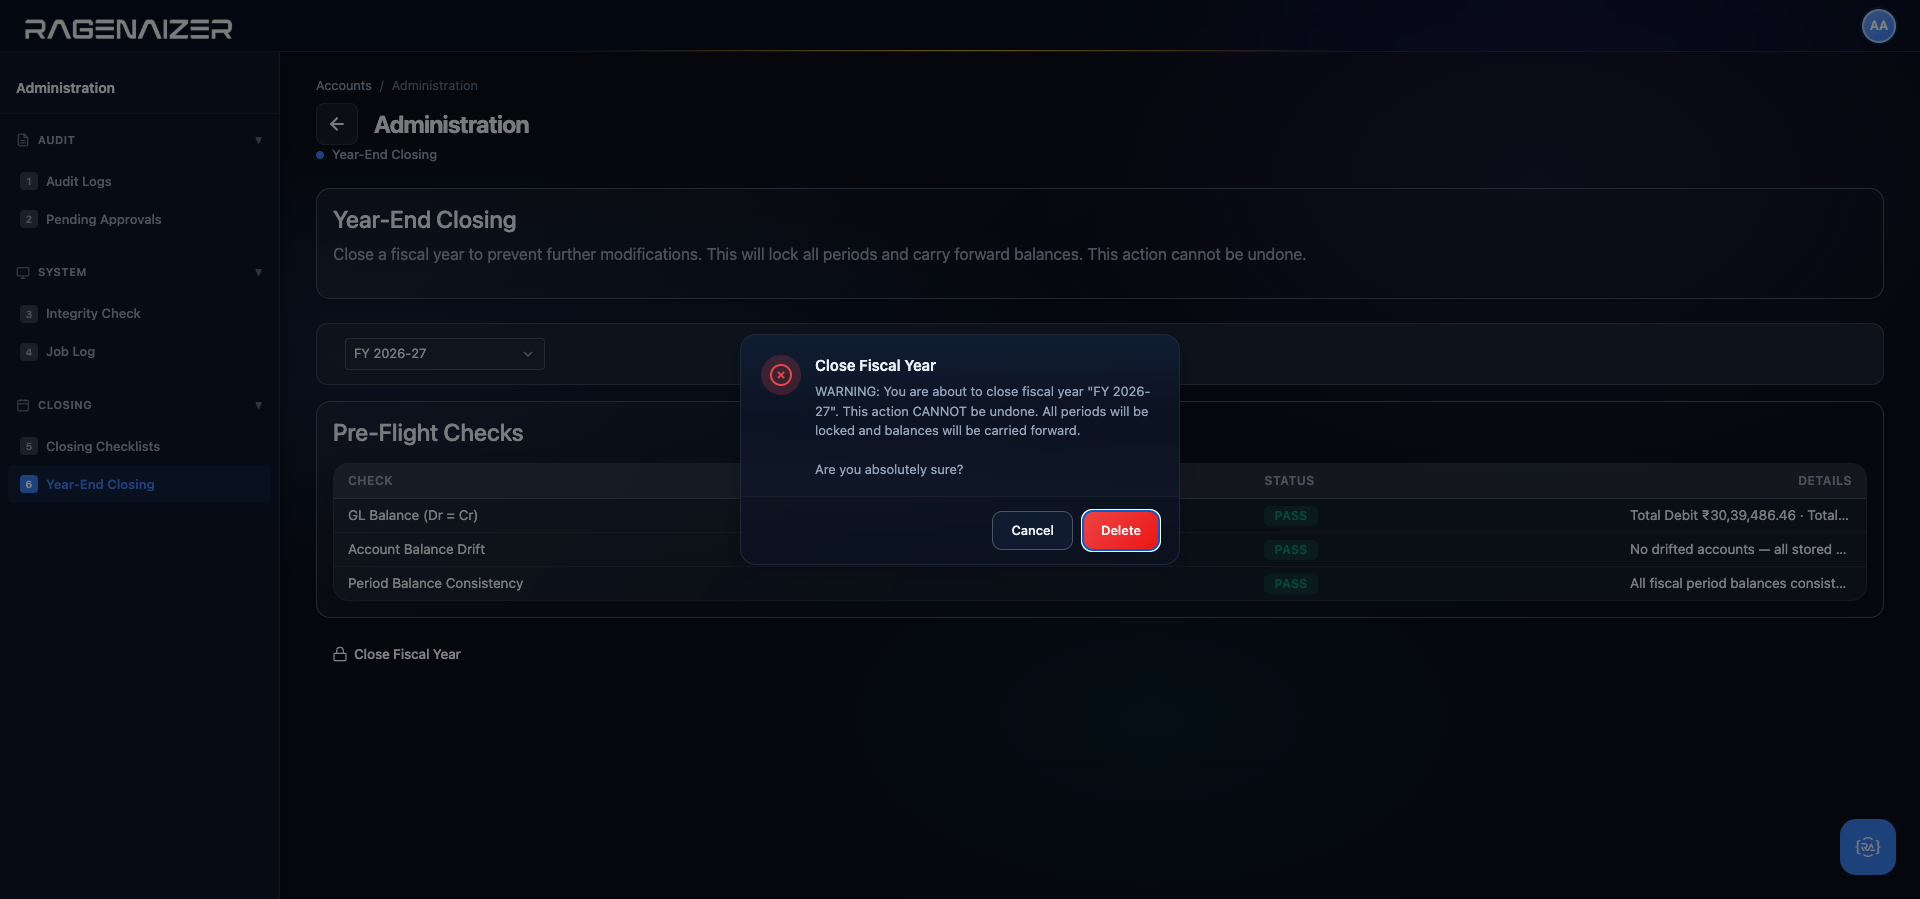
With pre-flight green, click Close Fiscal Year.
What the system does behind the scenes
When you click the red button, the backend runs all of the following inside a single database transaction:
- Re-runs the three pre-flight checks (just in case anything changed between loading the page and clicking the button).
- For every Revenue account with a non-zero balance, creates a closing journal line: Dr Revenue for the full balance, Cr 3300 Current Year Earnings.
- For every Expense account with a non-zero balance, creates the mirror: Dr 3300 Current Year Earnings, Cr Expense for the full balance.
- Posts the aggregate closing JE (journal type CLOSING, entry date = fiscal year end date, description = "FY 2026-27 Year-End Closing").
- Rolls 3300 Current Year Earnings into 3200 Retained Earnings with a second JE (Dr 3300 / Cr 3200 for the net profit, or Dr 3200 / Cr 3300 for a net loss).
- Locks all twelve fiscal periods by setting
is_locked = true. - Flips the fiscal year row's
is_closed = true. - Creates the next fiscal year (e.g. FY 2027-28) with the just-computed Asset / Liability / Equity closing balances as opening balances in the new year. Revenue and Expense accounts start at zero, as they should — they're period accounts.
- Logs every step to the audit log under
entity_type = 'fiscal_year',action = 'closed'.
If any step fails, the entire transaction rolls back — you end the click exactly where you started, with a toast-level error identifying which step failed. There is no half-closed state: either the year is fully closed and the next year is fully created, or nothing happened.
Unlike period-lock, year-end close has no Unlock button
Period locks can be lifted by an admin (§5.2). Year-end closing cannot — there is no Unclose Fiscal Year action in the UI or API. The reason is accounting integrity: the closing JEs have already propagated their numbers into next year's opening balances, and unwinding that would require also unwinding every transaction you've already booked to the new fiscal year — which in a real operating business is a cascade that quickly becomes uncorrectable. If something did go wrong and a legitimate correction to the closed year is genuinely necessary, the accounting convention is to post the correction as a prior-period adjustment in the current fiscal year (hit Retained Earnings, not the closed P&L), with full prose explaining the reason in the journal entry's description. The audit log keeps both the original closing and the correction.
Period close vs. year-end close — the distinction in one paragraph
Period close is monthly: it freezes a single month against further writes while leaving the rest of the year open. It is reversible (admin can unlock), auditable (log captures every lock/unlock), and local (only that one period is affected). Year-end close is annual: it freezes every period in the fiscal year simultaneously, posts the closing journal entries that zero out Revenue and Expense, rolls net profit into Retained Earnings, and creates the next fiscal year with the closing balances as opening balances. It is not reversible, is gated by pre-flight integrity checks that must all pass, and affects the entire chart of accounts. You'll run period close 12 times a year; you'll run year-end close once.
The advanced modules.
Five advanced modules that build on top of the foundation you've set up: Banking, Expense Management, Fixed Assets, Subscription Billing, and Administration. Each one is a full deep-dive — read the ones you need now and come back to the rest later.
Create dedicated GL accounts for each physical bank, fixed-asset class, and expense category
Every module in this section maps records into the General Ledger through a linked GL account. If that GL account doesn't exist yet, the dropdown will be empty of sensible choices and you'll end up mapping HDFC to Cash in Hand, which conflates two very different things. Before you open any module below, jump back to Section 4 — Chart of Accounts and create:
- One Current Asset account per physical bank account (e.g. 1010 HDFC Bank — Current A/C, 1020 ICICI Bank — Savings A/C). Use the 1010–1099 range by convention so they sort just below 1001 Cash in Hand.
- One Fixed Asset account per asset class (e.g. 1500 Computers & IT Equipment, 1510 Furniture & Fixtures) and one matching Accumulated Depreciation contra-asset (1590, 1591…).
- One Expense account per expense category you plan to use (e.g. 5020 Travel, 5030 Meals & Entertainment, 5040 Office Supplies).
Without these, you'll repeatedly hit half-empty dropdowns and end up polluting your Trial Balance. Two minutes of prep here saves hours of cleanup later.
Banking
The Banking module manages your bank accounts as real bank accounts — not just GL lines. You create one record per physical bank account, record every deposit and withdrawal against it, move money between your own accounts via inter-bank transfers, and at month-end you reconcile the Ragenaizer balance against the actual bank statement. Every action in this module posts a double-entry journal to the General Ledger automatically, so the balance you see here is always the same balance you see on the Balance Sheet.
Bank account
A record that mirrors a real bank account in the outside world. It has a name ("HDFC Current A/C"), an account number, an IFSC code, and — critically — a one-to-one link to a GL account on the asset side. The balance you see here is always the same balance you see on the Trial Balance for that GL account.
The four tabs
The Banking module has four sub-pages in the left sidebar: Bank Accounts (the list of your physical banks), Transactions (the running ledger of every deposit and withdrawal for a selected account), Inter-Bank Transfer (a shortcut for moving money between your own accounts), and Reconciliation (month-end statement matching). We'll walk them in order.
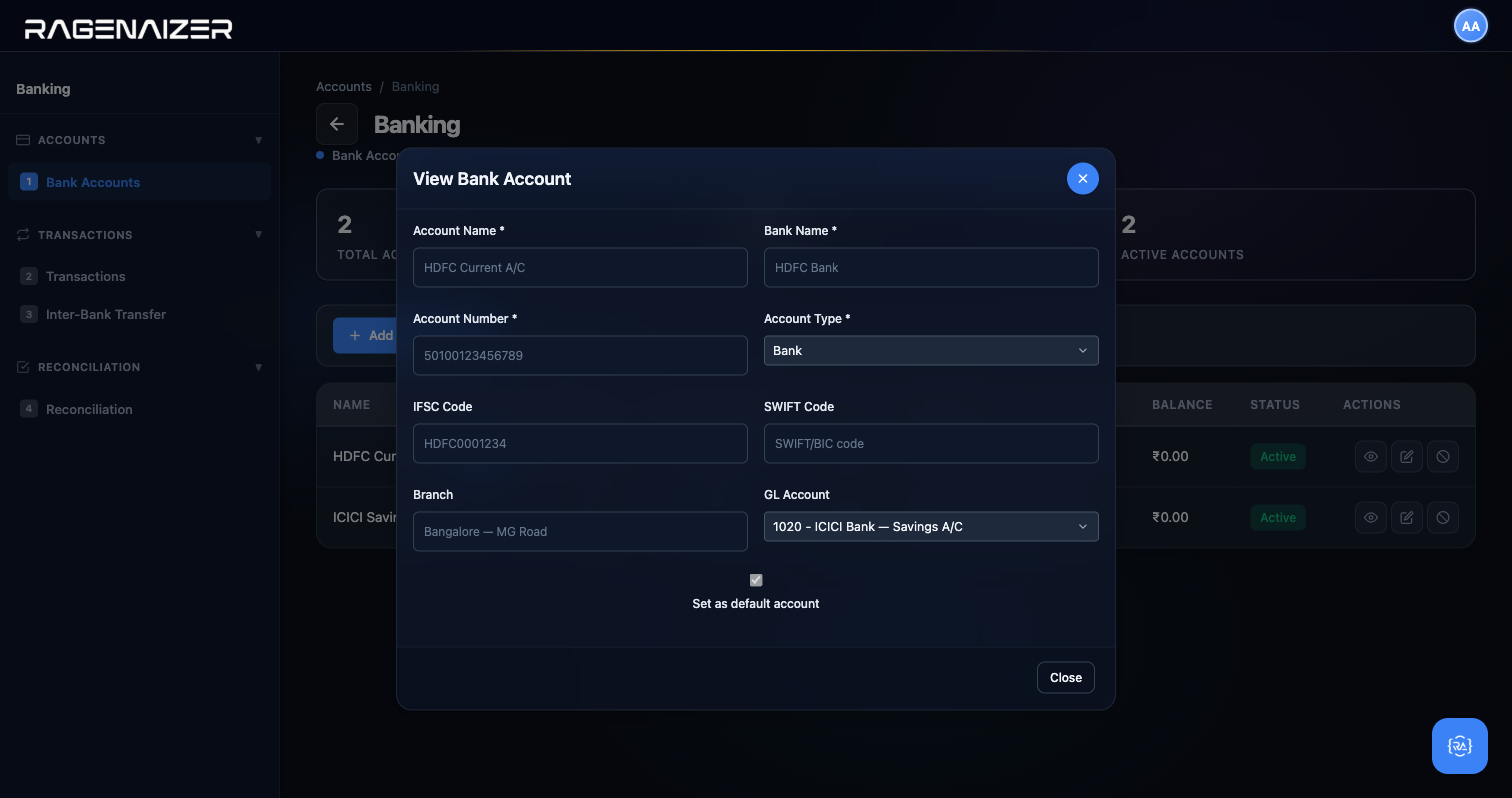
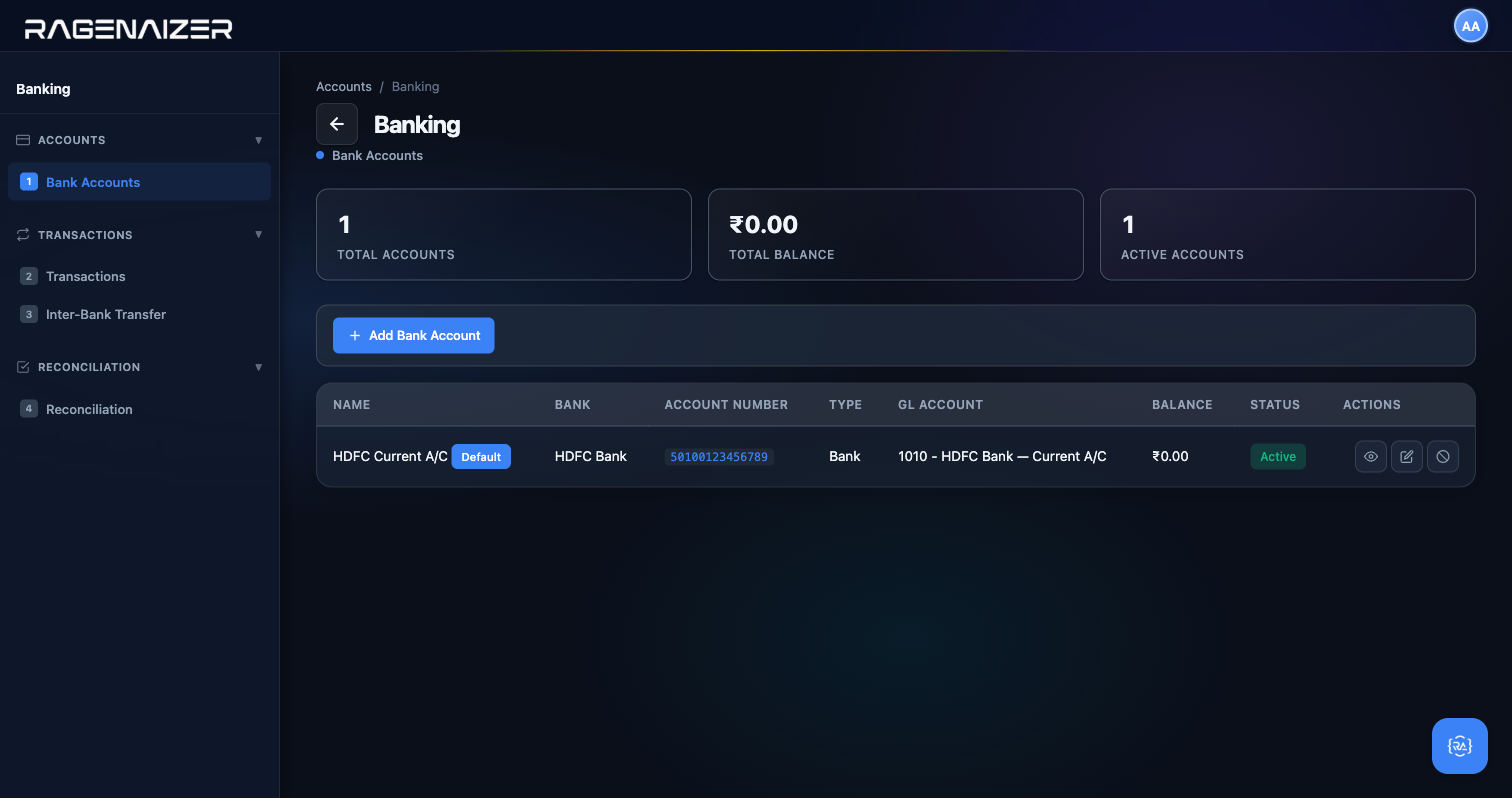
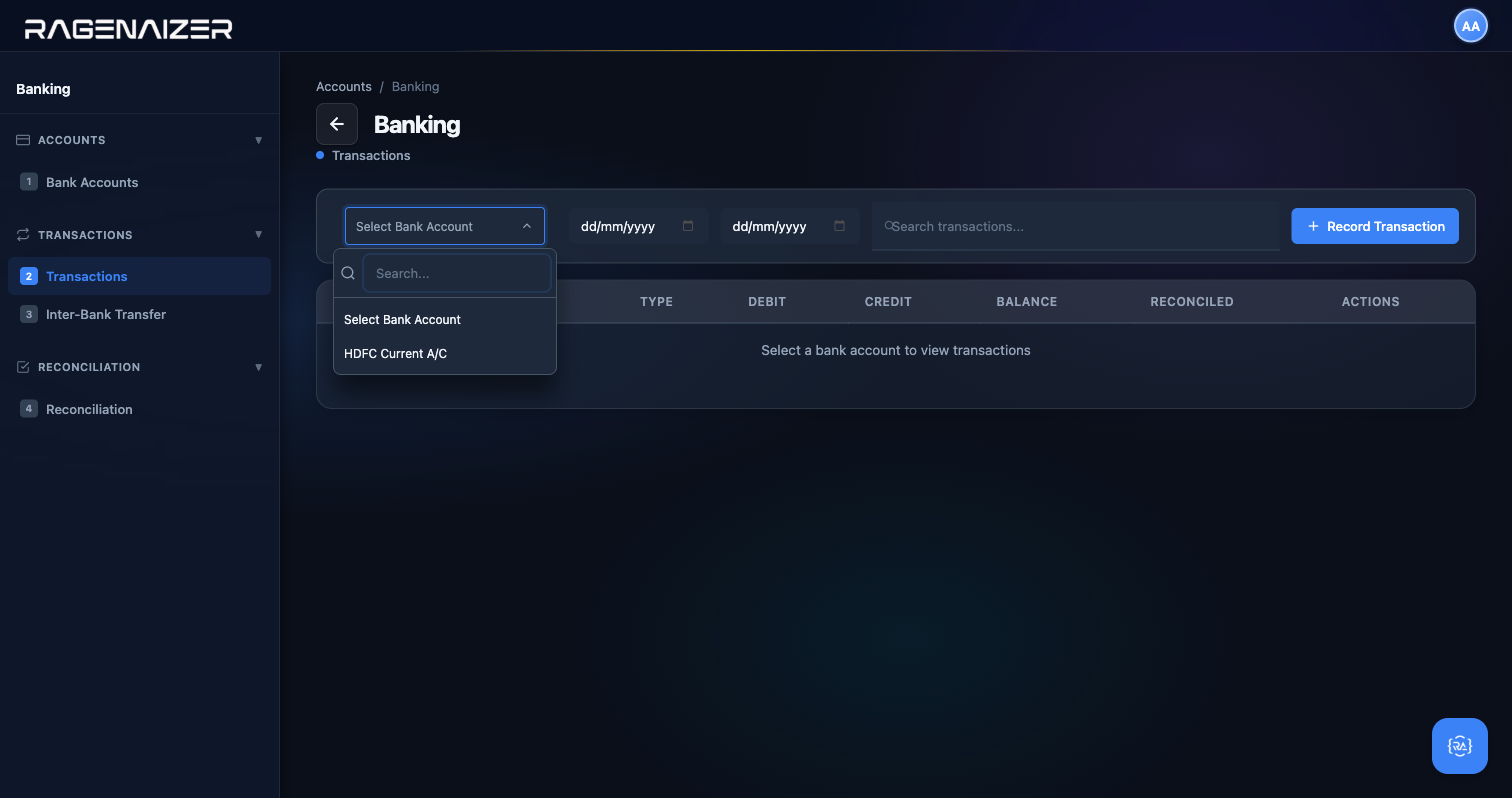
Tab 1 — Bank Accounts
Click + Add Bank Account. The form has nine fields: Account Name (a human-friendly label like "HDFC Current A/C"), Bank Name (e.g. "HDFC Bank"), Account Number, Account Type (Bank / Cash / Petty Cash / Payment Gateway), IFSC Code, SWIFT Code (for international transfers), Branch, GL Account (the Current Asset account you created in the prep step above — e.g. 1010 HDFC Bank — Current A/C), and Set as default account (for payment modals across the app to pre-select this one).
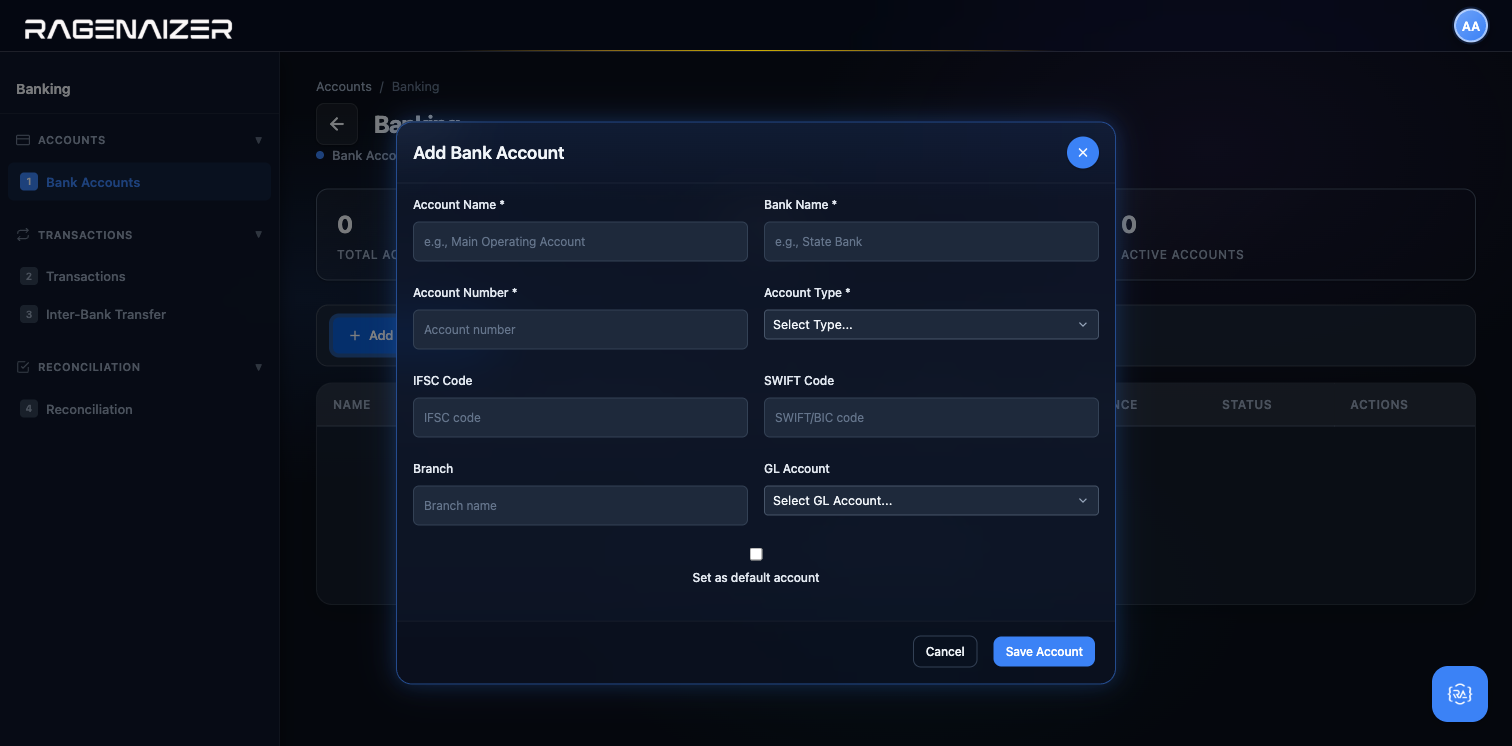
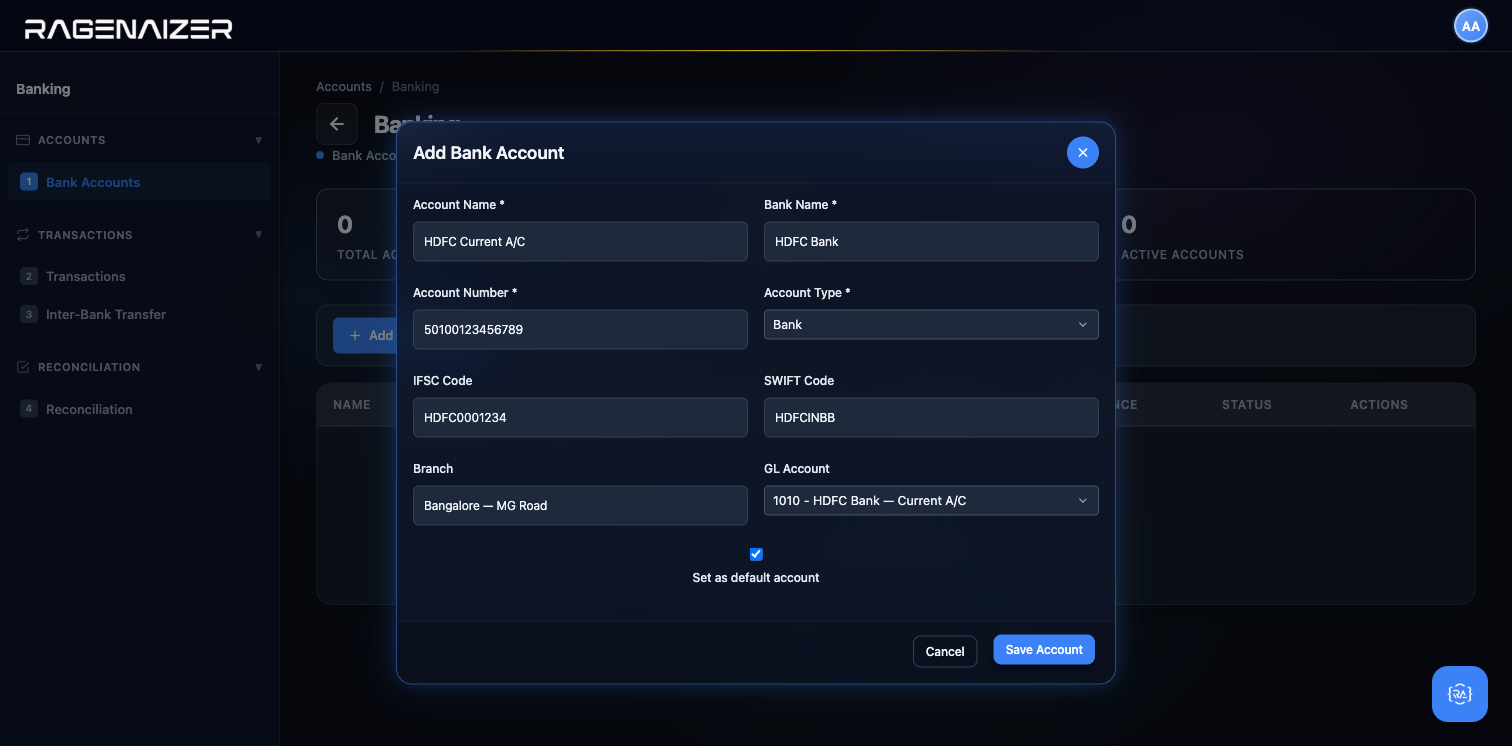
1010 — HDFC Bank — Current A/C, which is the dedicated GL account we created in the prep step. Set as default account is ticked because this is the account we'll use for most payments.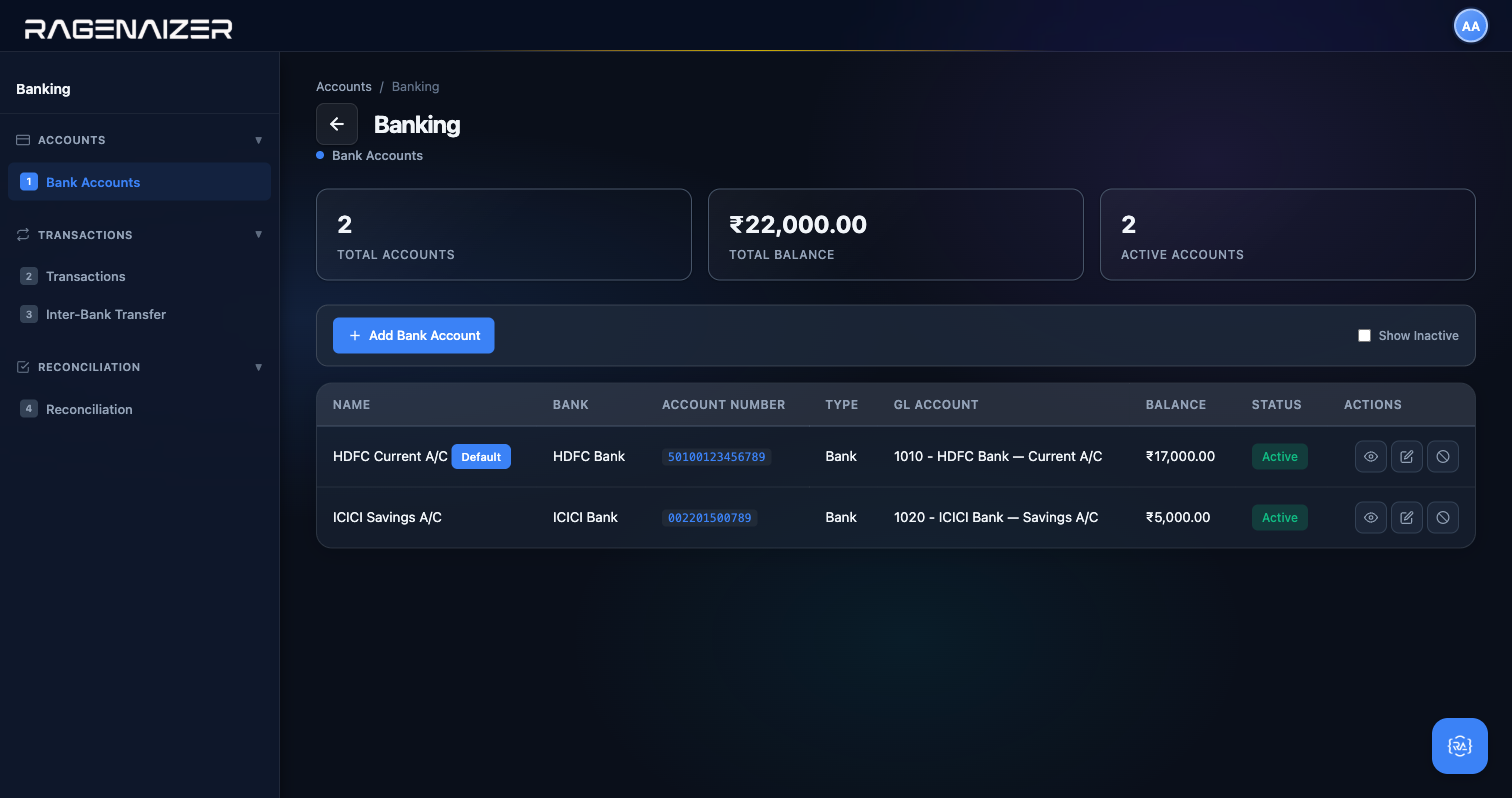
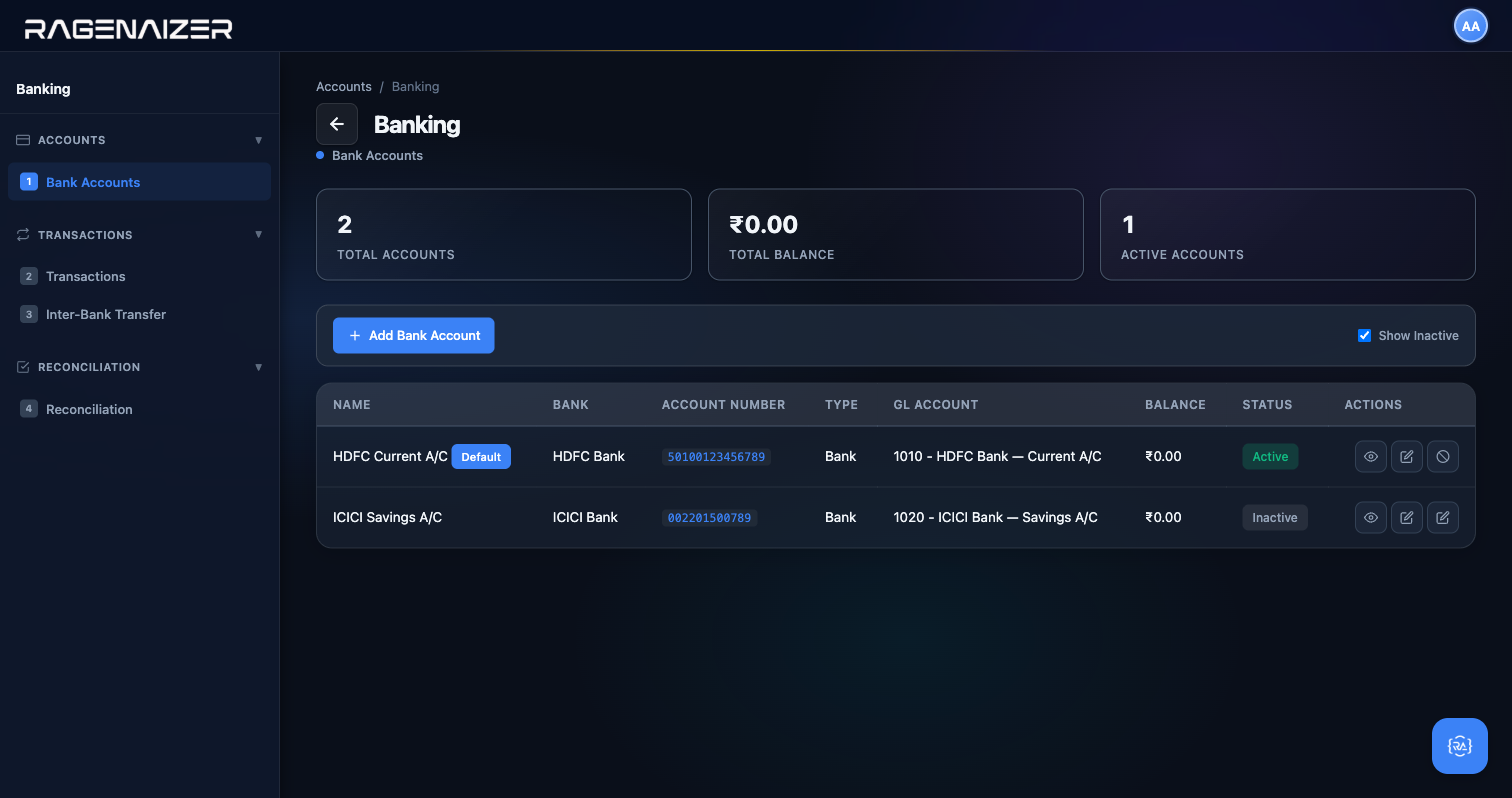
Add a second account to see contrast. Click + Add Bank Account again and fill in a different bank (we used ICICI Bank — Savings A/C mapped to GL 1020). Leave Set as default unticked so HDFC stays the default.
View, Edit, Deactivate — the three row actions
Click the View (eye) button on the HDFC row. A read-only modal opens with every field you entered, the Save button hidden, and Cancel replaced with Close. View is safe to click at any time — it never mutates anything.
Click Edit (pencil). The same modal opens but in edit mode — every field pre-filled and editable. This is where you'd fix a typo in the IFSC, or add the SWIFT code you forgot the first time.

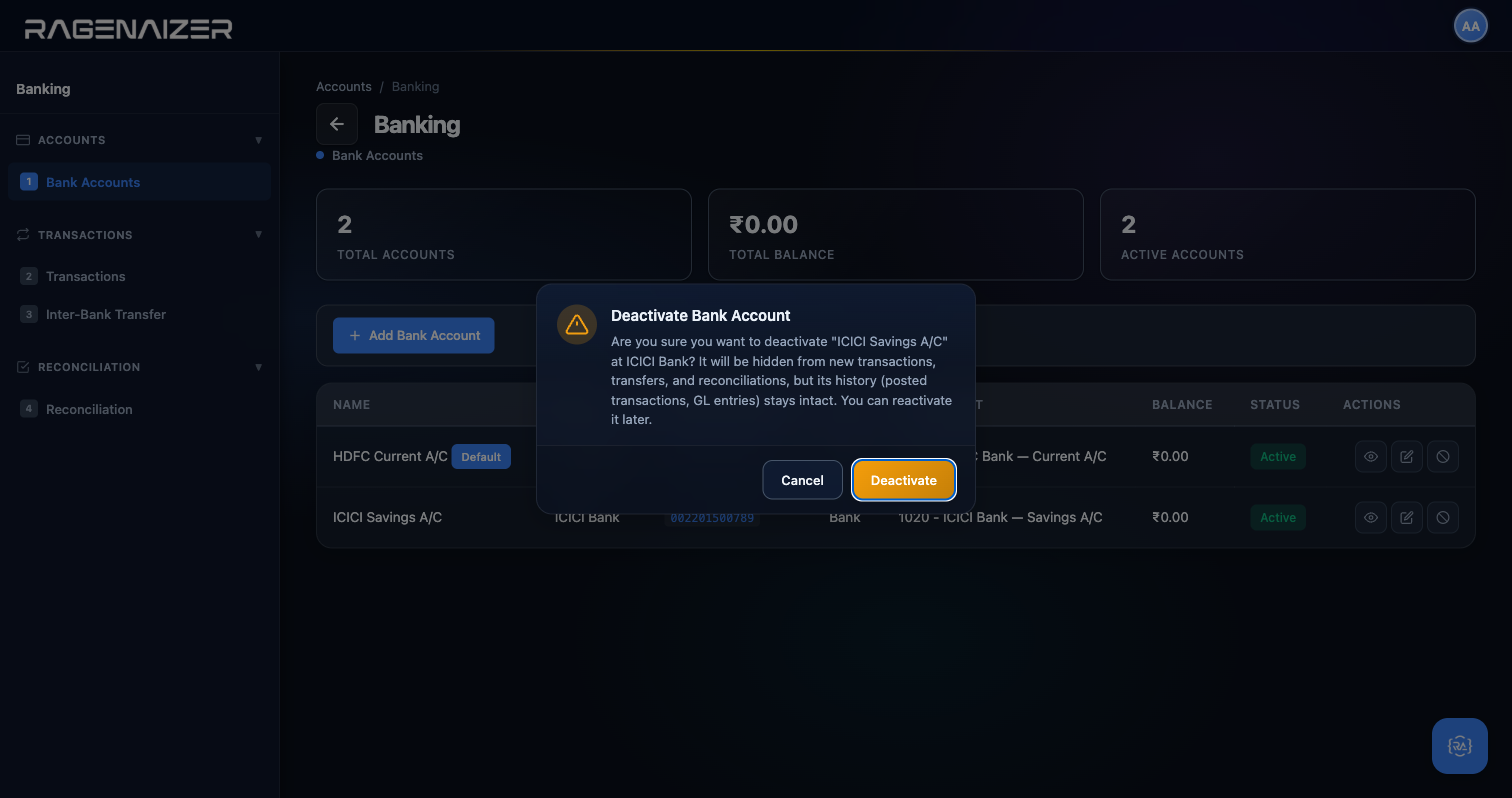
Click Deactivate (red circle-slash) on the ICICI row. A confirmation dialog appears, and crucially it names the target: "Are you sure you want to deactivate ICICI Savings A/C at ICICI Bank?" This is deliberate: confirmation dialogs across this module always name what you're about to do. If you ever see a generic "Are you sure?" prompt, it's a bug — report it.

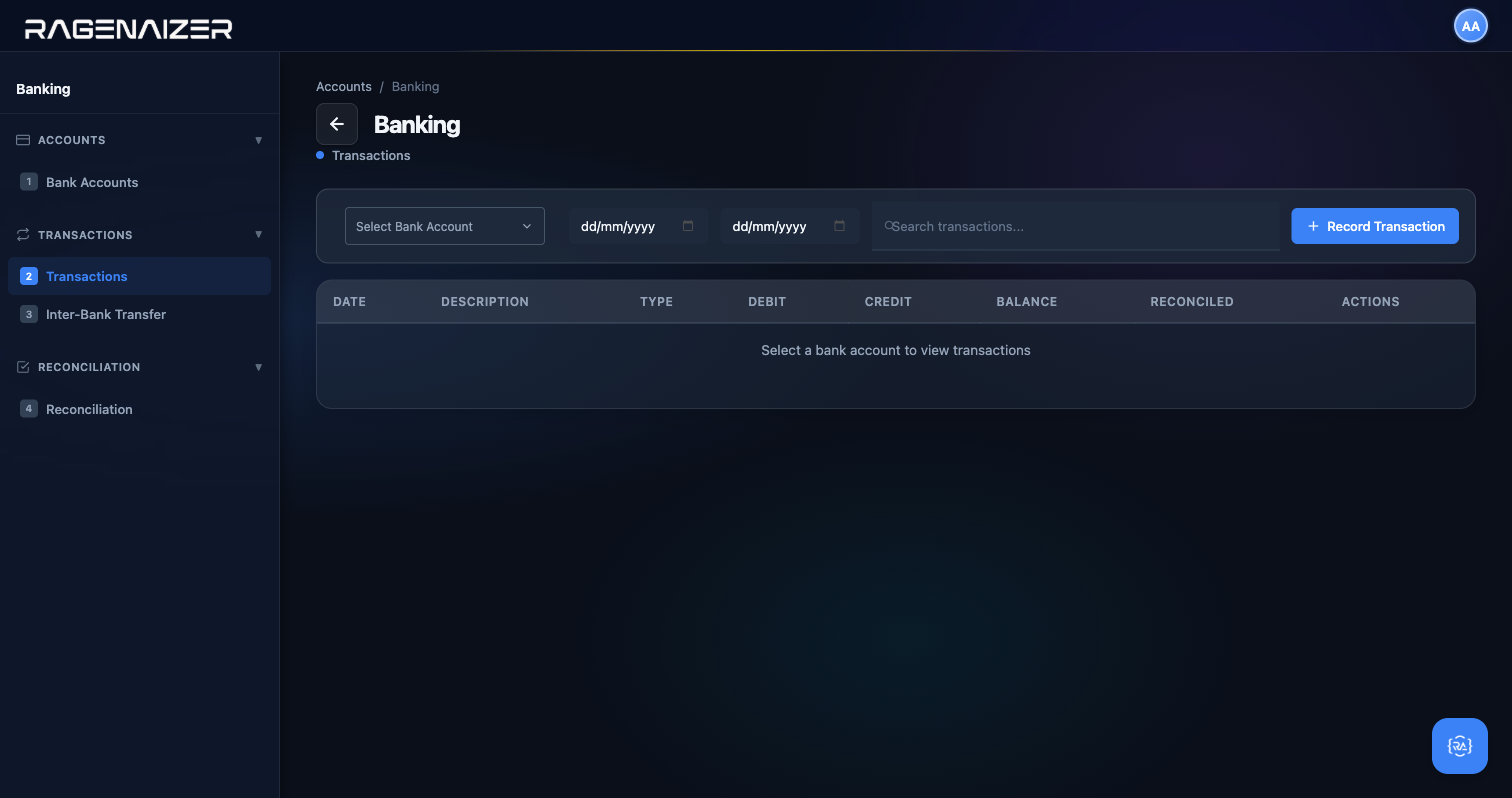
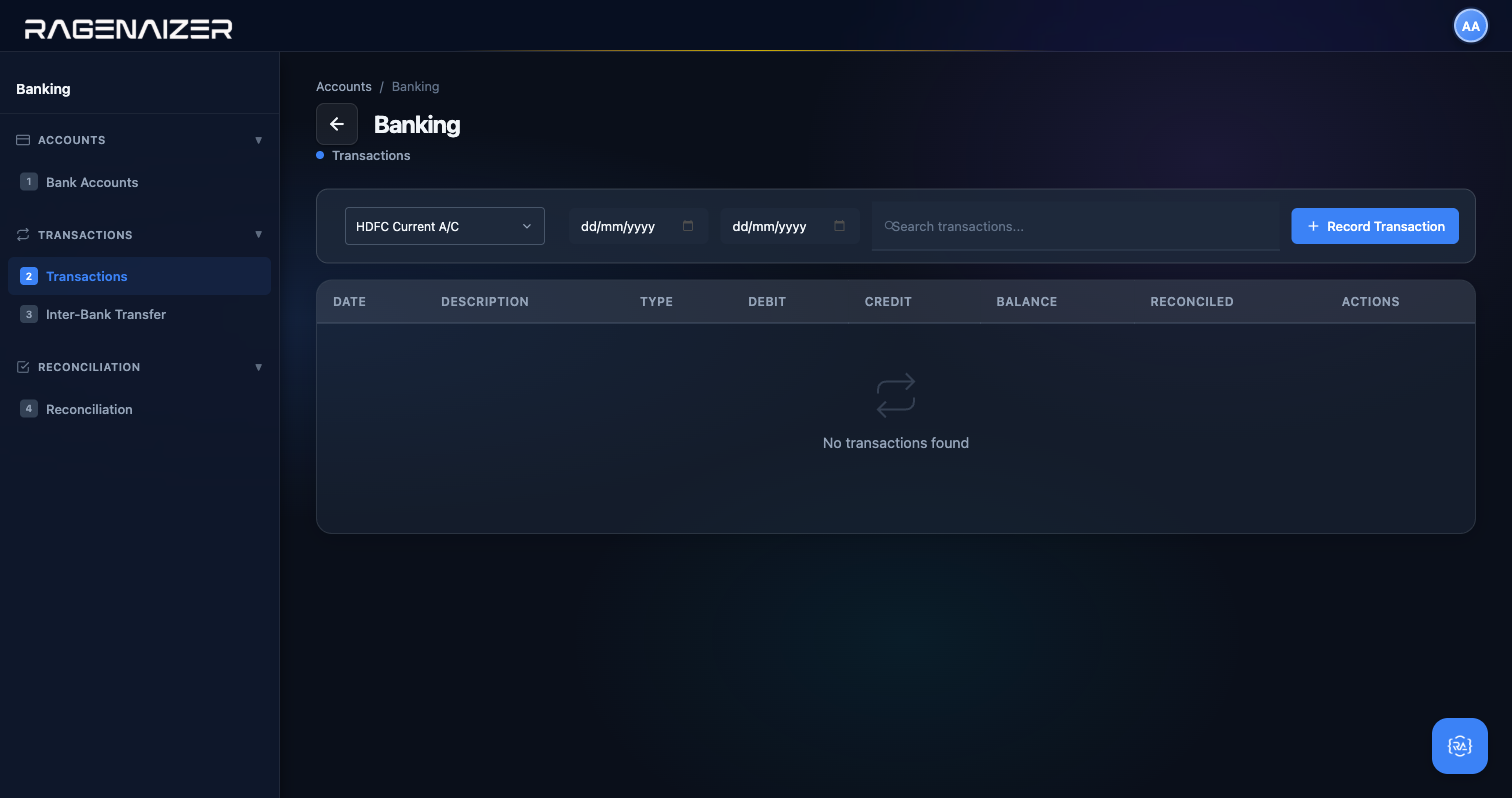
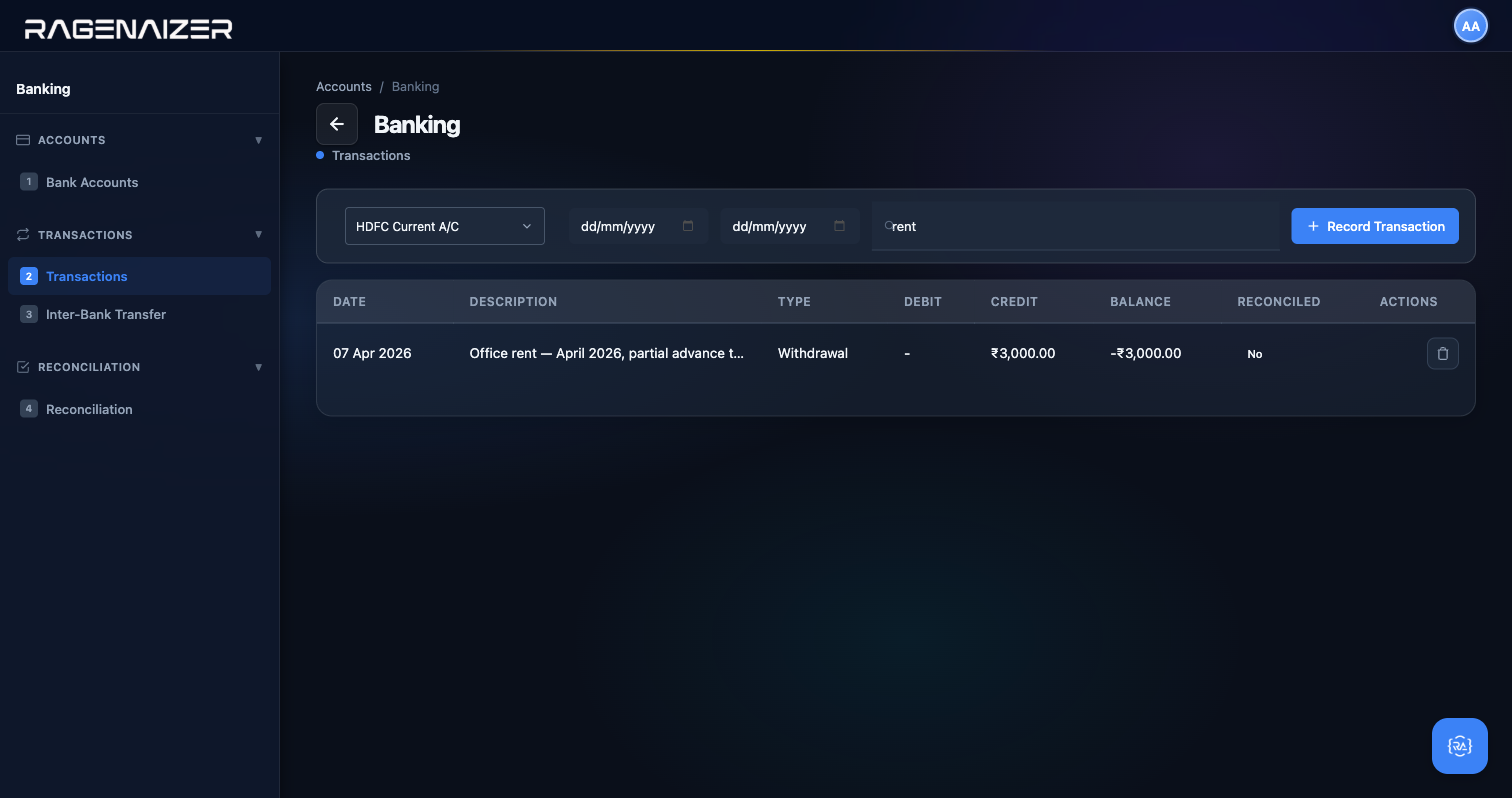
Tab 2 — Transactions
Click Transactions in the sidebar. This page is a bank passbook view, but unlike a real passbook the numbers you see are the numbers in your ledger (asset perspective) — so a deposit is a Debit (your asset goes up) and a withdrawal is a Credit (your asset goes down). If you're used to reading bank statements the other way round, this takes 30 seconds to get used to, and it's consistent with every other report in Ragenaizer. See the callout at the end of this subsection for the full explanation.
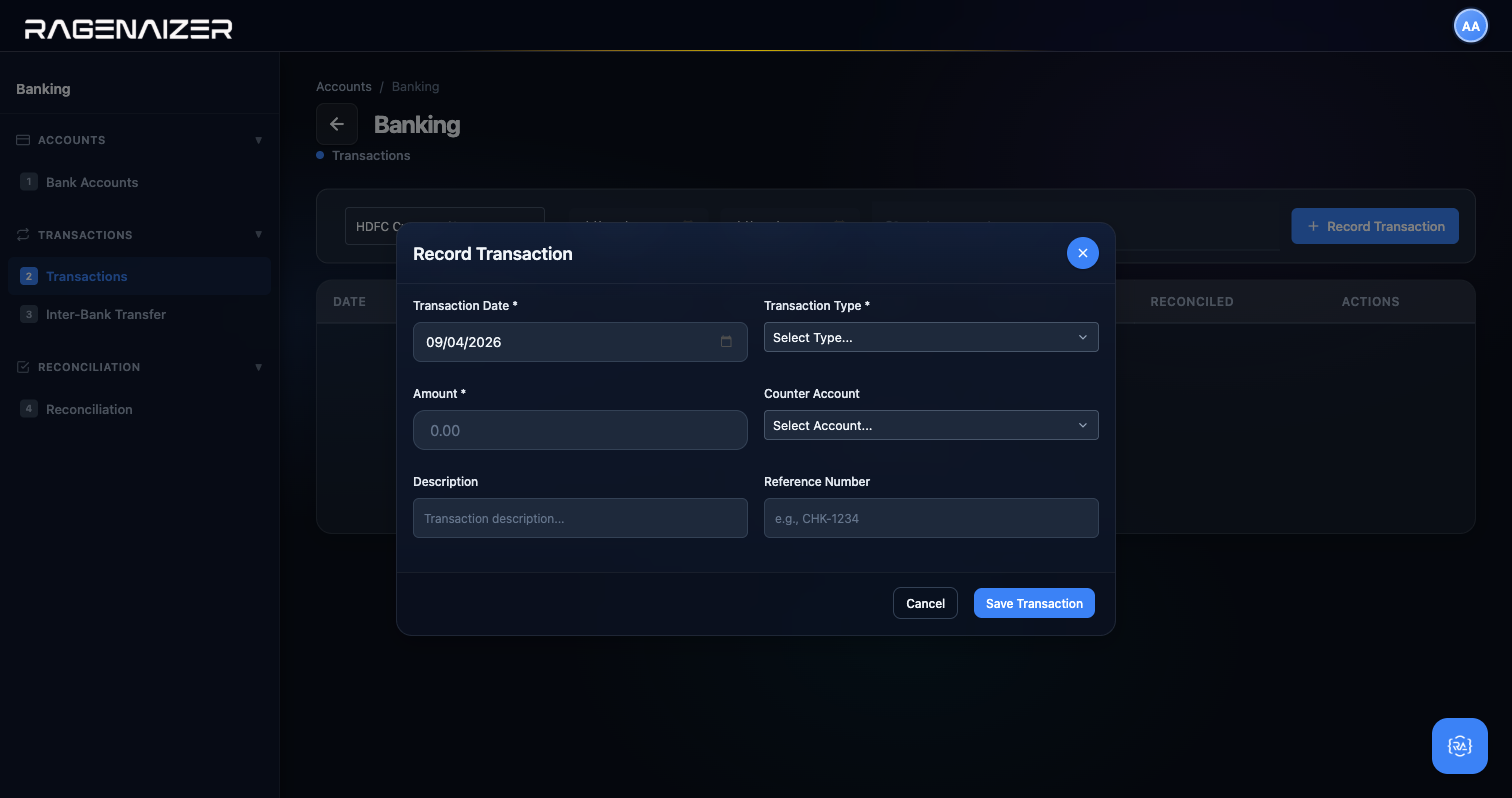
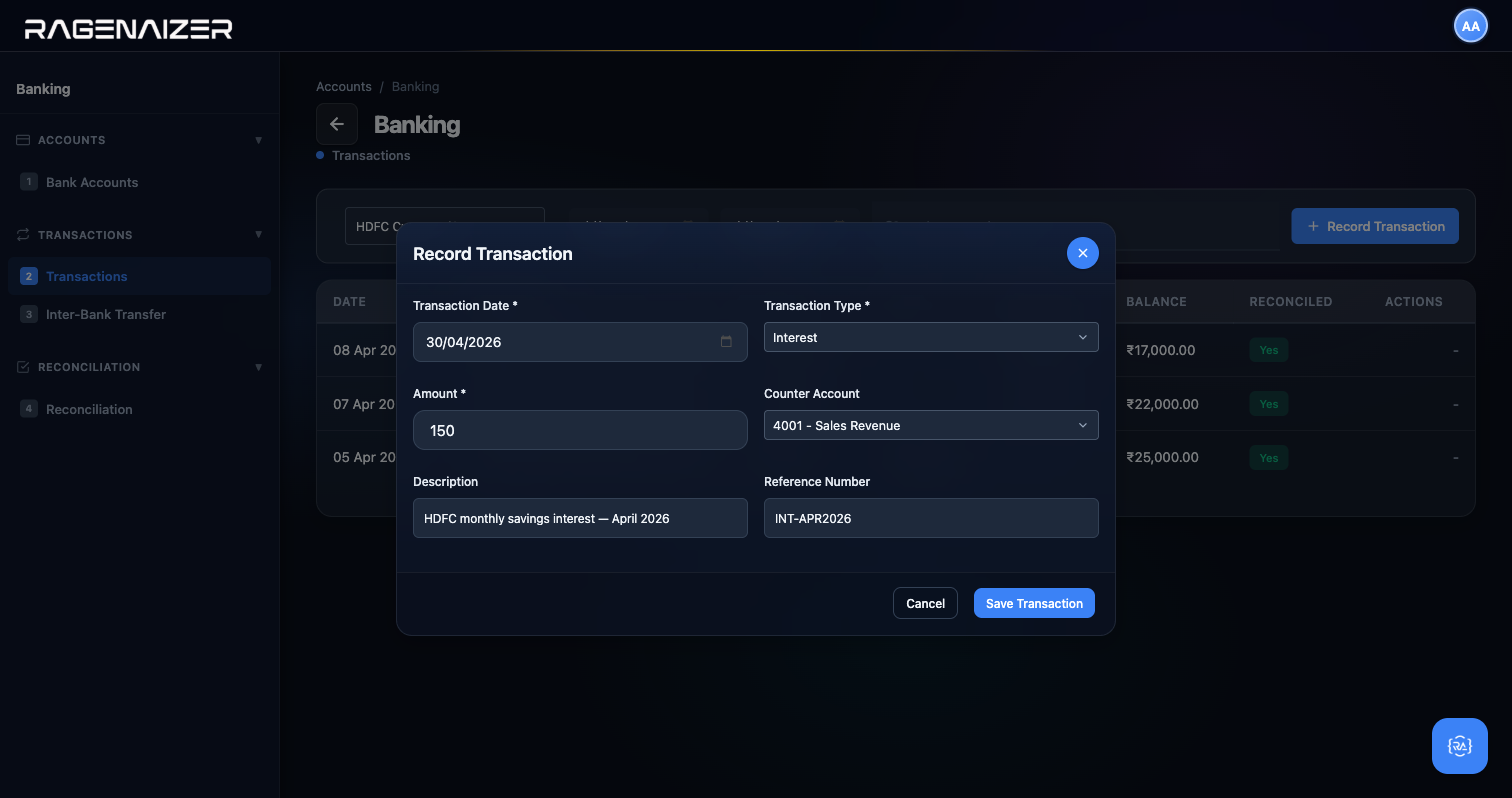
Record a deposit of ₹25,000 from a customer. The Record Transaction modal has six fields: Transaction Date, Transaction Type (four manual types: Deposit, Withdrawal, Interest, Charges — transfers and payment-gateway entries are created from their own dedicated forms so the dropdown stays clean), Amount, Counter Account (the other side of the double-entry — for a customer payment this is Sales Revenue or Accounts Receivable depending on whether the invoice was approved first), Description, and Reference Number (the cheque number, NEFT reference, etc.).
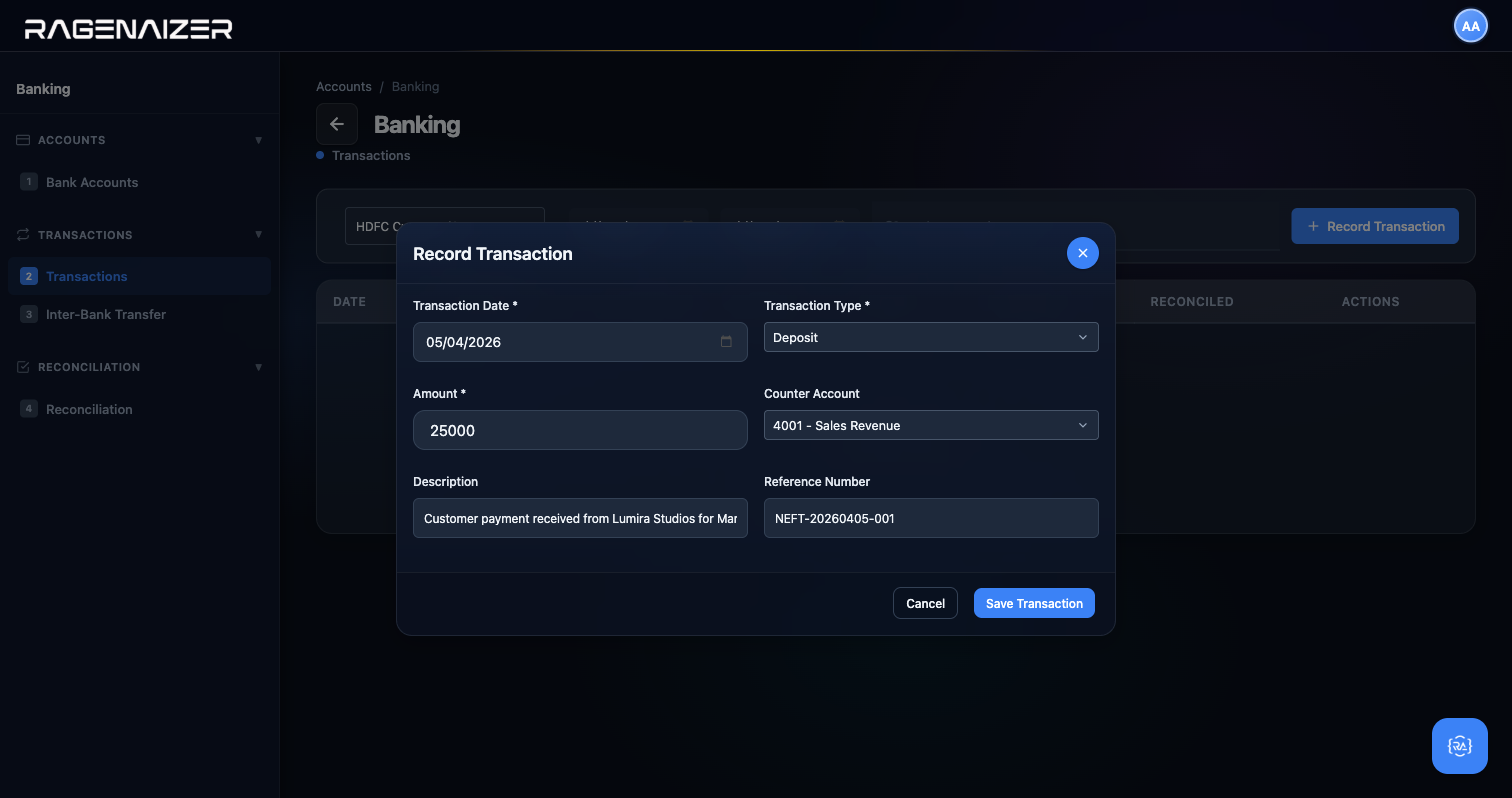

We're going to peek at the GL right now, because this is the moment the double-entry magic becomes visible. Open Ledger → GL Entries in a new tab, find the row that just got posted, and click the eye icon.
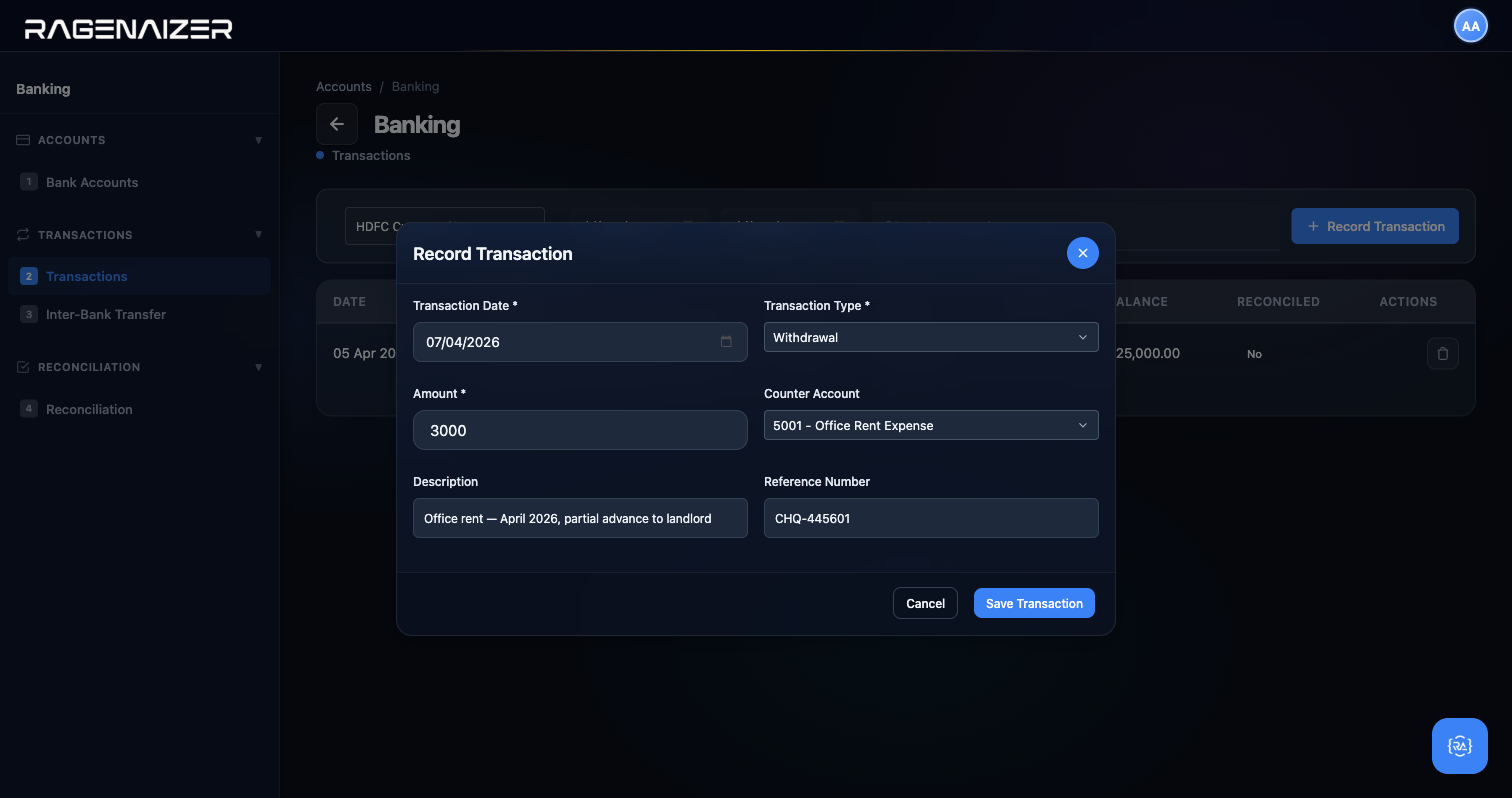
Now record a withdrawal — ₹3,000 for office rent — to show the opposite direction.
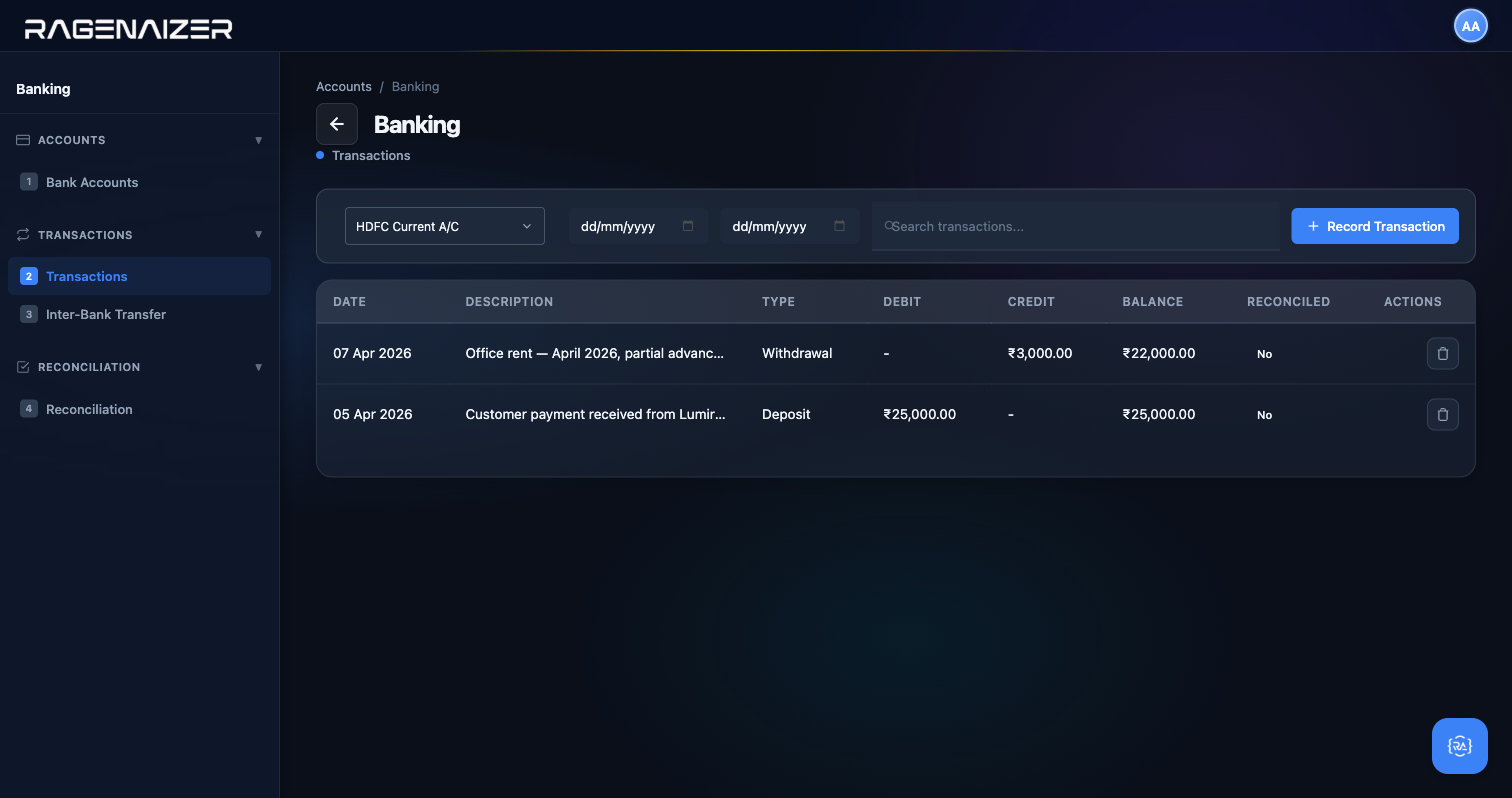
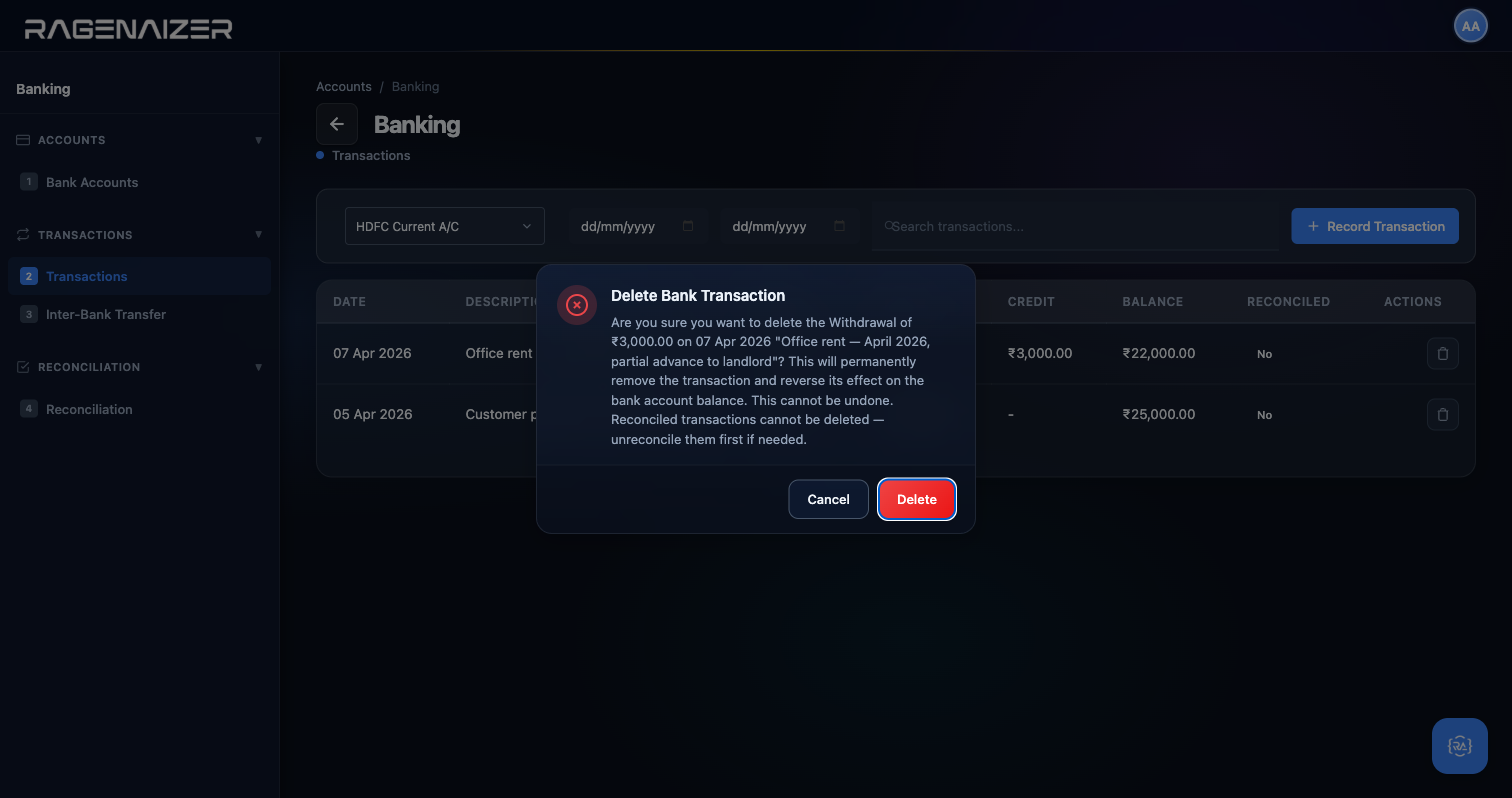
Exercise the search and delete actions to round out the tour.
One more transaction type, because it shows that both sides of the entry can be inflows when the money came from outside your operations: bank interest. Pick Interest from the Type dropdown, enter ₹150 with counter account 4900 Interest Income, and save.

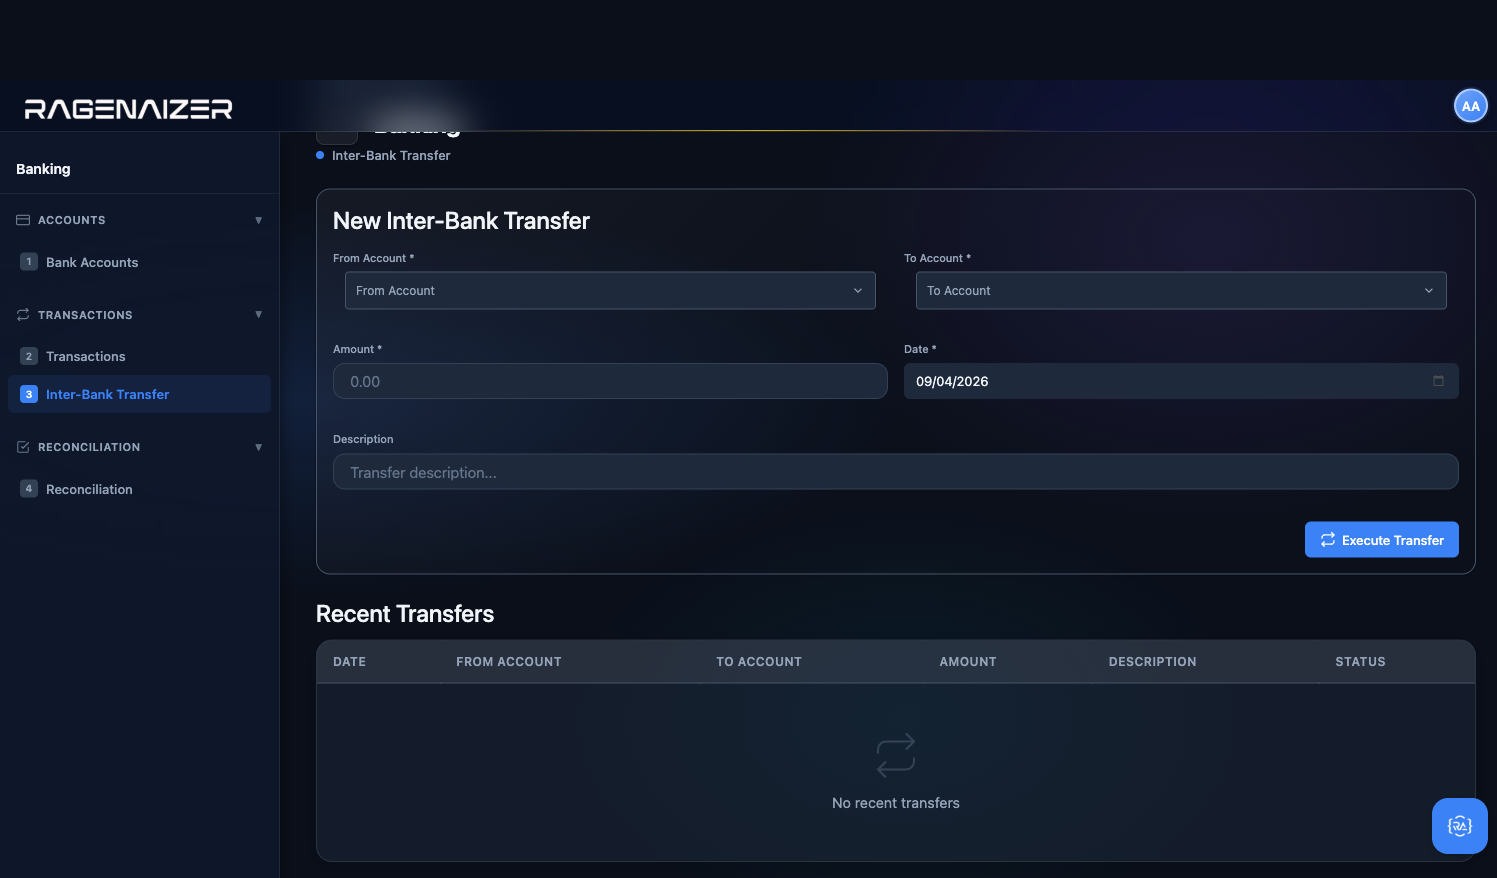
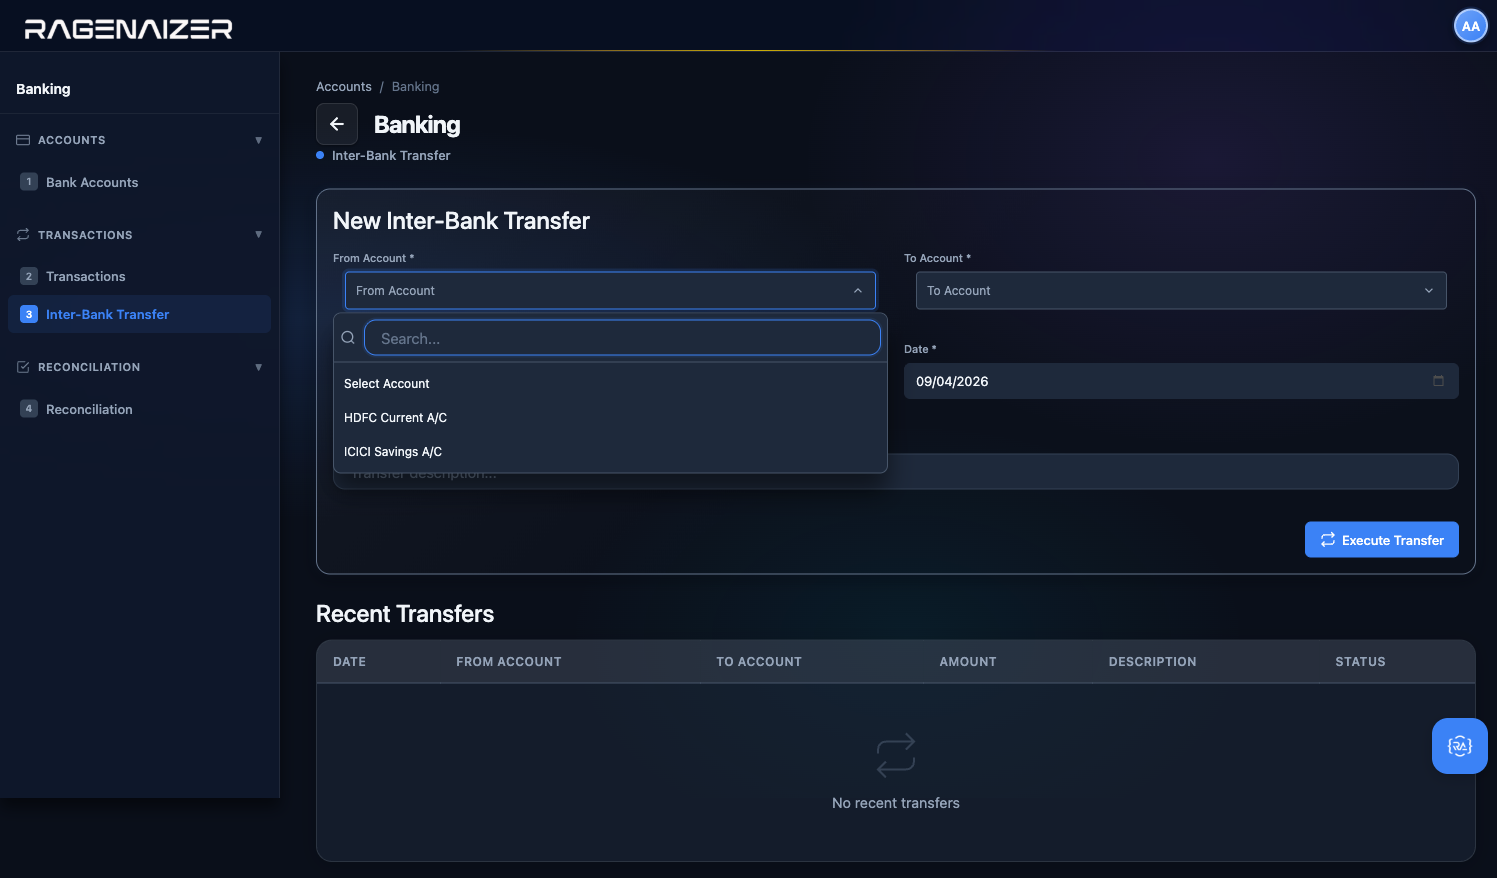
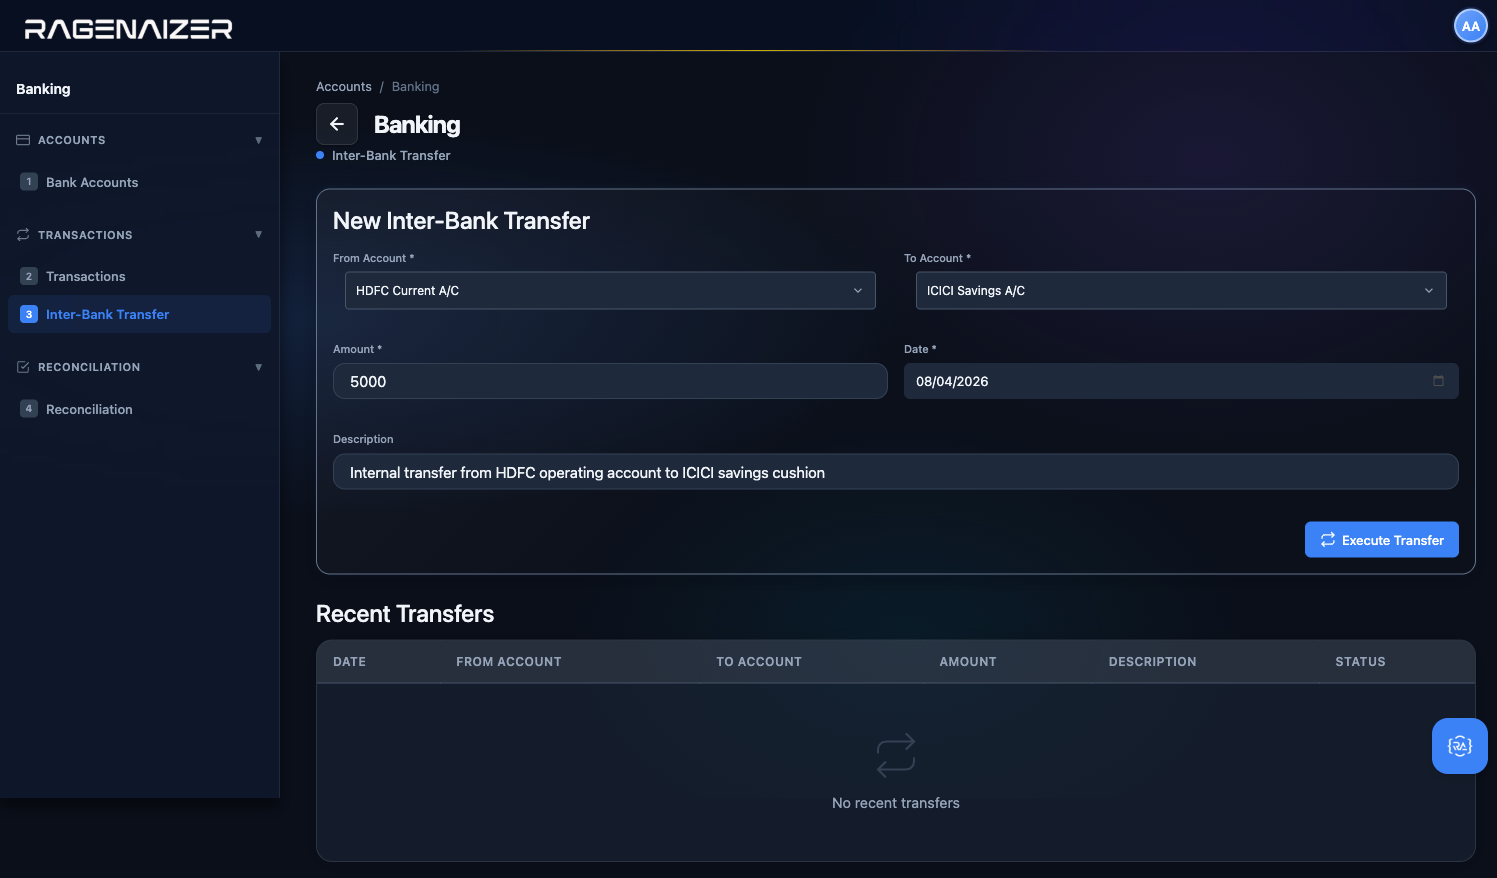
Tab 3 — Inter-Bank Transfer
When you move money from one of your own accounts to another, you could record two separate transactions (a withdrawal on the source and a deposit on the destination) — but that's tedious and error-prone. The Inter-Bank Transfer tab is a single-form shortcut that records both sides in one click, with one shared reference, so the two legs always agree.

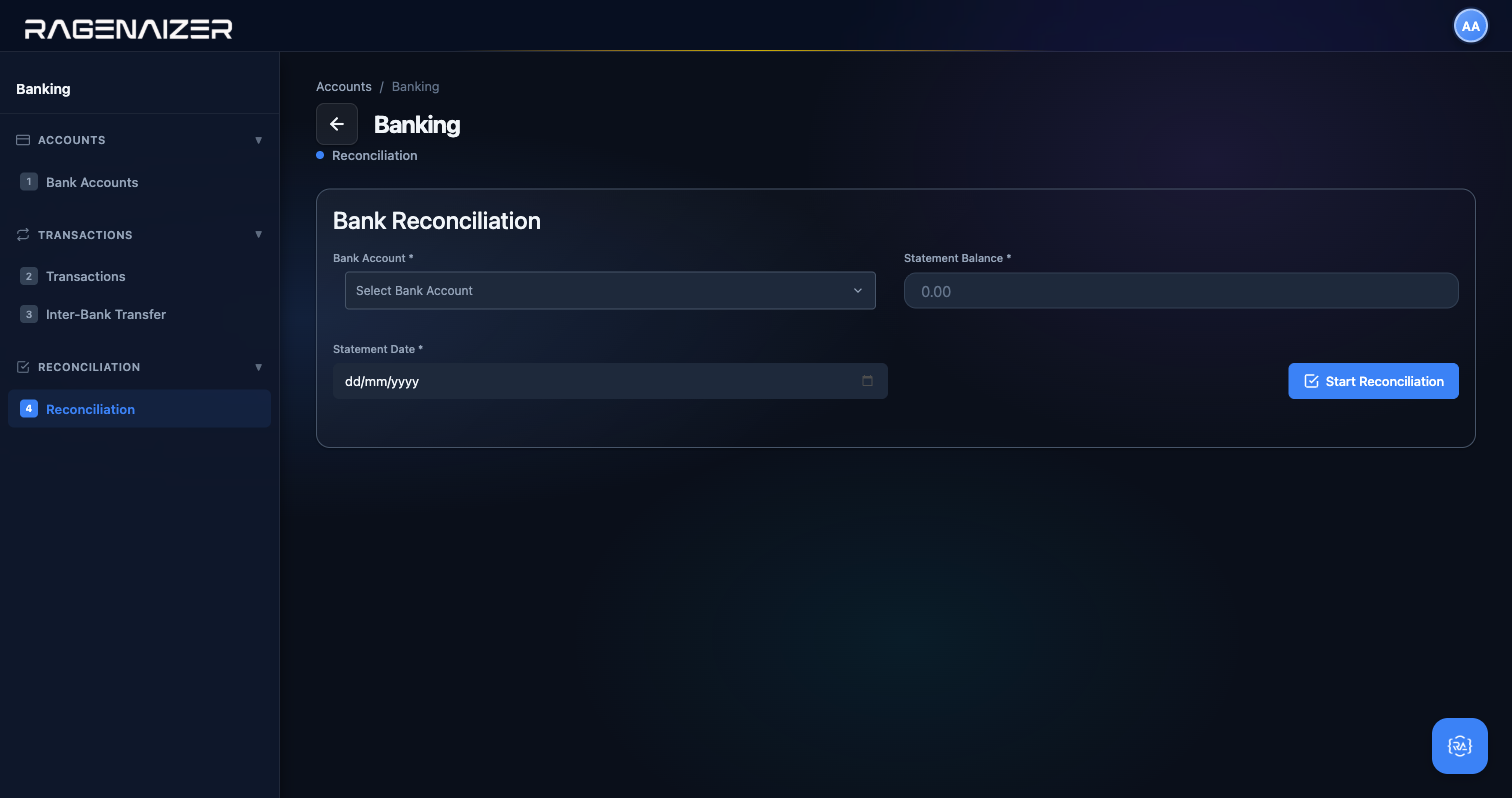
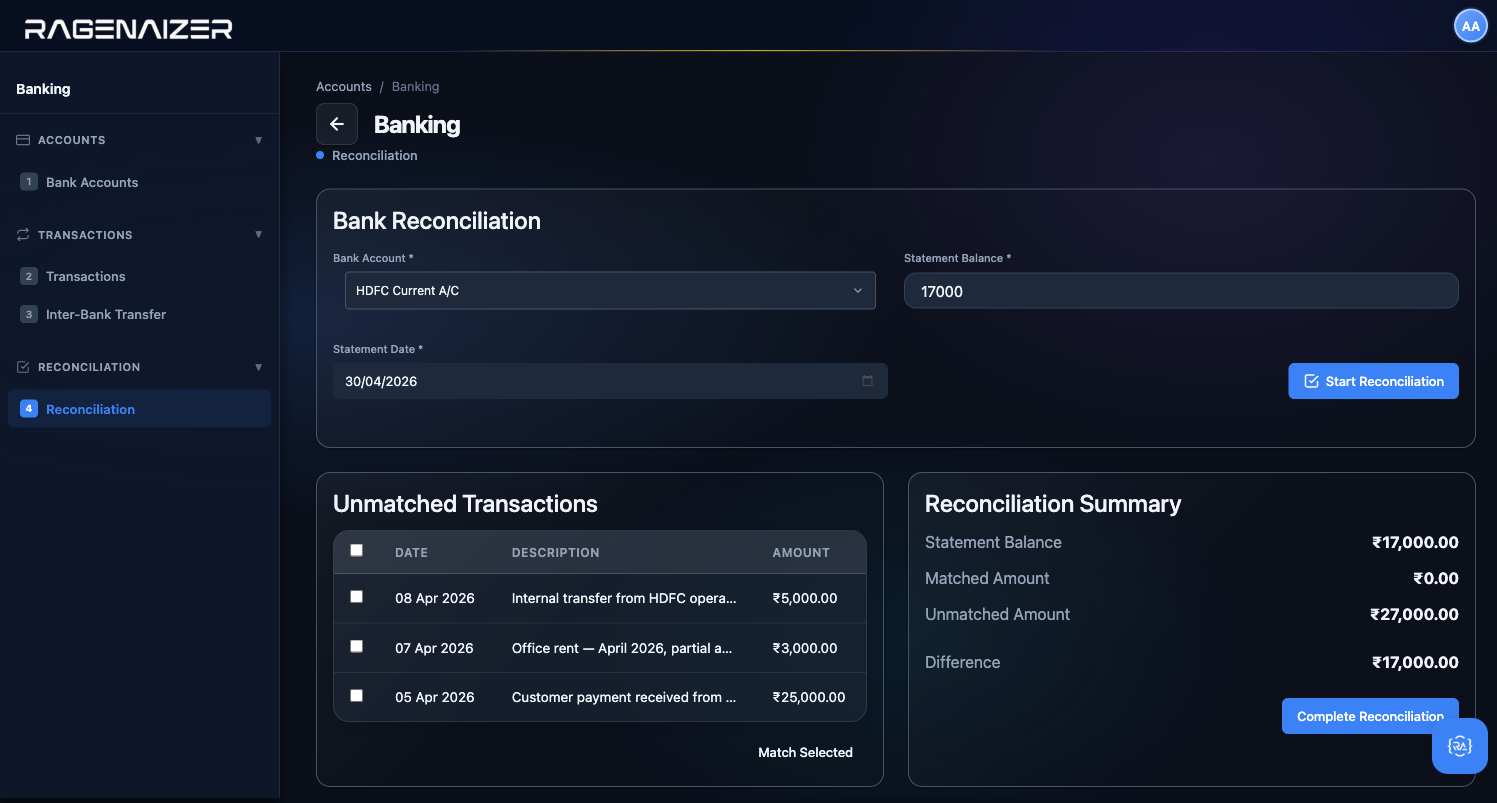
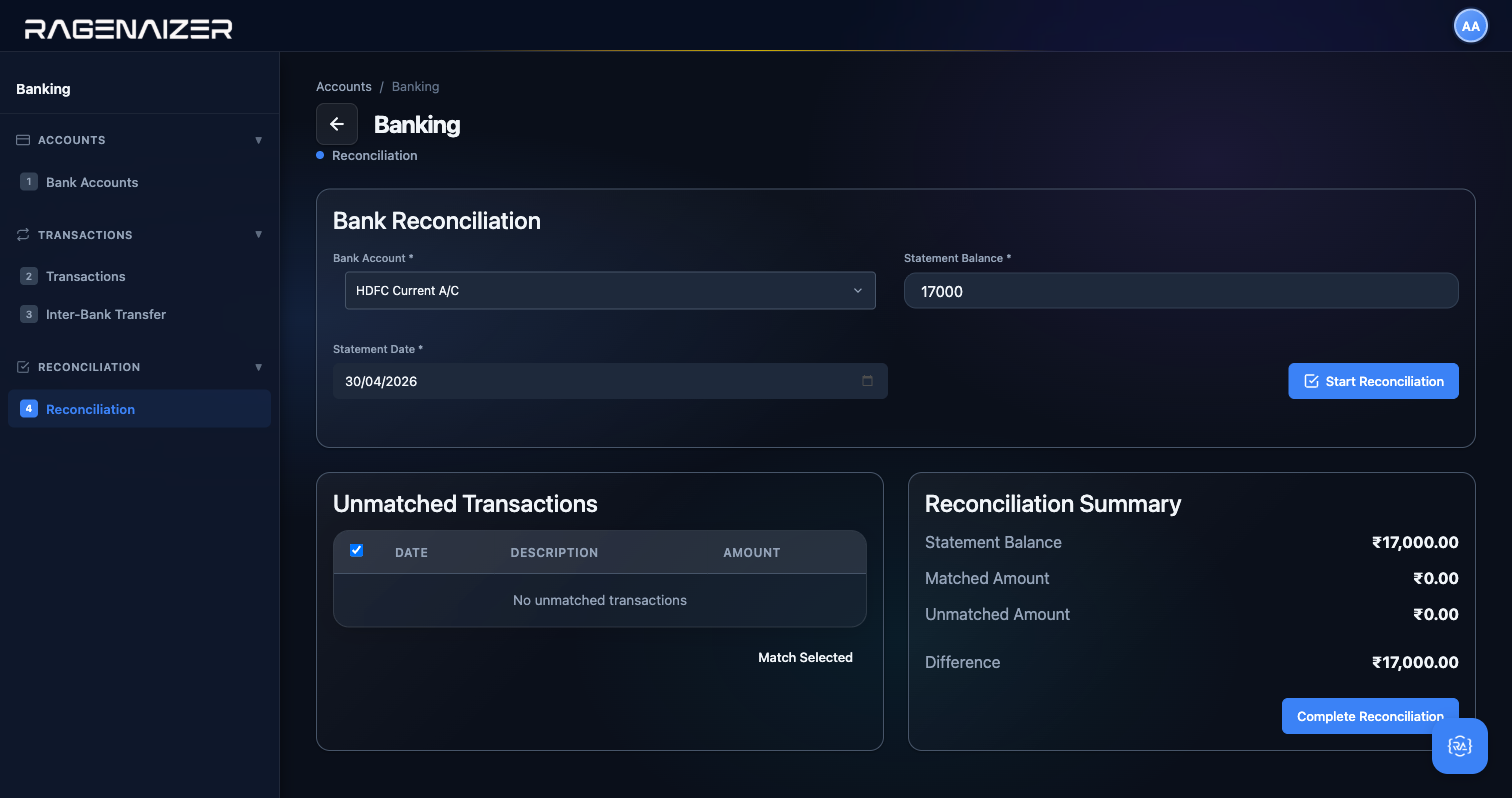
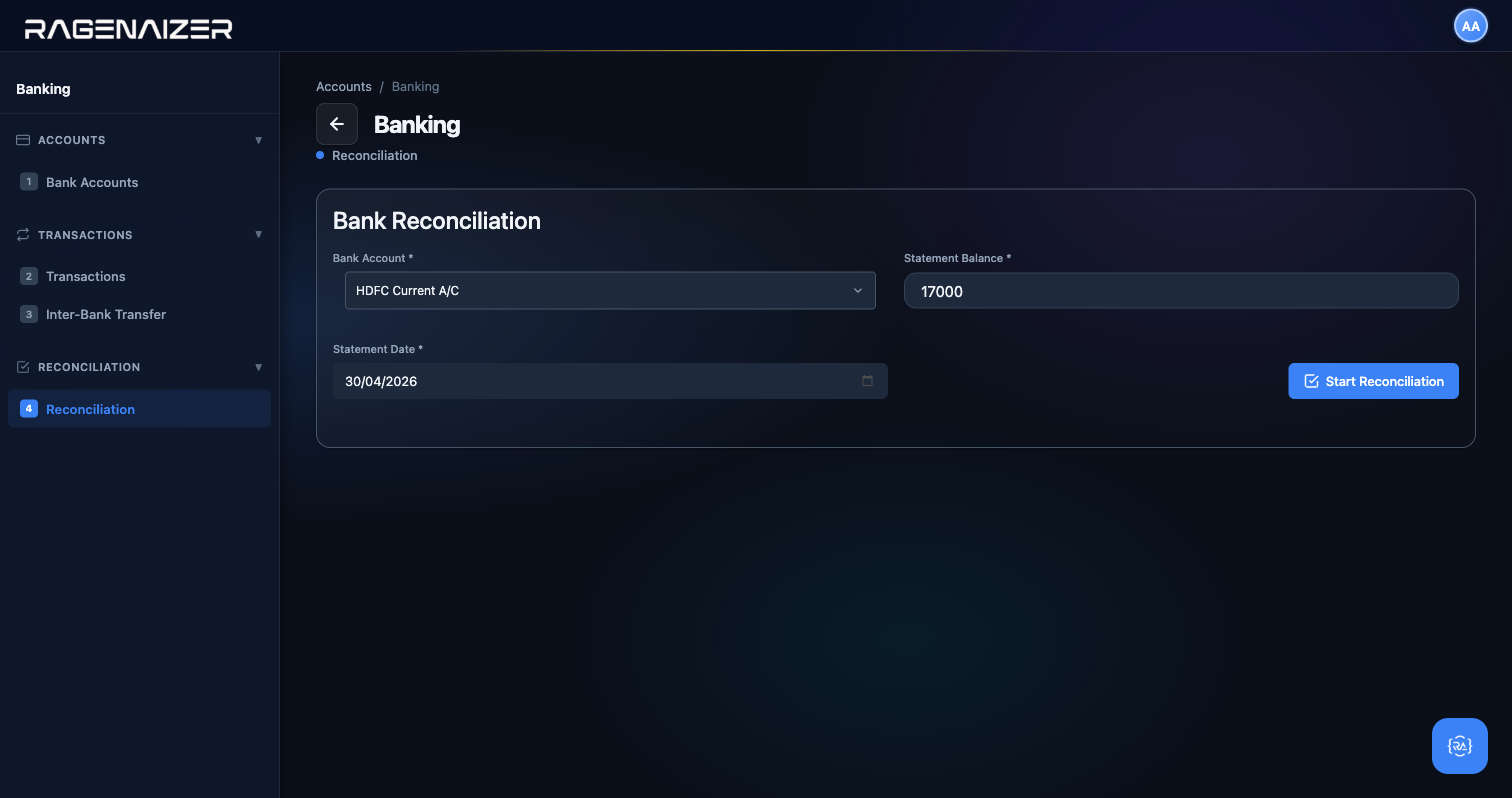
Tab 4 — Reconciliation
Reconciliation is what you do at the end of every month to prove that what the bank thinks is in your account matches what your books think is in your account. You get a statement from the bank (a PDF or CSV), you look at the closing balance on that statement, and you tell Ragenaizer: "As of this date, HDFC says I have ₹X. Here are all my transactions — tick off the ones that appear on the statement." If the final Difference is zero, you're reconciled. If not, either the bank is wrong, or you missed a transaction, or you have a duplicate — and you need to find it.
Reconciliation
The monthly sanity check between your ledger and the bank's ledger. Think of it as the accounting equivalent of "did my inbox arrive in the other person's outbox?" — you're proving that two independent records agree.


Tab 5 — Import Statement (Excel)
Typing in a month's worth of bank transactions one at a time is a job for an intern — and even then, a boring one. When you have 40+ transactions to enter for the month, the Import Statement tab is the right answer. You download a standard Excel template, paste your real bank statement's debits/credits into it, upload the filled file, preview every row, and post them all in one click.
Why a template instead of direct bank format?
HDFC, ICICI, SBI, Axis, Kotak — every bank exports CSV in its own shape. Date columns are named differently, debit/credit come in one column in some formats and two in others, running balance may or may not be included, and the exact header row changes across years. Maintaining a parser for every bank in every country is a tar pit. Instead, Ragenaizer defines one clean 6-column template (Date, Description, Debit, Credit, Balance, Reference), and asks you to paste your bank's data into the right columns. Two minutes of copy-paste, zero maintenance burden, works for literally any bank in any country.
Click the Import Statement item in the Banking sidebar. On a fresh tenant the page has three things: a Bank Account dropdown (which physical bank this statement belongs to), a Default Counter Account dropdown (the contra side for every imported line — usually a suspense account you'll reclassify later), and a drag-and-drop zone for the Excel file.

Pick an account you'll reclassify later
Every imported line needs a double-entry pair: one side is your bank account (obvious), the other side is the contra. You probably don't know the right GL account for each line at import time — that's what reconciliation is for. So pick a placeholder like 1180 Other Current Assets or create a dedicated 1199 Bank Import Suspense account for this purpose. After import, you can walk the list and edit each transaction's counter account to the real expense/revenue category. The import just gets the numbers into the books; classification is a separate pass.
Select the bank and counter account. We'll import into HDFC Current and use Cash in Hand as the counter for this demo.

Click the drop zone (or drag your filled Excel onto it). The file is read client-side with SheetJS — no upload yet. The parser figures out which row is the header by looking for "Date" in the first 5 rows, finds the six columns by their names (not position, so extra columns like Reference are fine), and tries to parse every data row. Three validations run on each row: (1) date parses, (2) description is non-empty, (3) exactly one of Debit or Credit has a value. If any row fails, it's flagged in the preview with a red Error badge and will be skipped on import.
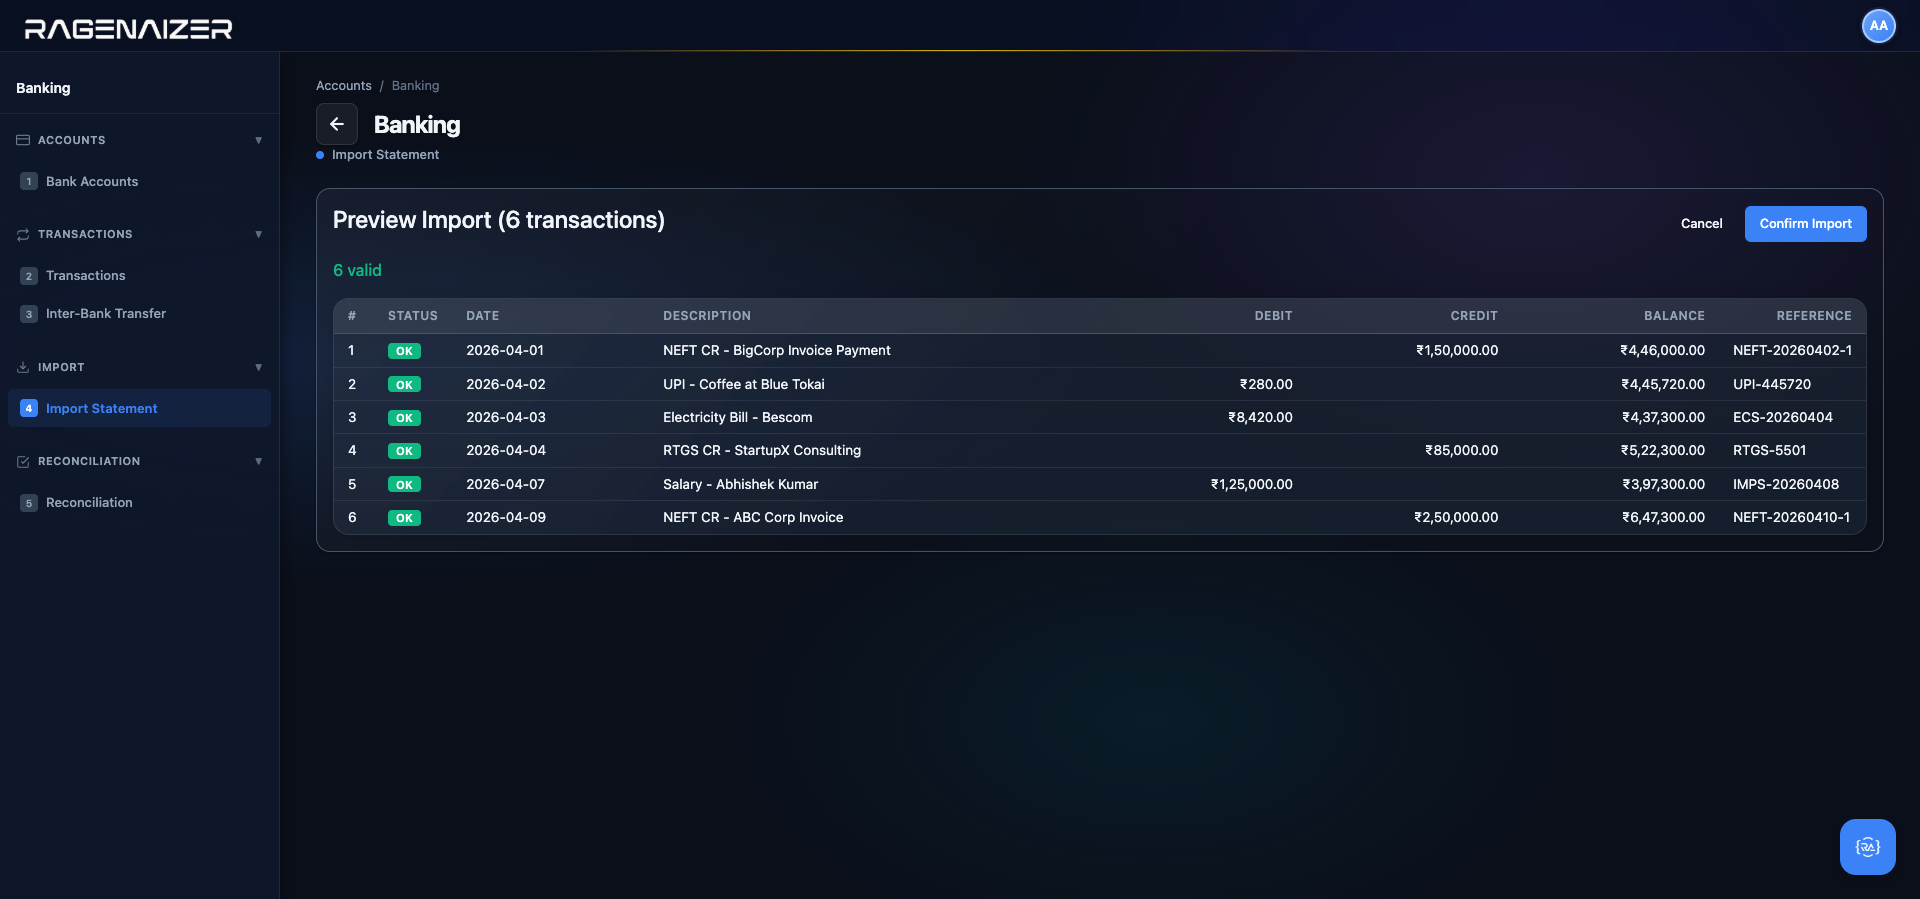
Re-importing a statement is safe
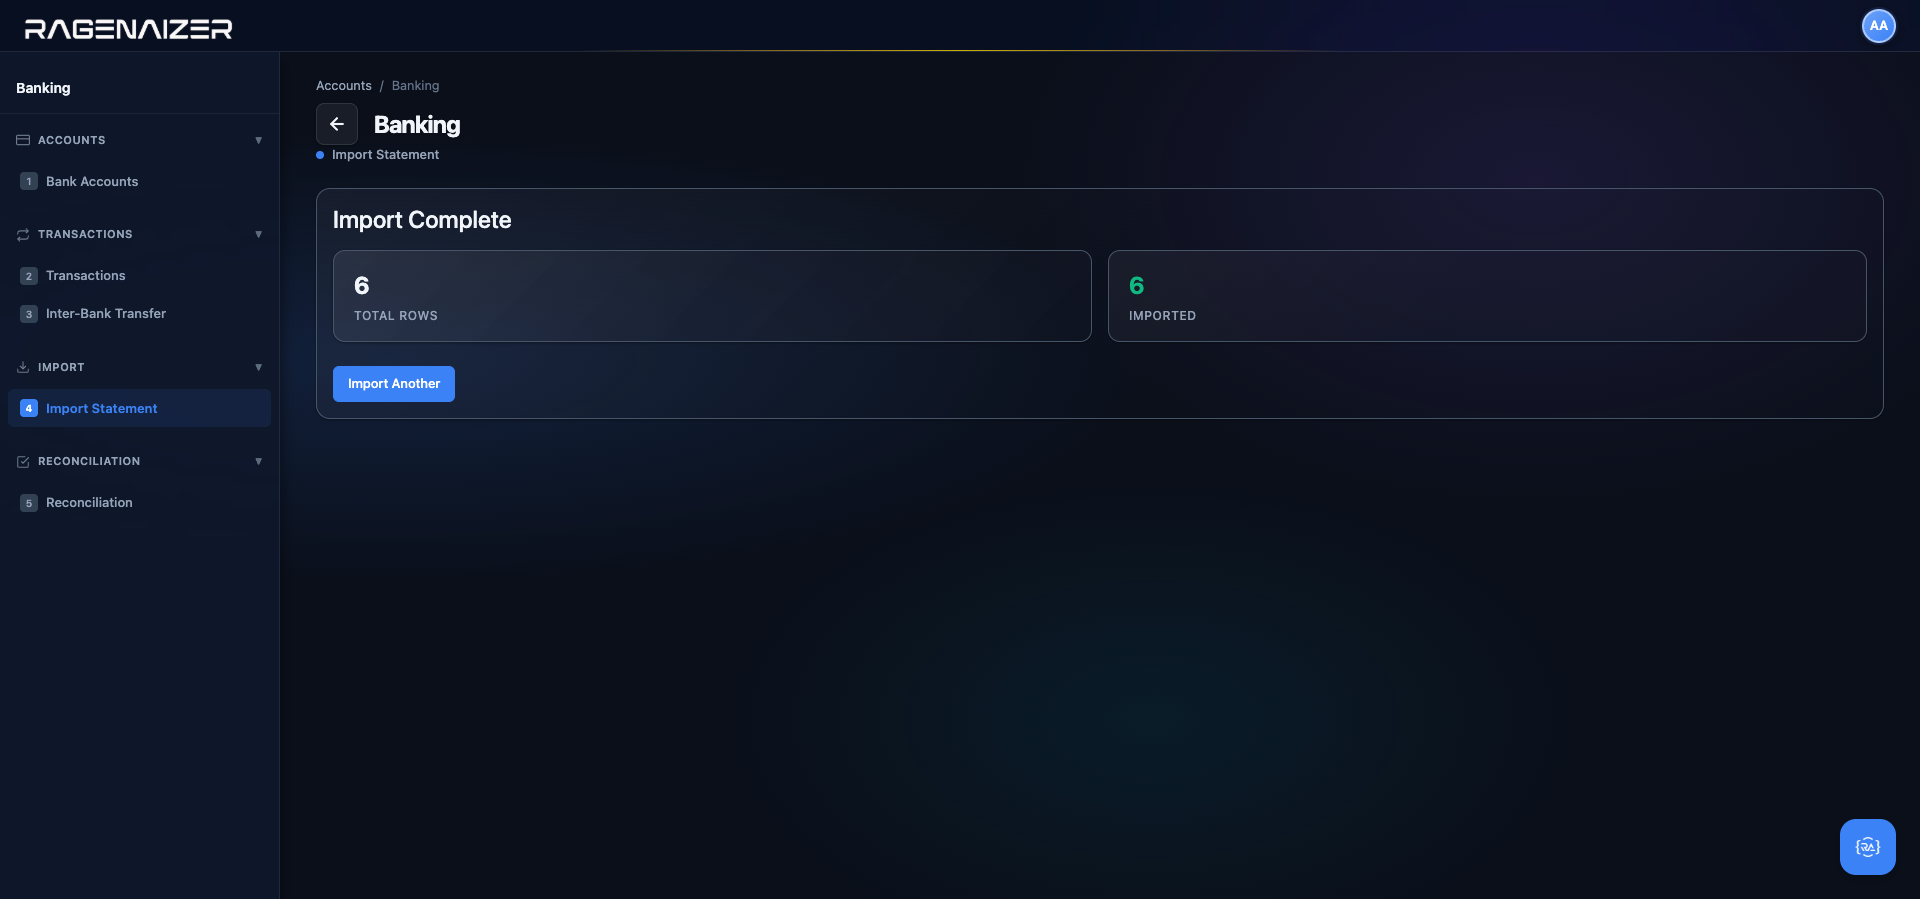
When you click Confirm Import, the backend queries existing bank transactions for this bank account within the min/max date range of your upload, builds a set of composite keys (date|amount|description), and skips any upload row whose key already exists. So if you accidentally upload the same file twice, or if the file for April overlaps the last three days of March that you've already imported, nothing is double-posted. The result summary tells you exactly how many were imported and how many were skipped as duplicates.
Click Confirm Import. The backend starts an atomic database transaction, loops through every valid row, creates a GL entry per row (Dr Bank / Cr Counter for deposits, Dr Counter / Cr Bank for withdrawals), creates a bank transaction row for each, and updates the bank account balance by the net delta. Either every row succeeds or the entire batch rolls back — you never end up with half a statement imported.
Reclassify counter accounts, then reconcile
The import is step 1 of a three-step workflow. Step 2: open each imported transaction and change its counter account from the suspense placeholder to the real category (this coffee was Travel & Conveyance, this salary was Salary & Wages, this customer payment offsets an invoice). Step 3: at month-end, run reconciliation (Tab 4) against the bank's closing balance to prove you caught every transaction. If the reconciliation balances, you're done; if it doesn't, you missed something — go back to step 2 and find it.
A deposit is a Debit, not a Credit
This catches everyone the first time. If you look at the bank's own passbook/statement, money coming IN is shown as "Credit" and money going OUT is shown as "Debit" — because from the bank's point of view, your account is a liability (they owe you the money), so a deposit increases their liability to you (Credit) and a withdrawal decreases it (Debit).
Ragenaizer shows transactions from your point of view. From your books, the bank account is an asset — it's money you own. So a deposit increases your asset (Debit) and a withdrawal decreases it (Credit). This is the same convention used everywhere else in the Accounts module, on the Trial Balance, the Balance Sheet, the Chart of Accounts — it matches the GL, not the bank statement. The two conventions are mirror images of each other; use the one that suits your books (your side) because that's the one the rest of Ragenaizer uses.
Expense Management
Every company has employees who spend money on the company's behalf — travel, meals, office supplies — and need to be reimbursed. Expense Management is where you define what counts as a valid expense (Categories), how much is too much (Policies), and who is asking to be reimbursed for what (Claims). Once a claim is approved and reimbursed, Ragenaizer posts the journal entries automatically: the expense hits your P&L, the cash leaves your bank, and the employee's balance sheet goes back to zero.
Category, Policy, Claim — the three levels
Category answers "what kind of expense is this?" (Travel, Meals, Office Supplies). It's linked to a default GL expense account so you don't have to pick one every time. Policy answers "what's the limit for this category?" (max ₹5,000 per trip, receipts required above ₹500). Policies are enforced at claim-submit time. Claim answers "who is asking to be reimbursed, for how much, in which category?" It has a header (employee, date, description) plus line items (category, amount, date, receipt).
Tab 1 — Categories
Click Categories in the sidebar. Empty state on day one. Click + Add Category. The modal has three fields: Name (e.g. "Travel"), Description (free text), and Default GL Account (the expense GL account you created in the prep step above — e.g. 5020 Travel). The Default GL Account is what gets debited when the claim is reimbursed; Accounts Payable is credited on approval and Cash/Bank is credited on reimbursement.
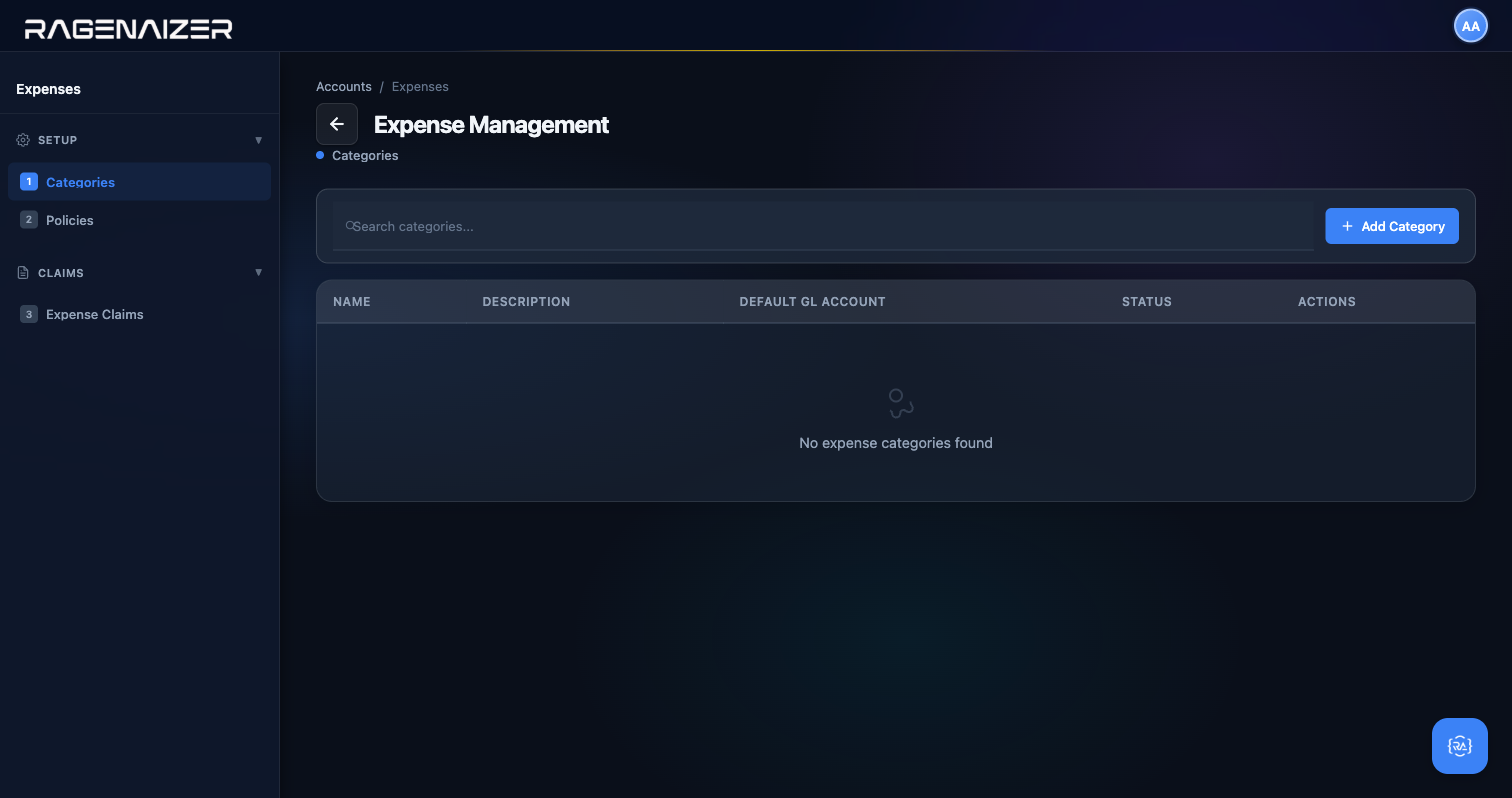
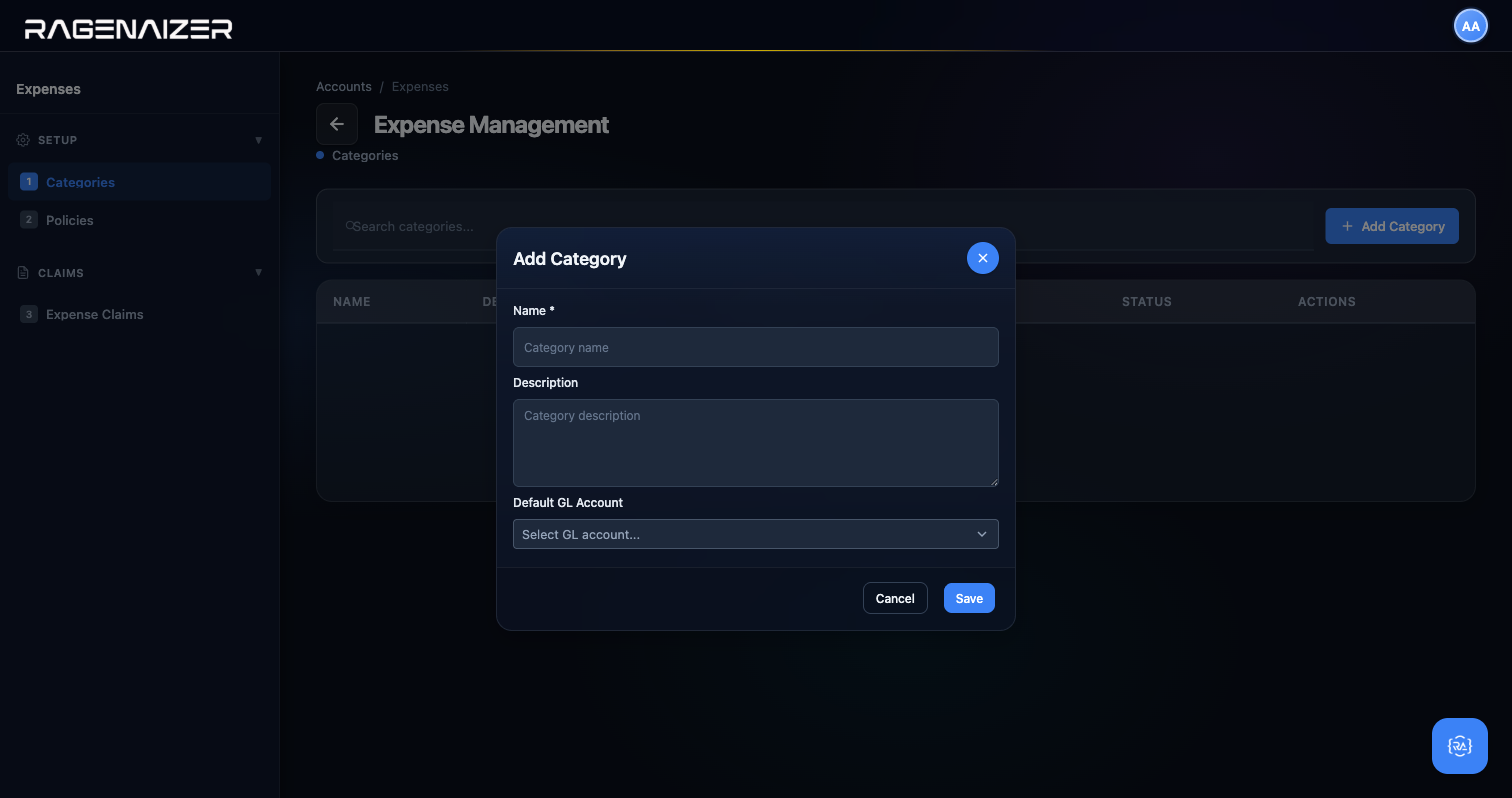
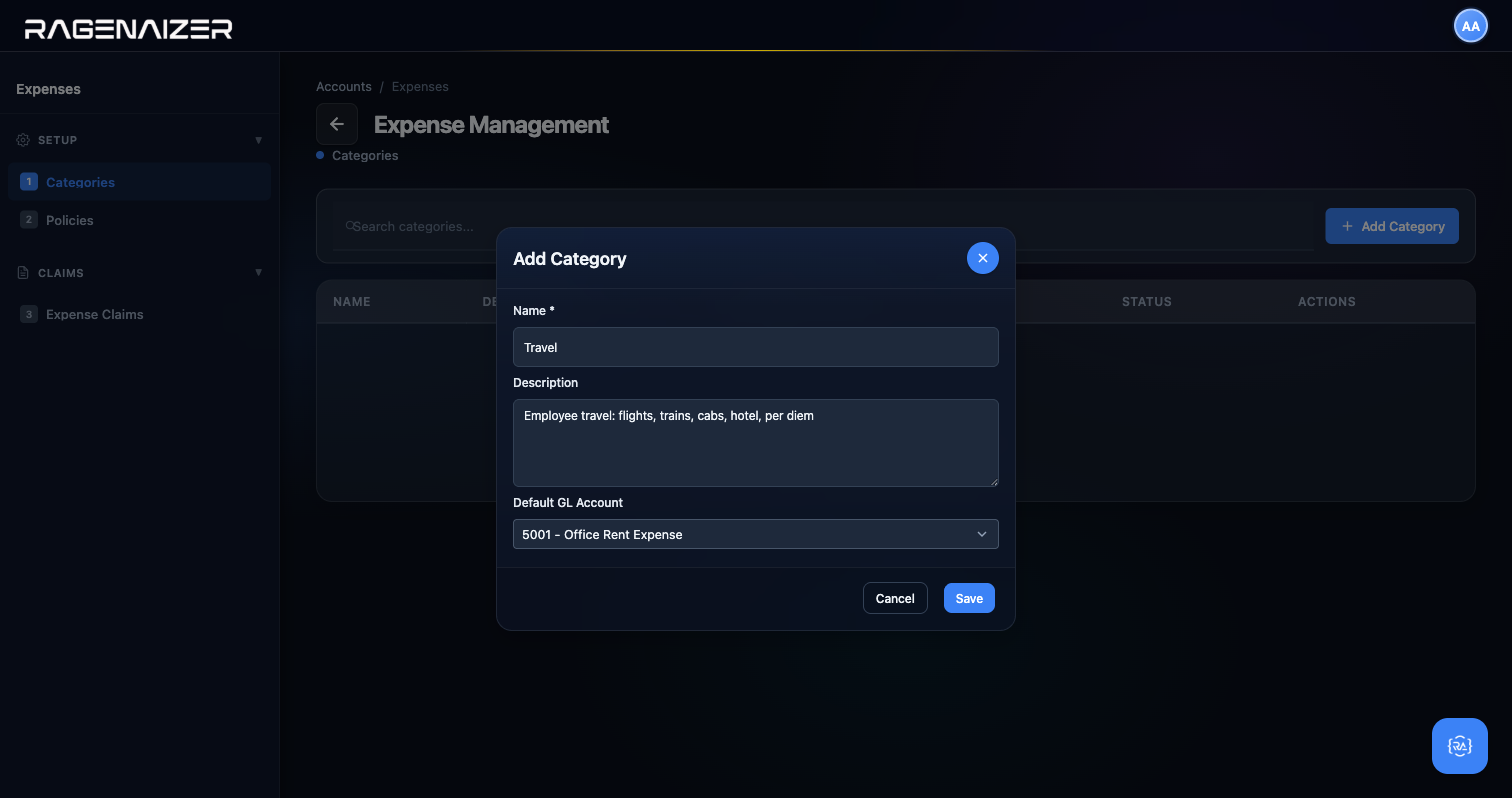
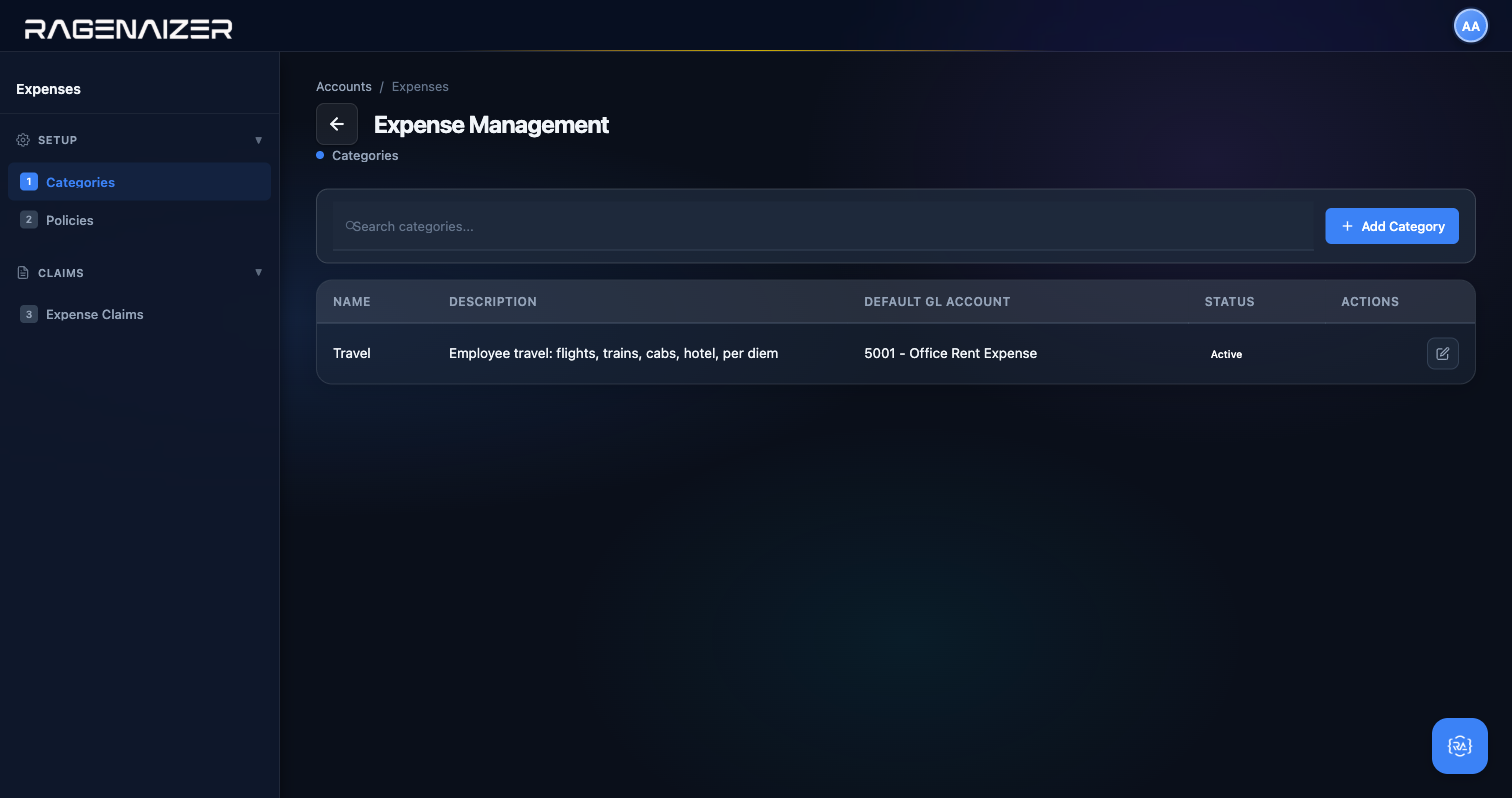
5001 — Office Rent Expense GL account label, Active badge, and Edit/Delete row actions. Click Edit to modify, Delete (red) to remove — with a target-named confirmation dialog.Tab 2 — Policies
Click Policies. This is where you set the rules: "Travel is capped at ₹5,000 per trip and requires a receipt for anything above ₹500." Policies are linked to a Category and are enforced when a claim is submitted — the claim either stays within the limit or generates a warning.
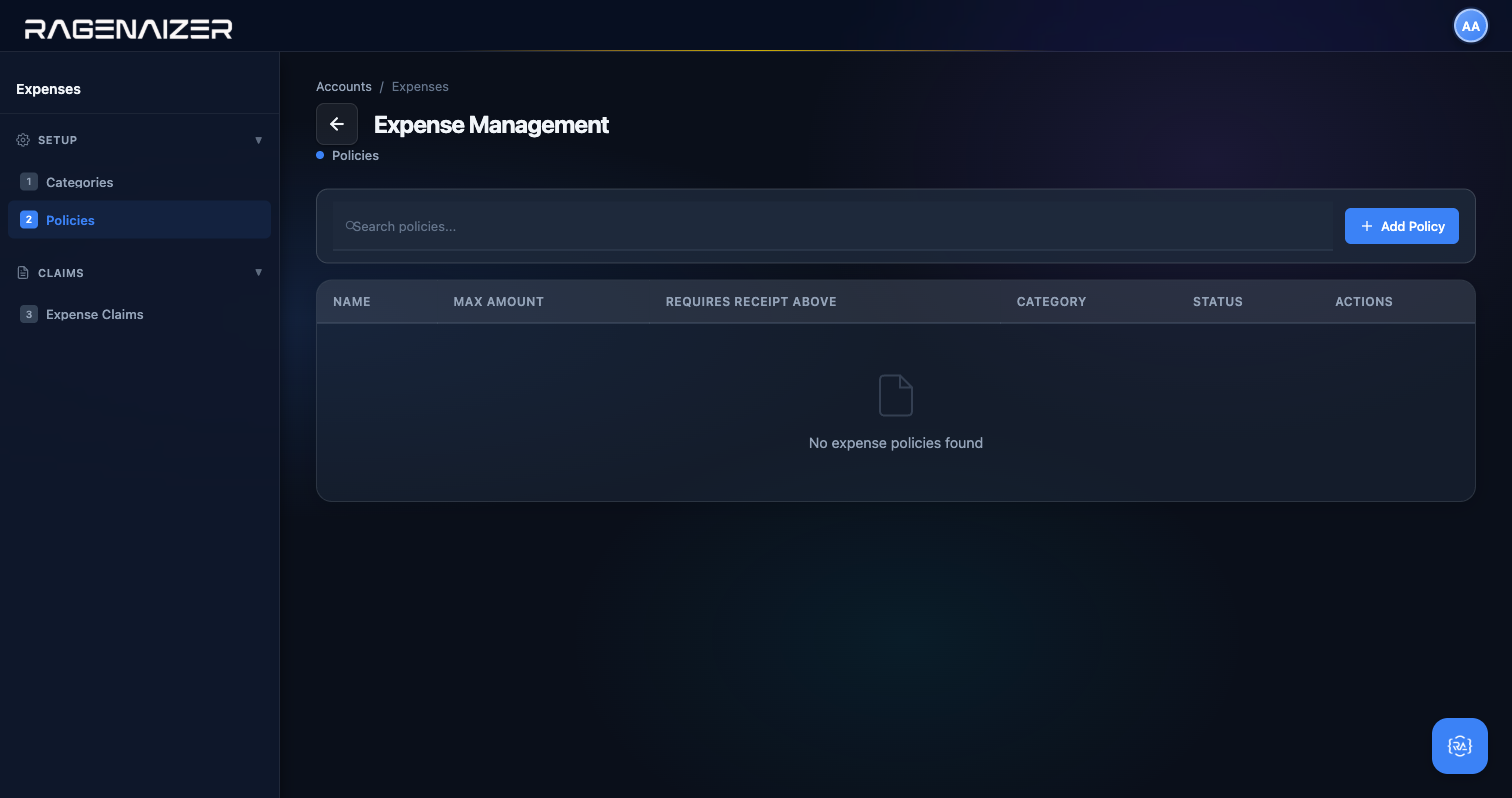
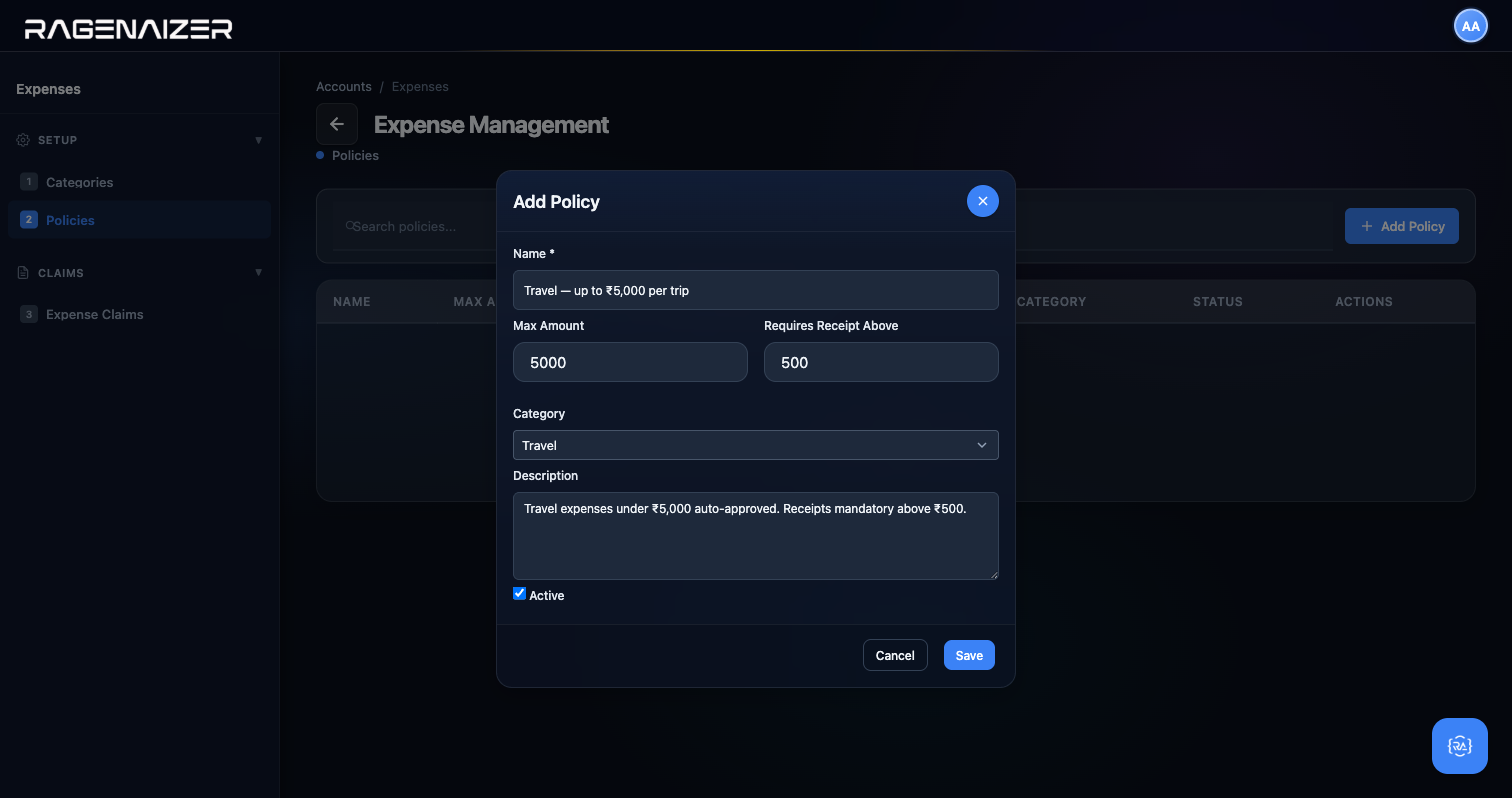
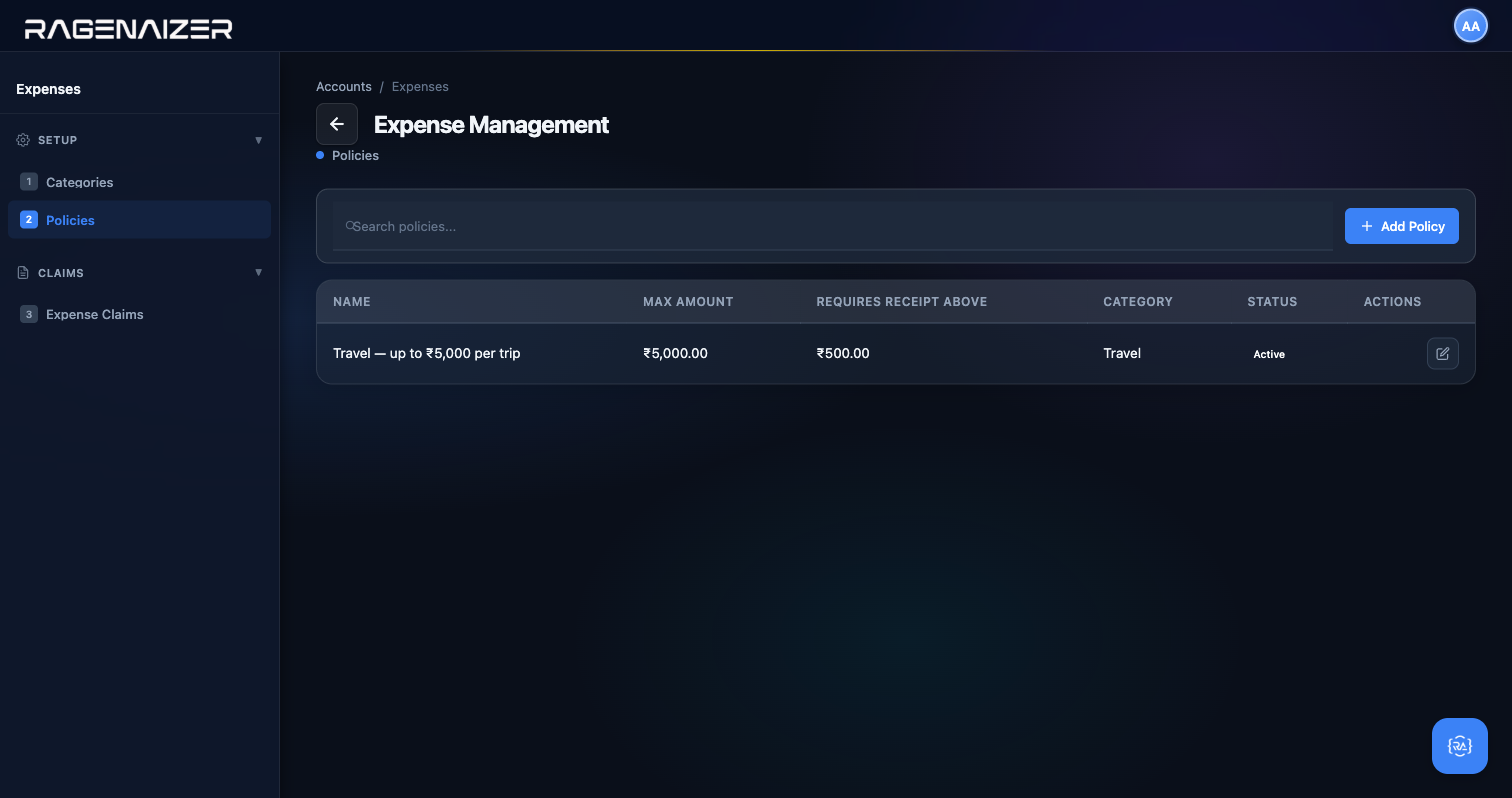
Tab 3 — Expense Claims
Click Expense Claims. This is the business end. A claim has a header (date, description) and one or more line items (category, description, amount, date). You submit a claim; it enters the Submitted state. A different user with approval rights (see the Segregation of Duties note below) approves or rejects it. When approved, a journal entry is posted: Dr Expense / Cr Accounts Payable (to the employee). When reimbursed, another journal entry is posted: Dr Accounts Payable / Cr Cash/Bank.
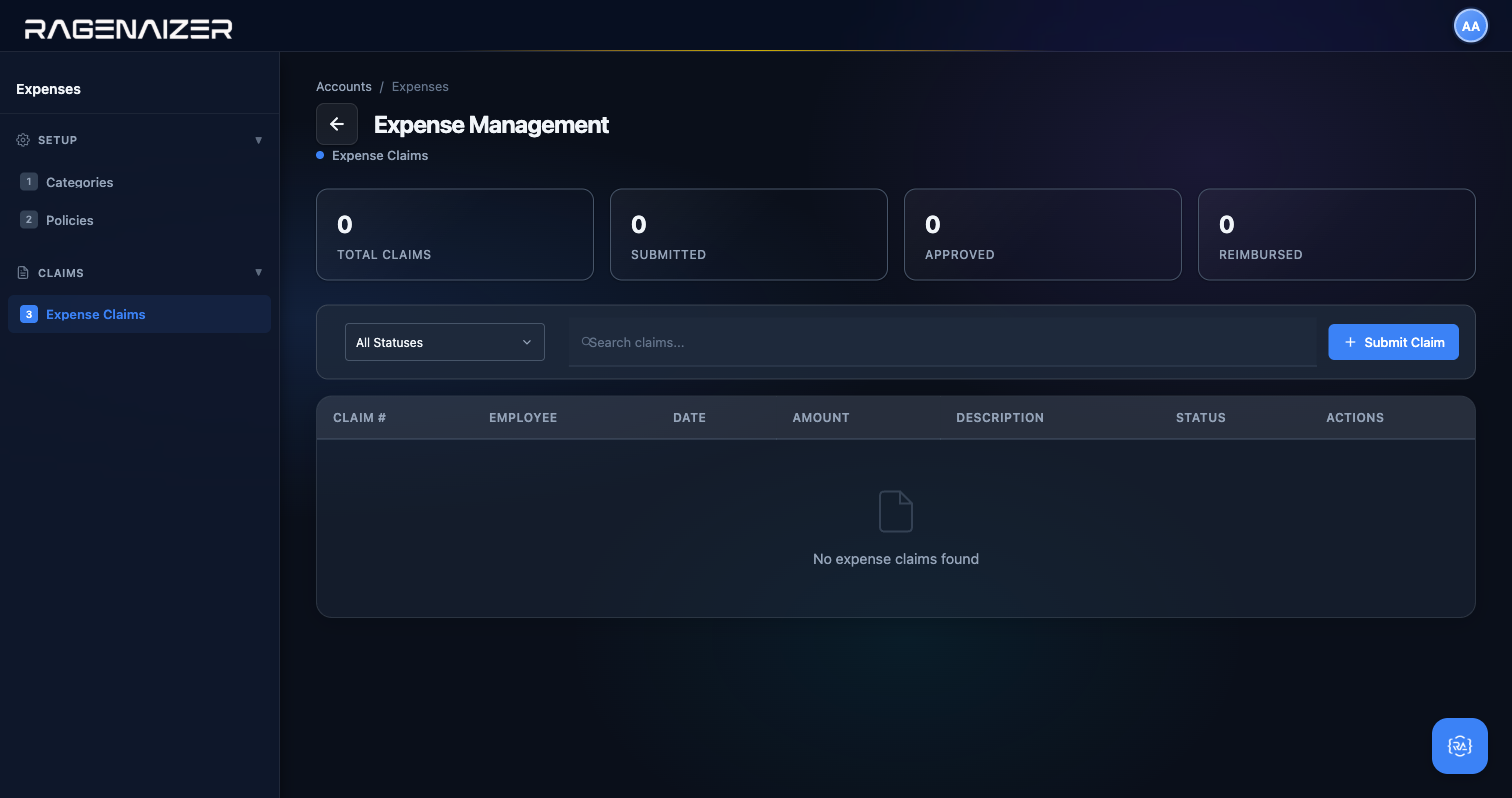
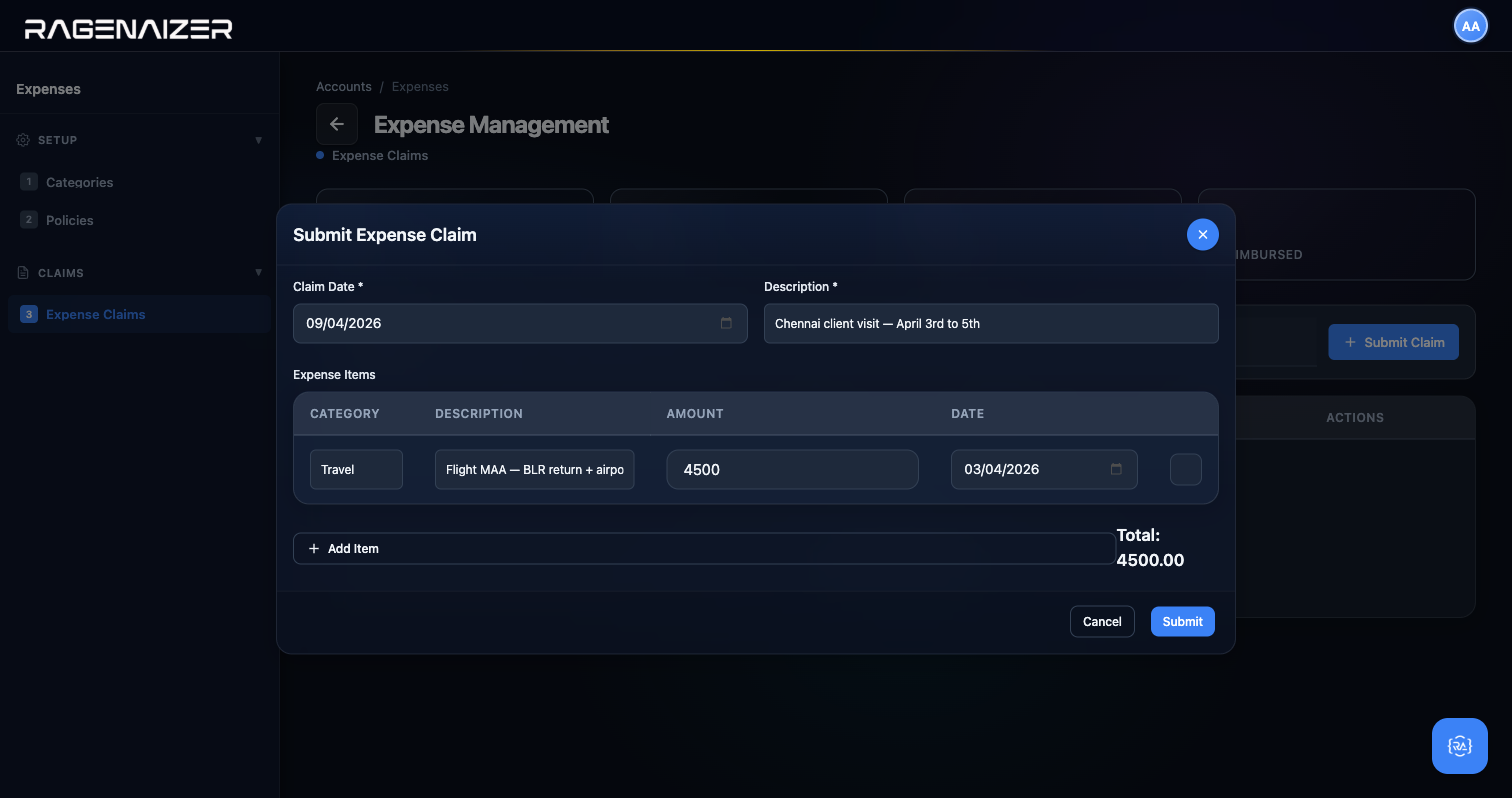
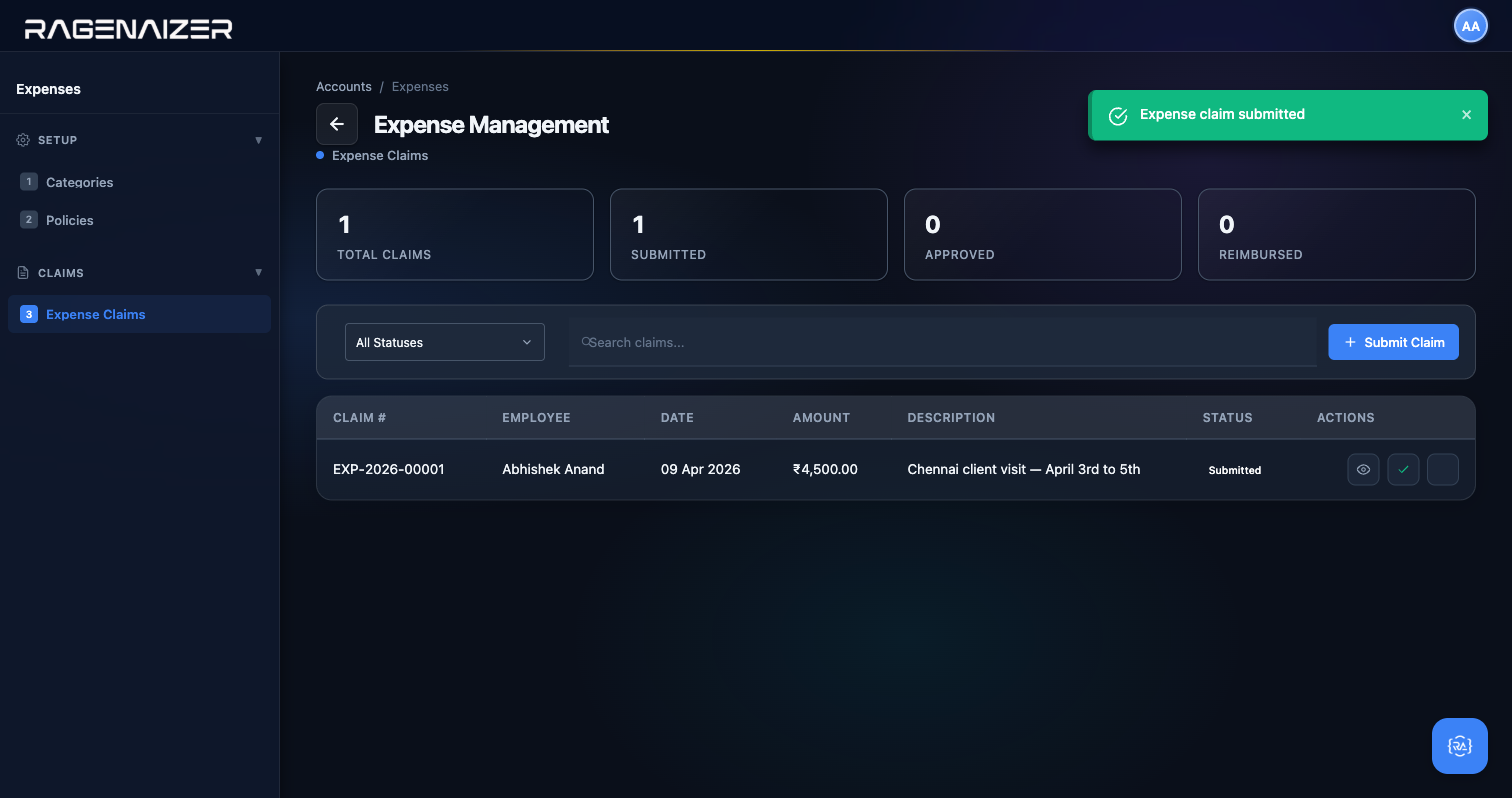
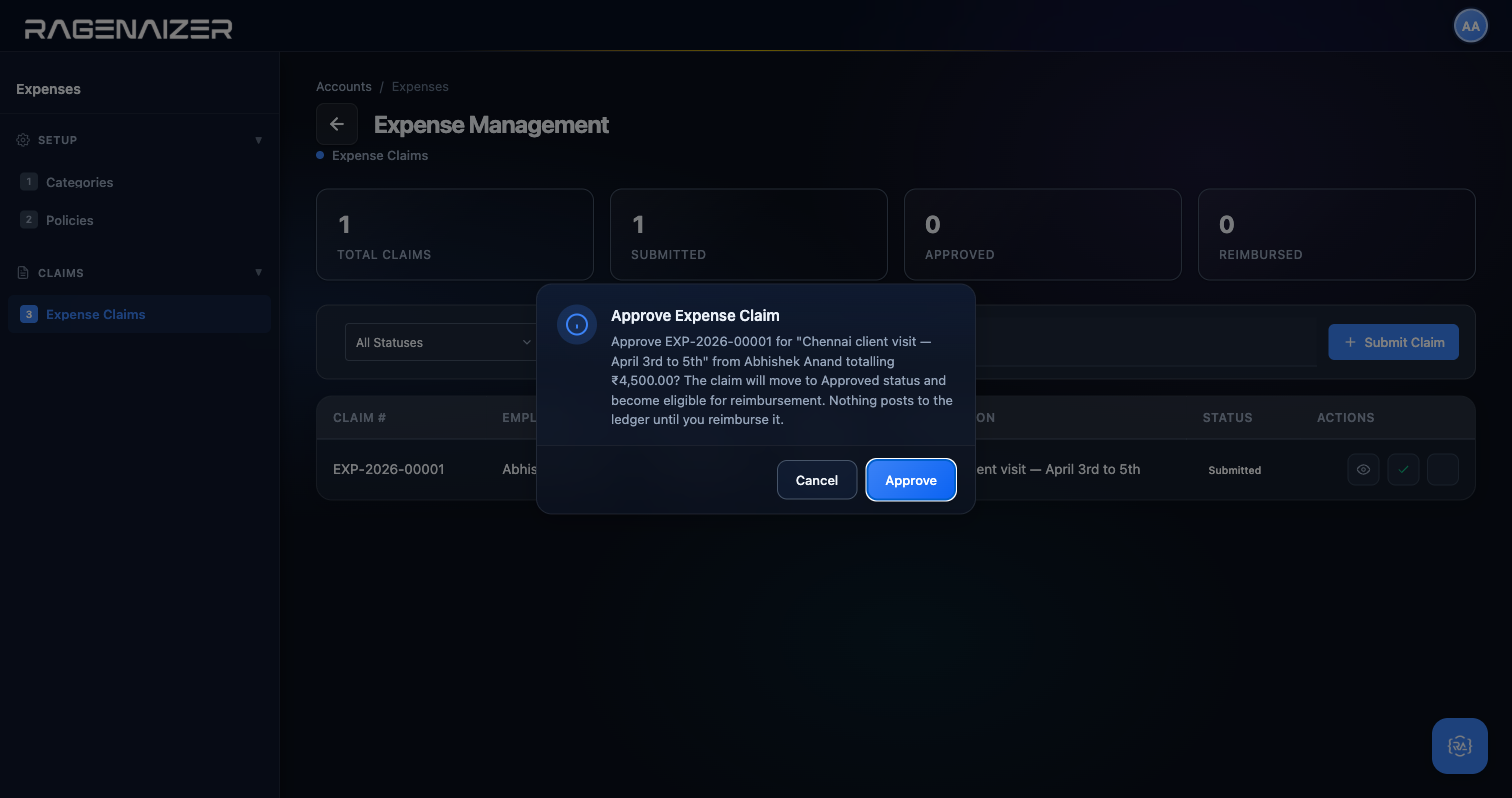
You can't approve your own expense claim
If the user who submitted the claim tries to approve it, the backend returns a 409 with the message
"Cannot approve your own expense claim (segregation of duties)" and the claim stays in Submitted state.
This is deliberate: it's the oldest rule in the auditor's playbook, the same reason the person who writes cheques
is not the person who signs them. To approve a claim, a different user with approval rights needs to log in
and click Approve from their account. For this demo we created a second user
manager.test@droidsdemo.com with the ACCOUNTS_ADMIN role — you can do the same from
the Authentication service's User Management page (or from Admin → Users in your own deployment).
In production this is enforced automatically by your HR/role setup.
We sign out, sign back in as manager.test@droidsdemo.com, navigate to
Accounts → Expenses → Expense Claims, and click Approve on the same row.
This time the SoD check passes and the backend posts the first half of the double entry:
Dr Travel Expense ₹4,500 / Cr Reimbursement Payable ₹4,500. (Reimbursement Payable is a system fixture
account that Ragenaizer auto-creates the first time it's needed — you don't have to set it up by hand.)
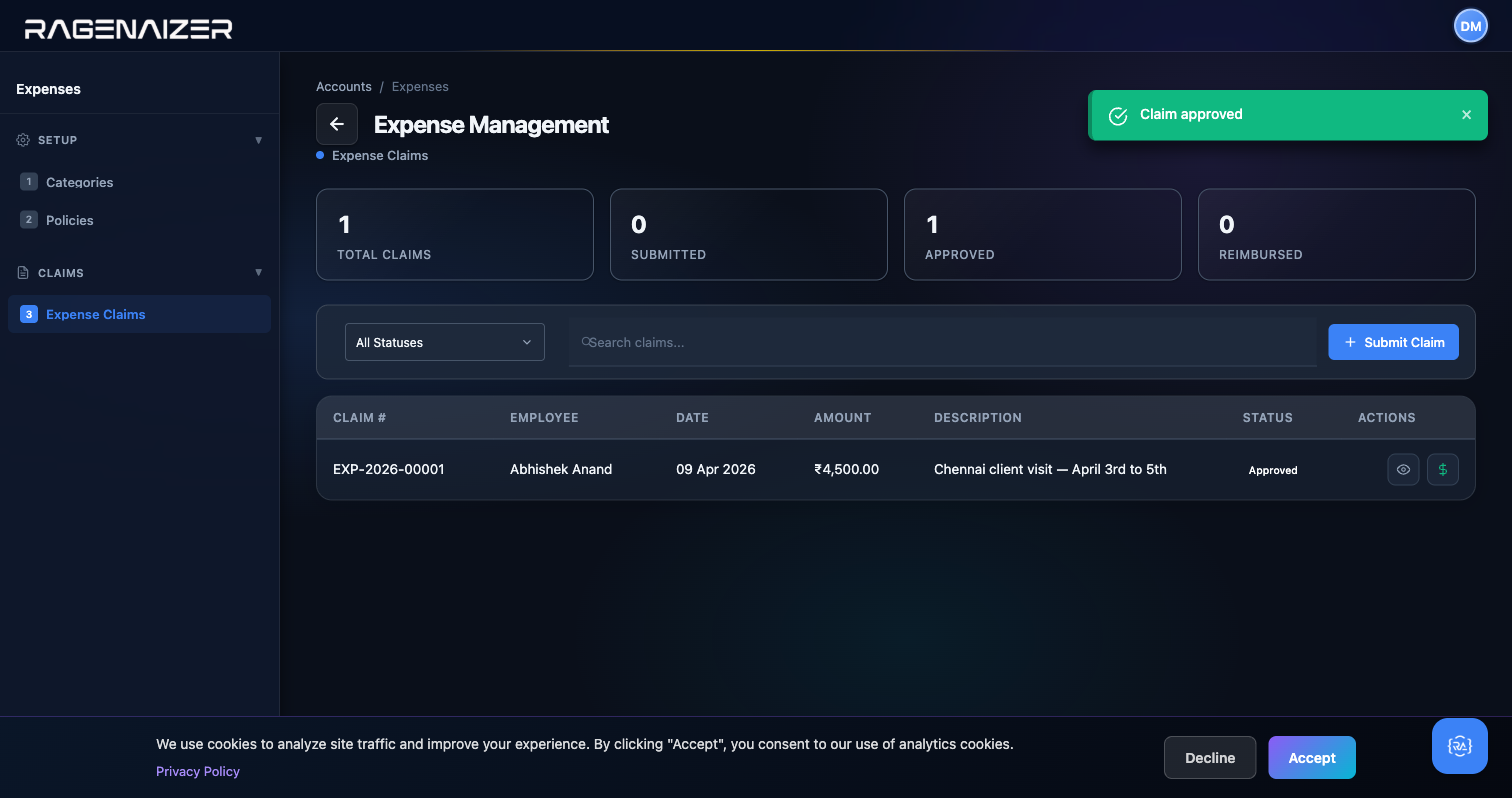
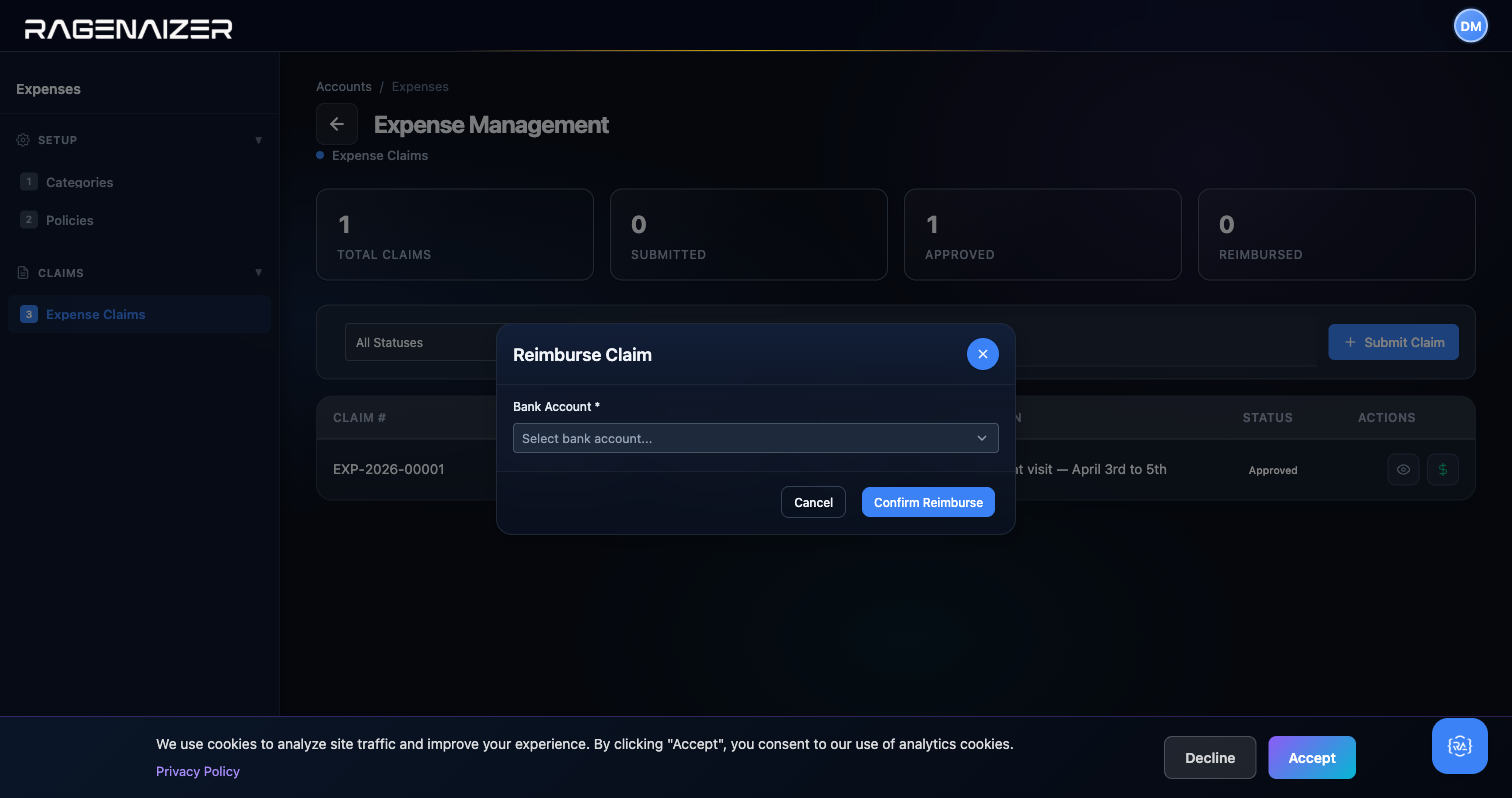

What just happened, in accounting terms
Two journal entries, four ledger postings, one expense claim. Submission posts nothing. Approval posts Dr Travel Expense / Cr Reimbursement Payable — the expense lands on the P&L and a liability to the employee lands on the balance sheet. Reimbursement posts Dr Reimbursement Payable / Cr Bank — the liability clears and cash leaves the bank. Net effect: expense up, cash down, liability flat. That's exactly what should happen, and it happened with two clicks by two different users.
Fixed Assets
Some things you buy are consumed quickly (rent, salaries, office supplies) — you expense them immediately on the P&L. Other things you buy — laptops, vehicles, furniture, machinery — you use for years. These are Fixed Assets: you capitalise them on the Balance Sheet at purchase time and then depreciate their cost slowly over their useful life, matching the expense to the periods in which you benefit from them. The Fixed Assets module manages all of this: categories, individual assets, monthly depreciation runs, and eventual disposal.
Depreciation
Spreading the cost of a long-lived asset over the periods you use it. If you buy a ₹1,50,000 MacBook with a 3-year useful life and a ₹15,000 salvage value, you don't hit the P&L with ₹1,50,000 in month one — you hit it with (₹1,50,000 − ₹15,000) / 36 = ₹3,750 every month for 36 months. That's straight-line depreciation. At any point in time, the book value (purchase cost minus accumulated depreciation) is what the asset is worth on your books.
Tab 1 — Asset Categories
Click Asset Categories. A category is a rule for how a class of assets depreciates: the Name (e.g. "Computers & IT Equipment"), the Depreciation Method (Straight Line, Written Down Value, or Units of Production), the Useful Life in years, and the GL Account + Depreciation Expense Account the postings will hit. Create one category per asset class. Every individual asset you later register will inherit these rules from its category.
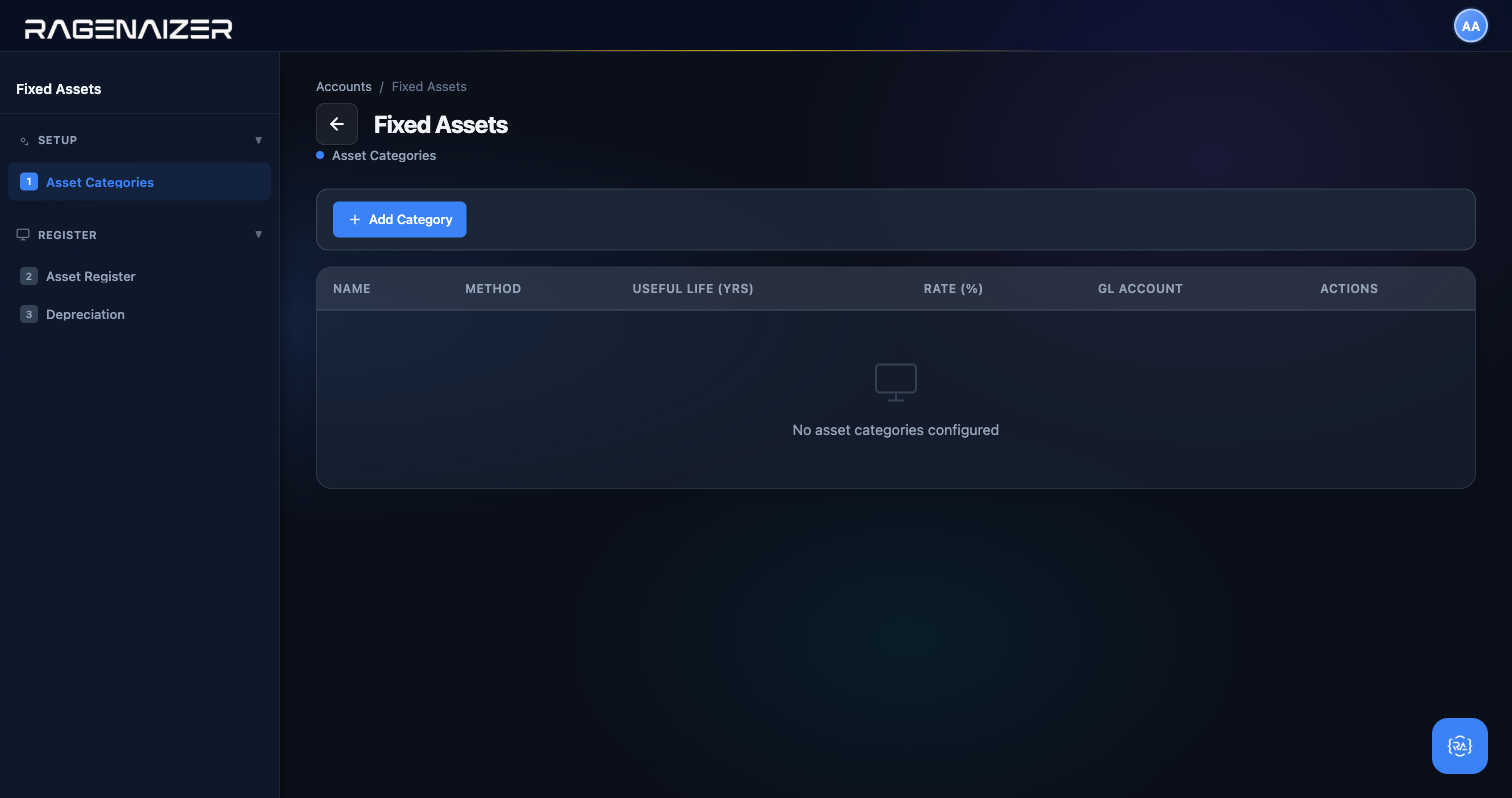


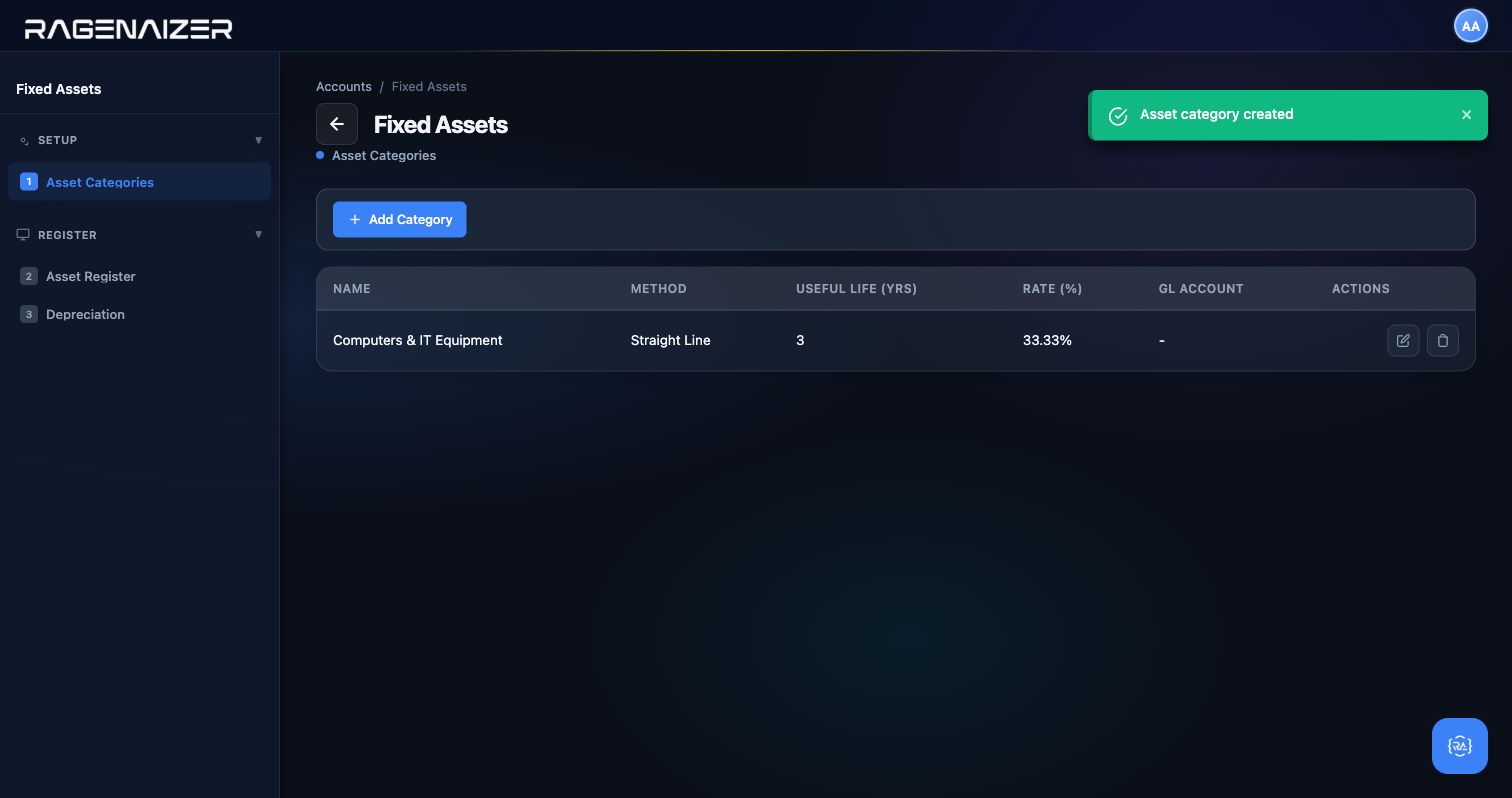
Tab 2 — Asset Register
Click Asset Register. This is the list of your individual assets — one row per physical thing. Click + Register Asset to add a new one. The modal has: Asset Code (your internal tag like "FA-0001"), Name, Category, Purchase Date, Cost, Residual Value (the estimated salvage at end of life), and Description.
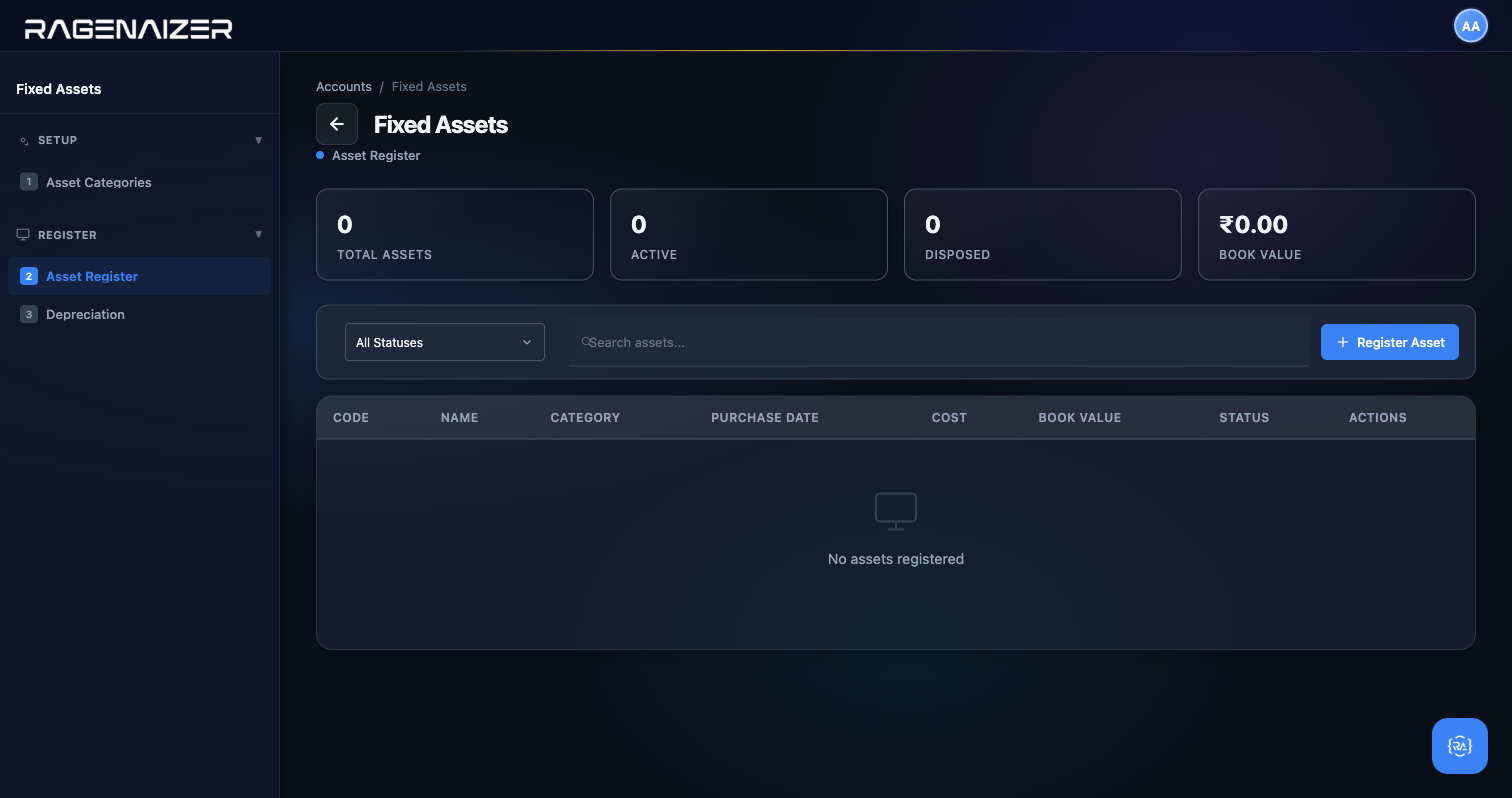
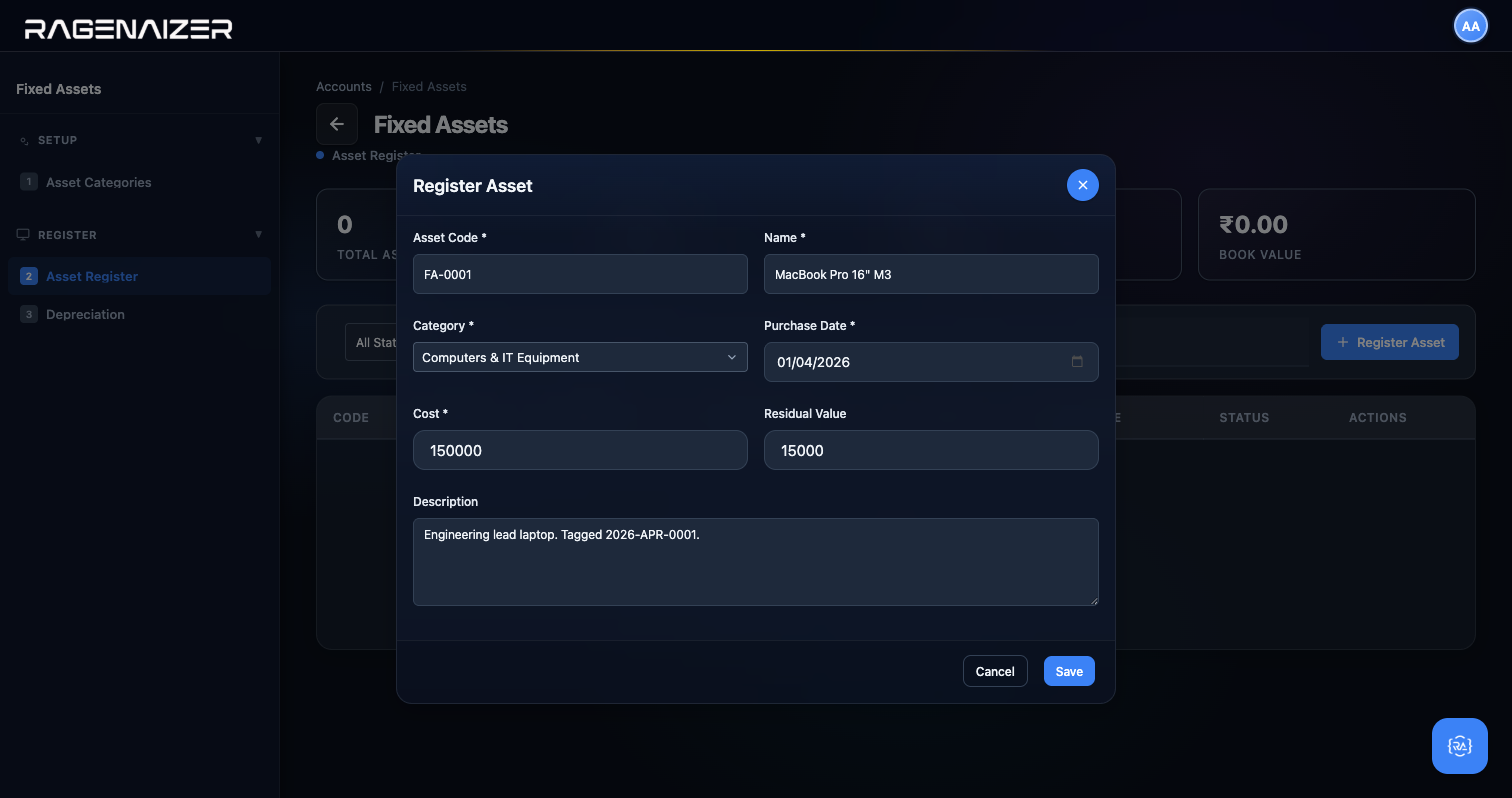
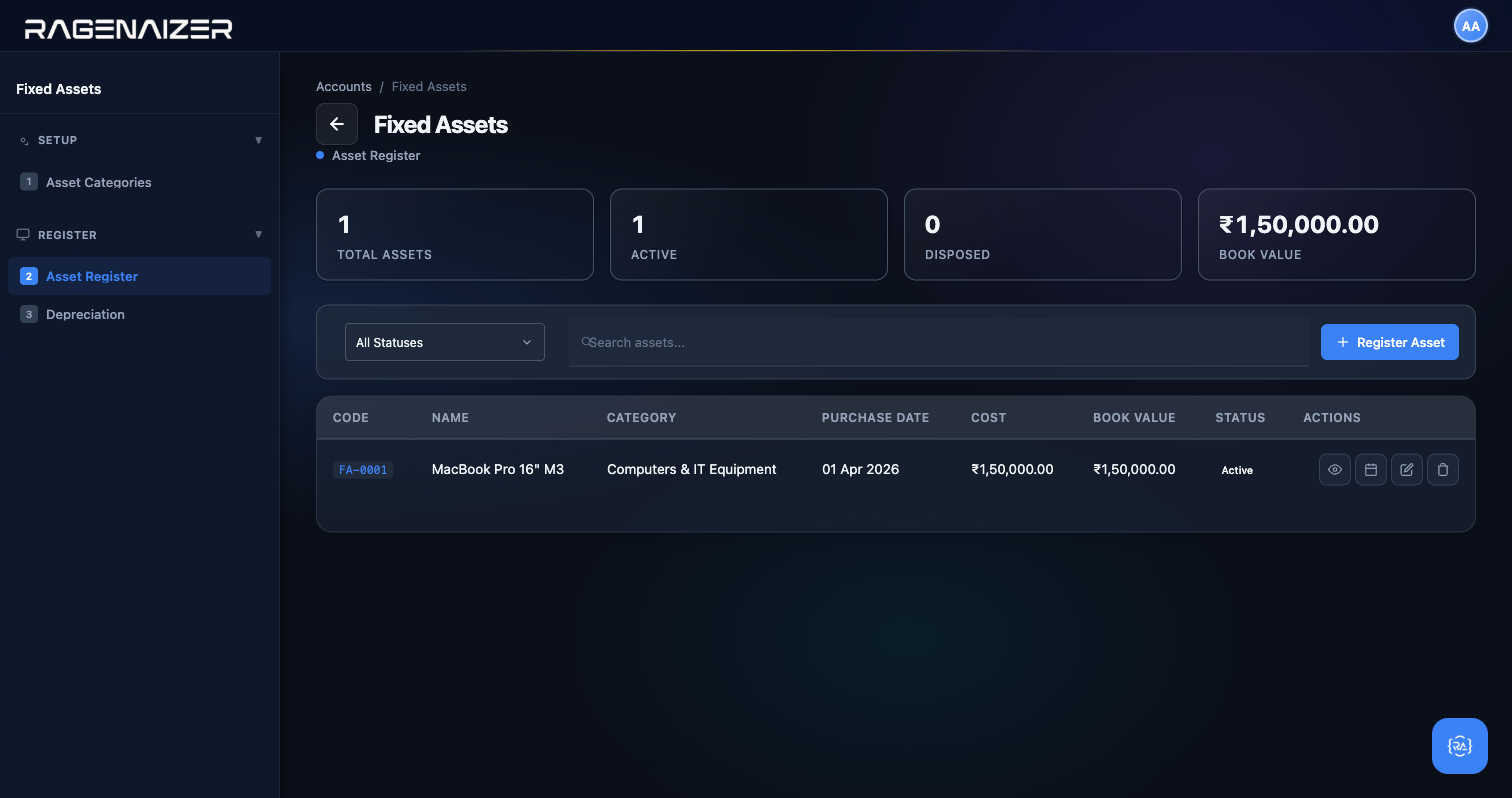
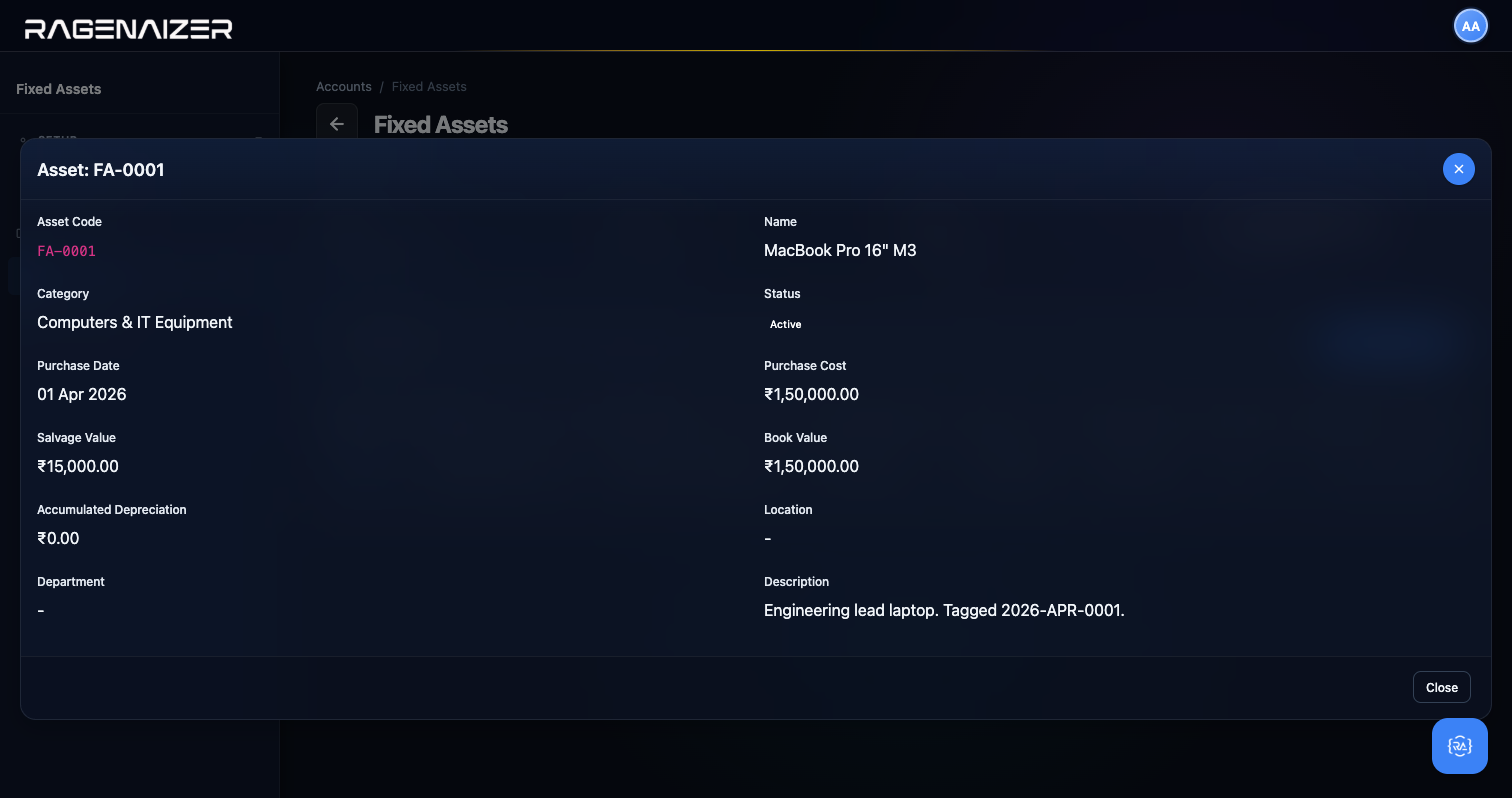
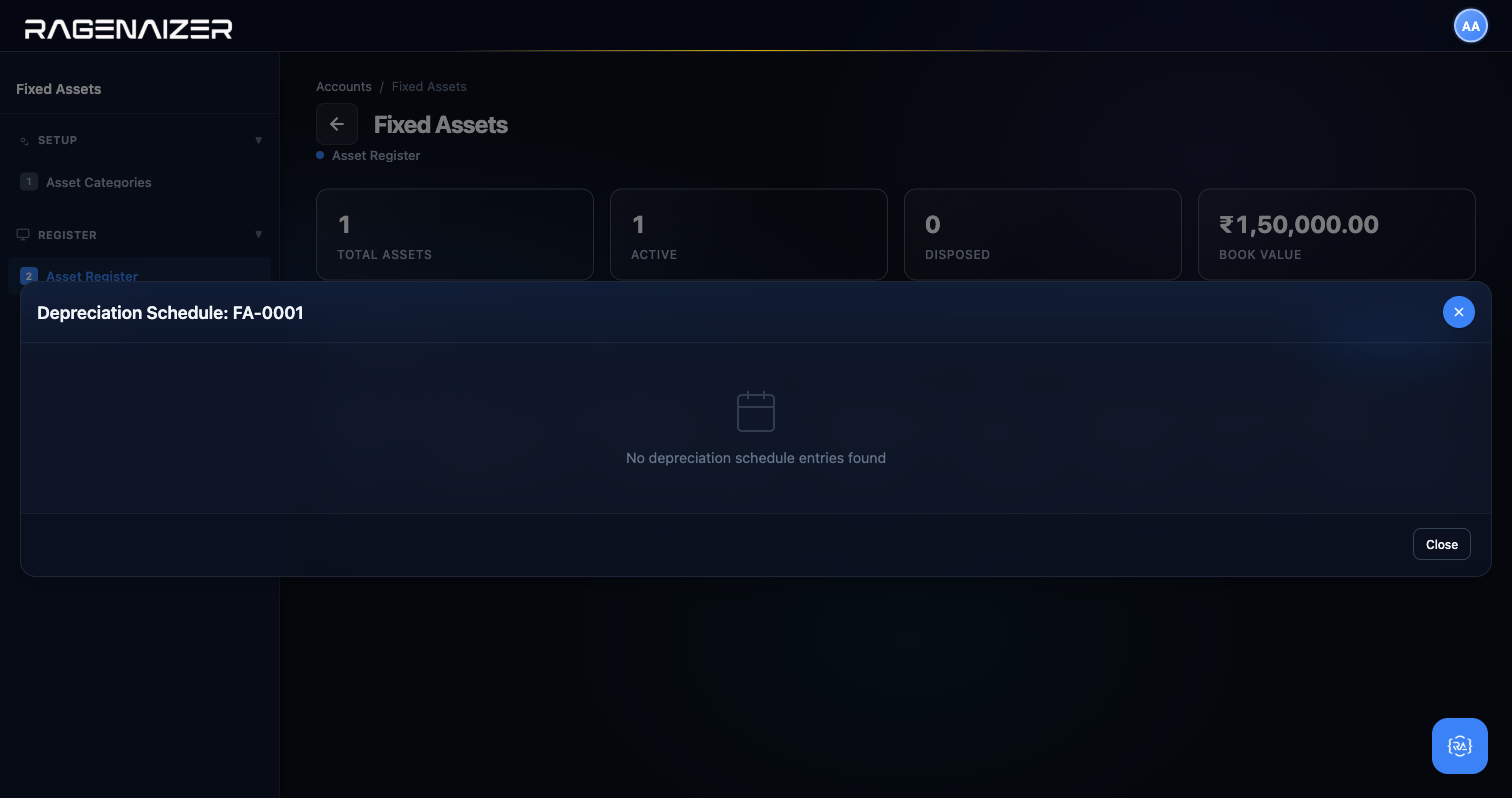
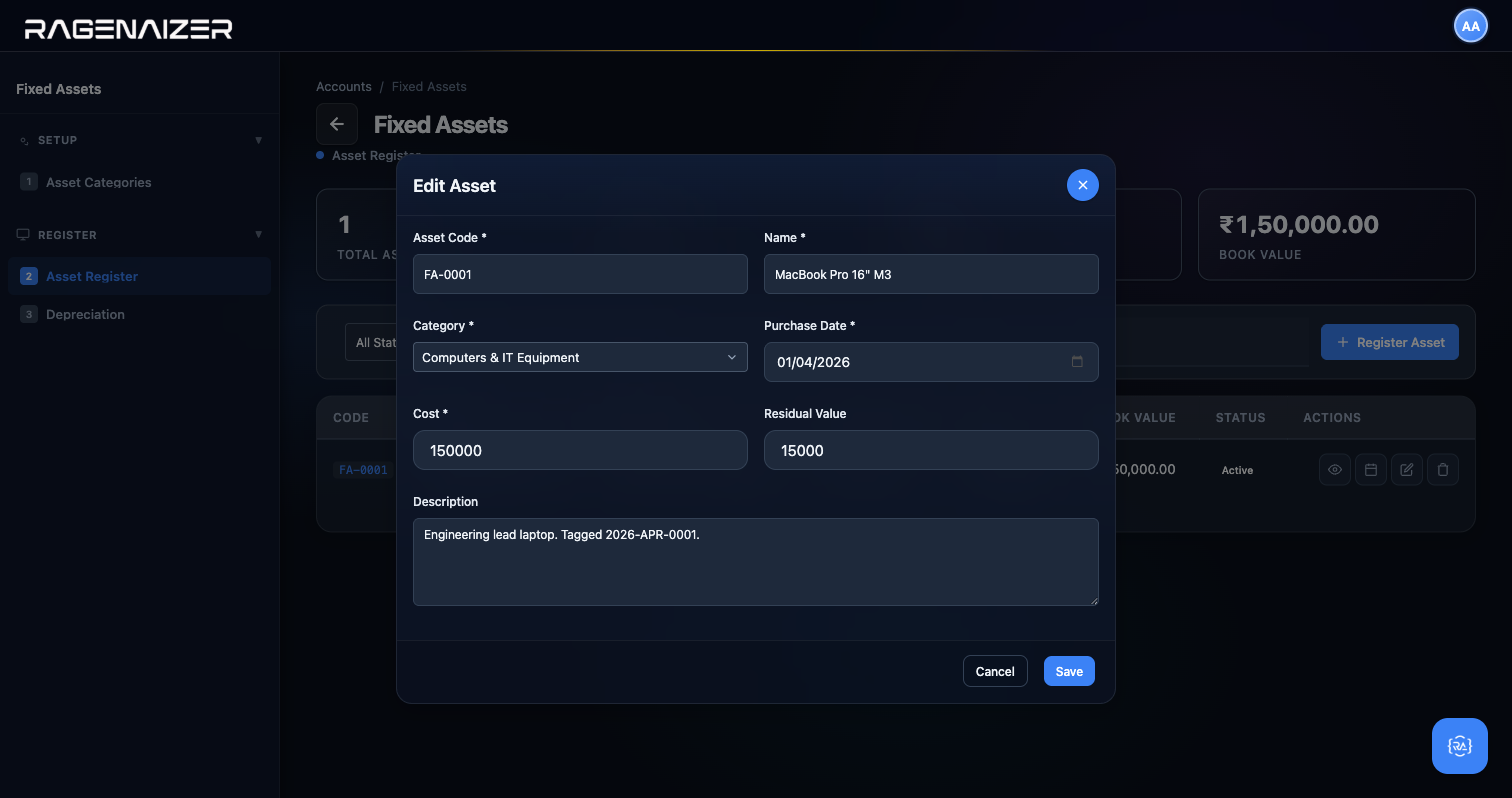
Tab 3 — Depreciation
Click Depreciation. This is where you actually post the monthly depreciation to the GL.
You pick a Period End Date (typically the last day of the month you're closing), optionally filter by
Asset Category, and click Run Depreciation. The system walks every active asset, calculates its
depreciation since the last run up to the period end date, and posts a journal entry: Dr Depreciation
Expense / Cr Accumulated Depreciation. Assets whose purchase date is too recent to have accrued a full period
of depreciation are skipped.

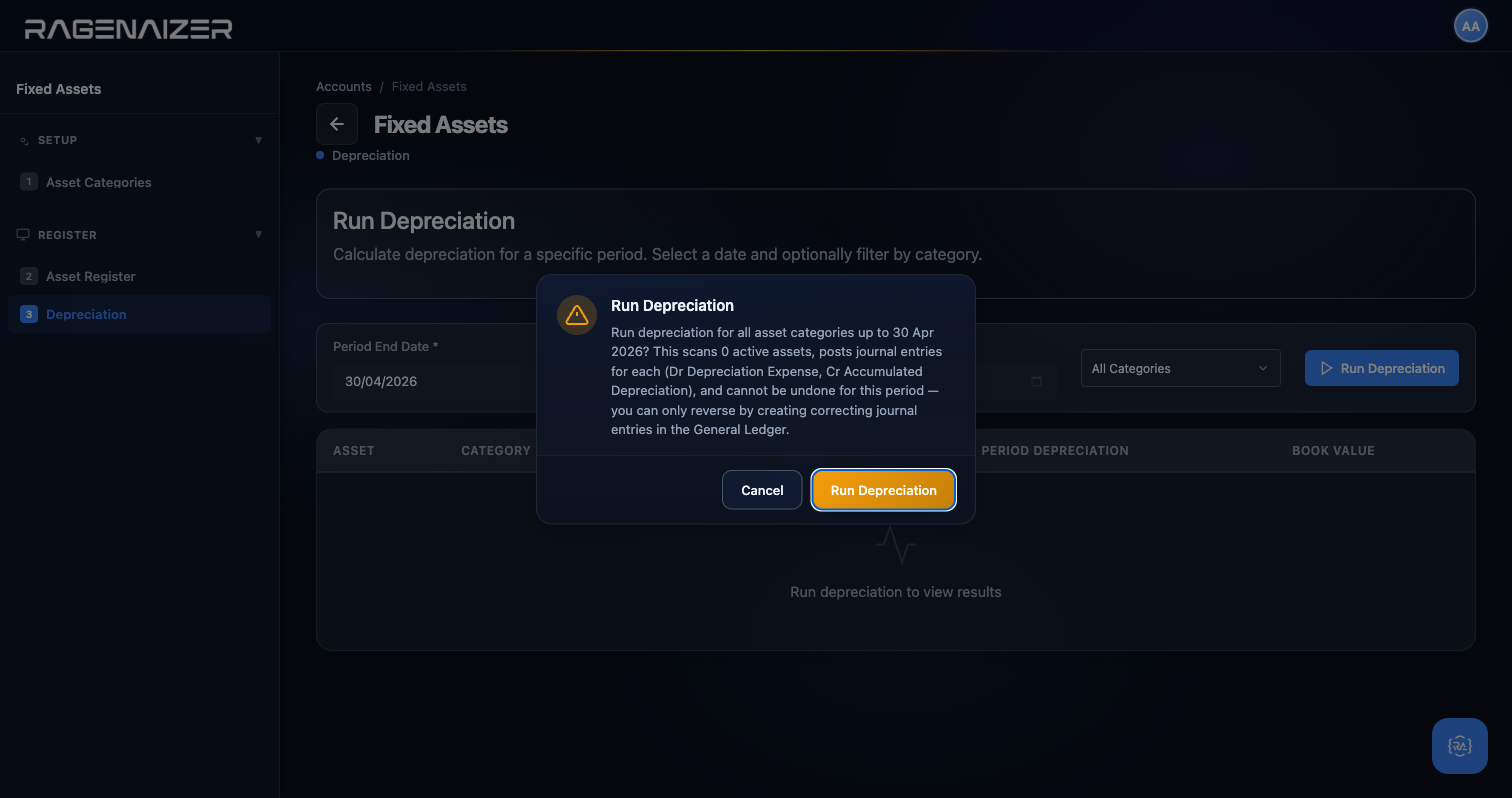
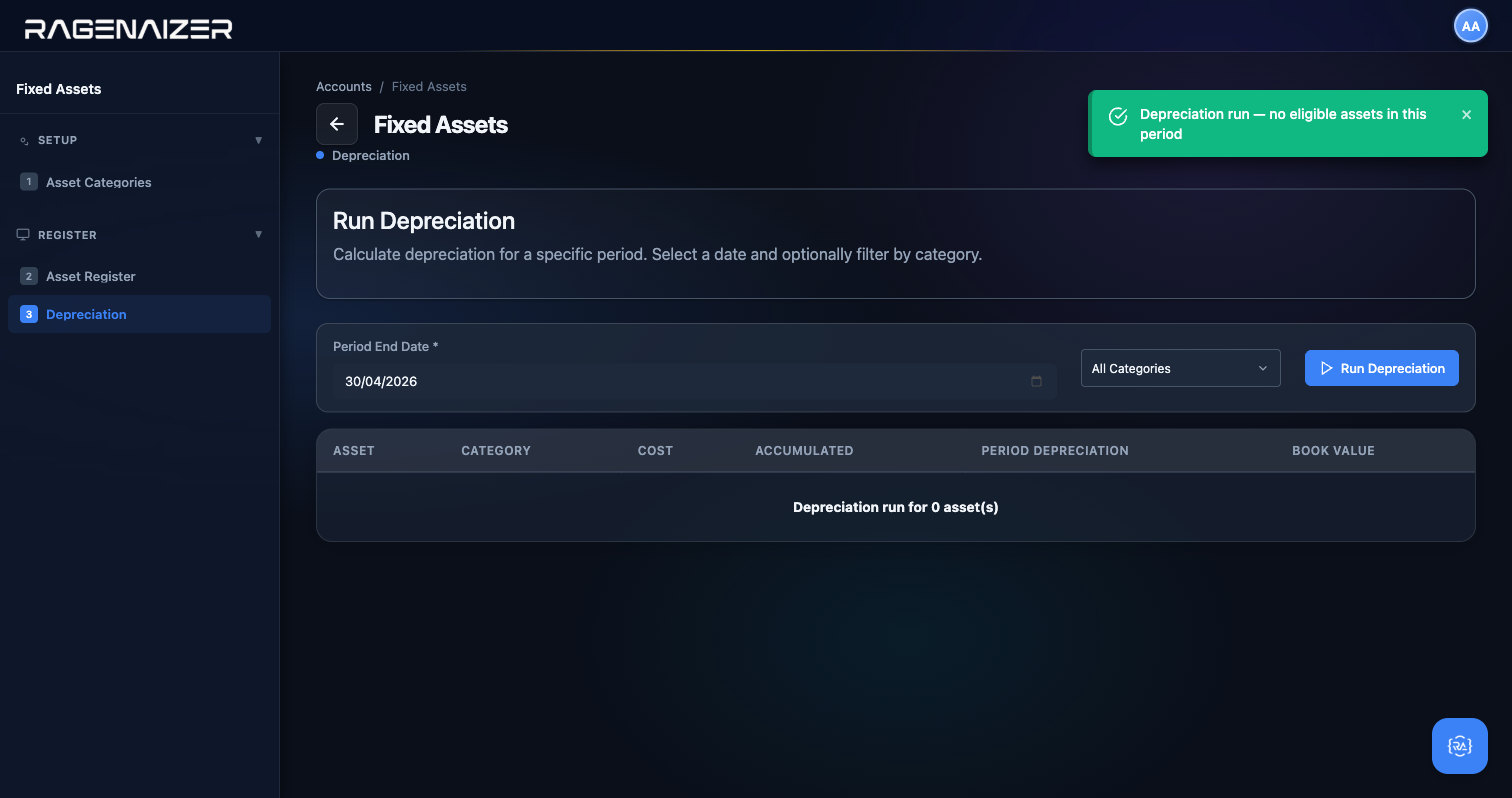
Subscription Billing
If you charge customers on a recurring basis — monthly SaaS subscriptions, annual maintenance contracts, usage-based metered billing, pre-paid tokens — Subscription Billing is where you set that up. You define reusable Billing Plans, enrol individual customers into Subscriptions against those plans, track Usage Meters for metered pricing, and manage Tokens for pre-paid balances. At the end of each billing cycle the system automatically generates Customer Invoices in the Receivables module — exactly the same invoice records you already know how to work with from Section 10 — Customer Invoices.
Four billing models in one module
Ragenaizer supports four billing models side by side. Subscription is a flat recurring fee (e.g. ₹999/month). Usage charges per unit consumed (e.g. ₹0.05 per API call, metered by a Usage Meter). Token is pre-paid credit that gets deducted as the customer consumes. One-time is a single charge with no recurrence. A single customer can have multiple active plans of different types.
Tab 1 — Billing Plans
Click Billing Plans. A plan is a reusable template — you define it once and then enrol multiple customers into it. The modal has: Name (e.g. "Pro Monthly"), Code (a short identifier like PRO-MO-999), Billing Type (Subscription / Usage / Token / One-Time), Amount (the recurring fee in INR), Billing Cycle (Monthly / Quarterly / Semi-Annual / Annual / One-Time), Status (Active / Inactive), and Description.
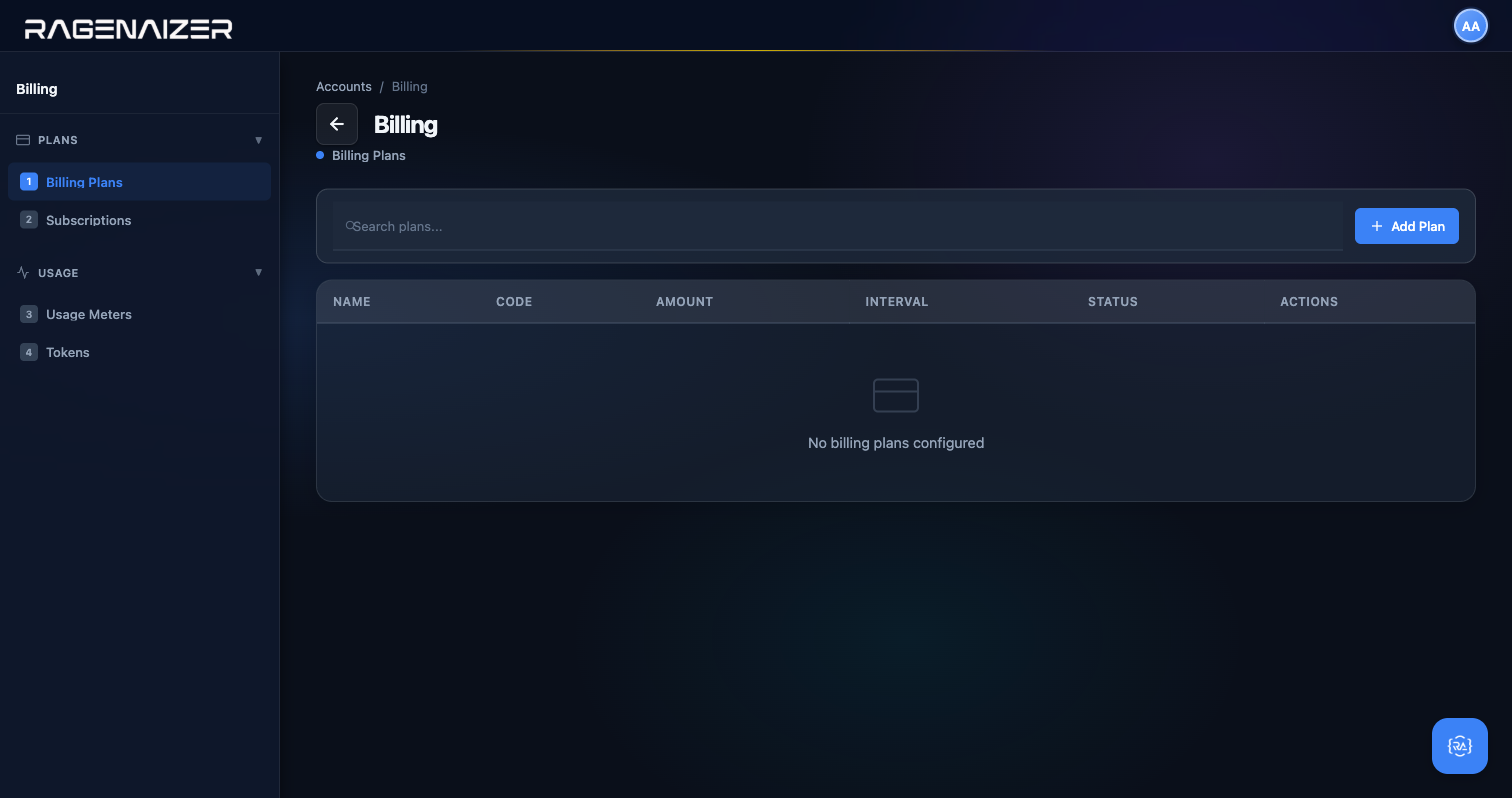
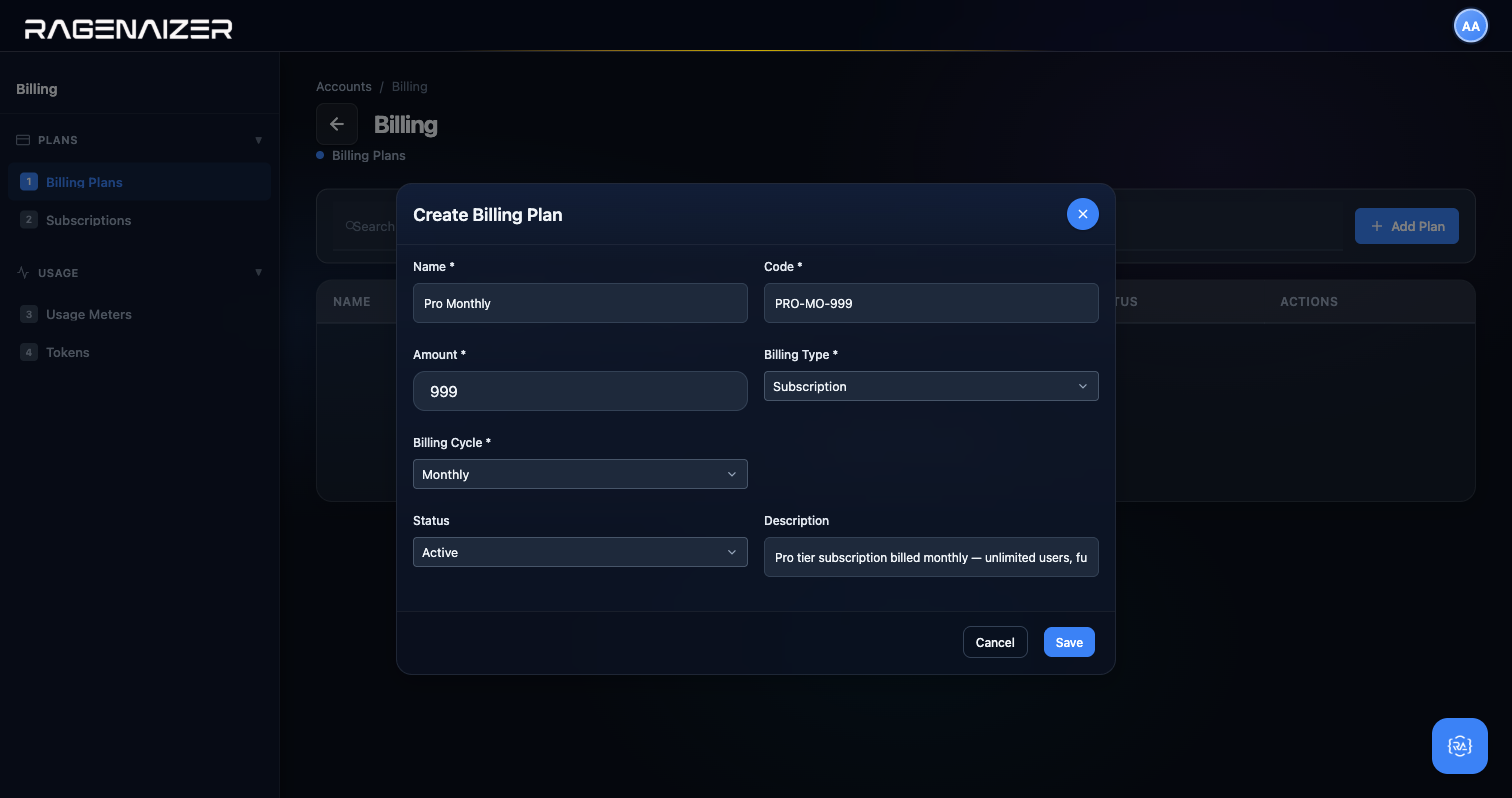
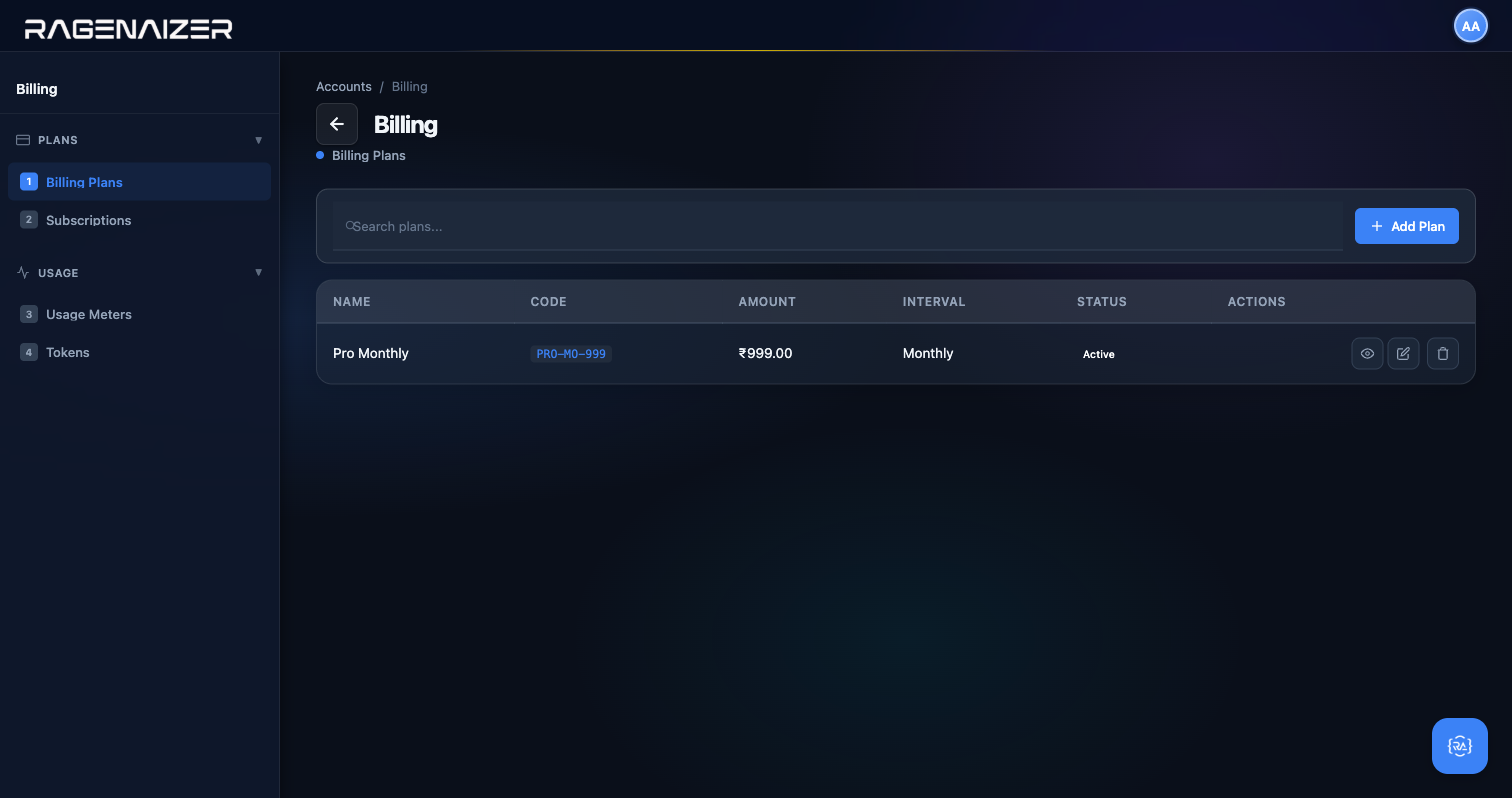
Exercise all three row actions on the Pro Monthly plan to confirm they work end-to-end.
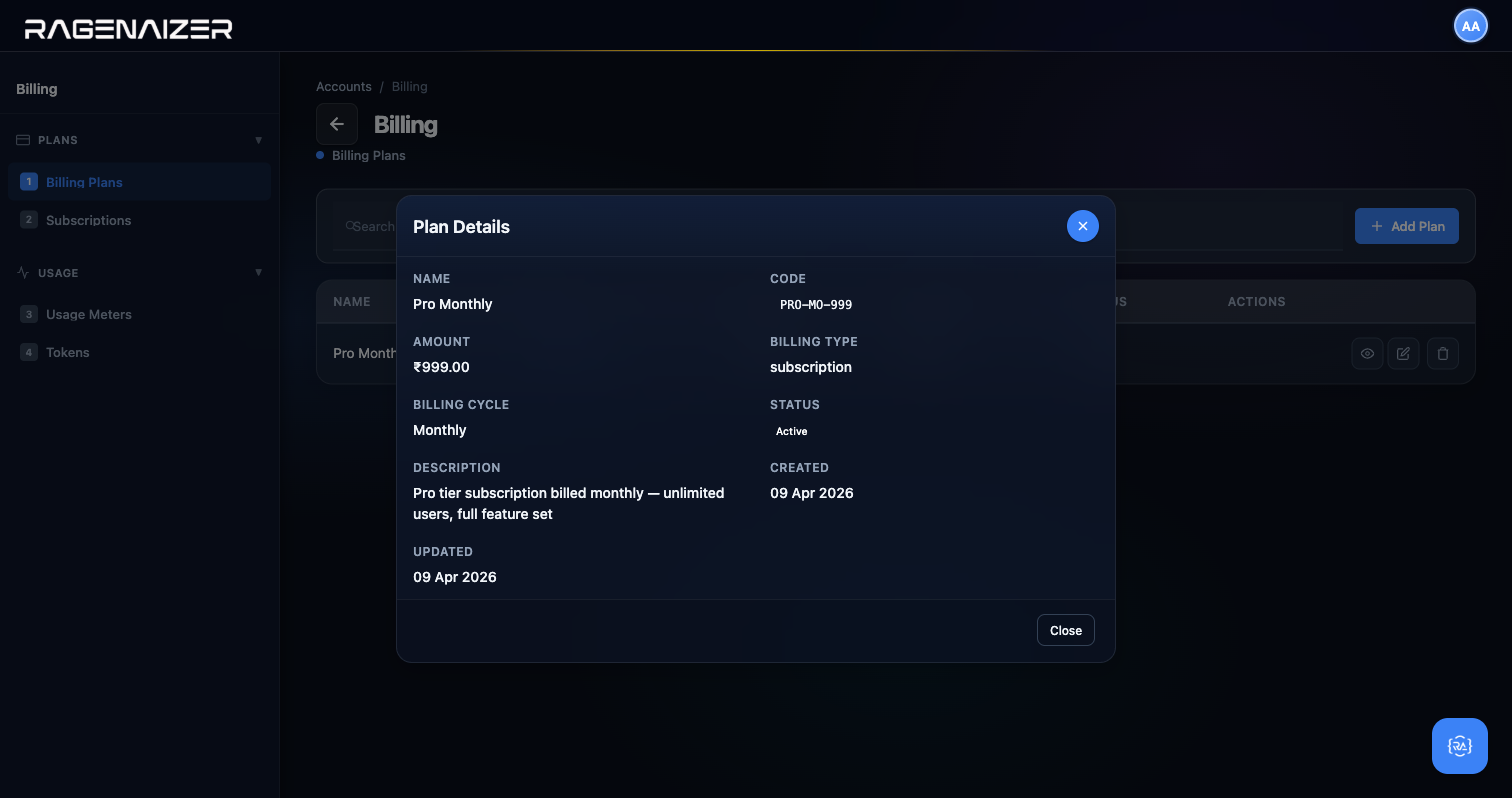
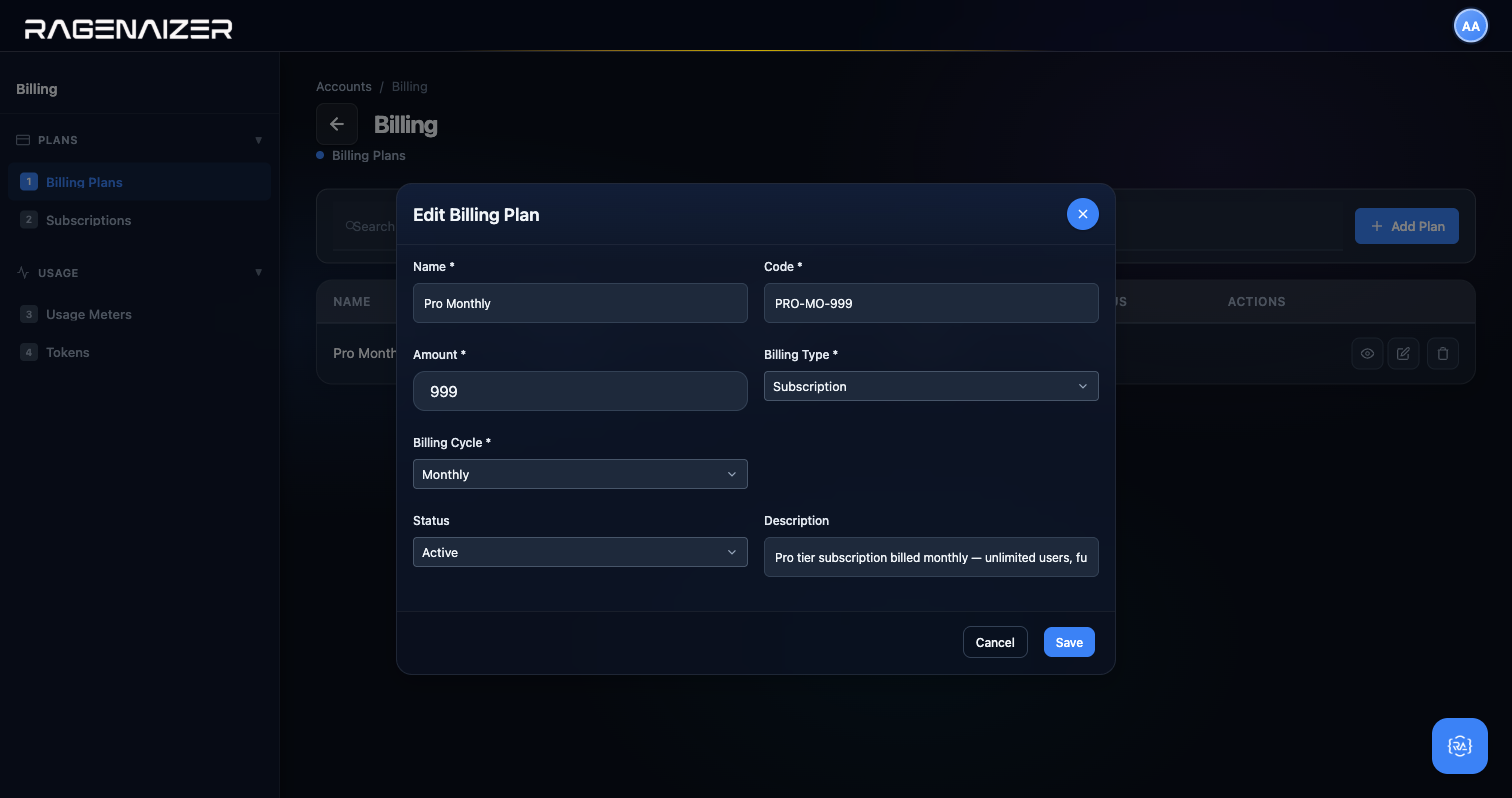
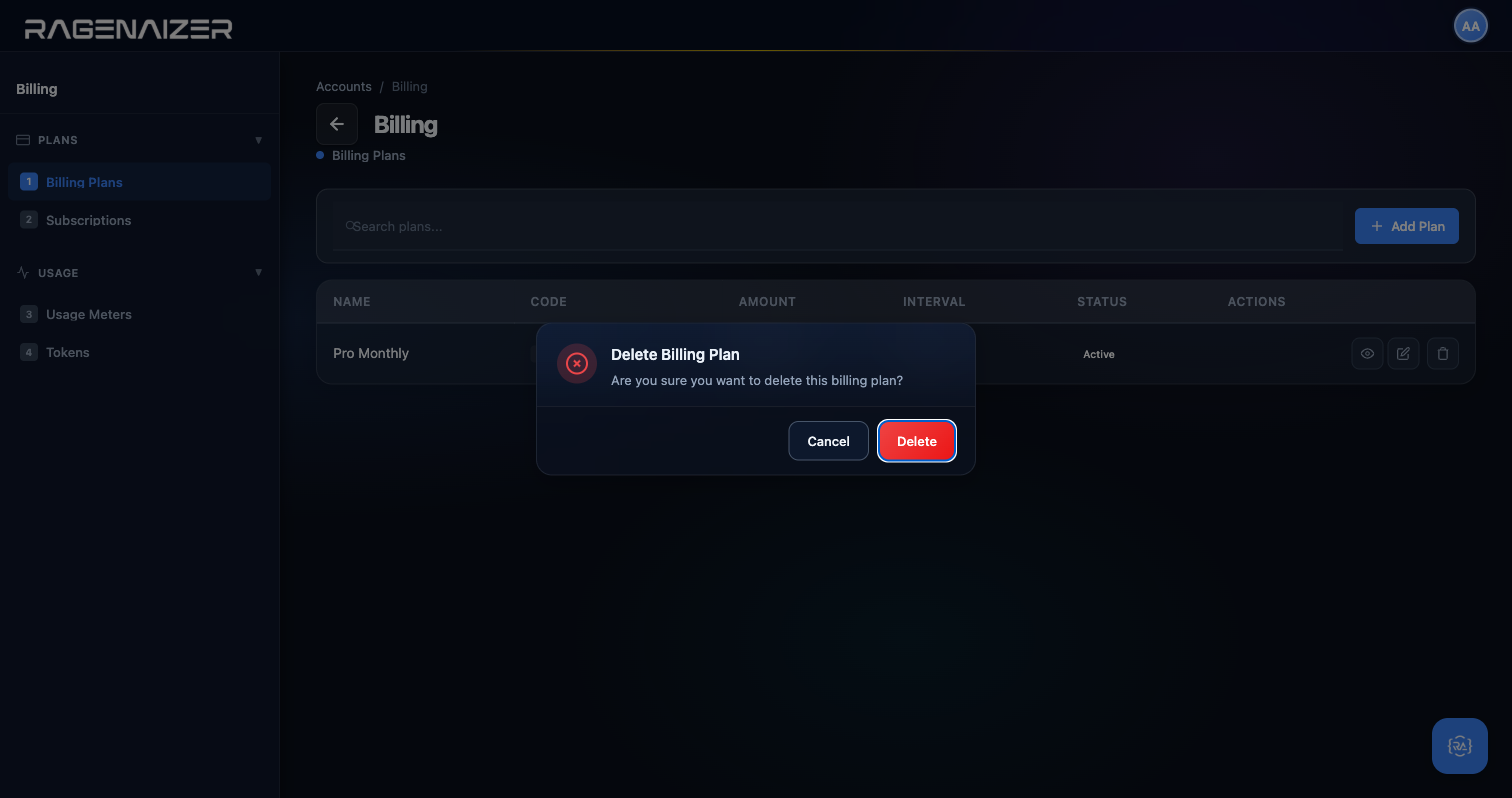
Tab 2 — Subscriptions
Click Subscriptions. This is where you enrol individual customers into a plan. Each subscription links a customer to a plan with a start date, optional end date, and quantity (for per-seat pricing). Subscriptions can be Active, Paused (temporarily stop billing without losing the contract), or Cancelled (end the contract). The Generate Invoices button in the toolbar runs the billing cycle immediately — normally this runs automatically in the background on the 1st of each month.
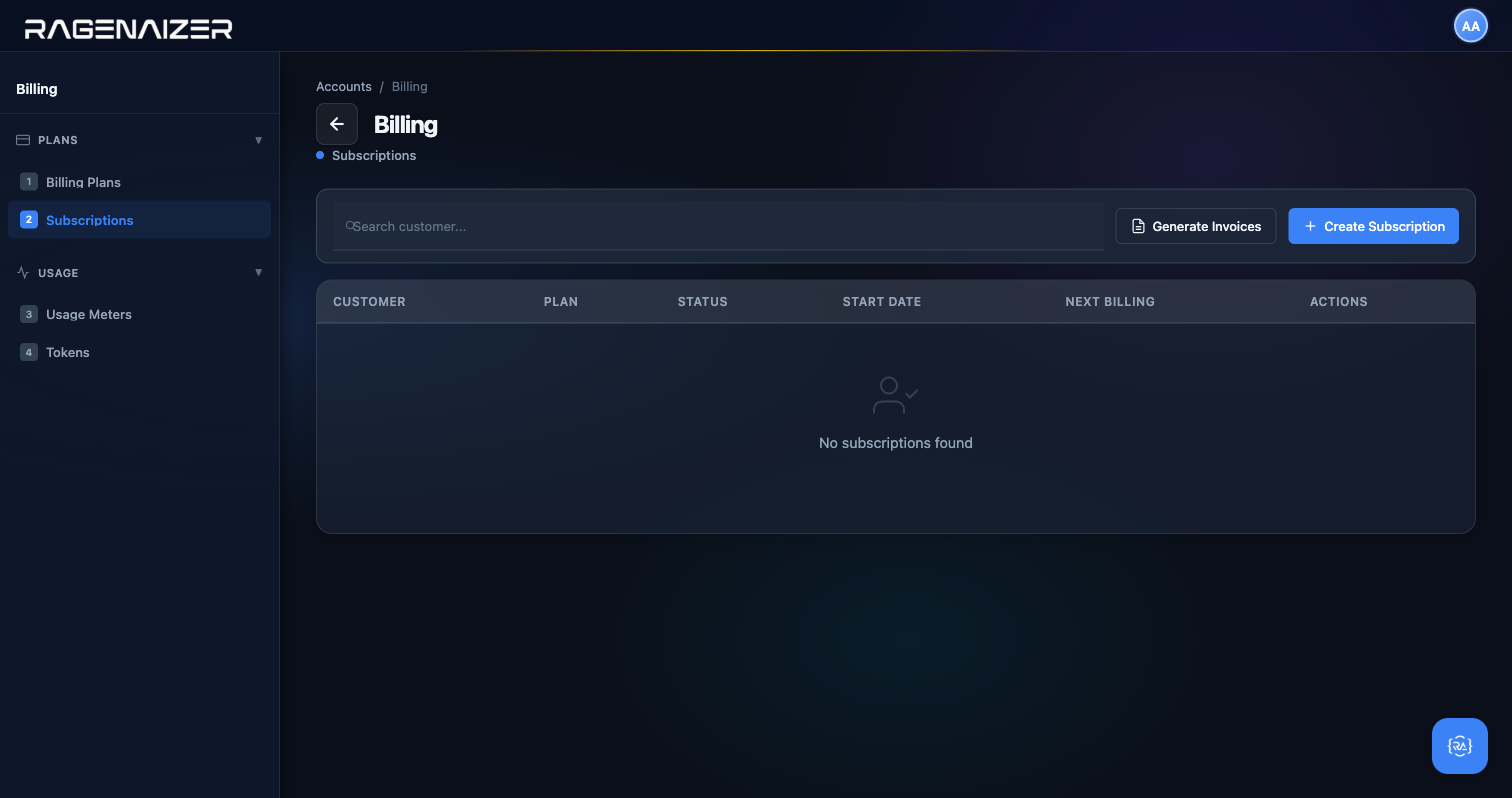

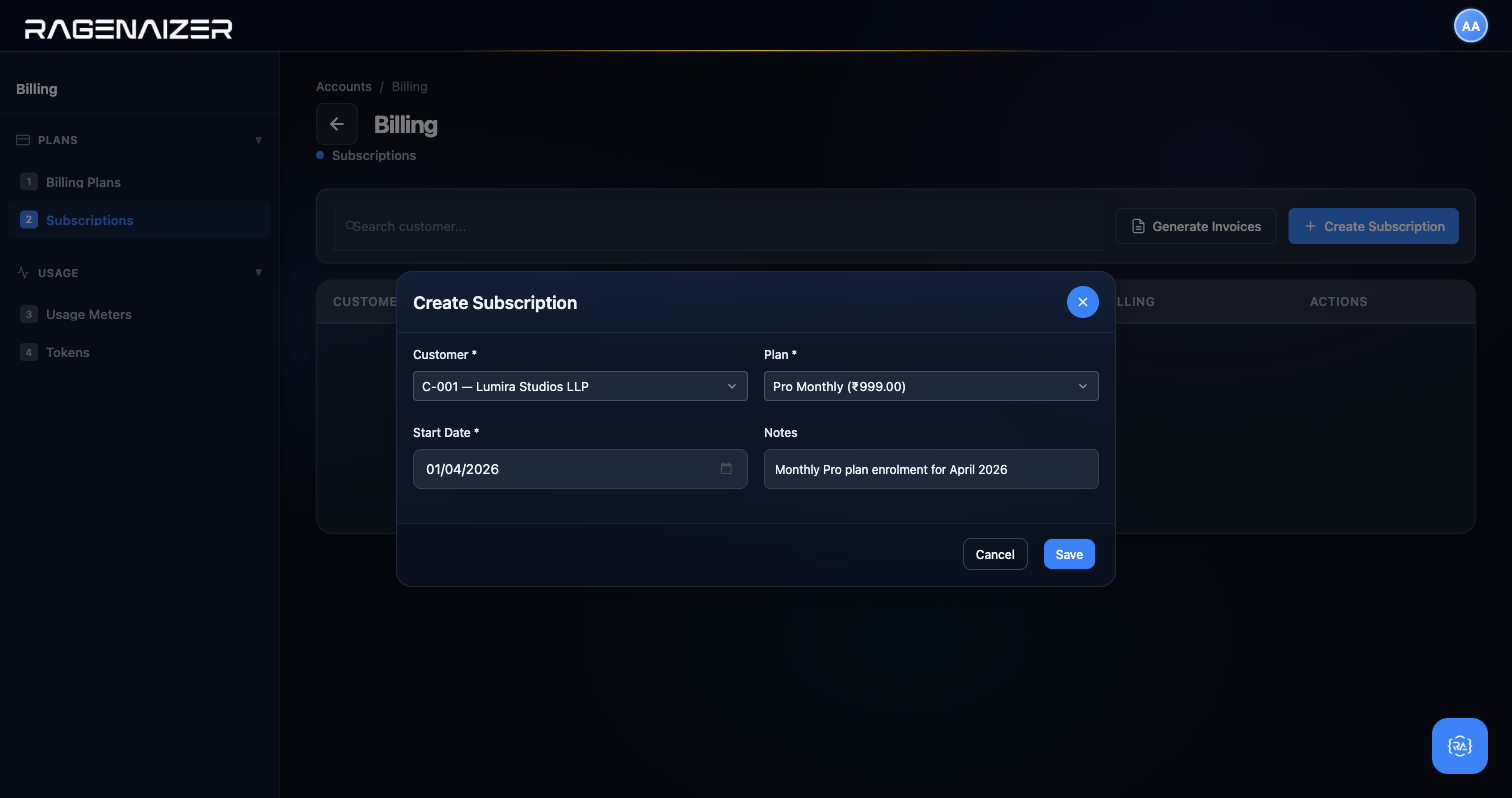

Tab 3 — Usage Meters
Click Usage Meters. A usage meter is a counter attached to a customer — think "API calls this month" or "GB of storage". Every time the customer uses the service, your integration posts a usage event to the meter. At billing time, the meter's total is multiplied by the plan's per-unit rate to produce the invoice line. The Record Usage form at the bottom of the page is for manual entry (useful for testing or for metered services you're billing by hand).
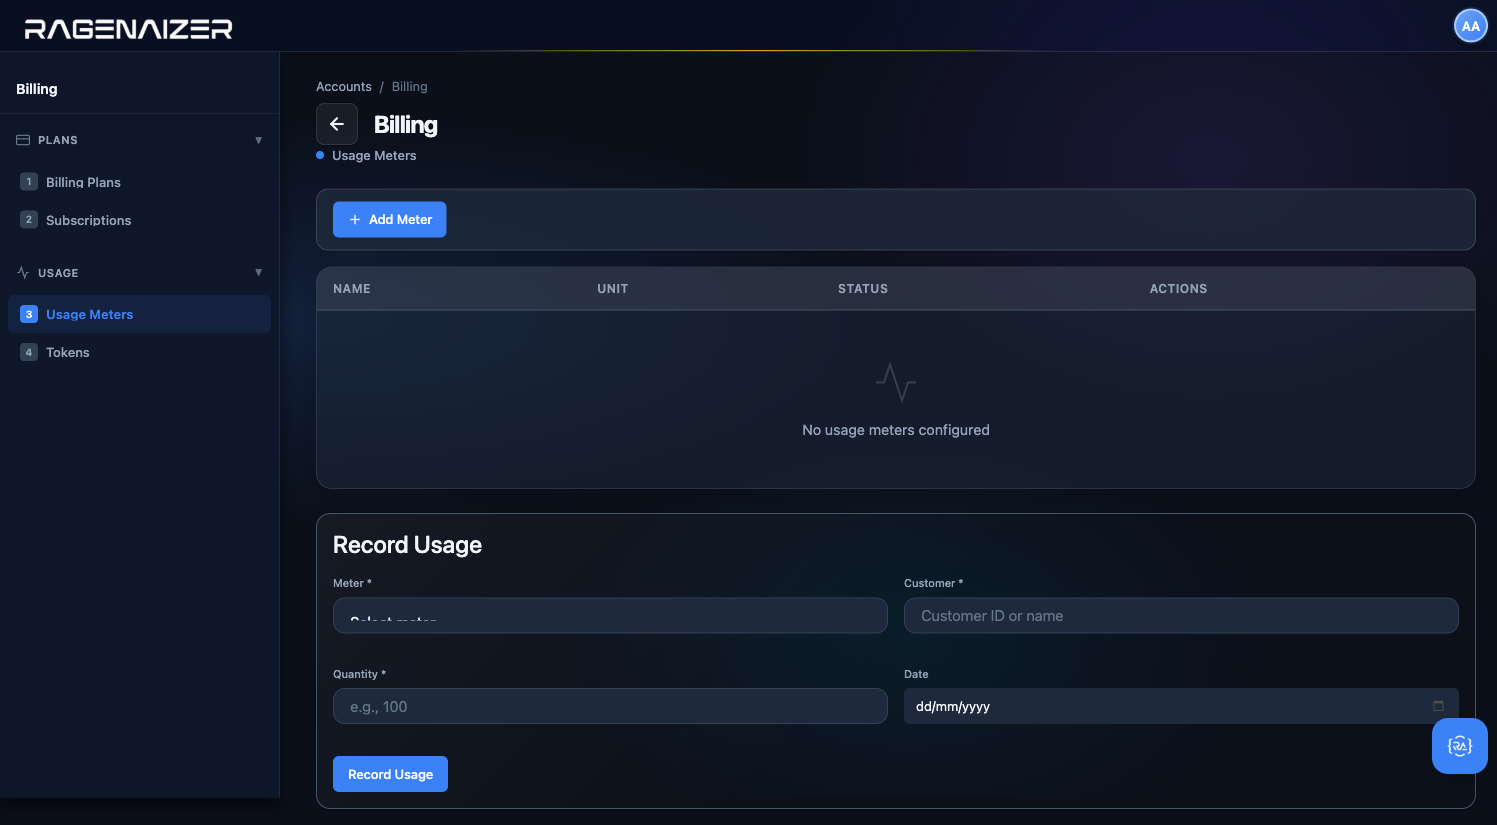

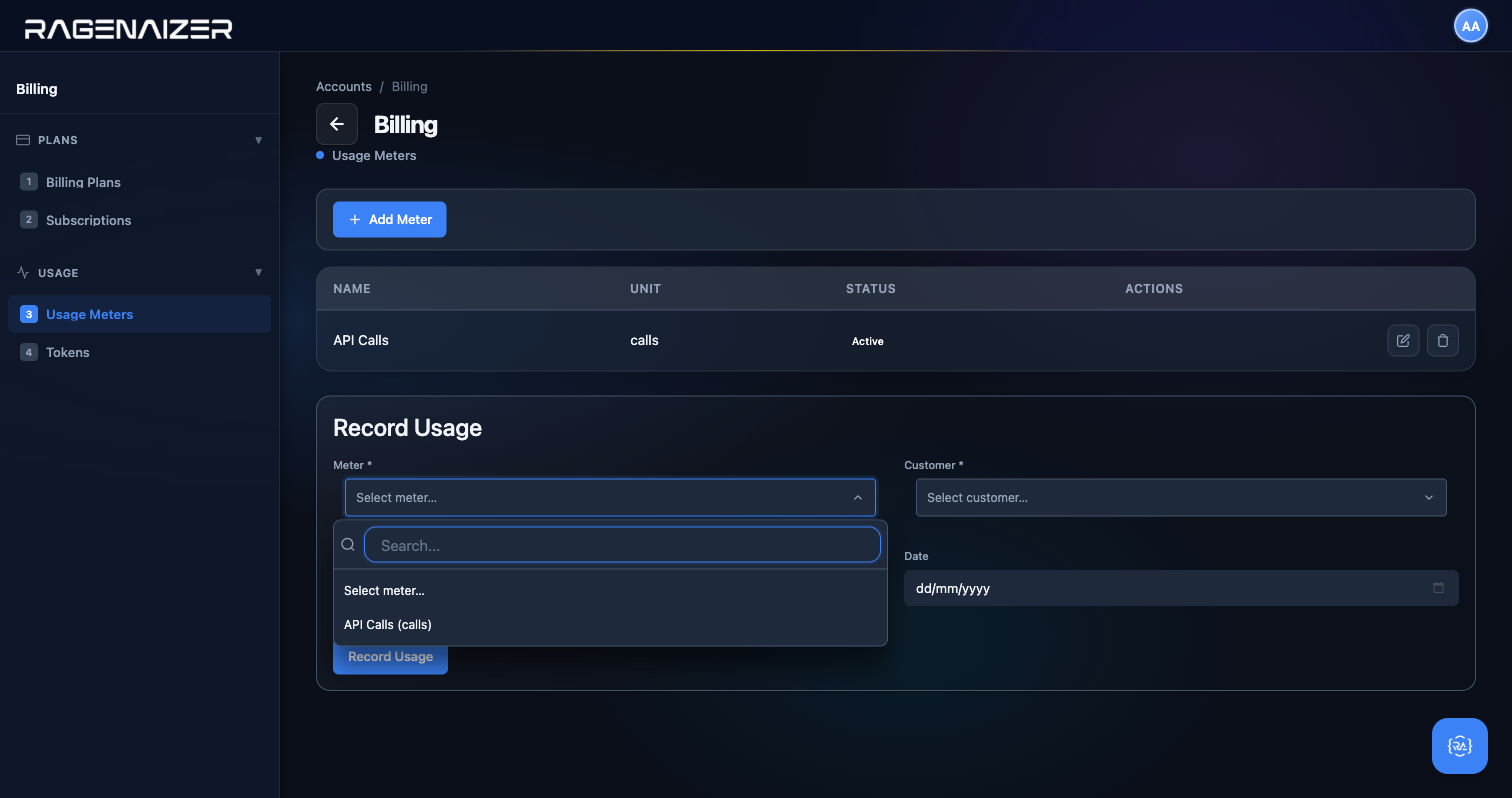
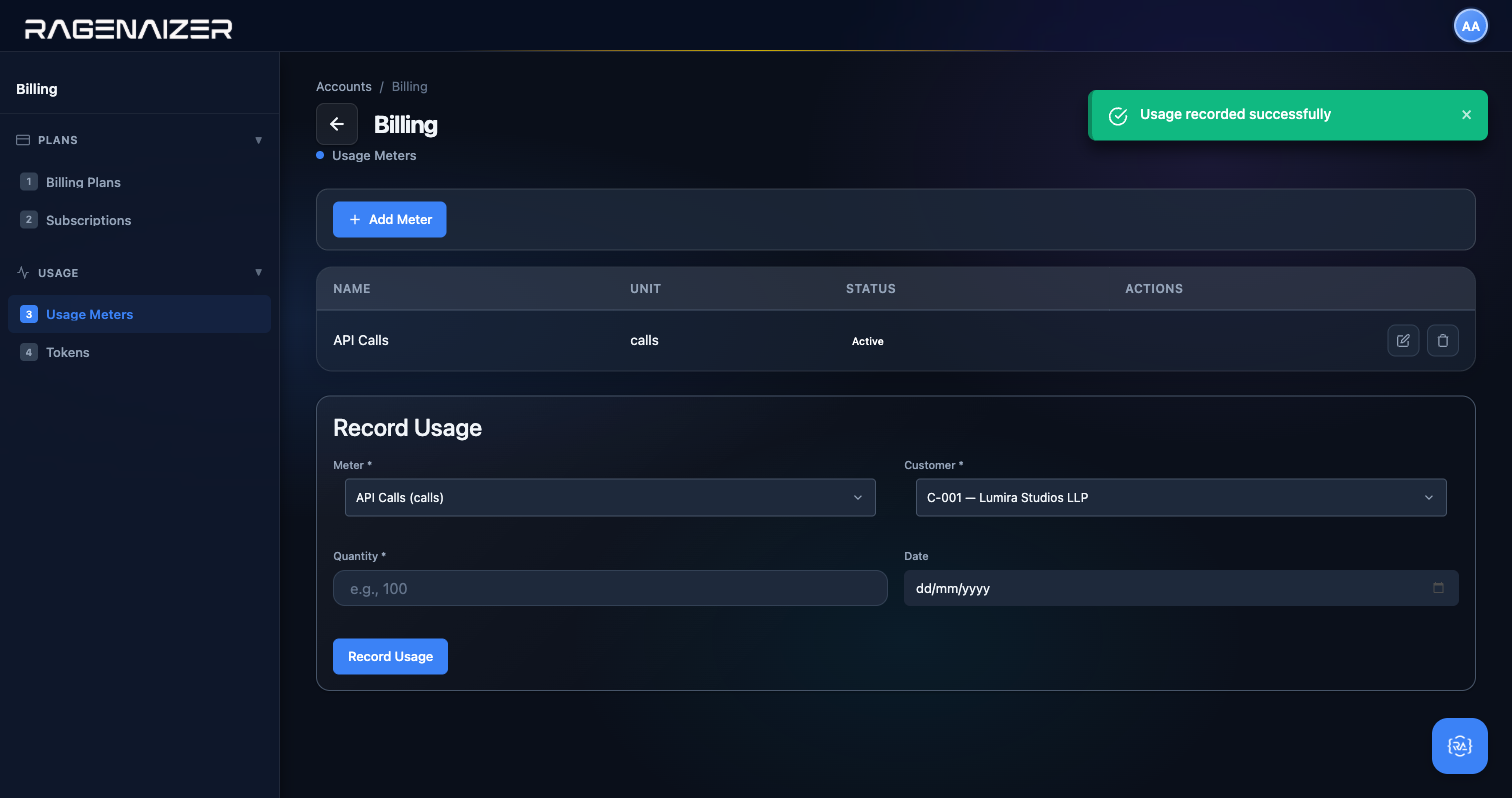
Tab 4 — Tokens
Click Tokens. Tokens are pre-paid credit balances, useful when you want the customer to pay upfront and have their consumption deducted as they go. The page has three sections: Token Management (view current balance for a customer), Purchase Tokens (credit a customer's balance when they pay), and Deduct Tokens (debit their balance when they consume).
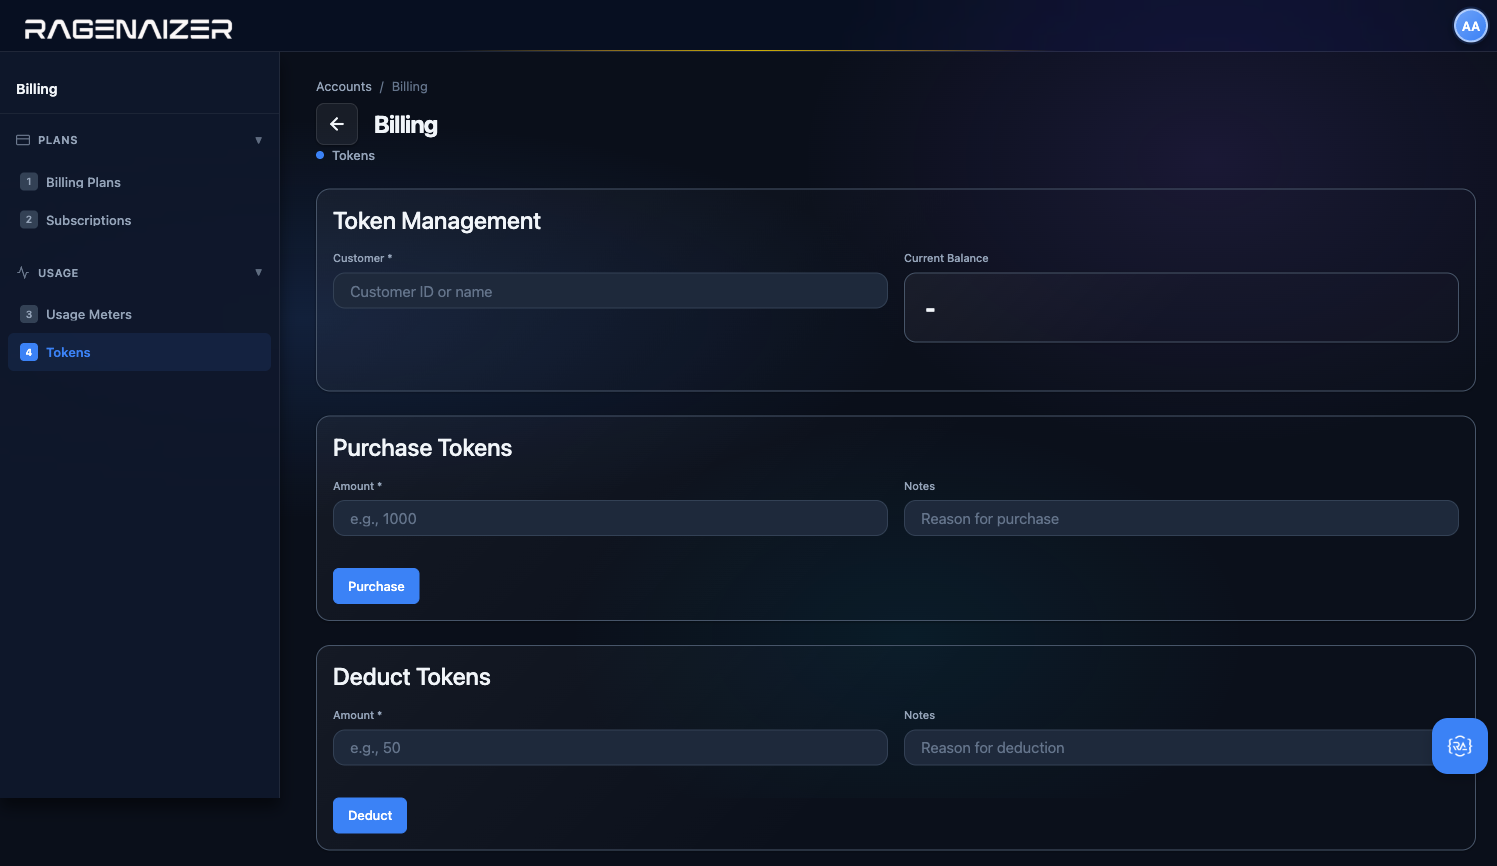

Administration
The Administration module is your control tower. It doesn't create any accounting data itself — instead, it gives you six tools for watching over the data the other modules produce: Audit Logs (who did what, when), Pending Approvals (items waiting for a reviewer), Integrity Check (a health check that proves your ledger is internally consistent), Job Log (background job history), Closing Checklists (month-end close workflow), and Year-End Closing (the annual rollover). Every serious accounting system has these; they're what auditors ask for first.
Tab 1 — Audit Logs
Click Audit Logs. This is the running history of every meaningful action in the tenant: invoices approved, bank accounts created, tax configs updated, periods locked, users logging in — every change leaves a row here with a timestamp, the user who did it, the entity type, the action, and the full before/after payload. It is append-only: nothing can delete or modify an audit log entry, even by a superadmin — that's the point. When an external auditor asks "who approved this invoice?", this page is where you find the answer.
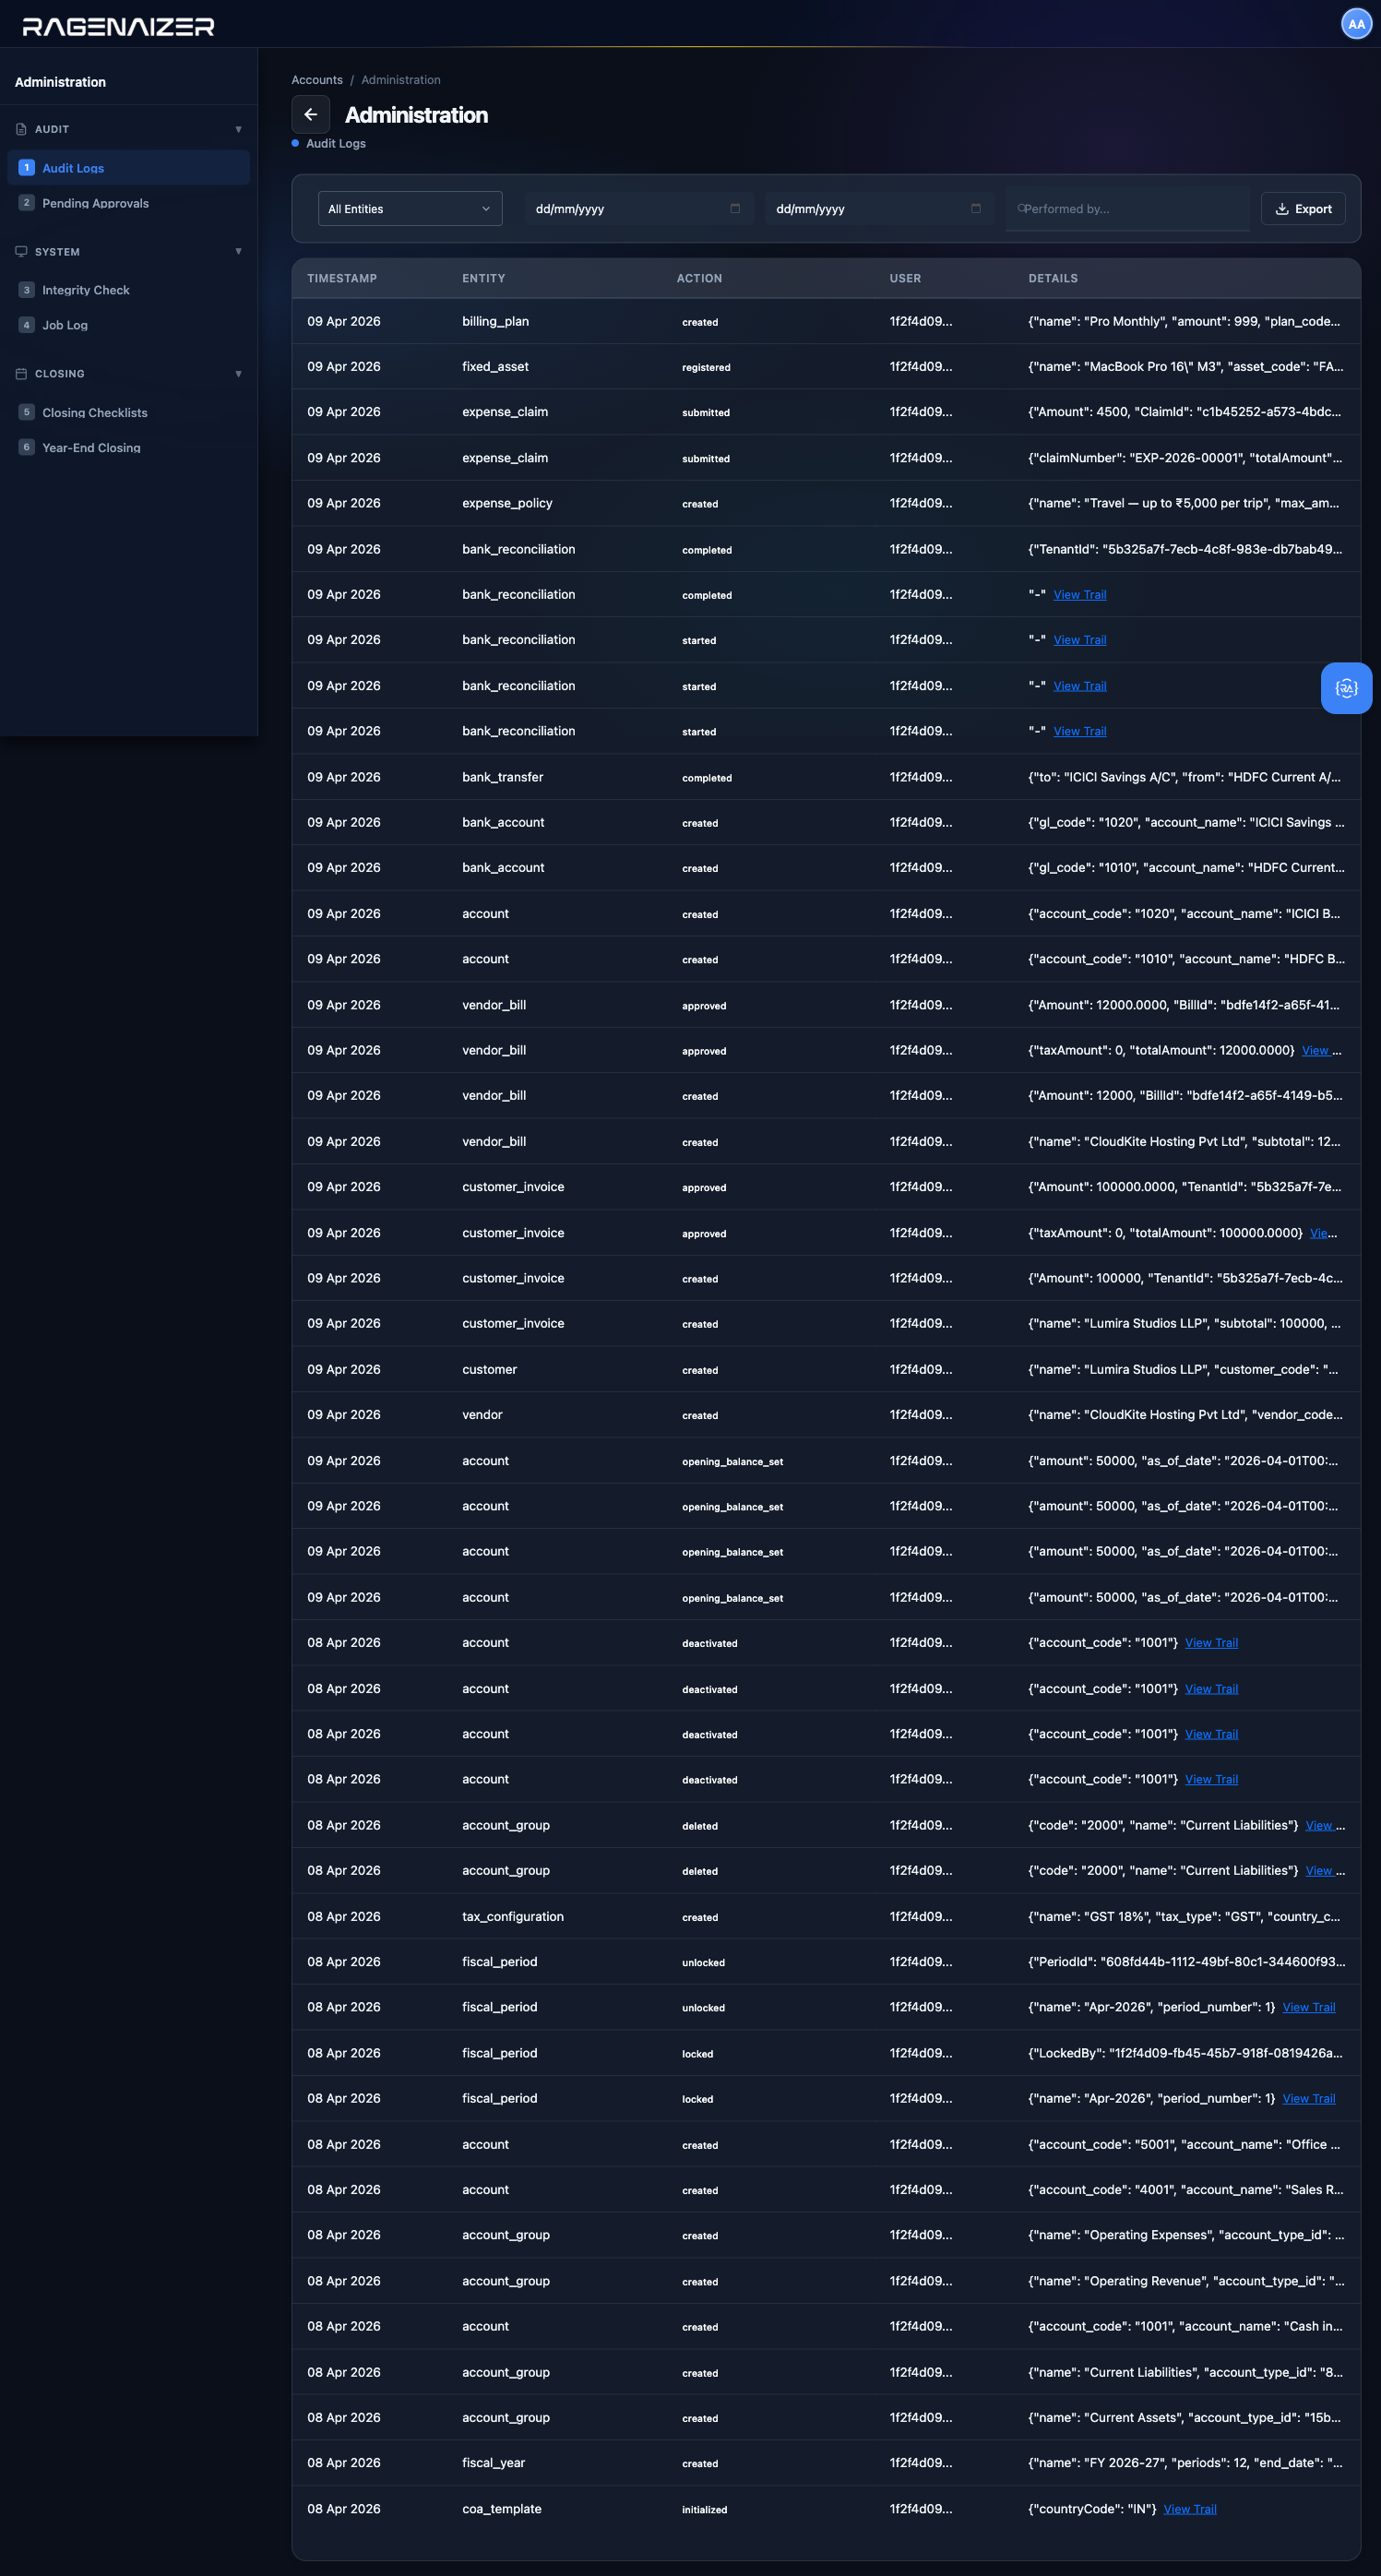
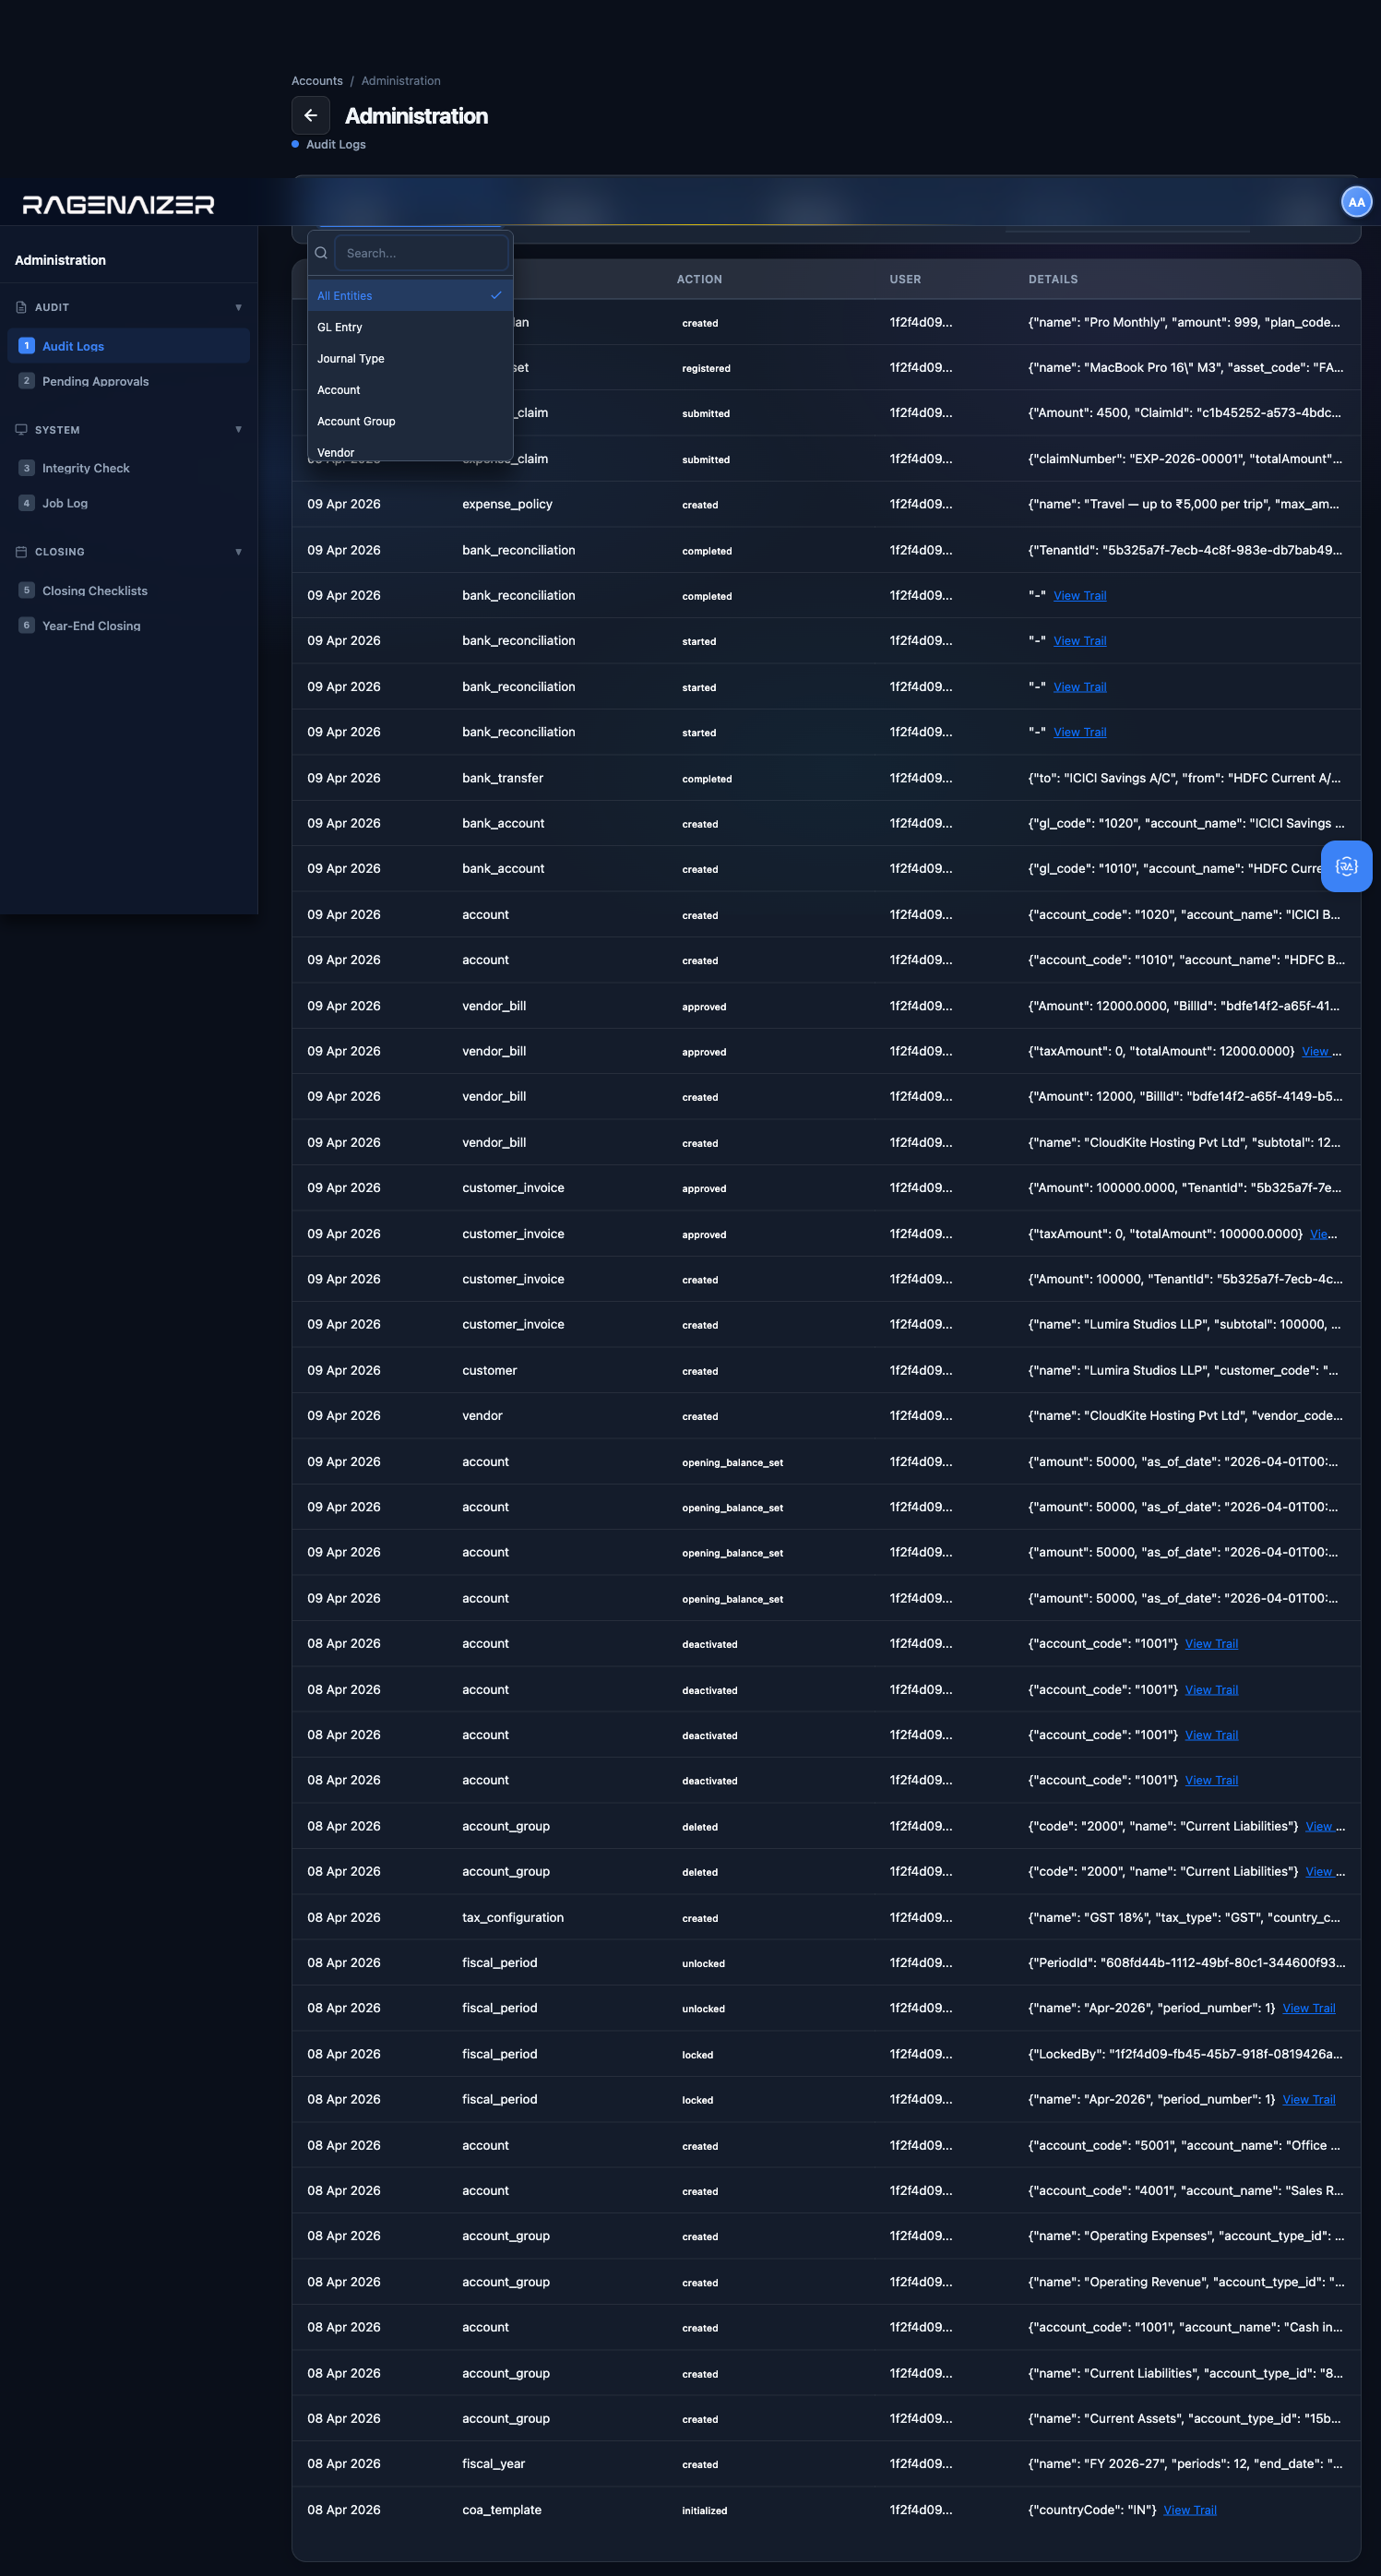

BankTransaction entities. Now you see only the bank-transaction lifecycle — create, update, delete — with each row's full payload one click away. This is exactly the kind of slice an external auditor will ask for first.Tab 2 — Pending Approvals
Click Pending Approvals. Some actions in Ragenaizer require a reviewer's sign-off before they take effect — large payments, sensitive tax config changes, master data edits. When those actions are initiated by a non-approver user, they land here instead of being applied immediately. An admin reviews the list and either approves (the action executes) or rejects (the requester is notified with a reason).
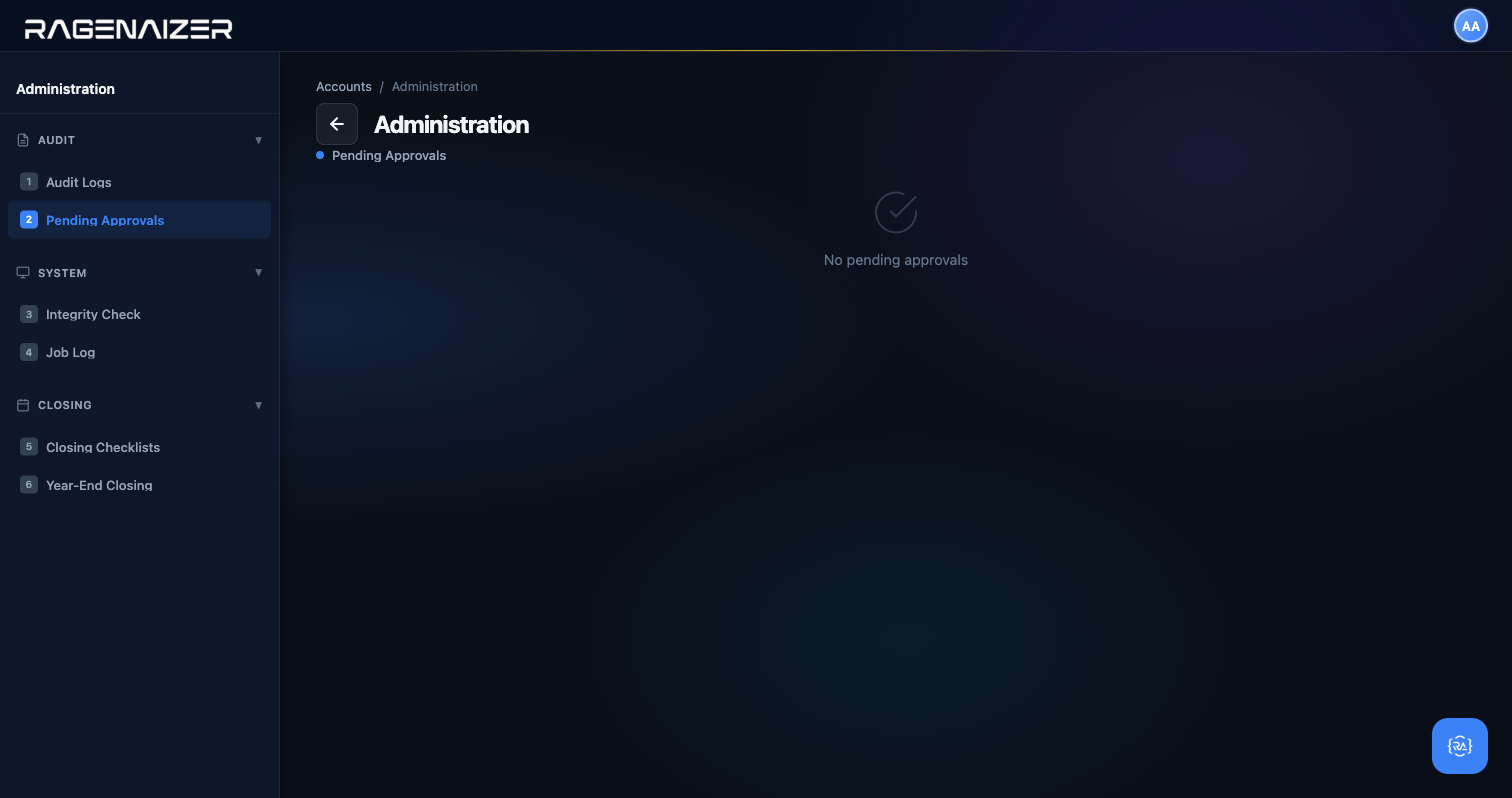
Tab 3 — Integrity Check
Click Integrity Check. This runs three automated health checks on your ledger data and tells you PASS/FAIL for each. GL Balance verifies that every posted journal entry has balanced debit and credit totals (this is the fundamental accounting invariant: Dr = Cr). Account Balance Drift verifies that every account's stored balance matches the sum of its posted journal entry lines — if these drift apart, something has gone wrong (usually a failed background job). Period Balance Consistency verifies that fiscal period opening and closing balances reconcile across periods. Click Run Check to execute; in a healthy tenant you want three PASS rows and zero FAIL. If anything fails, the Details column tells you what's wrong and you have a problem to investigate before the next close.
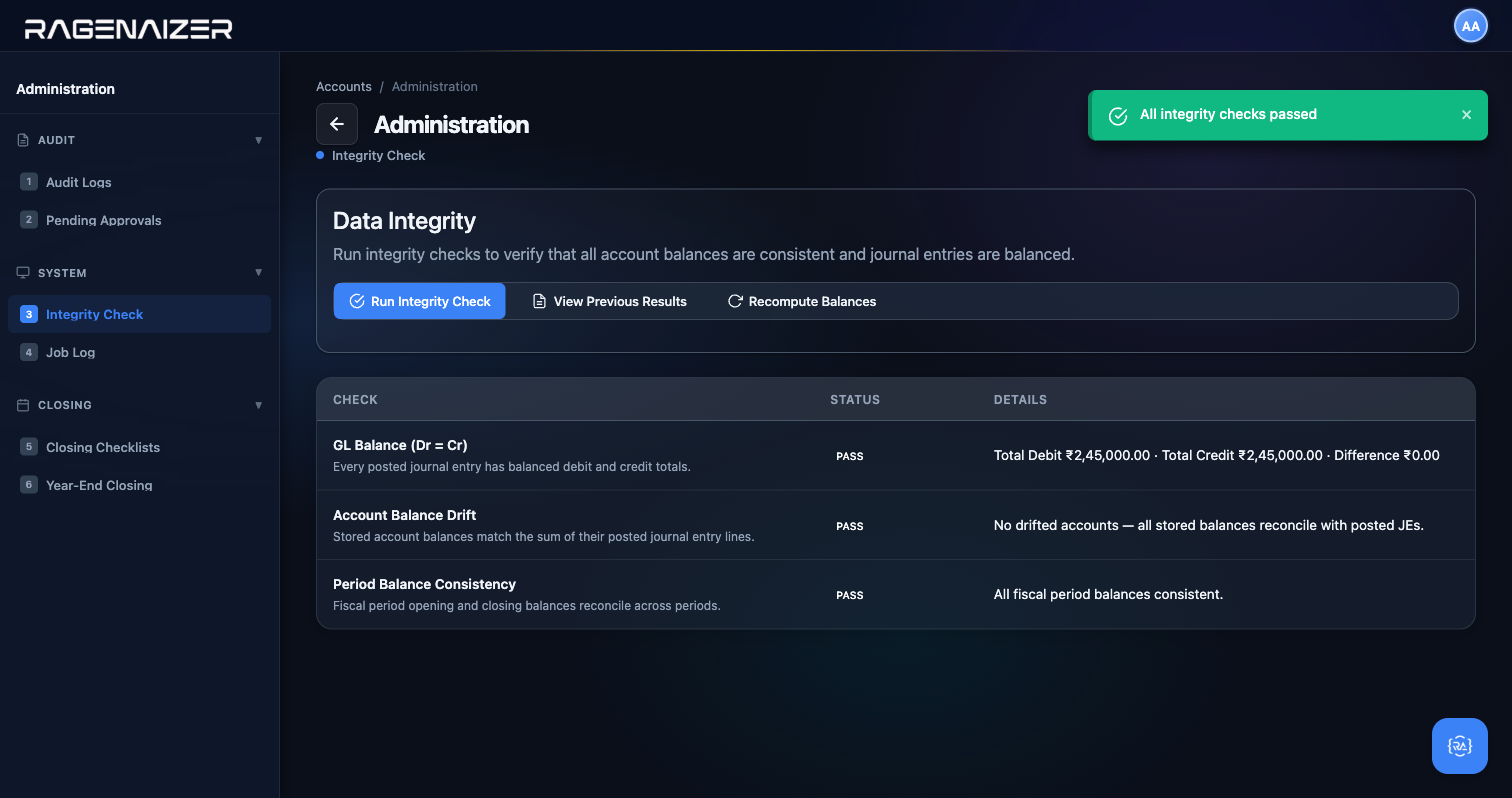
Tab 4 — Job Log
Click Job Log. Ragenaizer runs background jobs for things like the monthly billing cycle, the monthly depreciation run, the overnight integrity check, and the year-end rollover. The Job Log is where you see what ran, when it ran, whether it succeeded, and how long it took. Failed jobs have a Retry button and a View Details action that shows the stack trace and the full job payload.
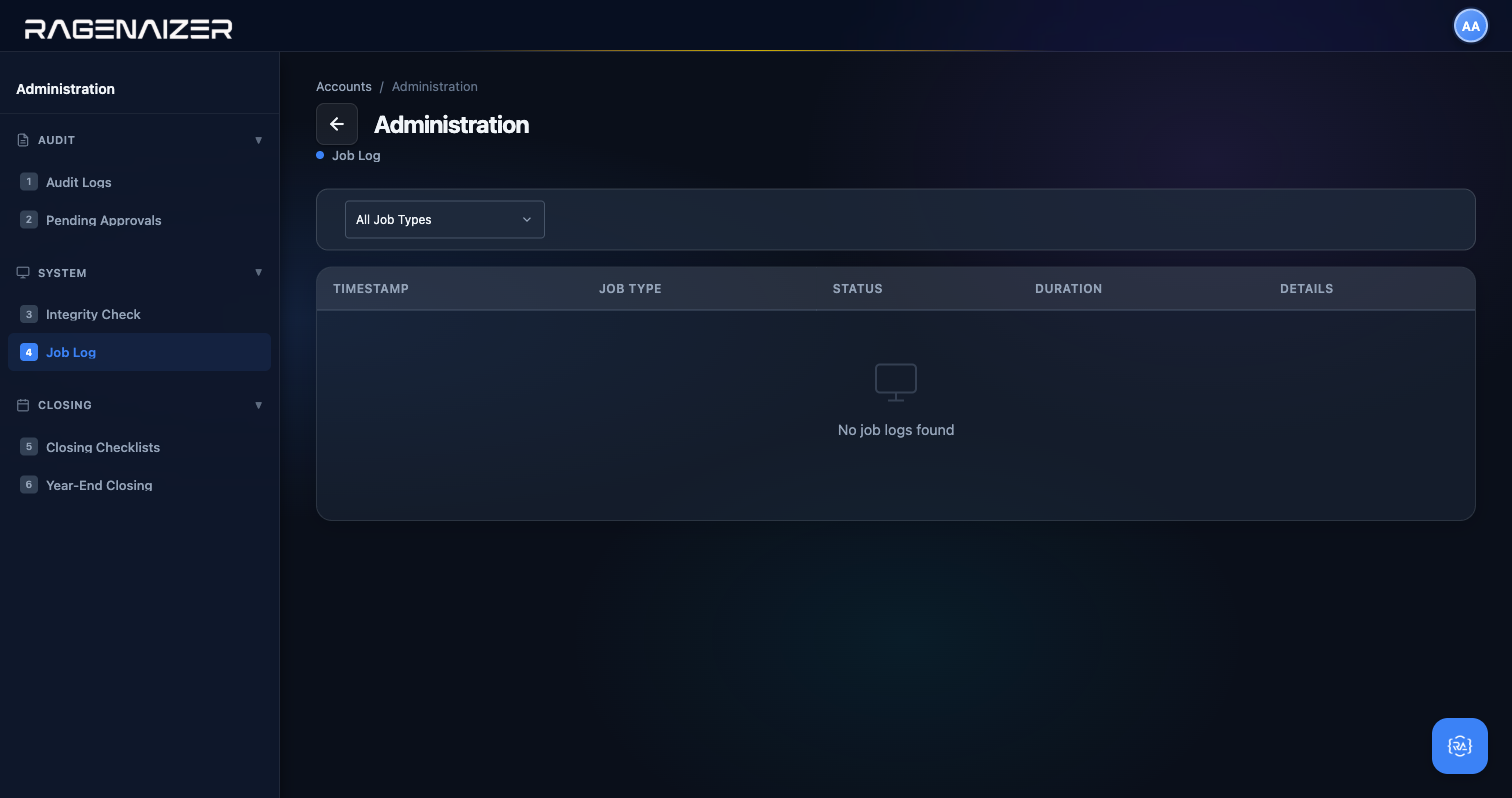
Tab 5 — Closing Checklists
Click Closing Checklists. Month-end close is a process, not an event — there's a sequence of things you do in order (post depreciation, reconcile banks, review AR aging, lock the period, etc.). Closing Checklists is where you define that sequence as a reusable template and then track progress through it each month. Check items off as you complete them, generate a signed report when you're done, and lock the period to prevent further changes. You can use the same checklist for every month or customise it.
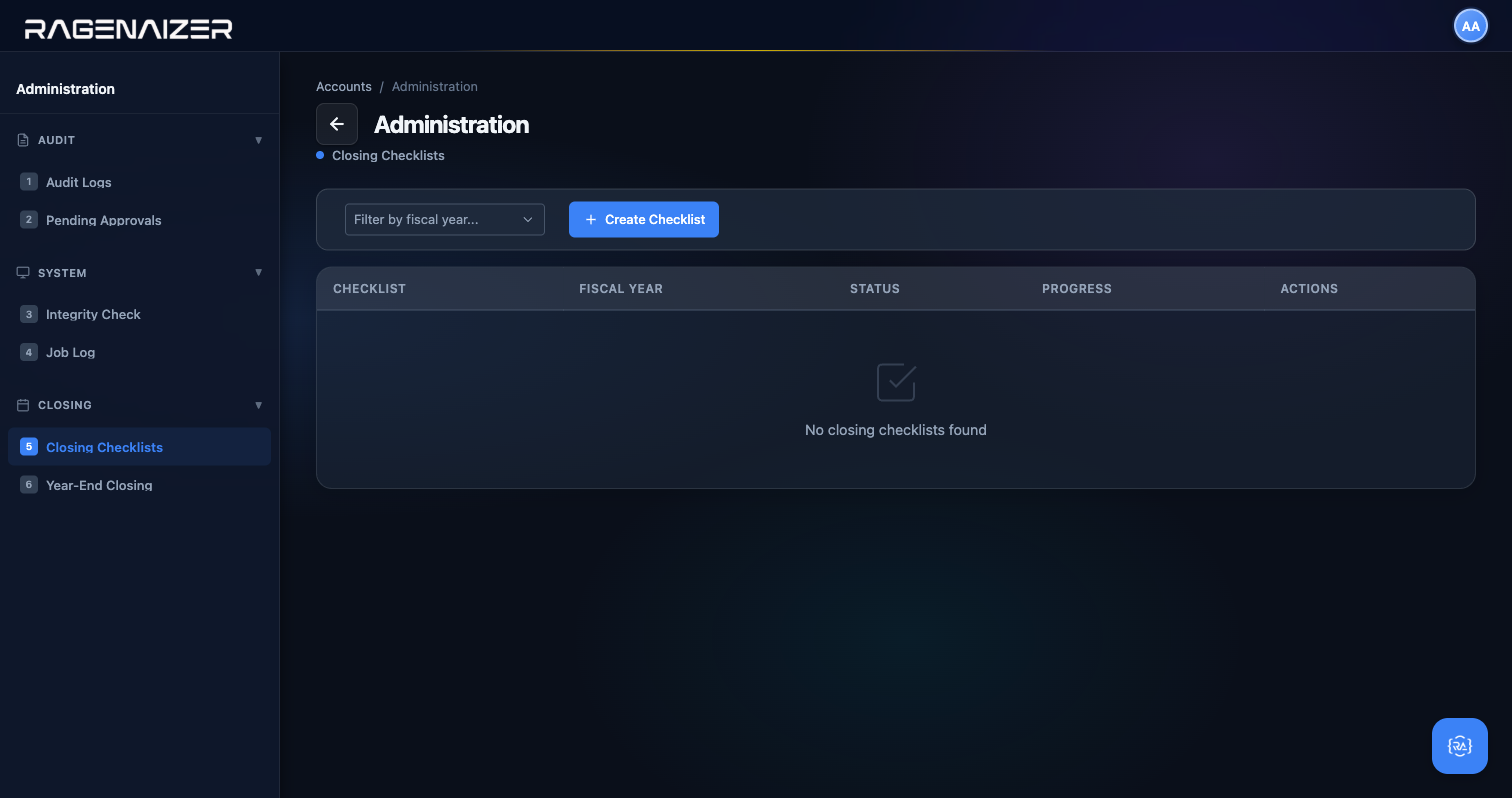

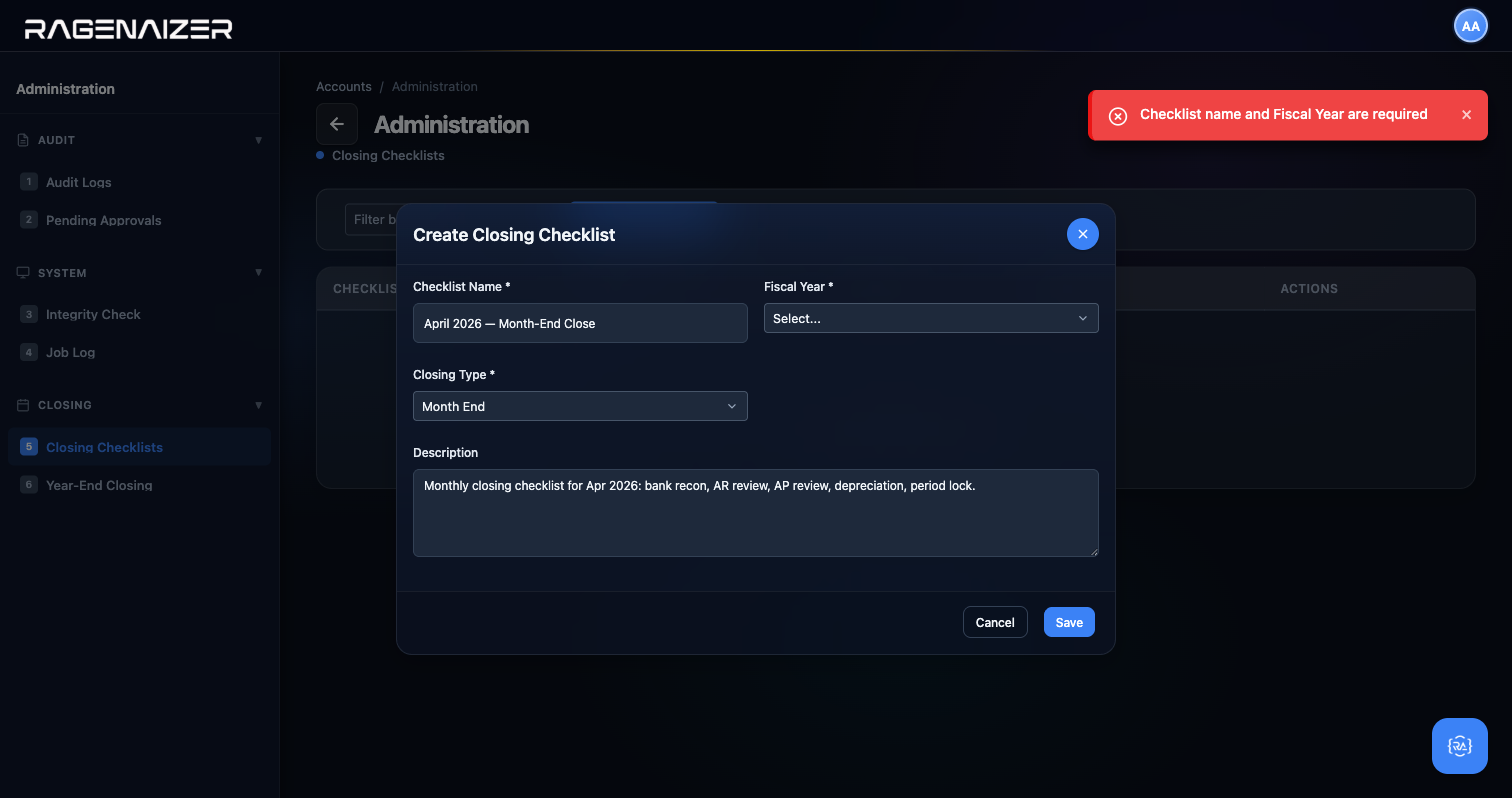
Tab 6 — Year-End Closing
Click Year-End Closing. Once a year you close the books for the entire fiscal year. This locks every period, zeros out the revenue and expense accounts by posting their net balance to Current Year Earnings (which rolls up into Retained Earnings for the next year), and creates the new fiscal year ready for postings. You can't undo a year-end close — it's the accounting equivalent of pouring concrete. Before running it, complete every month's closing checklist, run Integrity Check with all PASS, and back up the database.
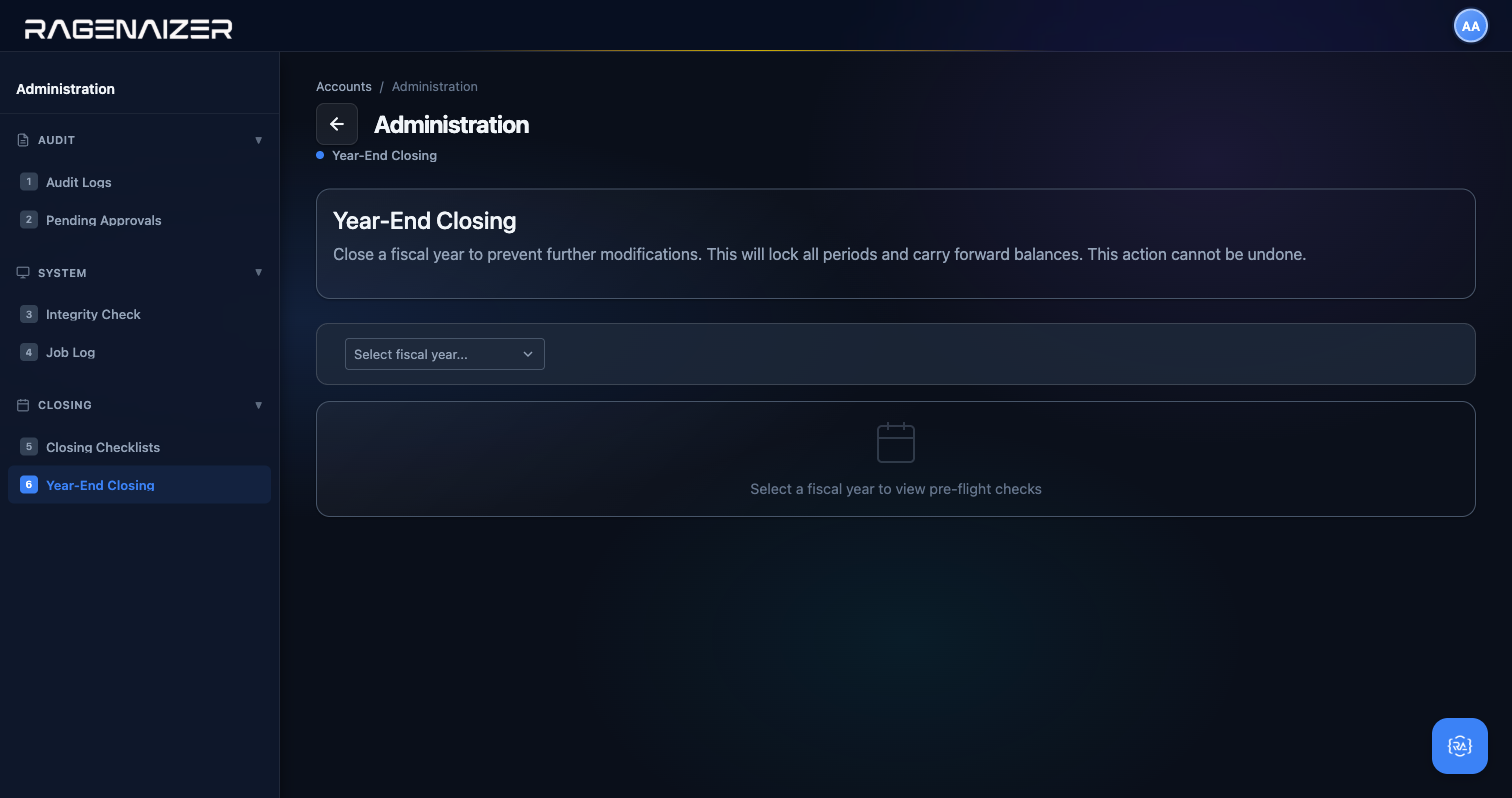
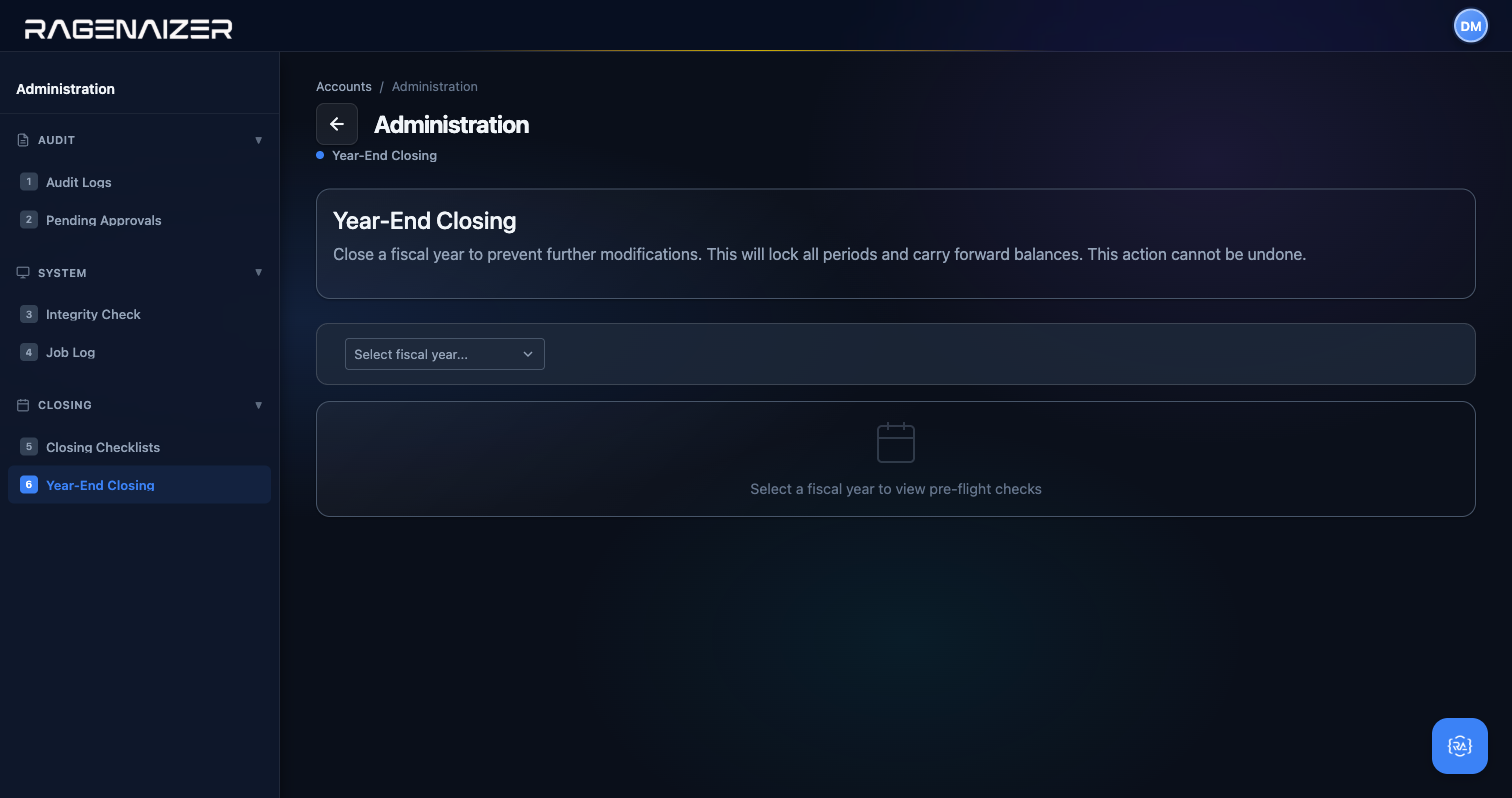
formatIntegrityDetails helpers from §15.5.3. The Run Year-End Closing button is disabled until every check is PASS — Ragenaizer will not let you close a year on top of a broken ledger.Where to go next
Your demo tenant now has the full picture: a working Chart of Accounts, two users (one for submission, one for approval —
abhishekanand.ko@gmail.com and manager.test@droidsdemo.com) so segregation-of-duties controls
actually exercise, two bank accounts with deposits / withdrawals / interest / a transfer / a completed reconciliation,
a real customer invoice and vendor bill end-to-end, an expense claim that has been submitted, approved by the second
user, and reimbursed (auto-creating the Reimbursement Payable system fixture), a fixed asset with a depreciation schedule,
a subscription billing plan with a real subscription and a usage meter, and a Trial Balance that balances to the rupee.
Trial Balance, P&L, Balance Sheet, Cash Flow, AR/AP Aging and Customer/Vendor Statements all carry real numbers.
Audit Logs, Pending Approvals, Integrity Check, Closing Checklists and Year-End Closing all open without errors.
That's a tenant you can hand to an investor with the guide as a script. From here the natural next step is the HRMS Organization Setup guide, which feeds the same Chart of Accounts from the payroll side — salary postings, statutory deductions, loan disbursements, and reimbursements all flow back into the GL you just built.
Payment gateway setup — per-tenant Razorpay credentials
Ragenaizer's Accounts module can generate payment links, accept gateway webhooks, and auto-apply received payments
against open customer invoices — but only if your tenant has its own Razorpay credentials configured. These
credentials are stored per tenant, AES-256-GCM encrypted at rest in the same tenant_api_keys
table that holds your AI provider keys (OpenAI, Deepgram, etc.), and fetched at runtime by the Accounts service via
gRPC. Nothing is ever stored in appsettings.json and keys never cross the REST boundary on read.
Your Razorpay account is yours alone
Each tenant's payment-gateway credentials are isolated. Tenant A's Razorpay key cannot be used by tenant B — the lookup path is (tenant_id, provider='razorpay', service_type='payment_gateway') and there is no shared/global key. This is deliberate: every invoice payment your tenant receives goes directly to your tenant's Razorpay account, and every webhook signature is verified against your tenant's webhook secret. A single Ragenaizer deployment can serve dozens of tenants each connected to a different Razorpay account.
To configure them, you need Superadmin access to the Auth service's admin dashboard (this is a separate page
from the Accounts dashboard because the keys are stored in the Auth database for security). Open
/pages/auth/dashboard.html and click the API Keys tab on the left.
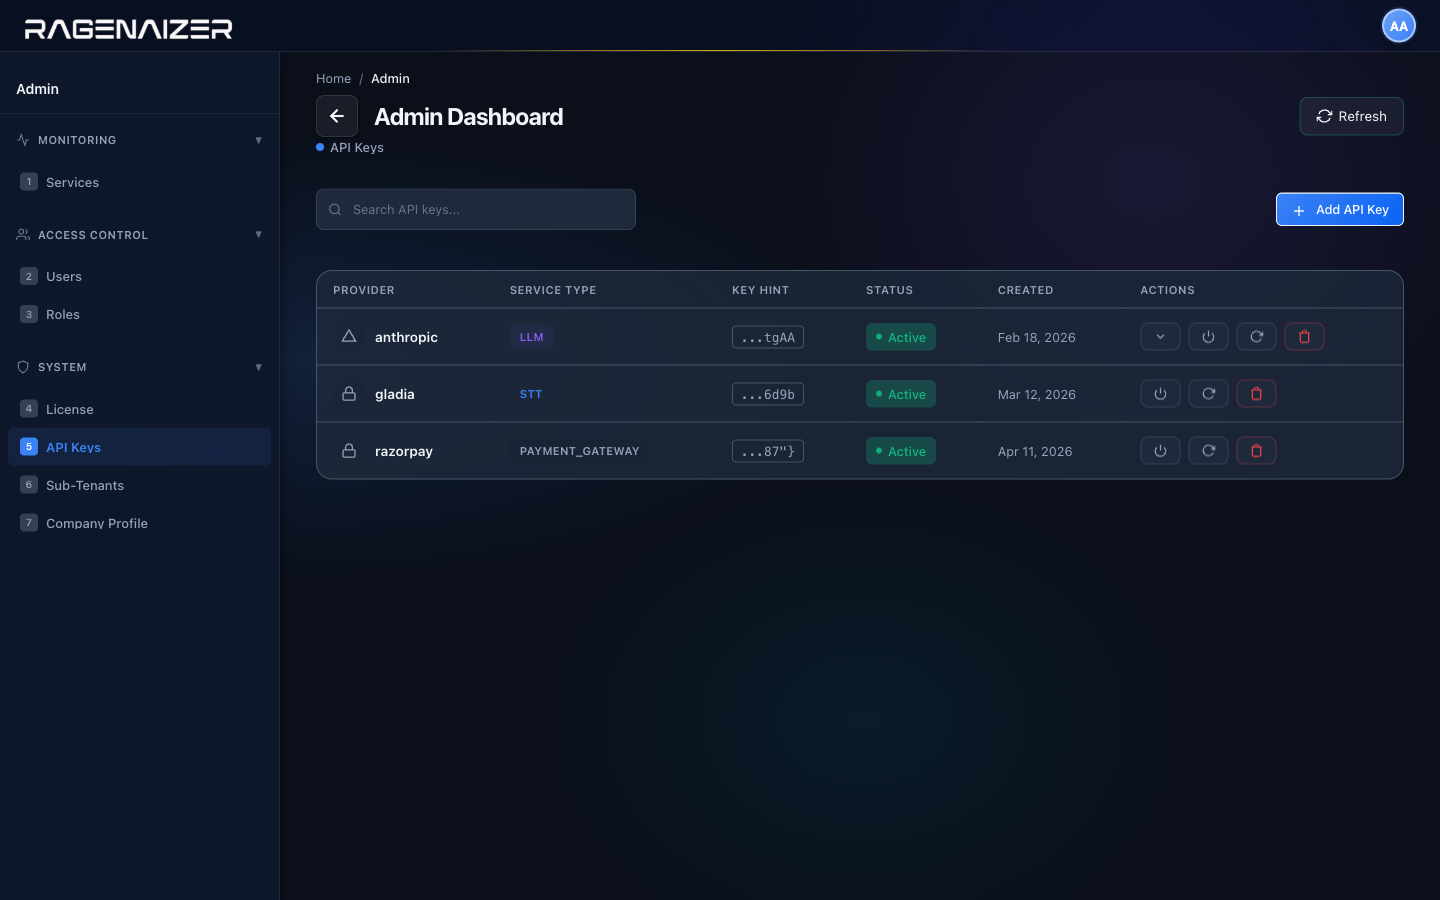
Click Add API Key. Select Razorpay (Payment Gateway) from the Provider dropdown. The form changes: the generic single-value API Key input disappears, and three Razorpay-specific fields appear in its place:

rzp_test_* or rzp_live_* identifier from the Razorpay dashboard), Key Secret (the server-side secret that matches the Key ID — shown as a password field), and Webhook Secret (optional; only required if you want automatic payment confirmation via Razorpay's webhook callbacks). Service Type is auto-locked to payment_gateway because that's the only meaningful service type for a payment provider.- Log into dashboard.razorpay.com and navigate to Settings → API Keys. Click Generate Key (or reveal your existing one). Copy the Key ID and Key Secret.
- For webhooks: Settings → Webhooks → Add New Webhook. Set the URL to
https://accounts.yourdomain.com/api/accounts/bank/webhooks/razorpay/<your-tenant-id>. Razorpay will give you a webhook secret — copy that too. - Paste all three values into the Ragenaizer Add API Key form (Key ID, Key Secret, Webhook Secret). Click Save.
- The Auth service encrypts the three values as a JSON blob with AES-256-GCM and stores them in
tenant_api_keys. Raw values are not logged, not returned by the REST GET endpoint, and cached on AccountsService's side for only 5 minutes before being re-fetched.
GET /api/accounts/bank/razorpay/status
After saving, hit GET /api/accounts/bank/razorpay/status with a normal Accounts JWT. If the round-trip worked (gRPC fetch → decrypt → parse JSON → return) the response is {"configured": true, "message": "Razorpay credentials are configured for this tenant — payment links and webhooks are available."}. If something's missing or malformed you get {"configured": false, "message": "Razorpay credentials are not configured. Add them on the Auth admin dashboard → API Keys tab (provider: Razorpay)."} — no stack trace, no partial state. The endpoint is deliberately cheap so the UI can use it for feature-gating (e.g. hiding the "Send payment link" button when the tenant hasn't set up a gateway yet).
Use /webhooks/razorpay/{tenant-id}, not the legacy shared path
The old version of this webhook handler lived at /api/accounts/bank/webhooks/razorpay with no tenant in the path — it read a single shared webhook secret from appsettings. That endpoint has been removed. The new endpoint requires the tenant id in the path so the service can deterministically look up which tenant's webhook secret to verify the signature against. Each tenant configures Razorpay with their own URL, and if two tenants share a deployment they each end up pointing at a different path. If you're migrating from the shared-key model, update the webhook URL in your Razorpay dashboard before rotating any keys.
Where to go from here
If you've followed every section you now have a working set of books, two dedicated bank GL accounts, two physical bank accounts with a full transaction history, a reconciled HDFC account, an Expense Category + Policy + submitted Claim, a Fixed Asset Category and registered asset, a Billing Plan, and a clean Integrity Check that proves the ledger's internal invariants all hold. This is the entire accounting system working end-to-end. Everything else — payroll, multi-currency, consolidation, branch accounting — builds on this same foundation. Check the Knowledge Base sidebar for dedicated guides on each module and return here any time for reference.
Recurring transactions.
The transactions you create every month by hand — rent, retainer invoices, SaaS subscription bills, month-end accruals — are exactly the kind of thing a computer should be creating for you. This section teaches you how to turn a one-time invoice, bill, or journal entry into a schedule that auto-generates real, posted transactions on the date you choose, at the frequency you choose, until the end date you choose.
Recurring transaction
A saved template plus a schedule. The template holds everything the eventual invoice / bill / journal needs — the customer or vendor, the line description, the amount, the GL account. The schedule says "every month, starting on this date, until this date". At 3 AM every day a background job finds every schedule whose next run date is today or earlier, creates the real transaction from the template, and advances the next-run date forward one period. Nothing you haven't previewed ever gets posted to the books.
What a recurring transaction is (and what it isn't)
Three common SMB scenarios:
- Monthly rent. You owe your landlord ₹85,000 on the 1st of every month. You don't want to copy-paste last month's vendor bill and change the date every time — you want the bill to appear on its own, already in Draft status, ready for you to approve.
- SaaS subscription invoice. ABC Corp pays you a flat ₹49,999/month for platform access. On the 1st of every month you want an invoice raised to them automatically, sent to their AP team, and waiting for payment.
- Month-end accrual journal. You book a ₹25,000 prepaid-insurance amortisation on the last day of every month. Same entry, same amount, every month.
A recurring transaction handles all three. It is not the same as a payment plan or an EMI schedule — those are for one big liability split over N months with different amounts. This is for the same thing, on a cadence.
Three types are supported: Customer Invoice, Vendor Bill, and Journal Entry. Five frequencies: daily, weekly, monthly, quarterly, yearly.
Open Accounts → Recurring Transactions from the dashboard Quick Actions grid, or go to /pages/accounts/recurring.html directly. On a fresh tenant you'll see the stats row (Active / Paused / Total Generated) and an empty list. Our tenant already has one running invoice schedule from our earlier SaaS example.
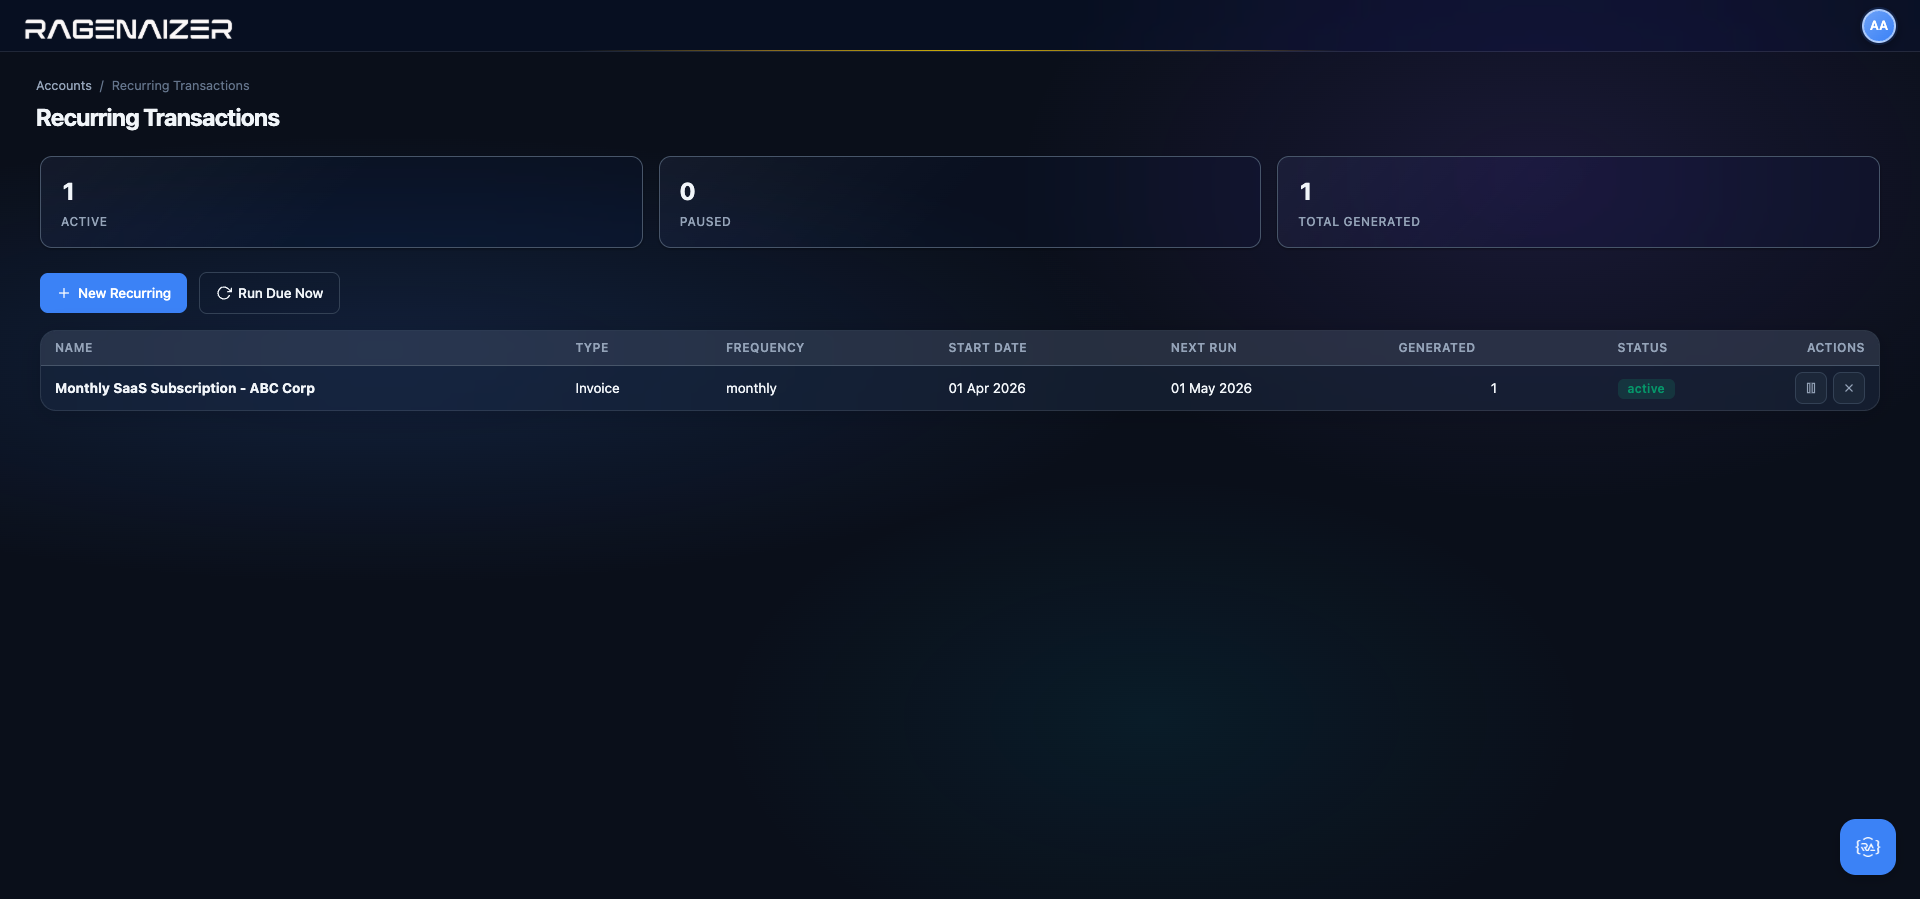
Creating a template — Monthly Office Rent
We'll add a second schedule for our monthly office rent. Click + New Recurring.
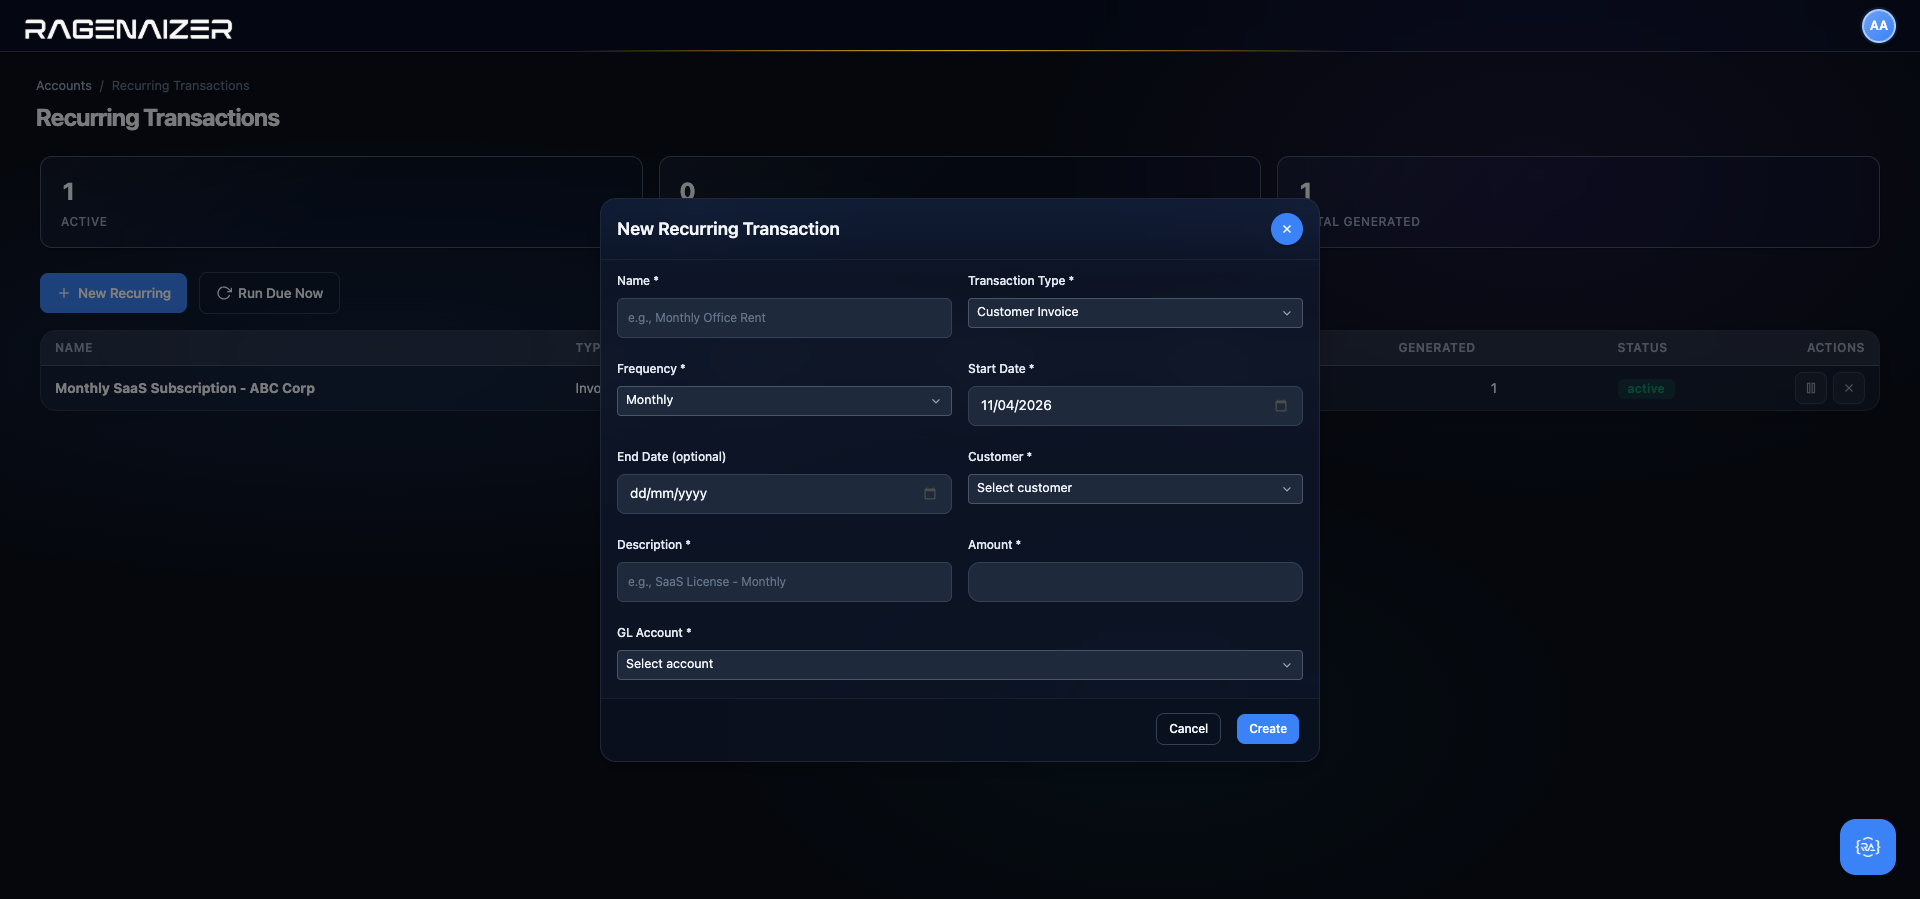
Invoices need a customer, bills need a vendor, journals need neither
When you change the Transaction Type dropdown, the form shows the right party field and hides the other. A customer-invoice recurring template with no customer would be meaningless, as would a vendor-bill template with no vendor. A journal-entry recurring template (for things like prepaid amortisations) doesn't reference any external party — only GL accounts — so both party dropdowns stay hidden.
Fill the form as follows:
- Name: Monthly Office Rent — this is the label that shows in the list; make it human.
- Transaction Type: Vendor Bill — rent is a bill from the landlord, not an invoice you raise.
- Frequency: Monthly.
- Start Date: 01 May 2026 — the first run will happen on this date.
- End Date: 30 Apr 2027 — the lease runs one year; when the schedule's next run would exceed this date the schedule auto-marks itself completed and stops. Leave blank for "run forever".
- Vendor: the landlord (we used CloudKite Hosting as a placeholder in the demo tenant).
- Description: Office premises rent — Whitefield, Bangalore.
- Amount: 85000.
- GL Account: 5310 — Rent. This is the expense account that will be debited on every generated bill.
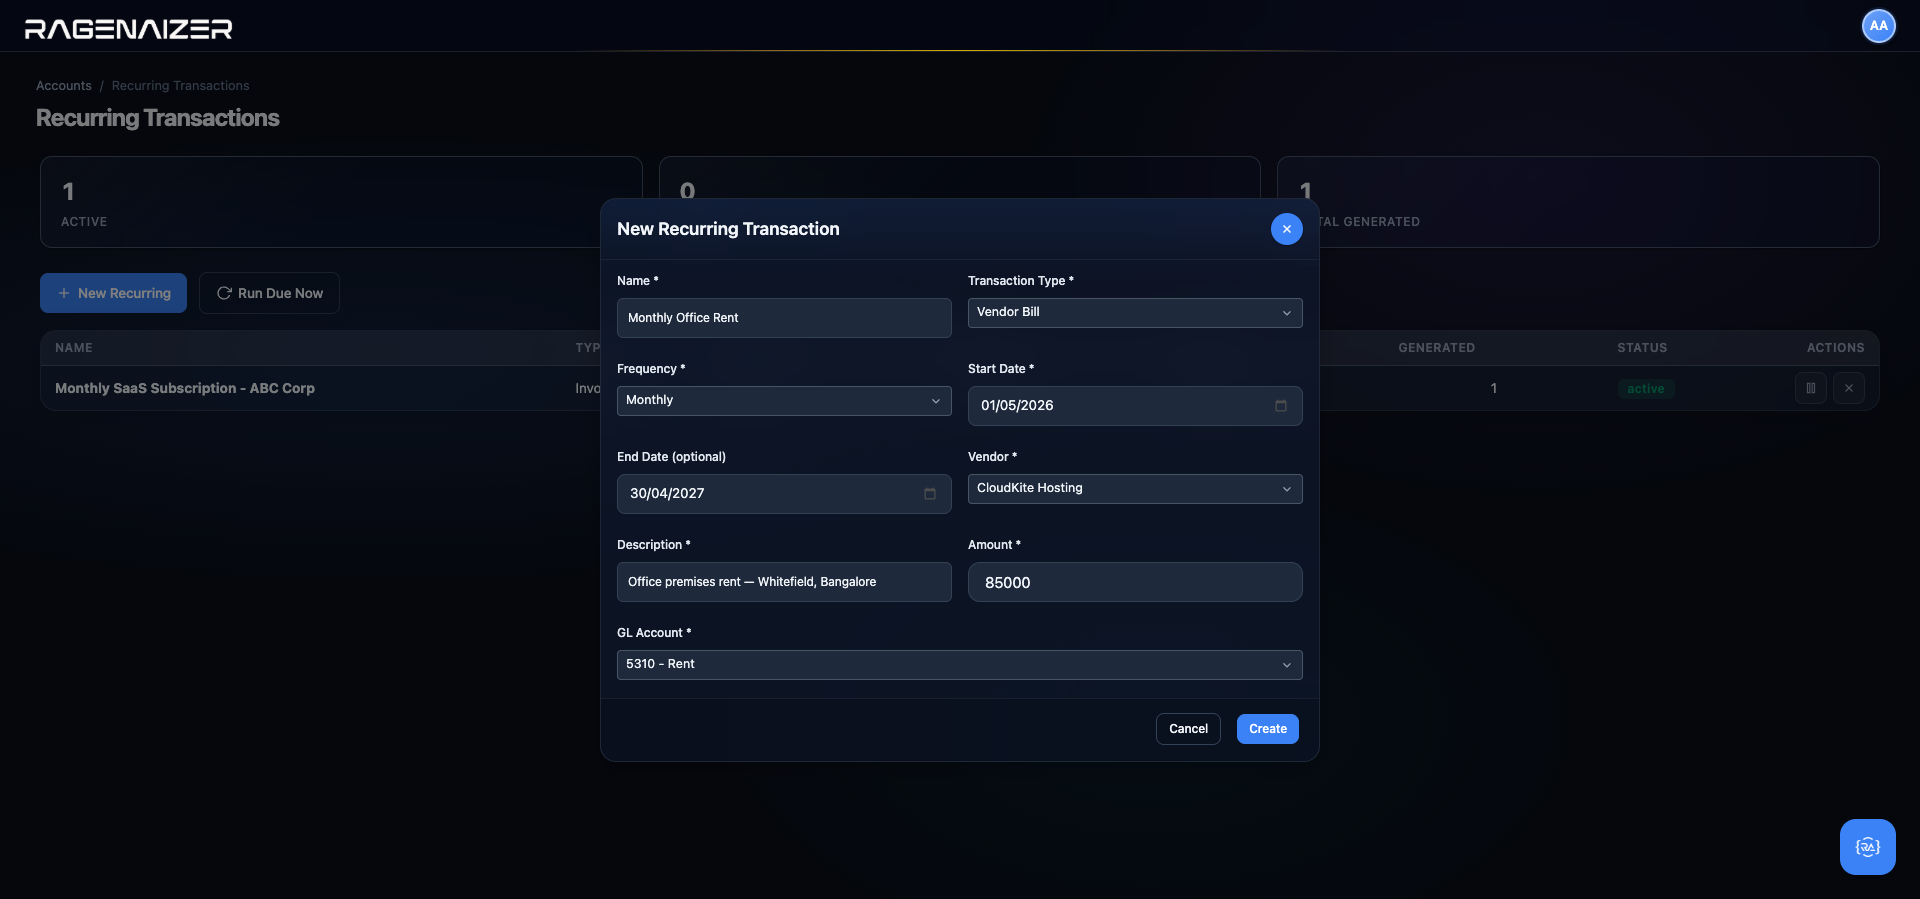
Click Create. Toast shows Recurring transaction created, the modal closes, and the new row appears at the top of the table.
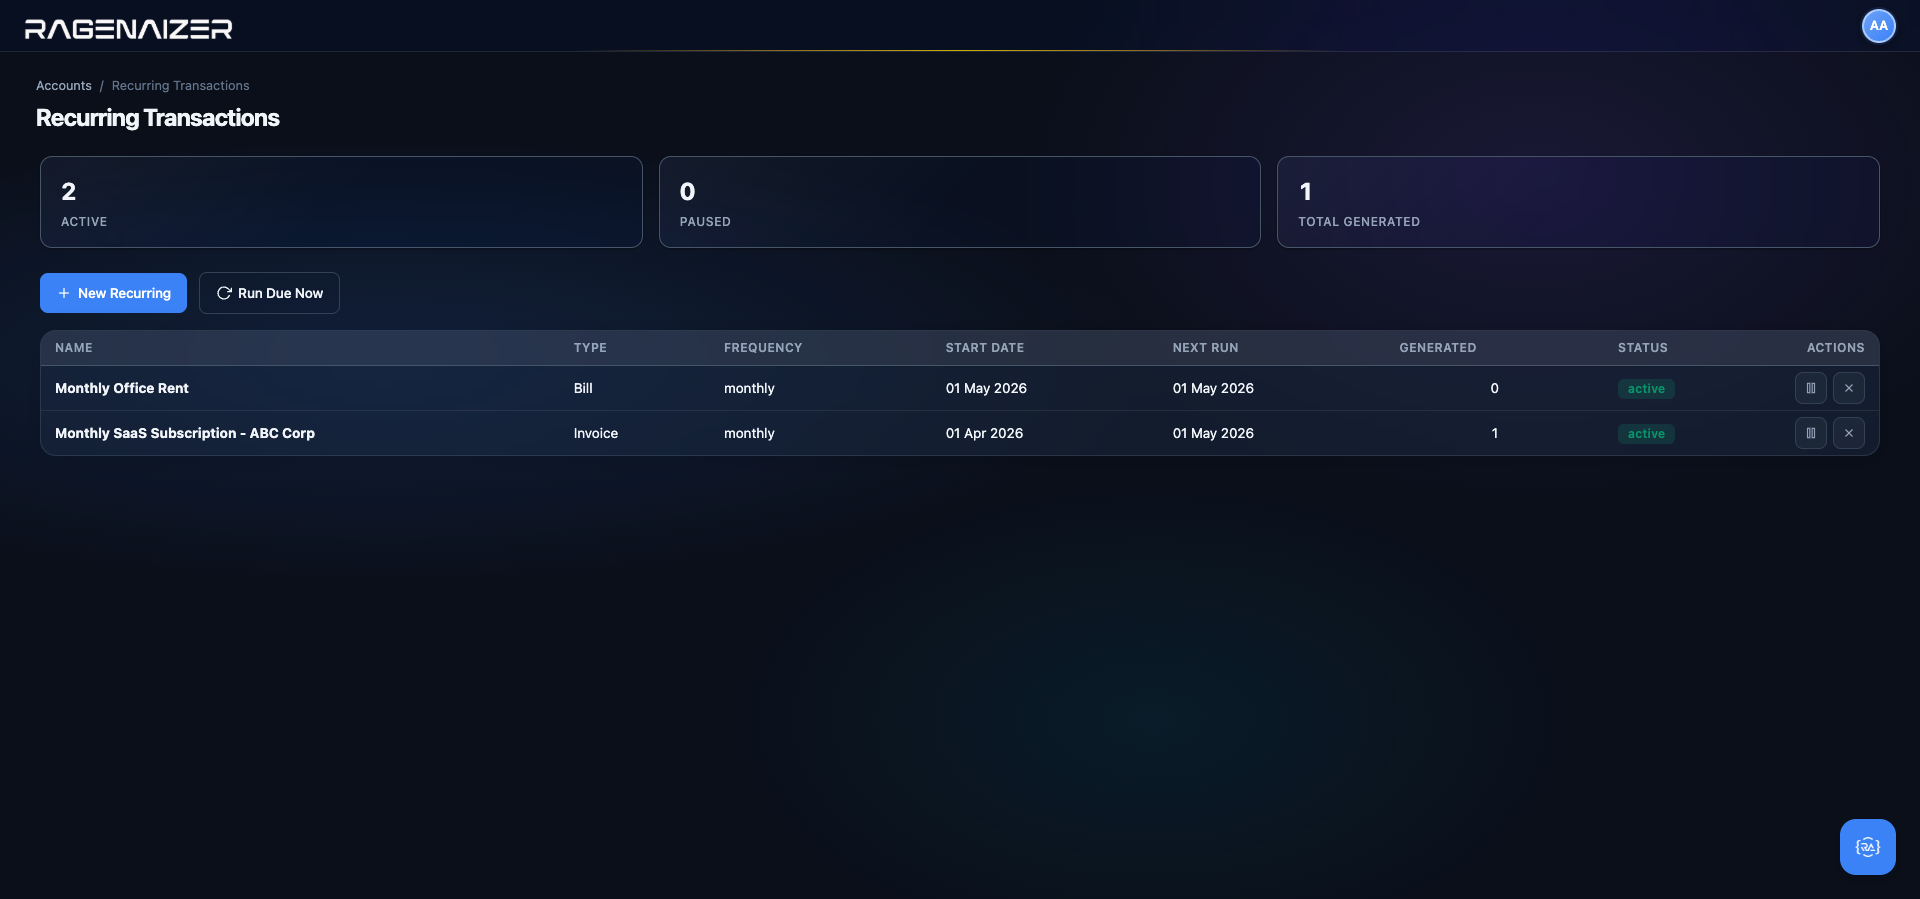
How and when schedules run — the 3 AM job and Run Due Now
Recurring schedules run in two places:
- Automatic — 3 AM every day. A Hangfire recurring job called
recurring-transactionsruns at 03:00 server time. It asks the database for every schedule wherestatus = 'active' AND next_run_date <= CURRENT_DATE, processes each one, creates the corresponding invoice / bill / journal entry in Draft status (so you can still review before posting), advances thenext_run_dateforward one period (+1 day / +7 days / +1 month / +3 months / +12 months), and increments thetotal_generatedcounter. Ifnext_run_datenow exceedsend_date, the status flips to completed and the schedule stops. - Manual — the Run Due Now button. Useful when you've just created a schedule with a past start date and want to catch up immediately, or when you're troubleshooting and want to see the behaviour without waiting for 3 AM. The button processes only schedules whose
next_run_date <= today— it does not force future schedules to run early.
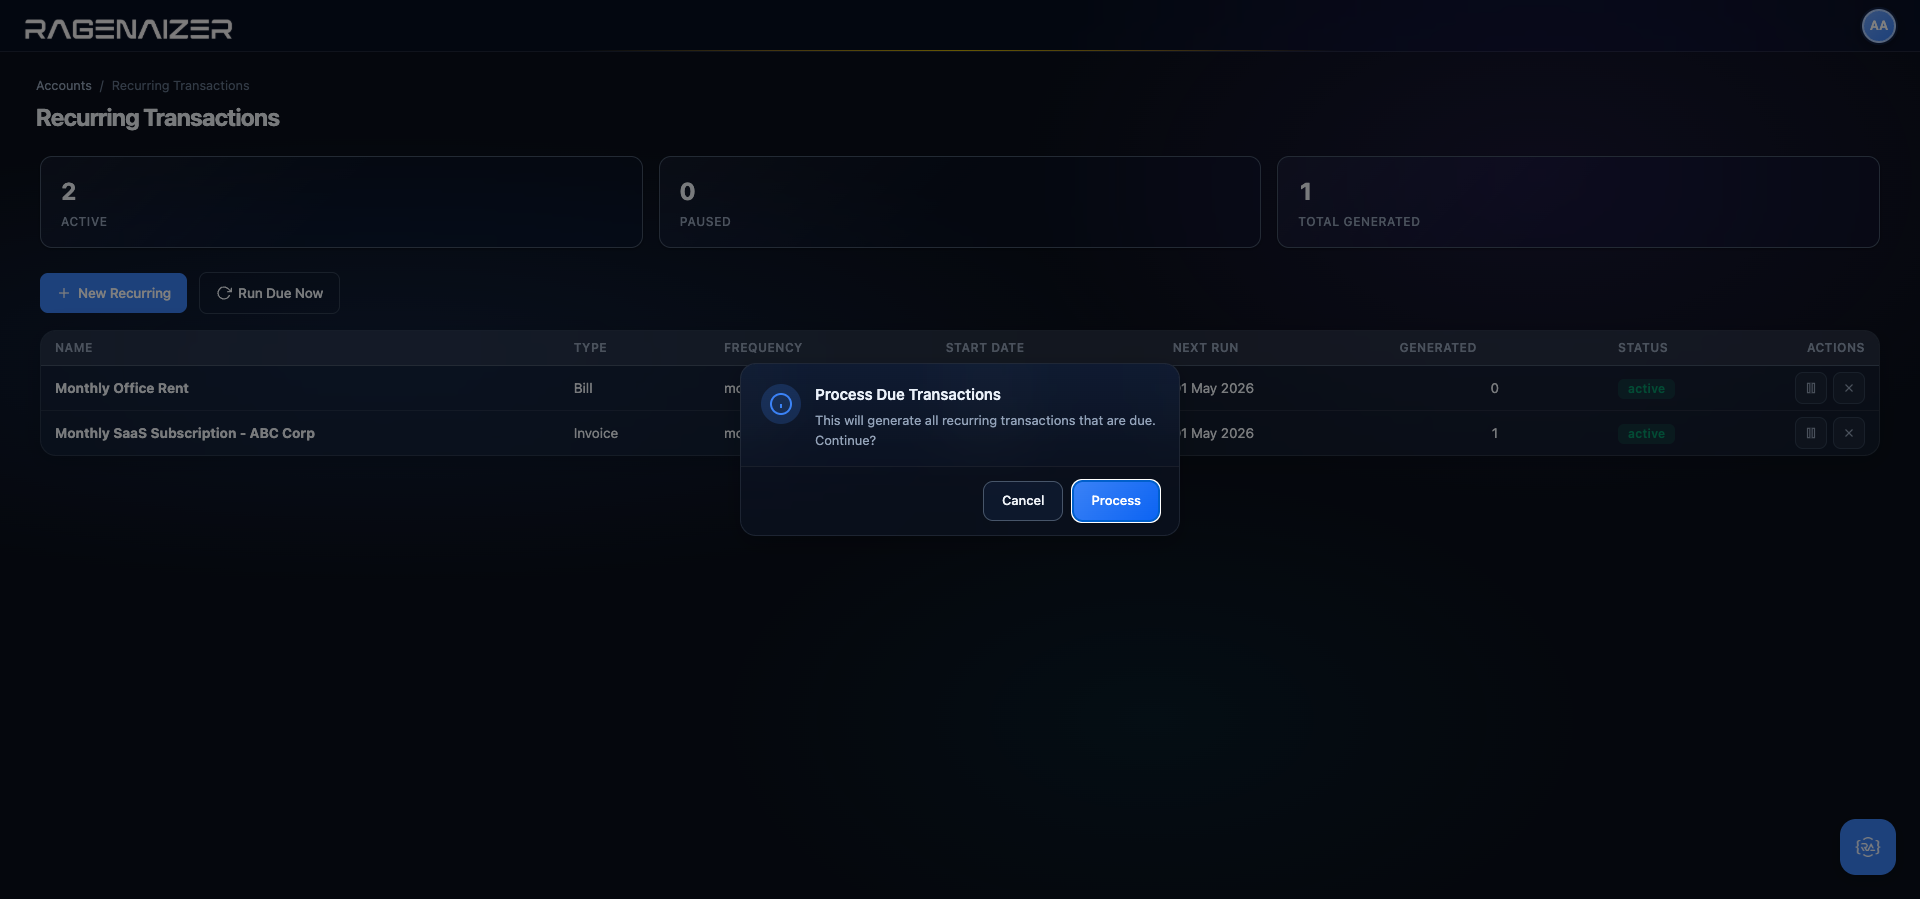

Automation does not skip human review
Every recurring schedule creates the downstream invoice / bill / journal in Draft status. The human reviewer still has to open it, check the amount (did rent go up this year? did the consultant take vacation this month?) and click Approve to post it to the GL. This is deliberate: a silent 3 AM auto-post to the General Ledger is exactly the kind of thing that surfaces as a nasty surprise at month-end close. Automating the keystrokes is useful; automating away the review is not.
Pause, resume, cancel — the row actions
Each row in the list has one or two action buttons depending on its current status:
- Active → Pause (❚❚) + Cancel (×)
- Paused → Resume (▶) + Cancel (×)
- Completed or Cancelled → no actions (read-only).
Click the Pause (double-bar) button on Monthly Office Rent.
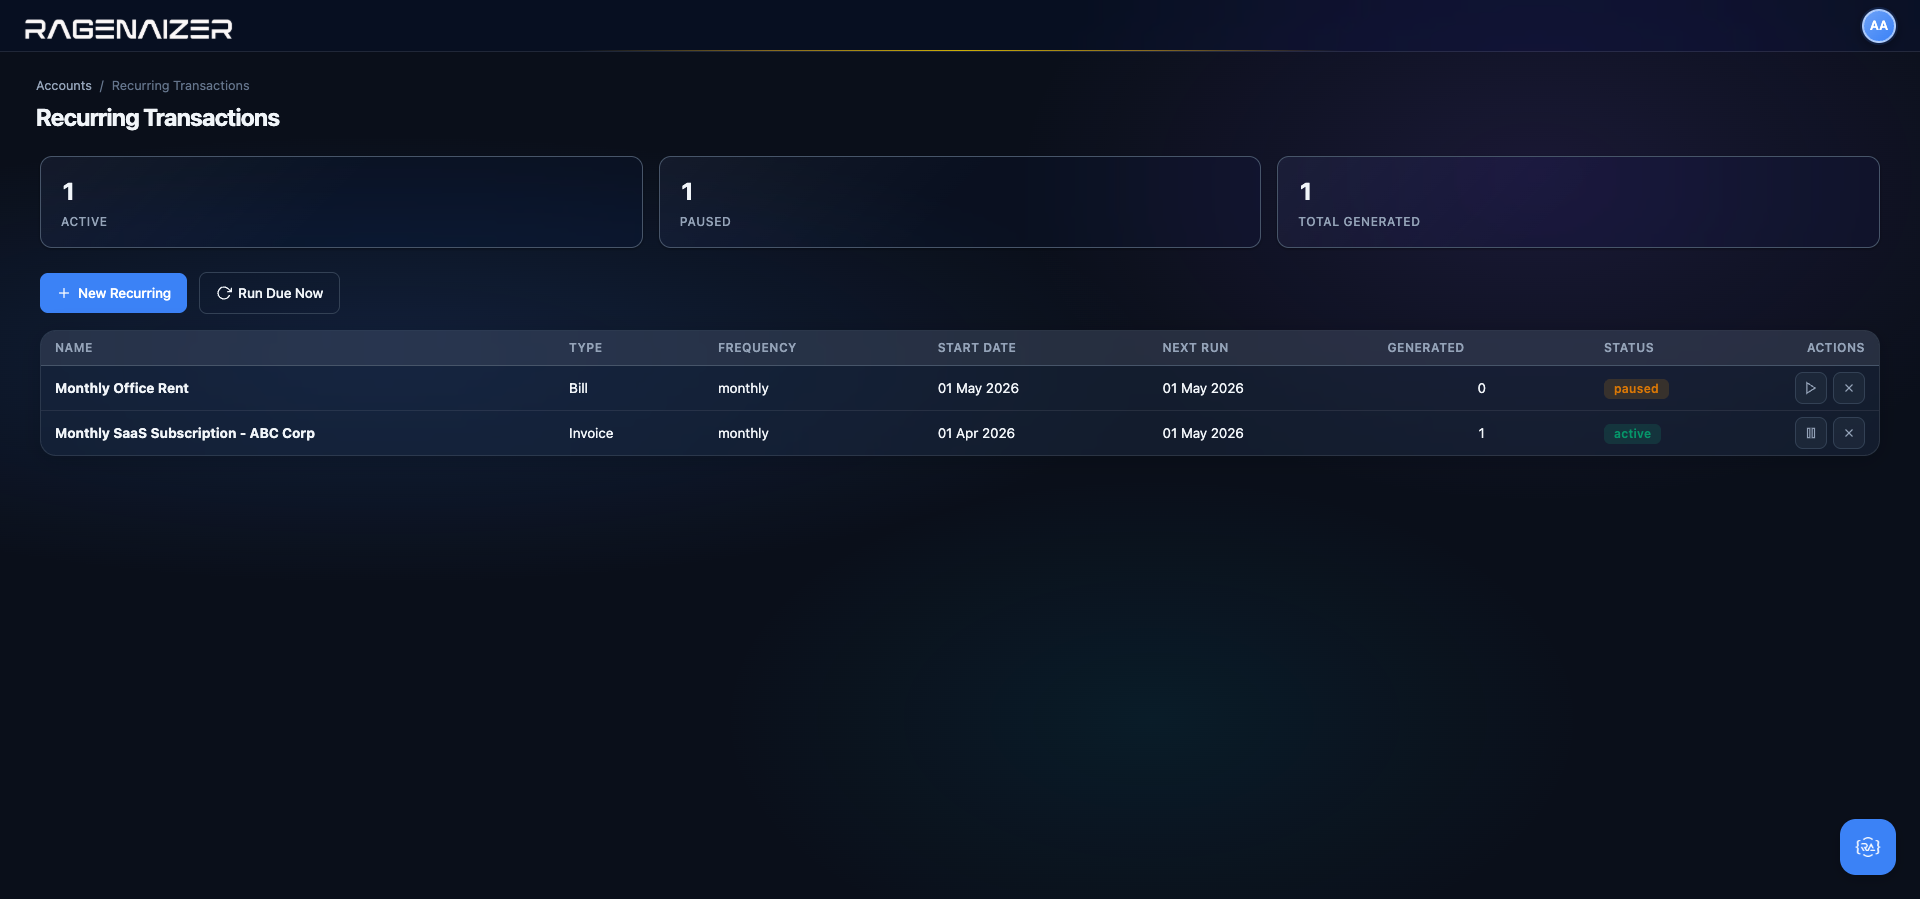
Use Pause when you know in advance that the recurrence needs to stop temporarily (landlord is renovating and has waived one month's rent; the customer is on a pilot extension and won't be billed in August). Use Cancel when the schedule is done forever (the lease ended; the customer churned).
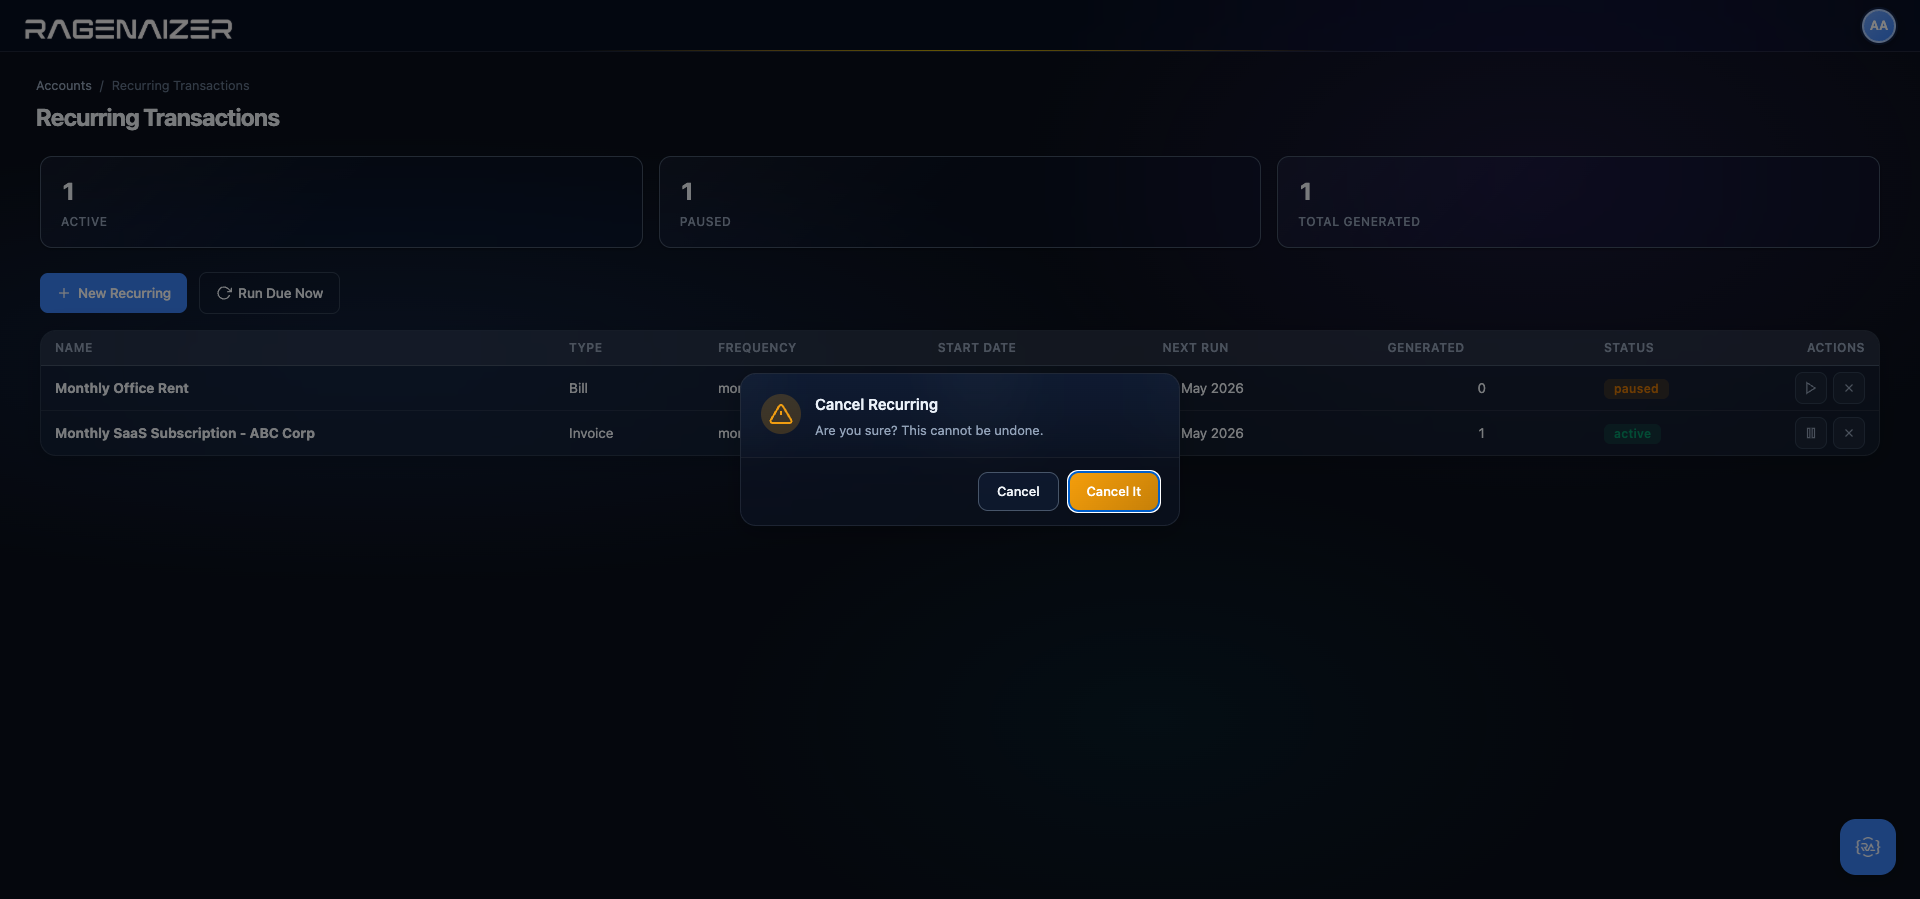
status = 'cancelled' for audit (you can still see the 12 generated bills that came from it via the audit log), but the schedule will never produce another document. Click the grey Cancel at the bottom of the dialog to back out — we won't actually cancel here.Click Resume to bring rent back online.

Cancelled schedules keep their history
When you Cancel a schedule, the database row is not deleted — its status is flipped to cancelled. Every invoice, bill, or journal entry this schedule has ever generated stays exactly where it is in the GL — cancellation affects only future runs. The audit log (Section 14) keeps the full history, including who cancelled it and when. To find the child documents a schedule created, filter the Ledger page by reference_type = 'recurring'.
Budgets & variance.
A budget is a promise you make to yourself about next year. Ragenaizer's budget module lets you set an annual amount against any Income or Expense account, distribute it across twelve months (auto-split or manual), then watch the actuals roll in against it throughout the year. The Budget vs. Actual report is the single most important management report once you get past your first month of real revenue — this section shows you how to build one.
Budget
A row in the budgets table: one fiscal year + one GL account + one annual amount + twelve per-month amounts. It has no effect on posting — you can still book ₹10 lakh to Rent even if your budget is ₹6 lakh — but it unlocks the Budget vs. Actual report that flags the overrun with a red variance number.
Why bother budgeting inside the books?
Most early-stage founders maintain a budget as a Google Sheet and update it once a quarter. That's fine until the spreadsheet and the real ledger drift apart — and they always drift. The problems it causes downstream:
- Stale. The sheet is updated manually from last month's books. By the time it reflects reality, it's already a week old.
- Invisible. Nobody outside the founder/finance person sees it. Department heads can't check their own burn without asking.
- Disconnected from drill-down. When the sheet flags a variance, you have no way to click into the individual GL entries that caused it. You have to switch apps and rebuild the filter from scratch.
Budgets inside the books fix all three. Every actual you book to Rent is immediately compared against the budget; you can open the Budget vs. Actual tab at any time and see the live variance; clicking any row drills into the General Ledger with a pre-filtered view (coming in Phase 2).
Open Accounts → Budgets from the dashboard Quick Actions grid.

Creating a budget — annual amount + monthly breakdown
Click + Add Budget.
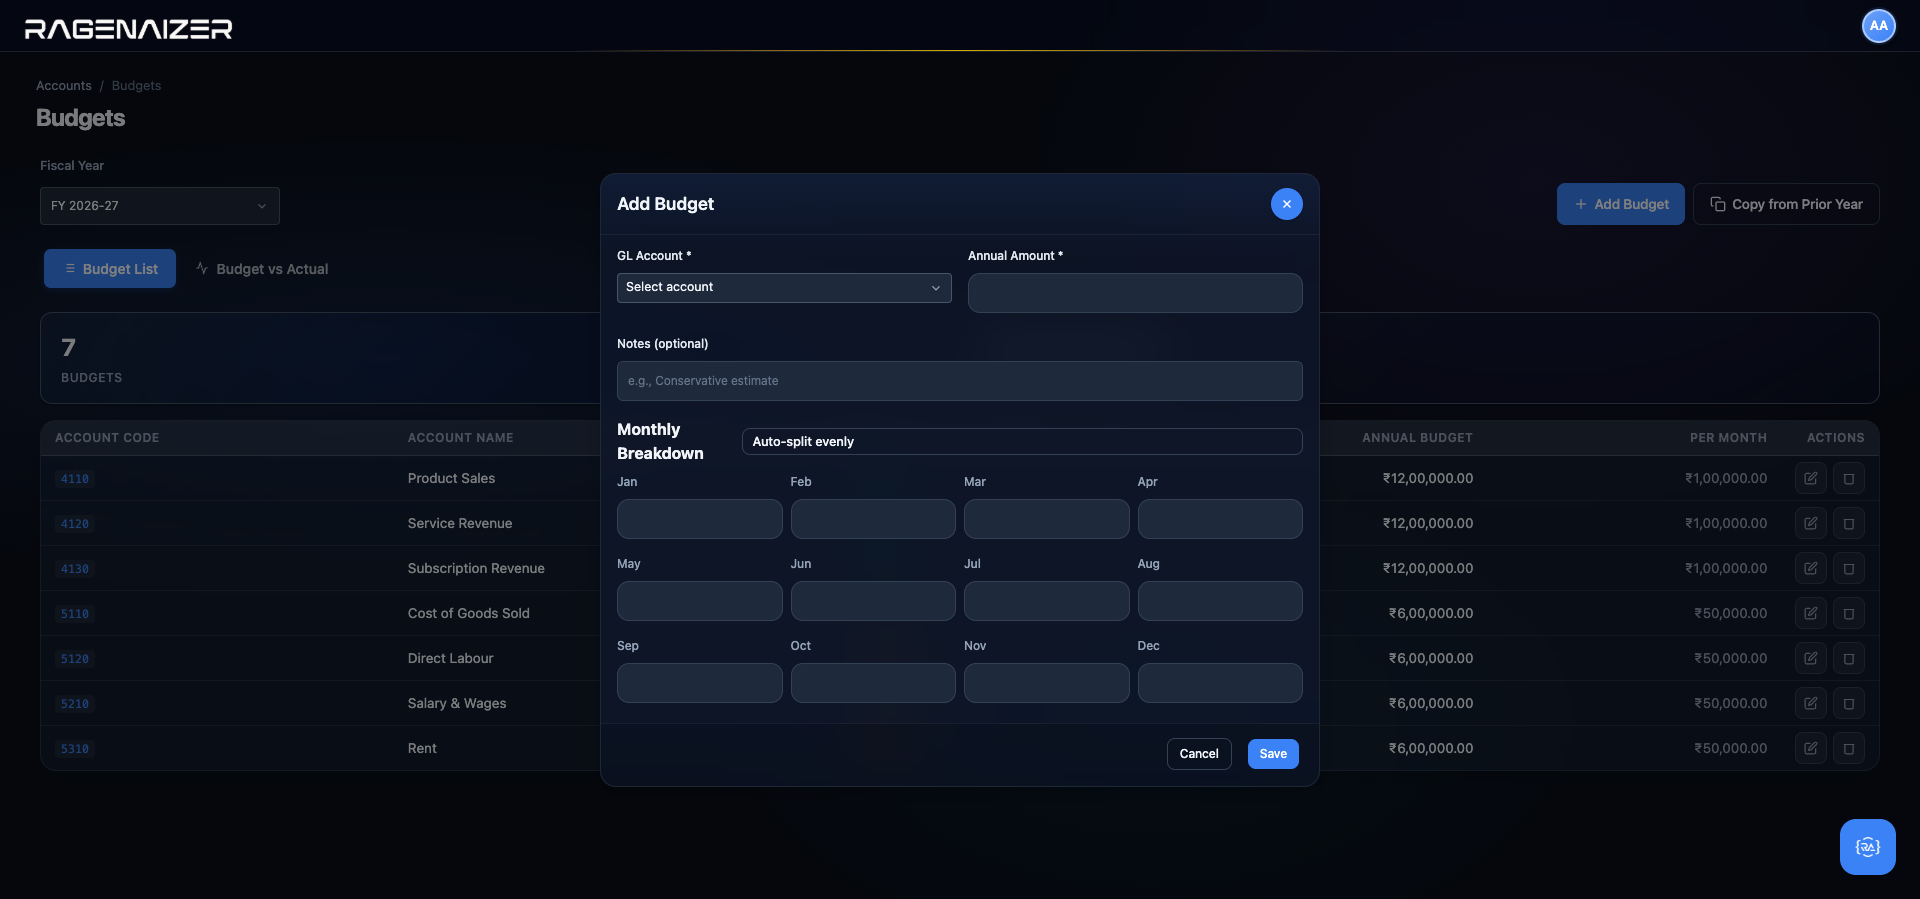
Monthly total = annual total (within one paisa)
When you edit the twelve monthly cells manually, the backend enforces that their sum equals the annual amount to within ₹0.01 (to absorb legitimate 4-decimal rounding). If you enter ₹10 lakh annual but your twelve monthly amounts only sum to ₹9.5 lakh, the Save call returns a 400 with the message "Sum of monthly amounts (950000.00) must equal annual amount (1000000.00)". Also, no individual month can be negative. Both rules exist to prevent the nightmare where the Budget vs. Actual report's annual summary disagrees with its own monthly drill-down.
We'll budget Travel & Conveyance (account 5370) at ₹3,60,000/year — ₹30,000/month, assuming roughly one customer-site visit per month. Select the account from the dropdown, type 360000 into Annual Amount, click Auto-split evenly, and add a note.
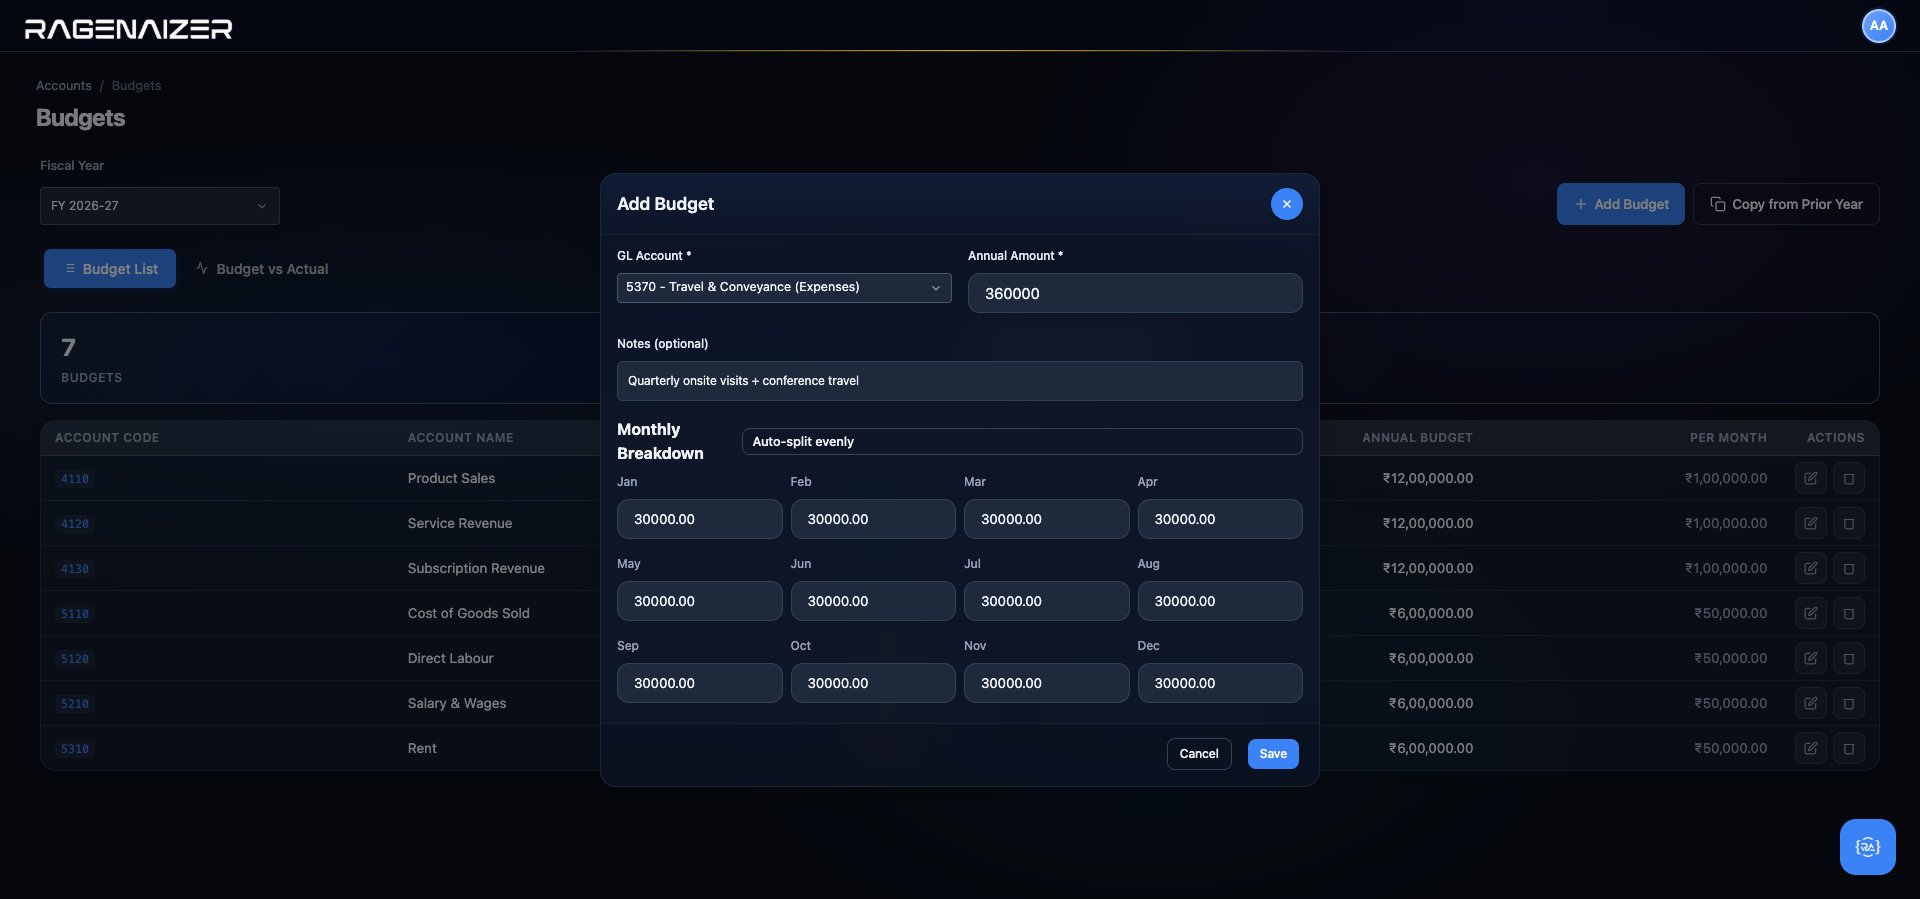
Click Save.
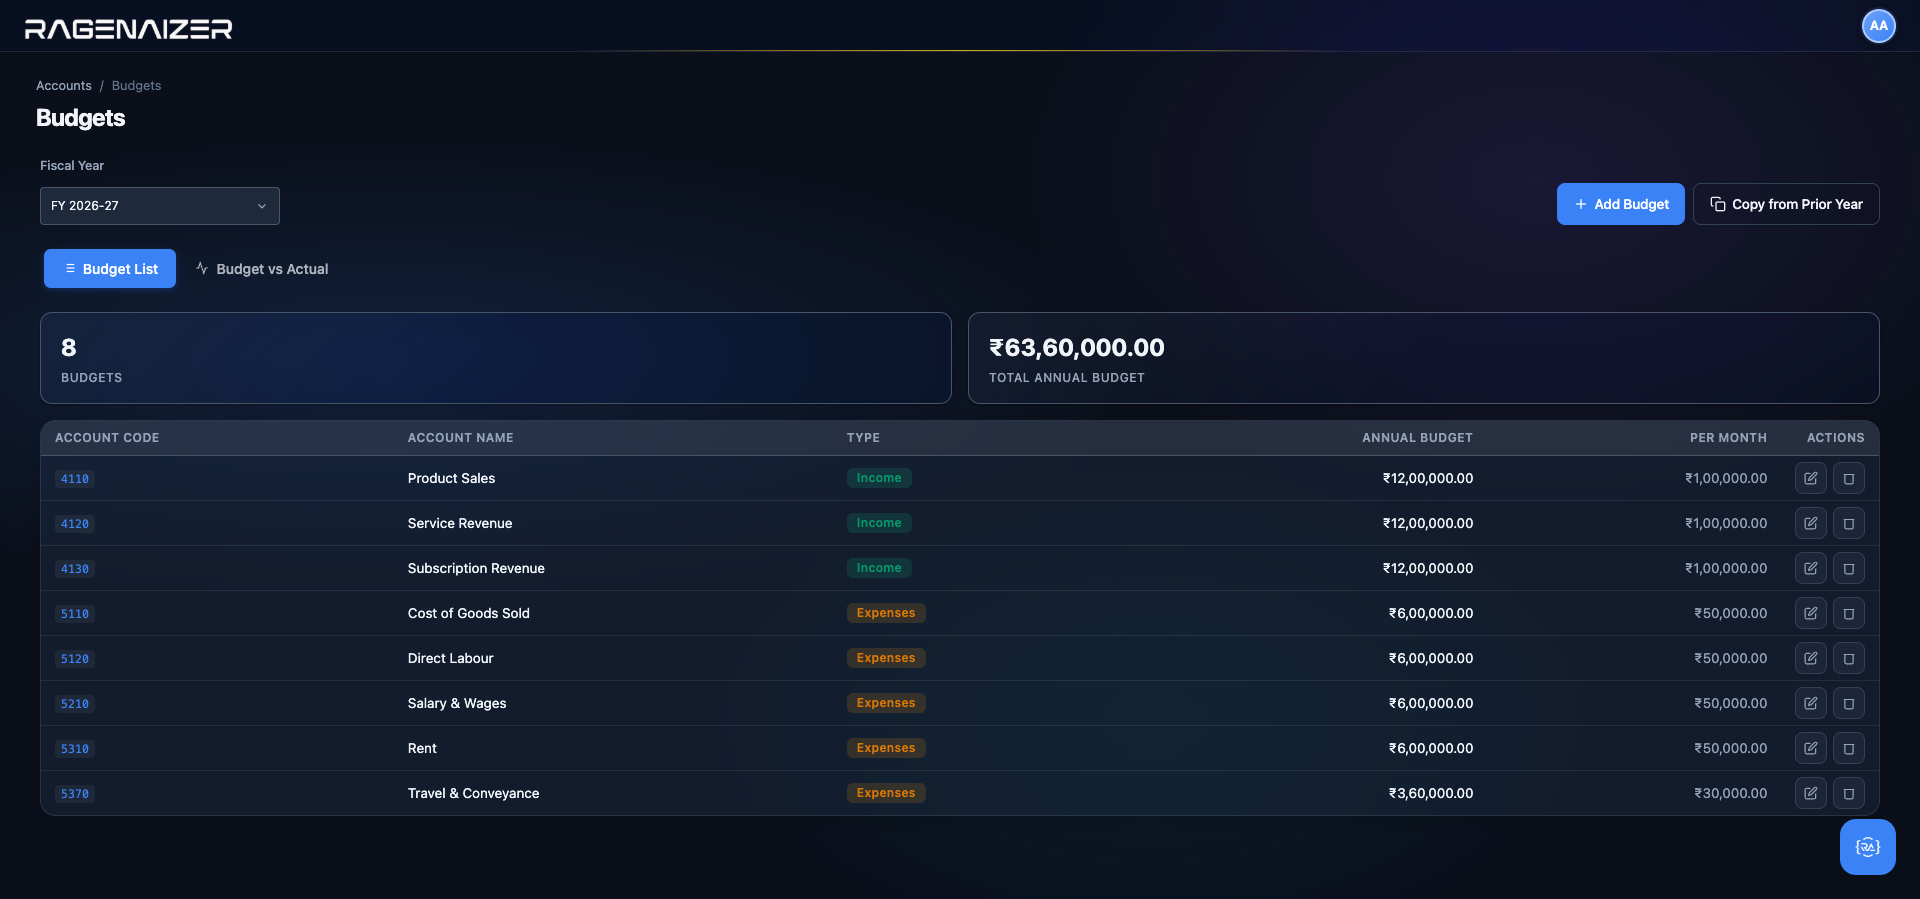
m1..m12 values — if you front-loaded Q1, the monthly total is a simple average; the actual per-month values are only visible in Edit mode).Budget vs. Actual — the management report
Click the Budget vs Actual tab (next to the Budget List tab at the top of the page). This is the report senior management will care about the most.
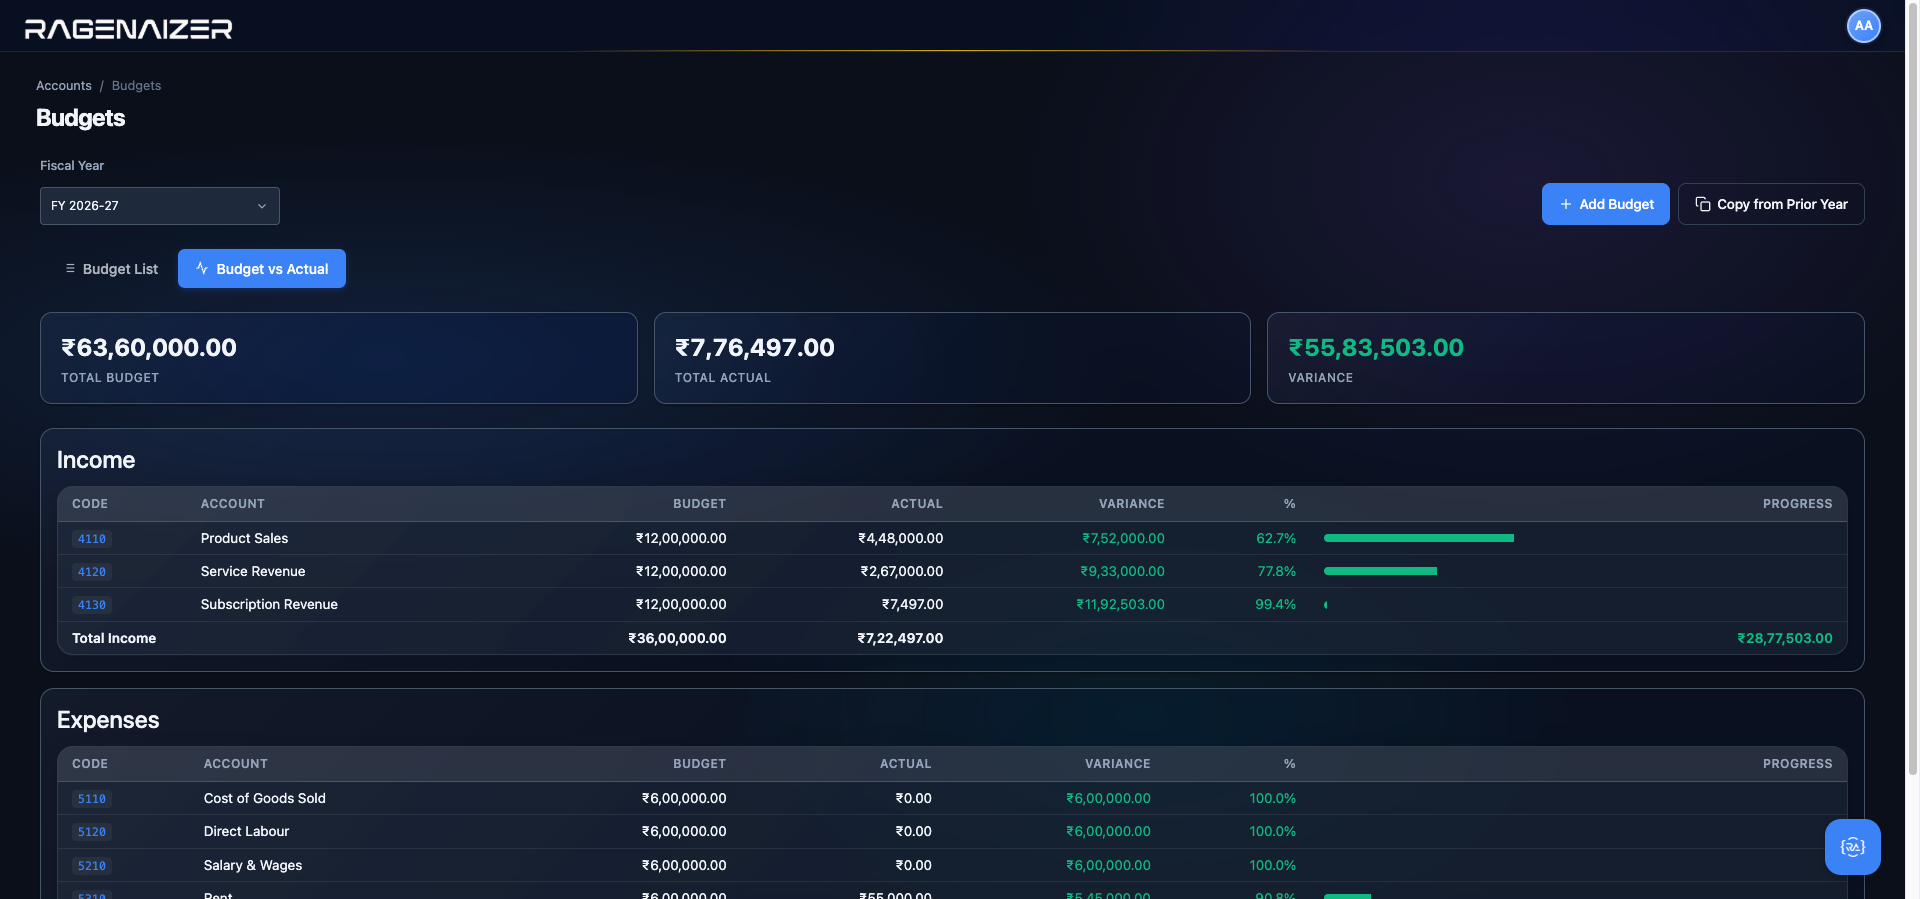
Scroll down to see the Expenses section.
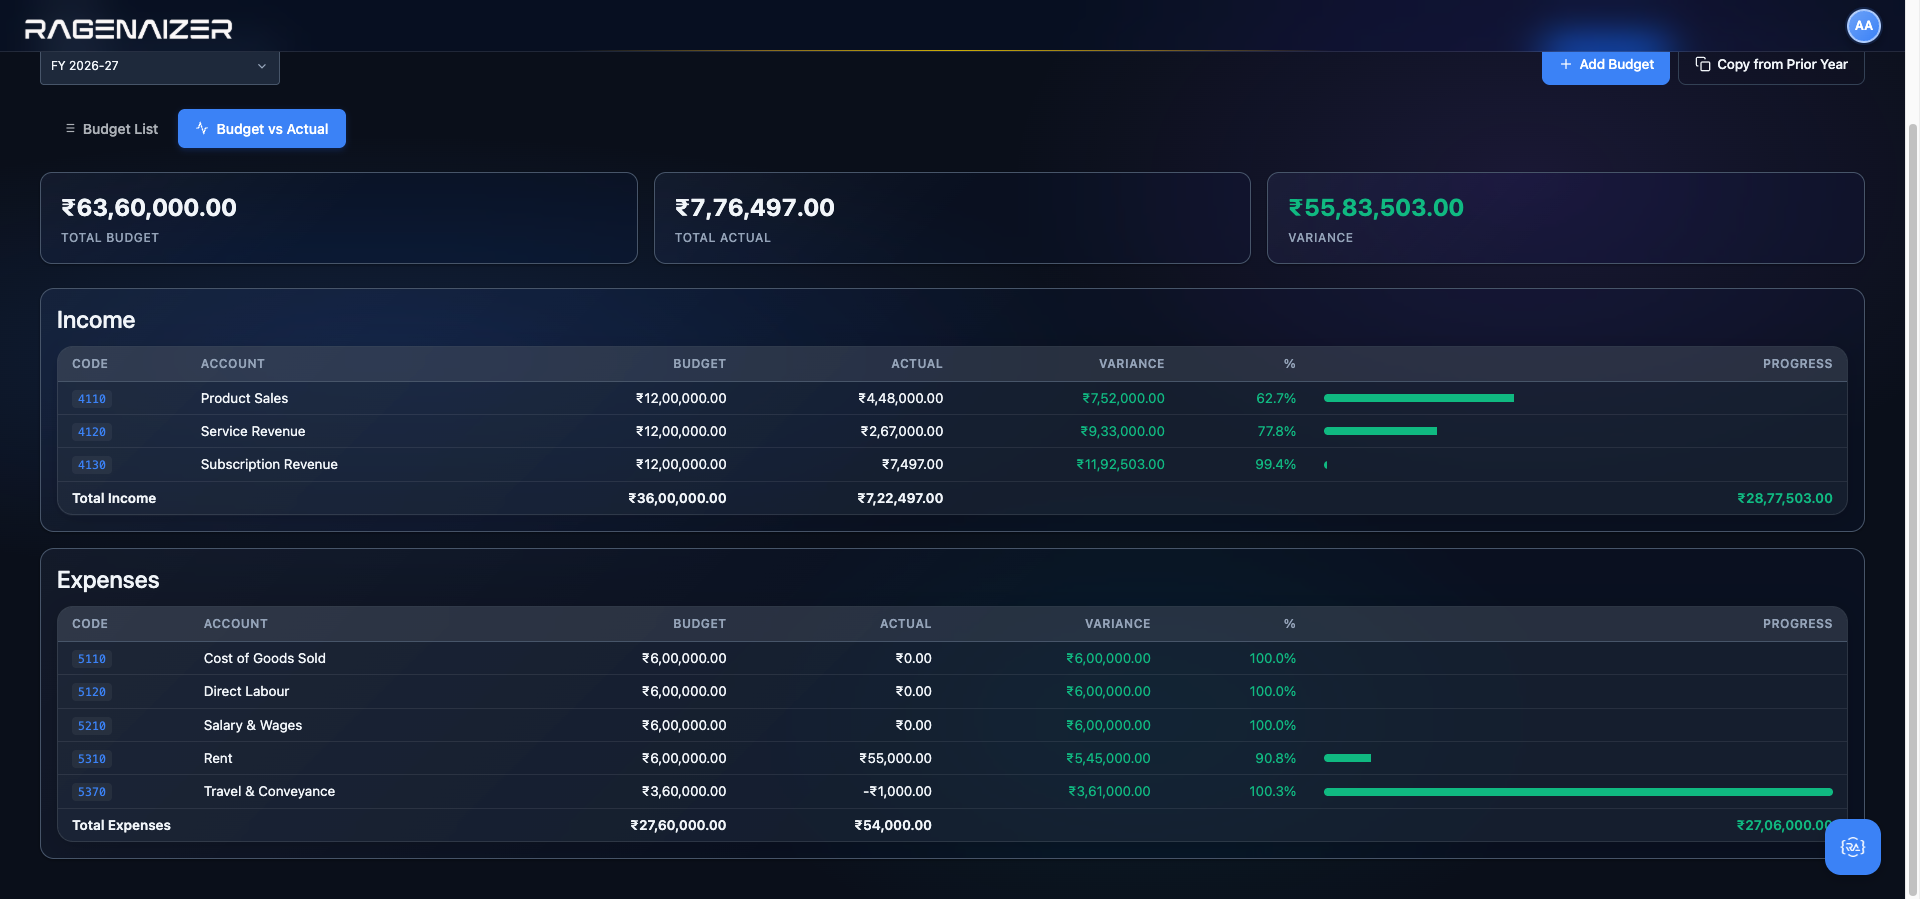
account_period_balances, the same cached structure the P&L uses, so variance is never stale.Variance = Budget - Actual (the sign is direction-aware)
For Income, a positive variance means you're behind your revenue target (you budgeted ₹12L but only booked ₹4.48L). For Expenses, a positive variance means you're under budget (you budgeted ₹6L but only spent ₹2L). The colour coding flips the sign so green always means "good news" regardless of account type. The Variance % column is the absolute variance as a percentage of the budget (not the actual).
Copy from prior year — the annual bootstrap
Every April, the first thing finance has to do for the new fiscal year is create a fresh budget. Most of the time that budget is "last year's budget, plus an escalation factor, minus a couple of things we killed". Recreating all 15-30 budget rows by hand is a waste of an hour — the Copy from Prior Year button does it in two clicks.
Click Copy from Prior Year (toolbar, top right).
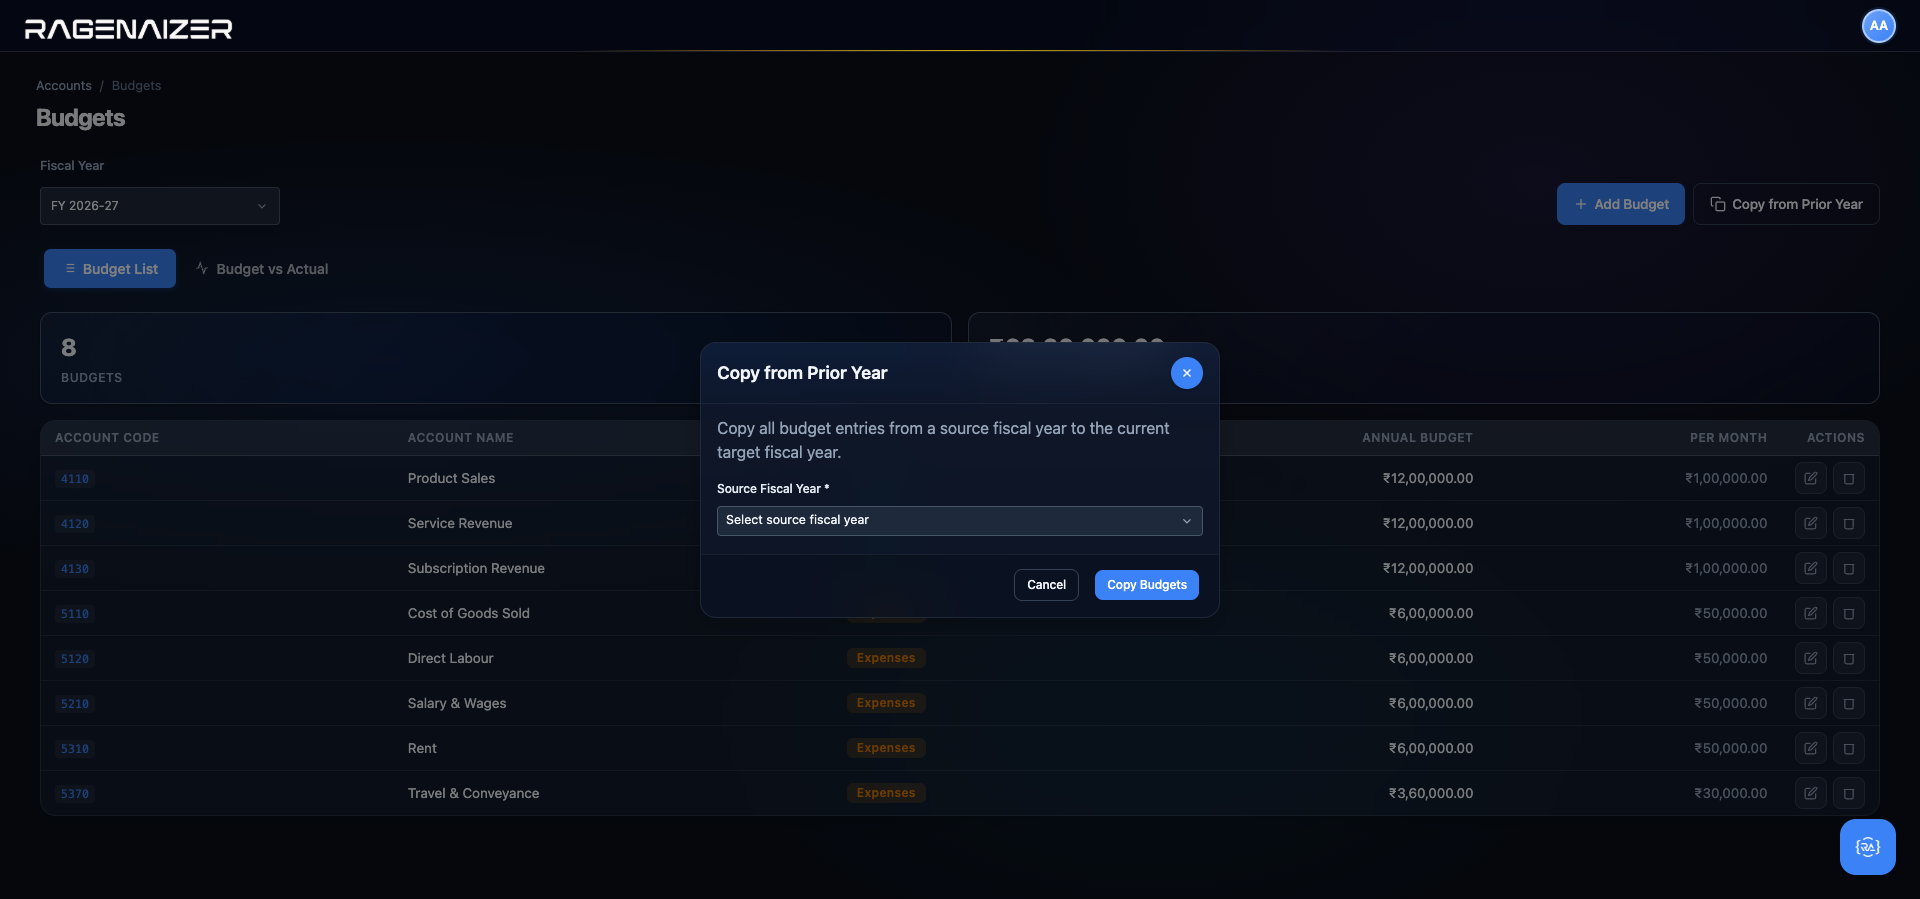
(fiscal_year_id, account_id) unique key.Pick the source, click Copy Budgets, and the toast reports how many rows were copied. Then open the list tab — every account in the source year is now budgeted in the target year at exactly the same annual amount and monthly breakdown. Edit the ones that need adjusting and delete the ones that are no longer relevant. Five minutes to bootstrap next year's budget, versus an hour doing it from scratch.
Glossary.
Every term used in this guide, defined in plain English. You can come back here at any time.
Chart of Accounts
The complete master list of every account — every "bucket" — that your business records transactions against. Organised by type (Asset, Liability, Equity, Revenue, Expense) and group.
GLGeneral Ledger
The master diary of every dated debit/credit entry. The balance of any account is the sum of its GL lines.
JEJournal Entry
A single dated transaction made up of debit and credit lines that always balance. Can be created manually or auto-generated by an invoice/bill/payment.
FYFiscal Year
A 12-month accounting calendar. India typically uses 1 April → 31 March; the US typically uses 1 January → 31 December.
Fiscal Period
A monthly division within a fiscal year. The system auto-creates 12 of them. Periods can be locked at month-end to prevent further posting.
Debit & Credit
The two sides of every transaction. Debits go on the left, credits on the right, and the totals always equal each other.
Account Type
One of the five fundamental GL categories: Asset, Liability, Equity, Revenue, Expense. Determines whether the account "naturally increases" on the debit or credit side.
Account Group
A logical sub-category within an account type (e.g. "Current Assets" inside the Assets type). Used to organise the Chart of Accounts hierarchically.
Normal Balance
The side — debit or credit — on which an account naturally increases. Assets/Expenses increase on debit; Liabilities/Equity/Revenue increase on credit.
Opening Balance
The starting balance of an account at the beginning of a fiscal year, carried forward from the previous year (or from your old accounting system).
Customer
A buyer of your goods or services. Has a credit limit, payment terms, optional tax ID and bank details.
Vendor
A supplier you buy from. Has payment terms and bank details so you can pay them.
Customer Invoice
A bill you send to a customer. Status flow: Draft → Approved → Posted → Paid.
Vendor Bill
A bill you've received from a supplier. Mirrors the invoice flow on the purchase side.
Credit Note
A document you issue to a customer to reduce what they owe (return, refund, correction).
Debit Note
A document you issue to a vendor to reduce what you owe them (return, allowance).
Trial Balance
A one-page report listing every account with its current balance. Total debits must equal total credits — if they don't, something is broken.
Balance Sheet
A snapshot of Assets, Liabilities, and Equity as of a date. Always satisfies Assets = Liabilities + Equity.
P&LProfit & Loss Statement
Revenue minus Expenses for a period. Shows whether the business made or lost money.
ARAccounts Receivable
Money your customers owe you. An asset on the balance sheet.
APAccounts Payable
Money you owe your vendors. A liability on the balance sheet.
GSTGoods & Services Tax
India's value-added tax. Applied to most invoices and bills at standard rates of 5%, 12%, 18%, or 28%.
HSNHSN Code
Harmonized System Nomenclature — an international product classification used in India to determine which GST rate applies to a good.
SACSAC Code
Service Accounting Code — the equivalent of HSN but for services rather than goods.
Posting
The act of finalising a draft entry into the General Ledger. Once posted, an entry cannot be edited — only reversed.
Reversal
Cancelling a posted entry by creating an equal-and-opposite entry. The original is preserved for audit; the net effect is zero.
Closing the books
Locking all entries in a fiscal period at month-end so no further changes can be made. Done to ensure data integrity for reporting.